下面代码按需要填写
@Bean
public Queue delayQueuePerMessageTTL() {
Map<String, Object> argument = new HashMap<>();
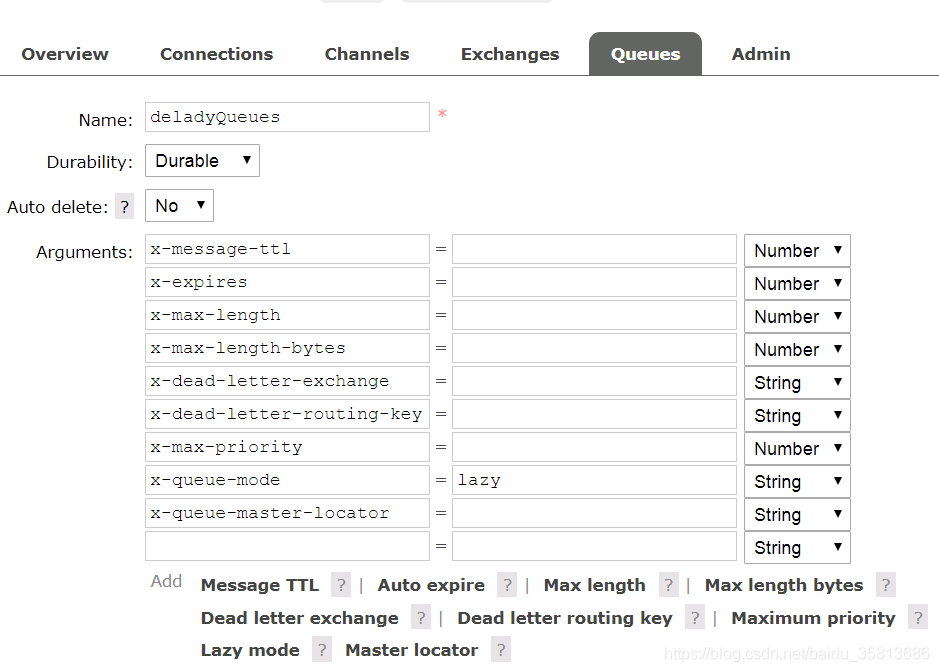
argument.put(“x-message-ttl”, 1000 * 5);//How long a message published to a queue can live before it is discarded (milliseconds).(Sets the “x-message-ttl” argument.)
argument.put(“x-expires”, 100060);//How long a queue can be unused for before it is automatically deleted (milliseconds).(Sets the “x-expires” argument.)
argument.put(“x-max-length”, 10000);//How many (ready) messages a queue can contain before it starts to drop them from its head.(Sets the “x-max-length” argument.)
argument.put(“x-max-length-bytes”, 10241024*10);//Total body size for ready messages a queue can contain before it starts to drop them from its head.(Sets the “x-max-length-bytes” argument.)
argument.put(“x-dead-letter-exchange”, “exchangeName”);//Optional name of an exchange to which messages will be republished if they are rejected or expire.(Sets the “x-dead-letter-exchange” argument.)
argument.put(“x-dead-letter-routing-key”, “routing-key”);//Optional replacement routing key to use when a message is dead-lettered. If this is not set, the message’s original routing key will be used.(Sets the “x-dead-letter-routing-key” argument.)
argument.put(“x-max-priority”, 100);//Maximum number of priority levels for the queue to support; if not set, the queue will not support message priorities.(Sets the “x-max-priority” argument.)
argument.put(“x-queue-mode”, “lazy”);//Set the queue into lazy mode, keeping as many messages as possible on disk to reduce RAM usage; if not set, the queue will keep an in-memory cache to deliver messages as fast as possible.(Sets the “x-queue-mode” argument.)
argument.put(“x-queue-master-locator”, “”);//Set the queue into master location mode, determining the rule by which the queue master is located when declared on a cluster of nodes.(Sets the “x-queue-master-locator” argument.)
return QueueBuilder.durable(“deladyQueues”).withArguments(argument).autoDelete().exclusive().build();
}
在实际的业务中我们会遇见生产者产生的消息,不立即消费,而是延时一段时间在消费。RabbitMQ本身没有直接支持延迟队列功能,但是我们可以根据其特性Per-Queue Message TTL和 Dead Letter Exchanges实现延时队列。也可以通过改特性设置消息的优先级。
1.Per-Queue Message TTL
RabbitMQ可以针对消息和队列设置TTL(过期时间)。队列中的消息过期时间(Time To Live, TTL)有两种方法可以设置。第一种方法是通过队列属性设置,队列中所有消息都有相同的过期时间。第二种方法是对消息进行单独设置,每条消息TTL可以不同。如果上述两种方法同时使用,则消息的过期时间以两者之间TTL较小的那个数值为准。消息在队列的生存时间一旦超过设置的TTL值,就成为dead message,消费者将无法再收到该消息。
2.Dead Letter Exchanges
当消息在一个队列中变成死信后,它能被重新publish到另一个Exchange。消息变成Dead Letter一向有以下几种情况:
消息被拒绝(basic.reject or basic.nack)并且requeue=false
消息TTL过期
队列达到最大长度
实际上就是设置某个队列的属性,当这个队列中有Dead Letter时,RabbitMQ就会自动的将这个消息重新发布到设置的Exchange中去,进而被路由到另一个队列,publish可以监听这个队列中消息做相应的处理,这个特性可以弥补RabbitMQ 3.0.0以前支持的immediate参数中的向publish确认的功能。
虽然 consumer 从来看不到过期的 message ,但是在过期 message 到达 queue 的头部时确实会被真正的丢弃(或者 dead-lettered )。当对每一个 queue 设置了 TTL 值时不会产生任何问题,因为过期的 message 总是会出现在 queue 的头部。当对每一条 message 设置了 TTL 时,过期的 message 可能会排队于未过期 message 的后面,直到这些消息被 consume 到或者过期了。在这种情况下,这些过期的 message 使用的资源将不会被释放,且会在 queue 统计信息中被计算进去(例如,queue 中存在的 message 的数量)。对于第一种设置队列TTL属性的方法,一旦消息过期,就会从队列中抹去,而第二种方法里,即使消息过期,也不会马上从队列中抹去,因为每条消息是否过期时在即将投递到消费者之前判定的,为什么两者得处理方法不一致?因为第一种方法里,队列中已过期的消息肯定在队列头部,RabbitMQ只要定期从队头开始扫描是否有过期消息即可,而第二种方法里,每条消息的过期时间不同,如果要删除所有过期消息,势必要扫描整个队列,所以不如等到此消息即将被消费时再判定是否过期,如果过期,再进行删除。
一、在队列上设置TTL
1.建立delay.exchange
这里Internal设置为NO,否则将无法接受dead letter,YES表示这个exchange不可以被client用来推送消息,仅用来进行exchange和exchange之间的绑定。
2.建立延时队列(delay queue)
如上配置延时5min队列(x-message-ttl=300000)
x-max-length:最大积压的消息个数,可以根据自己的实际情况设置,超过限制消息不会丢失,会立即转向delay.exchange进行投递
x-dead-letter-exchange:设置为刚刚配置好的delay.exchange,消息过期后会通过delay.exchange进行投递
这里不需要配置"dead letter routing key"否则会覆盖掉消息发送时携带的routingkey,导致后面无法路由为刚才配置的delay.exchange
3.配置延时路由规则
需要延时的消息到exchange后先路由到指定的延时队列
1)创建delaysync.exchange通过Routing key将消息路由到延时队列
2.配置delay.exchange 将消息投递到正常的消费队列
配置完成。
下面使用代码测试一下:
生产者:
package cn.slimsmart.study.rabbitmq.delayqueue.queue;
import java.io.IOException;
import com.rabbitmq.client.Channel;
import com.rabbitmq.client.Connection;
import com.rabbitmq.client.ConnectionFactory;
public class Producer {
private static String queue_name = "test.queue";

public static void main(String[] args) throws IOException {
    ConnectionFactory factory = new ConnectionFactory();
    factory.setHost("10.1.199.169");
    factory.setUsername("admin");
    factory.setPassword("123456");
    Connection connection = factory.newConnection();
    Channel channel = connection.createChannel();
    // 声明队列
    channel.queueDeclare(queue_name, true, false, false, null);
    String message = "hello world!" + System.currentTimeMillis();
    channel.basicPublish("delaysync.exchange", "deal.message", null, message.getBytes());
    System.out.println("sent message: " + message + ",date:" + System.currentTimeMillis());
    // 关闭频道和连接
    channel.close();
    connection.close();
}
}
消费者:
package cn.slimsmart.study.rabbitmq.delayqueue.queue;
import com.rabbitmq.client.Channel;
import com.rabbitmq.client.Connection;
import com.rabbitmq.client.ConnectionFactory;
import com.rabbitmq.client.QueueingConsumer;
public class Consumer {
private static String queue_name = "test.queue";

public static void main(String[] args) throws Exception {
    ConnectionFactory factory = new ConnectionFactory();
    factory.setHost("10.1.199.169");
    factory.setUsername("admin");
    factory.setPassword("123456");
    Connection connection = factory.newConnection();
    Channel channel = connection.createChannel();
    // 声明队列
    channel.queueDeclare(queue_name, true, false, false, null);
    QueueingConsumer consumer = new QueueingConsumer(channel);
    // 指定消费队列
    channel.basicConsume(queue_name, true, consumer);
    while (true) {
        // nextDelivery是一个阻塞方法(内部实现其实是阻塞队列的take方法)
        QueueingConsumer.Delivery delivery = consumer.nextDelivery();
        String message = new String(delivery.getBody());
        System.out.println("received message:" + message + ",date:" + System.currentTimeMillis());
    }
}
}
二、在消息上设置TTL
实现代码:
生产者:
package cn.slimsmart.study.rabbitmq.delayqueue.message;
import java.io.IOException;
import java.util.HashMap;
import com.rabbitmq.client.AMQP;
import com.rabbitmq.client.Channel;
import com.rabbitmq.client.Connection;
import com.rabbitmq.client.ConnectionFactory;
public class Producer {
private static String queue_name = "message_ttl_queue";

public static void main(String[] args) throws IOException {
    ConnectionFactory factory = new ConnectionFactory();
    factory.setHost("10.1.199.169");
    factory.setUsername("admin");
    factory.setPassword("123456");
    Connection connection = factory.newConnection();
    Channel channel = connection.createChannel();
    HashMap<String, Object> arguments = new HashMap<String, Object>();
    arguments.put("x-dead-letter-exchange", "amq.direct");
    arguments.put("x-dead-letter-routing-key", "message_ttl_routingKey");
    channel.queueDeclare("delay_queue", true, false, false, arguments);

    // 声明队列
    channel.queueDeclare(queue_name, true, false, false, null);
    // 绑定路由
    channel.queueBind(queue_name, "amq.direct", "message_ttl_routingKey");

    String message = "hello world!" + System.currentTimeMillis();
    // 设置延时属性
    AMQP.BasicProperties.Builder builder = new AMQP.BasicProperties.Builder();
    // 持久性 non-persistent (1) or persistent (2)
    AMQP.BasicProperties properties = builder.expiration("300000").deliveryMode(2).build();
    // routingKey =delay_queue 进行转发
    channel.basicPublish("", "delay_queue", properties, message.getBytes());
    System.out.println("sent message: " + message + ",date:" + System.currentTimeMillis());
    // 关闭频道和连接
    channel.close();
    connection.close();
}
}
消费者:
package cn.slimsmart.study.rabbitmq.delayqueue.message;
import java.util.HashMap;
import com.rabbitmq.client.Channel;
import com.rabbitmq.client.Connection;
import com.rabbitmq.client.ConnectionFactory;
import com.rabbitmq.client.QueueingConsumer;
public class Consumer {
private static String queue_name = "message_ttl_queue";

public static void main(String[] args) throws Exception {
    ConnectionFactory factory = new ConnectionFactory();
    factory.setHost("10.1.199.169");
    factory.setUsername("admin");
    factory.setPassword("123456");
    Connection connection = factory.newConnection();
    Channel channel = connection.createChannel();
    HashMap<String, Object> arguments = new HashMap<String, Object>();
    arguments.put("x-dead-letter-exchange", "amq.direct");
    arguments.put("x-dead-letter-routing-key", "message_ttl_routingKey");
    channel.queueDeclare("delay_queue", true, false, false, arguments);

    // 声明队列
    channel.queueDeclare(queue_name, true, false, false, null);
    // 绑定路由
    channel.queueBind(queue_name, "amq.direct", "message_ttl_routingKey");

    QueueingConsumer consumer = new QueueingConsumer(channel);
    // 指定消费队列
    channel.basicConsume(queue_name, true, consumer);
    while (true) {
        // nextDelivery是一个阻塞方法(内部实现其实是阻塞队列的take方法)
        QueueingConsumer.Delivery delivery = consumer.nextDelivery();
        String message = new String(delivery.getBody());
        System.out.println("received message:" + message + ",date:" + System.currentTimeMillis());
    }
}
}
spring-rabbit整合教程
maven依赖:
    <dependency>
        <groupId>org.springframework.amqp</groupId>
        <artifactId>spring-rabbit</artifactId>
        <version>1.4.6.RELEASE</version>
    </dependency>
spring配置文件(在文件头部引入rabbit的命名空间和约束文件):
<?xml version="1.0" encoding="UTF-8"?><!-- 定义Rabbit,指定连接工厂 -->
<rabbit:connection-factory id="connectionFactory" host="你的rabbitMQ服务的ip" virtual-host="/vhost名称" username="用户名" password="密码" port="5672" />
<!-- MQ的管理,包括队列、交换器等 -->
<rabbit:admin connection-factory="connectionFactory"/>
<!-- 定义Rabbit模板,指定连接工厂以及定义exchange -->
<rabbit:template id="amqpTemplate" exchange="my_exchange" connection-factory="connectionFactory" />
<!-- queue 队列声明 -->
<!-- durable 是否持久化 ,exclusive 仅创建者可以使用的私有队列,断开后自动删除 ,auto-delete 当所有消费端连接断开后,是否自动删除队列 -->
<rabbit:queue name="my_queue" durable="true" auto-delete="false" exclusive="false"/>
<!-- 交换机定义 -->
<!-- direct-exchange 模式:消息与一个特定的路由器完全匹配,才会转发; topic-exchange 模式:按规则转发消息,最灵活 -->
<rabbit:topic-exchange name="my_exchange" durable="true" auto-delete="false">
<rabbit:bindings>
<!-- 设置消息Queue匹配的pattern (direct模式为key) -->
<rabbit:binding queue="my_queue" pattern="my_patt"/>
</rabbit:bindings>
</rabbit:topic-exchange>
<!-- 引入消费者 -->
<bean id="rabbitmqService" class="com.group.service.RabbitmqService" />
<!-- 配置监听 消费者 acknowledeg = manual,auto,none -->
<rabbit:listener-container connection-factory="connectionFactory" acknowledge="auto" >
<!-- queues 监听队列,多个用逗号分隔; ref 监听器 -->
<rabbit:listener queue-names="my_queue" ref="rabbitmqService" method="test"/>
</rabbit:listener-container>
那么在项目中装配amqpTemplate中就可以发送消息了
作者:MC-闰土
来源:CSDN
原文:https://blog.csdn.net/qq_22075041/article/details/78885113
版权声明:本文为博主原创文章,转载请附上博文链接!