一、集群简介
引自suse官方关于corosync的高可用集群的框架图:
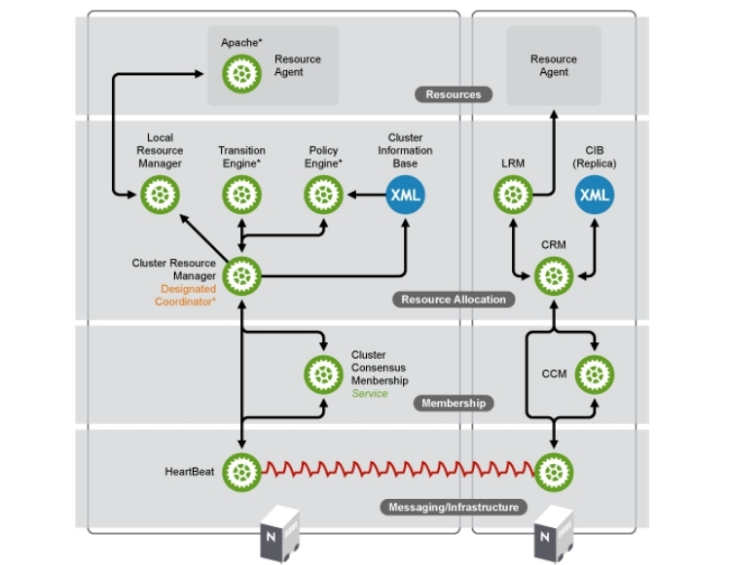
由图,我们可以看到,suse官方将集群的Architecture Layers分成四层。最低层Messaging/Infrastructure Layer提供了HeartBeat节点间传递心跳信息,即为心跳层。第二层Membership Layer层为集群事务决策层,决定了哪些节点作为集群节点,并传递给集群内所有节点,如果集群中成员拥有的法定票数不大于半数,该怎么作出决策等,通俗点讲,就是投票系统,同时,还提供了构建成员关系的视图。第三层Resource Allocation Layer为资源分配层,包含了crm,cib;crm作为资源分配层的核心组件,包括了Local Resource Manager、Transition Engine、Policy Engine三大组件,这三大组件都是在crm的基础之上得以实现的,同时,每个节点的crm还维持本节点的cib。在crm中选出一个节点作为DC(Designated Coordinator),DC负责维持主cib,所以所有cib的修改都由DC来实现,而后DC同步给其他节点,一个集群只有一个DC。cib是一个在内存中xml格式书写的保存着集群配置各条目的配置信息(集群状态,各节点,各资源,约束关系),可以使用gui修改,也可以使用crm_sh命令行修改。Transition Engine和Policy Engine,这两个组件只有DC拥有,PE是当集群状态改变时,根据配置文件中的约束信息,节点粘性计算要转移到的节点一应状态信息,并写入cib,TE根据PE作出的指示进行转移资源等操作。DC将改变的状态信息传至各crm,各节点的crm将要作出的改变传给lrm作出相应的更改,lrm有start|stop|monitor三种状态信息,在接受crm指令作出更改后,将状态信息传回crm。说到lrm了,下面我们来看看第四层Resources Layer层,即资源代理层,负责根据lrm传来的指令,找到对应的执行脚本执行,资源代理层有lsb格式,ocf格式的脚本,ocf相对于lsb,除了能接收更多参数外,还能提供监控功能。
HA Cluster的工作模型
A/P:两节点集群,active,passive:工作于主备模型
HA Services通常只有一个;HA resources可能会有多个
A/A:两节点集群,active/active;工作于双主模型
N-M:N个节点,M个服务;通常N>M
N-N:N个节点,N个服务
HA Cluster的组合方式:
heartbeat v2(v1 crm)
heartbeat v2(v2 crm)
corosync + pacemaker
cman + rgmanager
二、corosync + pacemaker
corosync + pacemaker框架图(引自马哥文档)
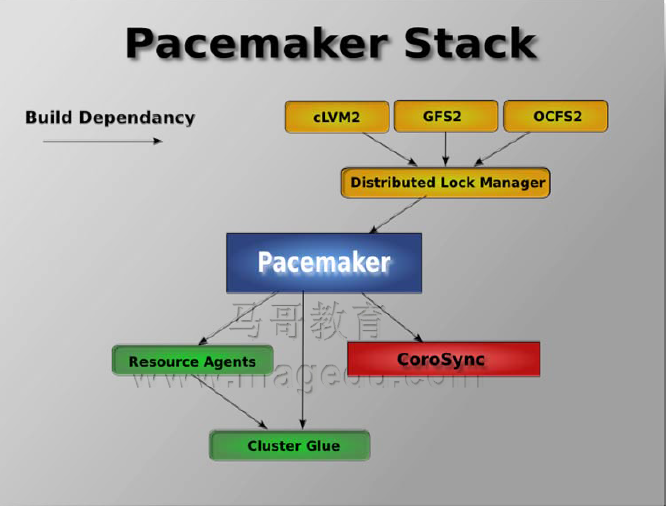
Pacemaker Stack栈由众多组件组成,其主要组件为corosync + pacemaker。corosync能实现底层传递心跳信息,但不提供资源管理器,因此,由工作于corosync之上的pacemaker提供资源管理的功能,并借助Resource Agents和Cluster Glue为不具备高可用的服务与资源提供高可用服务。
框架图的箭头描述了编译安装过程中的依赖关系,首先安装corosync和cluster glue,其次安装Resource Agents,之后再安装pacemaker,接着安装distibuted lock manager(分布式锁管理器),最后安装cLVM2,GFS2,OCFS2(非必须)。cLVM2,GFS2,OCFS2提供集群文件系统。
colosync
OpenAIS:Application Interface Standard 开放应用接口标准
提供了一种集群模式,包含集群框架,集群成员管理,通信方式,集群监测,但没有集群资源管理。因其为开源的,所以每种分支包含的组件不同。其主要分支有:picacho,witetank,wilson。colosync是由wilson把关于OpenAIS的功能独立出来形成的项目,实际上colosync是一个集群管理引擎,只是OpenAIS的一个子组件。从此OpenAIS分裂为两个项目,corosync和wilson。
pacemaker
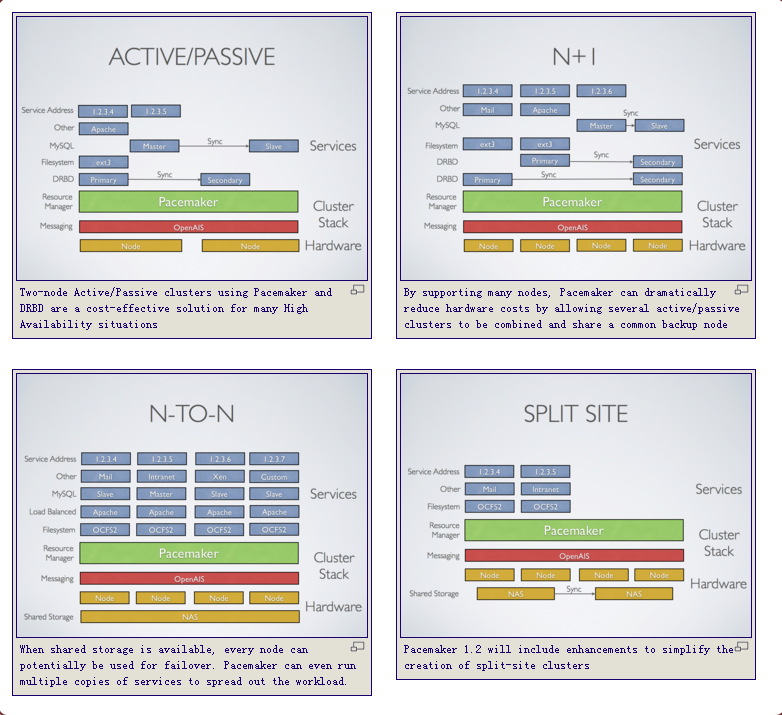 (引自pacemaker官方站点http://clusterlabs.org/wiki/Main_Page)
上图描述了corosync + pacemaker的四种工作模型。
配置前准备工作
等同HA集群部署前的准备工作 ----> 看这里
实现web高可用 ----> 看这里
heartbeatV3编译安装 ----> 看这里
MYSQL高可用 ----> 看这里
ipvs+ldirectord实现ipvs高可用----> 看这里
三、corosync + pacemaker部署
配置情况:
系统版本:CentOS6.7 x86_64
corosync.x86_64 0:1.4.7-5.el6
pacemaker.x86_64 0:1.1.14-8.el6_8.2
node1:192.168.0.15
node2:192.168.0.16
web server VIP:192.168.0.25
node1:
[root@node1 ~]# yum install corosync pacemaker
[root@node1 ~]# cd /etc/corosync/
[root@node1 corosync]# cp corosync.conf.example corosync.conf
[root@node1 corosync]# vim corosync.conf
##totem定义集群内各节点间是如何通信的,totem本是一种协议,专用于corosync专用于各节点间的协议,协议是有版本的
totem {
##版本号
        version: 2
##安全认证on|off,使用corosync-keygen命令生成密钥
        secauth: on
##用于安全认证开启的线程,0为不基于线程模式工作
        threads: 0
##接口设置
        interface {
##环数量,如果一个主机有多块网卡,避免心跳信息回流
            ringnumber: 0
##多播监听的网络地址(本机网段为192.168.0.0/24)
            bindnetaddr: 192.168.0.0
##多播地址,可设置为239.255.x.x
            mcastaddr: 239.165.17.17
##多播地址监听的端口
            mcastport: 5405
##生存时间为1
            ttl: 1
                  }
      }
##定义日志信息
logging {
##是否记录fileline
        fileline: off
##是否将日志发往标准错误输出(屏幕)
        to_stderr: no
##是否记录在日志文件中
        to_logfile: yes
##日志文件目录
        logfile: /var/log/cluster/corosync.log
##是否将日志发往系统日志
        to_syslog: no
##调试
        debug: off
##是否打开时间戳
        timestamp: on
##是否包含AMF组件的日志信息
        logger_subsys {
                subsys: AMF
                debug: off
        }
}
pacemaker与corosync结合有两种方式,一是作为corosync的插件,二是pacemaker作为单独的服务。不过一般在CentOS6的系统上一般是将pacemaker做为corosync的插件,用corosync启动pacemaker服务。因此,需要在corosync的配置文件中添加关于pacemaker的内容。
service {
        ver:    0
        name:   pacemaker
##是否让pacemaker独立启动mgmtd进程(可省略)
        use_mgmtd:      yes
}
##指明运行插件的用户与组(可省略)
aisexec{
        user:  root
        group:  root
}
验证网卡是否支持多播,如没有MULTICAST,手动打开
[root@node1 corosync]# ip link show
1: lo: <LOOPBACK,UP,LOWER_UP> mtu 65536 qdisc noqueue state UNKNOWN
    link/loopback 00:00:00:00:00:00 brd 00:00:00:00:00:00
2: eth0: <BROADCAST,MULTICAST,UP,LOWER_UP> mtu 1500 qdisc pfifo_fast state UP qlen 1000
    link/ether 00:0c:29:de:67:fa brd ff:ff:ff:ff:ff:ff
创建安全认证文件,如/dev/random中的随机数不足1024,敲击键盘使其增加值1024
[root@node1 corosync]# corosync-keygen
Corosync Cluster Engine Authentication key generator.
Gathering 1024 bits for key from /dev/random.
Press keys on your keyboard to generate entropy.
Writing corosync key to /etc/corosync/authkey.
node2:
[root@node2 ~]# yum install corosync pacemaker
将node1的配置文件复制到node2
[root@node1 corosync]# scp -p authkey corosync.conf node2:/etc/corosync/
authkey                                             100%  128     0.1KB/s   00:00
corosync.conf                                       100% 2757     2.7KB/s   00:00
启动服务
[root@node1 corosync]# service corosync start; ssh node2 'service corosync start'查看corosync引擎是否正常启动:
[root@node1 corosync]# grep -e "Corosync Cluster Engine" -e "configuration file" /var/log/cluster/corosync.log
Nov 21 12:36:25 corosync [MAIN  ] Corosync Cluster Engine ('1.4.7'): started and ready to provide service.
Nov 21 12:36:25 corosync [MAIN  ] Successfully read main configuration file '/etc/corosync/corosync.conf'
查看初始化成员节点通知是否正常发出:
[root@node1 corosync]# grep  TOTEM  /var/log/cluster/corosync.log
Nov 21 12:36:26 corosync [TOTEM ] Initializing transport (UDP/IP Multicast).
Nov 21 12:36:26 corosync [TOTEM ] Initializing transmit/receive security: libtomcrypt SOBER128/SHA1HMAC (mode 0).
检查启动过程中是否有错误产生:
[root@node1 corosync]# grep ERROR: /var/log/cluster/corosync.log | grep -v unpack_resources
##下面的错误信息表示packmaker不久之后将不再作为corosync的插件运行,因此,建议使用cman作为集群基础架构服务;此处可安全忽略。
Nov 21 12:36:26 corosync [pcmk  ] ERROR: process_ais_conf: You have configured a cluster using the Pacemaker plugin for Corosync. The plugin is not supported in this environment and will be removed very soon.
Nov 21 12:36:26 corosync [pcmk  ] ERROR: process_ais_conf:  Please see Chapter 8 of 'Clusters from Scratch' (http://www.clusterlabs.org/doc) for details on using Pacemaker with CMAN
Nov 21 12:36:28 corosync [pcmk  ] ERROR: pcmk_wait_dispatch: Child process mgmtd exited (pid=1859, rc=100)
查看pacemaker是否正常启动:
[root@node1 corosync]# grep pcmk_startup /var/log/cluster/corosync.log
Nov 21 12:36:26 corosync [pcmk  ] info: pcmk_startup: CRM: Initialized
Nov 21 12:36:26 corosync [pcmk  ] Logging: Initialized pcmk_startup
Nov 21 12:36:26 corosync [pcmk  ] info: pcmk_startup: Maximum core file size is: 18446744073709551615
Nov 21 12:36:26 corosync [pcmk  ] info: pcmk_startup: Service: 9
Nov 21 12:36:26 corosync [pcmk  ] info: pcmk_startup: Local hostname: node1
四、安装crmsh
官方下载地址:https://github.com/ClusterLabs/crmsh
发行版本rpm包:http://download.opensuse.org/repositories/network:/ha-clustering:/Stable/
[root@node1 ~]# vim /etc/yum.repos.d/CentOS-Base.repo
[network_ha-clustering_Stable]
name=Stable High Availability/Clustering packages (CentOS_CentOS-6)
type=rpm-md
baseurl=http://download.opensuse.org/repositories/network:/ha-clustering:/Stable/CentOS_CentOS-6/
gpgcheck=1
gpgkey=http://download.opensuse.org/repositories/network:/ha-clustering:/Stable/CentOS_CentOS-6//repodata/repomd.xml.key
enabled=1

#配置好yum源后可以直接yum了,注意crmsh和pssh都要装上
[root@node1 ~]# yum install crmsh
[root@node1 ~]# yum install pssh*

#查看crm的状态
[root@node1 corosync]# crm status
Last updated: Mon Nov 21 14:50:27 2016		Last change: Mon Nov 21 14:50:26 2016 by hacluster via crmd on node1
Stack: classic openais (with plugin)
Current DC: node1 (version 1.1.14-8.el6_8.2-70404b0) - partition with quorum
2 nodes and 0 resources configured, 2 expected votes

Online: [ node1 node2 ]
五、crmsh命令简介
1、查看配置信息
crm(live)# configure
crm(live)configure# show
node node1
node node2
property cib-bootstrap-options: \
	dc-version=1.1.14-8.el6_8.2-70404b0 \
	cluster-infrastructure="classic openais (with plugin)" \
	expected-quorum-votes=2

2、因为无stonith设备,所以禁用stonith,stonith的值为布尔类型,true和false
crm(live)configure# property stonith-enabled=false

3、提交配置
crm(live)configure# commit

4、介绍node子命令
crm(live)configure# cd ..    #返回上一级
crm(live)# node
crm(live)node# help

attribute      Manage attributes
clearstate     Clear node state        #清理当前node的状态信息
delete       Delete node             #删除节点
fence        Fence node
maintenance    Put node into maintenance mode
online       Set node online        #将当前节点重新上线,standby转为online
ready       Put node into ready mode
server       Show node hostname or server address
show        Show node       #显示当前所有节点
standby       Put node into standby    #将当前节点转为备用
status       Show nodes' status as XML
status-attr    Manage status attributes
utilization    Manage utilization attributes

cd        Navigate the level structure
help       Show help (help topics for list of topics)
ls        List levels and commands    #指明级别和子命令列出当前可用节点
quit       Exit the interactive shell
up        Go back to previous level

5、介绍resource子命令
crm(live)# resource
crm(live)resource# help

ban        Ban a resource from a node    #禁止资源在一个节点
cleanup      Cleanup resource status       #清理资源状态
constraints    Show constraints affecting a resource    #显示影响资源的约束
demote       Demote a master-slave resource   #降级主从资源
failcount     Manage failcounts                #管理员错误状态统计数据
locate       Show the location of resources   #显示资源的位置
maintenance    Enable/disable per-resource maintenance mode #启用/禁用每个资源维护模式
manage       Put a resource into managed mode #资源定义为可被管理状态
meta        Manage a meta attribute          #管理meta 属性
move        Move a resource to another node  #将资源移动到另一个节点
operations     Show active resource operations  #显示活动的资源的操作
param       Manage a parameter of a resource #管理资源参数
promote      Promote a master-slave resource
refresh      Refresh CIB from the LRM status
reprobe      Probe for resources not started by the CRM
restart      Restart resources           #重启一个资源
scores       Display resource scores     #查看资源
secret       Manage sensitive parameters
start       Start resources             #开启一个资源
status       Show status of resources    #资源当前状态
stop        Stop resources              #停止一个资源
trace       Start RA
unmanage      Put a resource into unmanaged mode   #资源定义为不可被管理状态
untrace      Stop RA tracing
utilization    Manage a utilization attribute

6、介绍资源代理RA子命令
crm(live)# ra
crm(live)ra# help
classes       List classes and providers   #列出资源代理类型
info        Show meta data for a RA    #显示资源代理的帮助信息
list        List RA for a class (and provider)    #列出资源代理类型中所拥有的资源代理
providers      Show providers for a RA and a class
validate      Validate parameters for RA
7、介绍configure子命令
node define a cluster node #定义一个集群节点
primitive define a resource #定义资源
monitor add monitor operation to a primitive #对一个资源添加监控选项(如超时时间,启动失败后的操作)
group define a group #定义一个组类型(包含一个或多个资源,这些资源可通过“组”这个资源统一进行调度)
clone define a clone #定义一个克隆类型(可以在同一个集群内的多个节点运行多份克隆)
ms define a master-slave resource #定义一个主从类型(集群内的节点只能有一个运行主资源,其它从的做备用)
rsc_template define a resource template #定义一个资源模板
location a location preference #定义位置约束优先级(默认运行于那一个节点(如果位置约束的值相同,默认倾向性那一个高,就在那一个节点上运行))
colocation colocate resources #排列约束资源(多个资源在一起的可能性)
order order resources #顺序约束,定义资源在同一个节点上启动时的先后顺序
rsc_ticket resources ticket dependency
property set a cluster property #设置集群属性
rsc_defaults set resource defaults #设置资源默认属性(粘性)
fencing_topology node fencing order #隔离节点顺序
role define role access rights #定义角色的访问权限
user define user access rights #定义用用户访问权限
op_defaults set resource operations defaults #设置资源默认选项
schema set or display current CIB RNG schema
show display CIB objects #显示集群信息库对
edit edit CIB objects #编辑集群信息库对象(vim模式下编辑)
filter filter CIB objects #过滤CIB对象
delete delete CIB objects #删除CIB对象
default-timeouts set timeouts for operations to minimums from the meta-data
rename rename a CIB object #重命名CIB对象
modgroup modify group #改变资源组
refresh refresh from CIB #重新读取CIB信息
erase erase the CIB #清除CIB信息
ptest show cluster actions if changes were committed
rsctest test resources as currently configured
cib CIB shadow management
cibstatus CIB status management and editing
template edit and import a configuration from a template
commit commit the changes to the CIB #将更改后的信息提交写入CIB
verify verify the CIB with crm_verify #CIB语法验证
upgrade upgrade the CIB to version 1.0
save save the CIB to a file #将当前CIB导出到一个文件中(导出的文件存于切换crm 之前的目录)
load import the CIB from a file #从文件内容载入CIB六、使用crmsh配置pacemaker
配置两节点的corosync/pacemaker集群,设置两个全局属性
stonith-enable=false
no-quorum-policy=ignore
crm(live)configure# property stonith-enabled=false
crm(live)configure# property no-quorum-policy=ignore
crm(live)configure# commit
配置web高可用集群
crm(live)# cd configure
crm(live)configure# primitive webip ocf:heartbeat:IPaddr params ip=192.168.0.25 nic=eth0 cidr_netmask=24
crm(live)configure# verify
crm(live)configure# commit
crm(live)configure# primitive webserver lsb:httpd
crm(live)configure# verify
crm(live)configure# commit

查看资源运行
[root@node2 ~]# crm status
Last updated: Mon Nov 21 17:11:54 2016		Last change: Mon Nov 21 17:11:08 2016 by root via cibadmin on node1
Stack: classic openais (with plugin)
Current DC: node2 (version 1.1.14-8.el6_8.2-70404b0) - partition with quorum
2 nodes and 2 resources configured, 2 expected votes

Online: [ node1 node2 ]

Full list of resources:

 webip	(ocf::heartbeat:IPaddr):	Started node1
 webserver	(lsb:httpd):	Started node2

高可用集群默认为资源平均分配,因此我们要通过组或者约束使资源在同一个节点
crm(live)configure# group webservice webip webserver
crm(live)configure# verify
crm(live)configure# commit

查看资源运行
[root@node2 ~]# crm status
Last updated: Mon Nov 21 17:16:23 2016		Last change: Mon Nov 21 17:16:08 2016 by root via cibadmin on node1
Stack: classic openais (with plugin)
Current DC: node2 (version 1.1.14-8.el6_8.2-70404b0) - partition with quorum
2 nodes and 2 resources configured, 2 expected votes

Online: [ node1 node2 ]

Full list of resources:

 Resource Group: webservice
     webip	(ocf::heartbeat:IPaddr):	Started node1
     webserver	(lsb:httpd):	Started node1
测试:

通过排列约束定义资源
crm(live)configure# delete webservice
crm(live)configure# commit
crm(live)configure# colocation webserver_with_webip inf: webserver webip
crm(live)configure# verify
crm(live)configure# commit

可以看到,ip与server又在一起了
[root@node2 ~]# crm status
Last updated: Mon Nov 21 17:35:02 2016		Last change: Mon Nov 21 17:34:43 2016 by root via cibadmin on node1
Stack: classic openais (with plugin)
Current DC: node2 (version 1.1.14-8.el6_8.2-70404b0) - partition with quorum
2 nodes and 2 resources configured, 2 expected votes

Online: [ node1 node2 ]

Full list of resources:

 webip	(ocf::heartbeat:IPaddr):	Started node1
 webserver	(lsb:httpd):	Started node1

通过顺序约束定义资源启动顺序
crm(live)configure# order webip_before_webserver Mandatory: webip webserver
crm(live)configure# verify
crm(live)configure# commit
crm(live)configure# show
node node1
node node2
primitive webip IPaddr \
	params ip=192.168.0.25 nic=eth0 cidr_netmask=24
primitive webserver lsb:httpd
order webip_before_webserver Mandatory: webip webserver
colocation webserver_with_webip inf: webserver webip
property cib-bootstrap-options: \
	dc-version=1.1.14-8.el6_8.2-70404b0 \
	cluster-infrastructure="classic openais (with plugin)" \
	expected-quorum-votes=2 \
	stonith-enabled=false \
	no-quorum-policy=ignore


通过位置约束定义资源倾向性
crm(live)configure# location webip_on_node2 webip rule 50: #uname eq node2
crm(live)configure# show
node node1
node node2
primitive webip IPaddr \
	params ip=192.168.0.25 nic=eth0 cidr_netmask=24
primitive webserver lsb:httpd
order webip_before_webserver Mandatory: webip webserver
location webip_on_node2 webip \
	rule 50: #uname eq node2
colocation webserver_with_webip inf: webserver webip
property cib-bootstrap-options: \
	dc-version=1.1.14-8.el6_8.2-70404b0 \
	cluster-infrastructure="classic openais (with plugin)" \
	expected-quorum-votes=2 \
	stonith-enabled=false \
	no-quorum-policy=ignore
crm(live)configure# verify
crm(live)configure# commit

可以看到资源都转移到node2上了
[root@node2 ~]# crm status
Last updated: Mon Nov 21 17:49:08 2016		Last change: Mon Nov 21 17:47:58 2016 by root via cibadmin on node1
Stack: classic openais (with plugin)
Current DC: node2 (version 1.1.14-8.el6_8.2-70404b0) - partition with quorum
2 nodes and 2 resources configured, 2 expected votes

Online: [ node1 node2 ]

Full list of resources:

 webip	(ocf::heartbeat:IPaddr):	Started node2
 webserver	(lsb:httpd):	Started node2
此外,可以在全局配置中定义当前资源对当前节点的粘性
crm(live)configure# property default-resource-stickiness=50
crm(live)configure# verify
crm(live)configure# commit
注意:资源粘性默认大于资源的倾向性
七、配置集群对资源的监控
因为corosync+pacemaker集群默认对节点高可用,但是对于节点上资源的运行状态无法监控,因此,我们要配置集群对于资源的监控,在资源因意外情况下,无法提供服务时,对资源提供高可用。
crm(live)configure# primitive webip ocf:heartbeat:IPaddr params ip=192.168.0.25 nic=eth0 cidr_netmask=24 op monitor interval=10s timeout=20s
crm(live)configure# verify
crm(live)configure# commit
注意:timeout时间不得少于20s,否则会提示
crm(live)configure# verify
WARNING: webip: specified timeout 10s for monitor is smaller than the advised 20s

crm(live)configure# primitive webserver lsb:httpd op monitor interval=10s timeout=20s
crm(live)configure# verify
crm(live)configure# commit

crm(live)configure# group webservice webip webserver
crm(live)configure# verify
crm(live)configure# commit

此时,资源运行于node1
[root@node2 ~]# crm status
Last updated: Mon Nov 21 18:09:43 2016		Last change: Mon Nov 21 18:09:23 2016 by root via cibadmin on node1
Stack: classic openais (with plugin)
Current DC: node2 (version 1.1.14-8.el6_8.2-70404b0) - partition with quorum
2 nodes and 2 resources configured, 2 expected votes

Online: [ node1 node2 ]

Full list of resources:

 Resource Group: webservice
     webip	(ocf::heartbeat:IPaddr):	Started node1
     webserver	(lsb:httpd):	Started node1

此时,在node1上手动结束httpd,测试监控
[root@node1 ~]# killall httpd
[root@node1 ~]# ps aux | grep httpd
root       5567  0.0  0.1 103304   888 pts/1    S+   18:13   0:00 grep httpd
[root@node1 ~]# ps aux | grep httpd
root       5637  0.0  0.7 175304  3760 ?        Ss   18:13   0:00 /usr/sbin/httpd
apache     5639  0.0  0.4 175304  2432 ?        S    18:13   0:00 /usr/sbin/httpd
apache     5640  0.0  0.4 175304  2432 ?        S    18:13   0:00 /usr/sbin/httpd
apache     5641  0.0  0.5 175304  2448 ?        S    18:13   0:00 /usr/sbin/httpd
apache     5642  0.0  0.4 175304  2432 ?        S    18:13   0:00 /usr/sbin/httpd
apache     5643  0.0  0.4 175304  2432 ?        S    18:13   0:00 /usr/sbin/httpd
apache     5644  0.0  0.4 175304  2432 ?        S    18:13   0:00 /usr/sbin/httpd
apache     5645  0.0  0.4 175304  2432 ?        S    18:13   0:00 /usr/sbin/httpd
apache     5646  0.0  0.4 175304  2432 ?        S    18:13   0:00 /usr/sbin/httpd
root       5654  0.0  0.1 103304   884 pts/1    S+   18:13   0:00 grep httpd

可以看到,httpd又被启动了