实现mybatis的简易增删改查的基本步骤记录
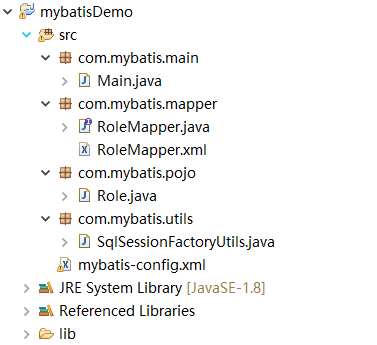
0.项目结构
1.第一步:确保mybatis的jar包都有
从此https://github.com/mybatis/mybatis-3/releases地址可以获取所需的jar包
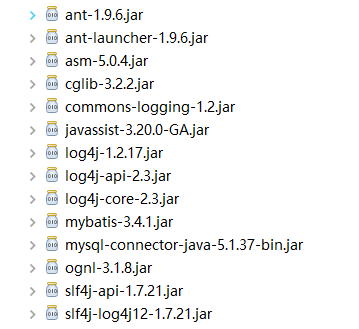
基本一个简易的mybatis需要这个jar包,其中mysql-connector-java-5.137.jar是连接mysql所需
2.构建数据库表的POJO对象,最终mybatis的查询都会映射到它上面,活着将其存入数据库中(数据库表别忘了建)
package com.mybatis.pojo;

public class Role {
    private Integer id;
    private String roleName;
    private String note;

        /**setter and gettet

    @Override
    public String toString() {
        return "Role [id=" + id + ", roleName=" + roleName + ", note=" + note + "]";
    }


}
3..构建映射器,采用XML方式构建,包含一个接口和一个XML文件,把他们都放入到com.mybatis.mapper包里
接口RoleMapper.java
package com.mybatis.mapper;

import com.mybatis.pojo.Role;

public interface RoleMapper {
    public Role getRole(Integer id);
}
对应的XML文件:RoleMapper.xml
<?xml version="1.0" encoding="UTF-8"?>
<!DOCTYPE mapper
	PUBLIC "-//mybatis.org//DTD Mapper 3.0//EN"
	"http://mybatis.org/dtd/mybatis-3-mapper.dtd">

<!-- namespace对应于mapper接口的位置 -->
<mapper namespace="com.mybatis.mapper.RoleMapper">

<!-- 对应于增删改查语句,以select/update/delete/insert开头
     id值对应于接口内的方法名,parameterType值对应于方法的参数类型
     resultType对应于方法的返回值类型 -->
<select id="getRole" parameterType="Integer" resultType="role">
	select * from t_role where id=#{id}
</select>

</mapper>
4.设置用于连接数据库的XML文件mybatis-config.xml
<?xml version="1.0" encoding="UTF-8"?>
<!DOCTYPE configuration
	PUBLIC "-//mybatis.org//DTD Config 3.0//EN"
	"http://mybatis.org/dtd/mybatis-3-config.dtd">
<configuration>

<typeAliases><!-- 别名  -->
		<typeAlias alias="role" type="com.mybatis.pojo.Role"/>
</typeAliases>

	<!-- 数据库环境 -->
	<environments default="development">
		<environment id="development">
			<transactionManager type="JDBC" />
			<!-- type="POOLED"指mybatis内部提供的连接池方式 -->
			<dataSource type="POOLED">
				<property name="driver" value="com.mysql.jdbc.Driver"/>
				<property name="url" value="jdbc:mysql://localhost:3306/ssm"/>
				<property name="username" value="root"/>
				<property name="password" value="root"/>
			</dataSource>
		</environment>
	</environments>

	<!-- 映射文件 -->
	<mappers>
		<mapper resource="com/mybatis/mapper/RoleMapper.xml" />
	</mappers>

</configuration>
5.创建获取SqlSeesionFactory和SqlSession的工具类,当然也可以直接放到主函数内
package com.mybatis.utils;

import java.io.IOException;
import java.io.InputStream;

import org.apache.ibatis.io.Resources;
import org.apache.ibatis.session.SqlSession;
import org.apache.ibatis.session.SqlSessionFactory;
import org.apache.ibatis.session.SqlSessionFactoryBuilder;

import com.mybatis.utils.SqlSessionFactoryUtils;

public class SqlSessionFactoryUtils {

	//使用单例模式
	private final static Class<SqlSessionFactoryUtils> LOCK=SqlSessionFactoryUtils.class;

	private static SqlSessionFactory sqlSessionFactory=null;

	private SqlSessionFactoryUtils(){}

	//获取SqlSeesionFactory
	public static SqlSessionFactory getSqlSessionFactory(){
		synchronized(LOCK){
			if(sqlSessionFactory !=null){
				return sqlSessionFactory;
			}
			String resource="mybatis-config.xml";
			InputStream inputStream;
			try{
				inputStream=Resources.getResourceAsStream(resource);
				sqlSessionFactory=new SqlSessionFactoryBuilder().build(inputStream);
			}catch(IOException e){
				e.printStackTrace();
				return null;
			}
			return sqlSessionFactory;
		}
	}

	//获取SqlSession
	public static SqlSession openSqlSession(){
		if(sqlSessionFactory==null){
			getSqlSessionFactory();
		}
		return sqlSessionFactory.openSession();
	}
}
6.测试类
package com.mybatis.main;

import org.apache.ibatis.session.SqlSession;
import org.apache.log4j.Logger;

import com.mybatis.mapper.RoleMapper;
import com.mybatis.pojo.Role;
import com.mybatis.utils.SqlSessionFactoryUtils;

public class Main {
	public static void main(String[] args) {
		Logger log=Logger.getLogger(Main.class);
		SqlSession sqlSession=null;
		try{
			sqlSession=SqlSessionFactoryUtils.openSqlSession();
			RoleMapper roleMapper=sqlSession.getMapper(RoleMapper.class);
			Role role=roleMapper.getRole(1);
			log.info(role.getRoleName());
			System.out.println(role);
		}catch(Exception e){
			e.printStackTrace();
		}finally{
			if(sqlSession != null){
				sqlSession.close();
			}
		}
	}
}

至此一个简单的mybatis实例已经运行成功了