系列连载目录
- 请查看博客 《Paper》 4.1 小节 【Keras】Classification in CIFAR-10 系列连载
学习借鉴
- github:BIGBALLON/cifar-10-cnn
- 知乎专栏:写给妹子的深度学习教程
- AlexNet Caffe 代码:https://github.com/BVLC/caffe/blob/master/models/bvlc_alexnet/train_val.prototxthttps://github.com/DeepScale/SqueezeNet/blob/master/SqueezeNet_v1.0/train_val.prototxt
- AlexNet Keras 代码:keras实现常用深度学习模型LeNet,AlexNet,ZFNet,VGGNet,GoogleNet,Resnet
参考
代码
- 链接:https://pan.baidu.com/s/1KnR1ZYTHaXOStmDA_d1jjQ
提取码:7d87
硬件
- TITAN XP
文章目录
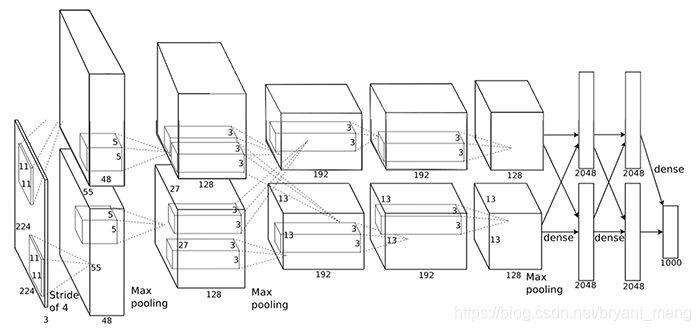
1 理论基础
2 AlexNet 代码实现
2.1 alexnet
1)导入库,设置好超参数
import os
os.environ["CUDA_DEVICE_ORDER"]="PCI_BUS_ID"
os.environ["CUDA_VISIBLE_DEVICES"]="1"

import keras
from keras.datasets import cifar10
from keras import backend as K
from keras.layers import Input, Conv2D, GlobalAveragePooling2D, Dense, BatchNormalization, Activation, MaxPooling2D
from keras.models import Model
from keras.layers import concatenate,Dropout,Flatten

from keras import optimizers,regularizers
from keras.preprocessing.image import ImageDataGenerator
from keras.initializers import he_normal
from keras.callbacks import LearningRateScheduler, TensorBoard, ModelCheckpoint

num_classes        = 10
batch_size         = 64         # 64 or 32 or other
epochs             = 300
iterations         = 782
DROPOUT=0.5 # keep 50%
CONCAT_AXIS=3
weight_decay=1e-4
DATA_FORMAT='channels_last' # Theano:'channels_first' Tensorflow:'channels_last'
log_filepath  = './alexnet'
2)数据预处理并设置 learning schedule
def color_preprocessing(x_train,x_test):
    x_train = x_train.astype('float32')
    x_test = x_test.astype('float32')
    mean = [125.307, 122.95, 113.865]
    std  = [62.9932, 62.0887, 66.7048]
    for i in range(3):
        x_train[:,:,:,i] = (x_train[:,:,:,i] - mean[i]) / std[i]
        x_test[:,:,:,i] = (x_test[:,:,:,i] - mean[i]) / std[i]
    return x_train, x_test

def scheduler(epoch):
    if epoch < 100:
        return 0.01
    if epoch < 200:
        return 0.001
    return 0.0001

# load data
(x_train, y_train), (x_test, y_test) = cifar10.load_data()
y_train = keras.utils.to_categorical(y_train, num_classes)
y_test  = keras.utils.to_categorical(y_test, num_classes)
x_train, x_test = color_preprocessing(x_train, x_test)
3)搭建网络

https://engmrk.com/alexnet-implementation-using-keras/
def alexnet(img_input,classes=10):
    x = Conv2D(96,(11,11),strides=(4,4),padding='same',
               activation='relu',kernel_initializer='uniform')(img_input)# valid
    x = MaxPooling2D(pool_size=(3,3),strides=(2,2),padding='same',data_format=DATA_FORMAT)(x)

    x = Conv2D(256,(5,5),strides=(1,1),padding='same',
               activation='relu',kernel_initializer='uniform')(x)
    x = MaxPooling2D(pool_size=(3,3),strides=(2,2),padding='same',data_format=DATA_FORMAT)(x)

    x = Conv2D(384,(3,3),strides=(1,1),padding='same',
               activation='relu',kernel_initializer='uniform')(x)

    x = Conv2D(384,(3,3),strides=(1,1),padding='same',
               activation='relu',kernel_initializer='uniform')(x)

    x = Conv2D(256,(3,3),strides=(1,1),padding='same',
               activation='relu',kernel_initializer='uniform')(x)
    x = MaxPooling2D(pool_size=(3,3),strides=(2,2),padding='same',data_format=DATA_FORMAT)(x)
    x = Flatten()(x)
    x = Dense(4096,activation='relu')(x)
    x = Dropout(0.5)(x)
    x = Dense(4096,activation='relu')(x)
    x = Dropout(0.5)(x)
    out = Dense(classes, activation='softmax')(x)
    return out
4)生成模型
img_input=Input(shape=(32,32,3))
output = alexnet(img_input)
model=Model(img_input,output)
model.summary()
参数量如下(还是相当恐怖的):
Total params: 21,622,154
Trainable params: 21,622,154
Non-trainable params: 0
5)开始训练
# set optimizer
sgd = optimizers.SGD(lr=.1, momentum=0.9, nesterov=True)
model.compile(loss='categorical_crossentropy', optimizer=sgd, metrics=['accuracy'])

# set callback
tb_cb = TensorBoard(log_dir=log_filepath, histogram_freq=0)
change_lr = LearningRateScheduler(scheduler)
cbks = [change_lr,tb_cb]

# set data augmentation
datagen = ImageDataGenerator(horizontal_flip=True,
                             width_shift_range=0.125,
                             height_shift_range=0.125,
                             fill_mode='constant',cval=0.)
datagen.fit(x_train)

# start training
model.fit_generator(datagen.flow(x_train, y_train,batch_size=batch_size),
                    steps_per_epoch=iterations,
                    epochs=epochs,
                    callbacks=cbks,
                    validation_data=(x_test, y_test))
model.save('alexnet.h5')
6)结果分析
training accuracy 和 training loss


test accuracy 和 test loss


loss 和 accuracy 一个样,正宗的耐克标志!超级过拟合,fully connection 果然名不虚传
2.2 alexnet_slim
将 AlexNet 中 第一个卷积和第一个 maxpooling 用一个 filters = 96,size = 3,stride = 1 的 convolution 来替代。AlexNet 原有 5 次 downsampling 的过程,这样操作的话,只有后面 2次了,这么做的原因是 imagenet 和 cifar-10 图片的 resolution 的差别!
x = Conv2D(96,(3,3),strides=(1,1),padding='same',
           activation='relu',kernel_initializer='uniform')(img_input)# valid
其它部分代码同 alexnet
参数量如下(增加了挺多的):
Total params: 87,650,186
Trainable params: 87,650,186
Non-trainable params: 0
- alexnet
Total params: 21,622,154
因为 down sampling 的次数少了3次,最后接 fc 层 的feature map 的 resolution 会大 8×8倍,而且 CNN 的参数量大多都集中在 fc 层的结构,所以参数量变多了可想而知! 叫 slim 的原因是缩减了一些 down sampling 层,如果是全卷积网络,参数量会减少或者不变!
test accuracy 和 test loss

美滋滋,90%+了,可是还是有一定的过拟合现象!
2.3 alexnet_slim_regular
在 alexnet_slim 的基础上,修改网络的初始化策略为 he_normal,增加 l2 regularization,配合 weight decay,修改每个卷积如如下形式:
x = Conv2D(96,(3,3),strides=(1,1),padding='same',
           activation='relu',kernel_initializer='he_normal',kernel_regularizer=regularizers.l2(weight_decay))(img_input)# valid
其它代码同 alexnet_slim
参数量如下(不变):
Total params: 87,650,186
Trainable params: 87,650,186
Non-trainable params: 0
- alexnet
Total params: 21,622,154 - alexnet_slim
Total params: 87,650,186
结果分析如下
training accuracy 和 training loss


test accuracy 和 test loss

精度上到了 92%,过拟合现象得到了缓解

2.4 alexnet_thinner
alexnet_thinner_2 在 alexnet_slim_regular 的基础上,将网络所有的 filters number 改为原来的 1/2,包括 fully connection,
alexnet_thinner_4 在 alexnet_slim_regular 的基础上,将网络所有的 filters number 改为原来的 1/4,包括 fully connection。
其它代码同 alexnet_slim_regular
参数量如下:
-
alexnet
Total params: 21,622,154 -
alexnet_slim
Total params: 87,650,186 -
alexnet_slim_regular
Total params: 87,650,186 -
alexnet_thinner_2
Total params: 6,074,250 -
alexnet_thinner_4
Total params: 5,488,106
结果分析如下
train accuracy 和 train loss

test accuracy 和 test loss

对比来看,thinner_2 模型比较大,有些过拟合了,thinner_4 模型较小,后面loss 没有上升的迹象,直觉上的感觉是 convolution 和 fc 要相匹配,convolution 过小,fc 过大,则会过拟合,相匹配会好一些(可能 hyper parameters 不是最优,所以结论并不靠谱)!
3 总结
精度最高的是 alexnet_slim_regular
模型大小

参数量
-
alexnet
Total params: 21,622,154 -
alexnet_slim
Total params: 87,650,186 -
alexnet_slim_regular
Total params: 87,650,186 -
alexnet_thinner_2
Total params: 6,074,250 -
alexnet_thinner_4
Total params: 5,488,106