从我第一天了解到javascript开始,就听说在这里是没有类的。其实一开始我是沮丧的,尽管我并不知道有没有“类”对编程究竟有多大影响,不过有缺憾总是让人感觉遗憾,哪怕这是一个你可能永远不会用到的东西。确实,在没有任何自定义“类”的情况下,也能做出一款打飞机的游戏。
我们用到的是EaselJS中所定义的一些可以重复使用的对象,并且这些对象包含一些类似于类的行为,比如可以new 一个新的对象实例。为方便理解,我们在这里先把这些称作类。
在EaselJS中类的关系结构图:
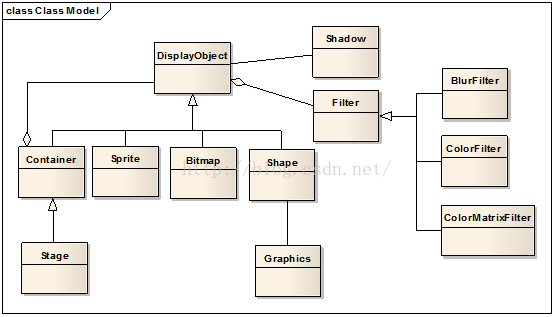
偶然间找到了这张图,EaselJS中类的结构变的一目了然,元素的基类是DisplayObject,Container同做动画用的Sprite、显示图片的Bitmap、显示 图形的Shape、甚至包括Filter,基类都是DisplayObject,而stage则是继承自Container。
令人欣慰的是,在EaselJS中我们同样可以通过继承现有这些类的方式来创建自己的类,通过继承而来的新类,对EaselJS现有的元素进行功能上进行扩展,调用方式跟创建Sprite/Shape这些也没什么太大的不同,并且可以重复使用。我总觉得这好过使用javascript创建一个“模拟类",一般直接使用javascript来创建模拟类的代码看起来是这样的:
function Shape(color){
                this.color=color;
            }
            Shape.prototype.size=50;
            Shape.prototype.draw=function(){
              .....
            }
必须在定义Shape的变量和成员函数时使用prototype才能保证使用你创建的Shape实例化的对象能够拥这些变量和成员函数(读起来真别扭,因为在javascript中并没有类的概念,我们所定义的Shape也是一个对象,不使用prototype的话,定义的size只是Shape对象的一个私有变量;而prototype的功能是使你定义的size和draw指向Shape的父类,这是一个虚拟的父类,但是通过prototype定义后,在示例化Shape时,由于它的父类包含着size和draw,所以其他由shape实例化而来的对象也会拥有size和draw。)
真够令人迷茫的,万幸,使用EaselJS,你可以这样来实现一个自定义类:
(function() {

function Button(label) {
    this.Container_constructor();
    this.label = label;
}
var p = createjs.extend(Button, createjs.Container);

p.draw = function() {
    this.Container_draw();
    // 自定义Button的draw()
}

window.Button = createjs.promote(Button, "Container");
}());
这里是使用一个container来实现一个按钮,createjs.extend表明了Button的继承关系,它继承自Container,最后的window.Button = createjs.promote(Button, "Container")也非常重要,它允许你的在Button中可以重写Container的成员函数,并且在调用Container的成员函数时,加一个Container的前缀。最后赋值给window.Button,使得你自定的Button被加载到window中,可以被调用。
这是一个最基本的格式,用一个例子来演示一下,我们在游戏中经常会使用到按钮,如果每次都要先绘制一个Shape然后添加上Text作为label,再添加鼠标滑过等状态的响应函数,就会有大量的重复动作,所以我们可以来做一个Button类,需要按钮的时候,只要使用new Button();就可以创造一个新的按钮。
(function(){
    function Button(color, label){
        this.Container_constructor();
        this.color = color;
        this.label = label;
        this.setup();
    }

    var p = createjs.extend(Button, createjs.Container);

    p.setup = function(){
        var text = new createjs.Text(this.label, "20px Arial", "#000");
        text.textBaseline = "top";
        text.textAlign = "center";

        var width = text.getMeasuredWidth()+30;
        var height = text.getMeasuredHeight()+20;

        text.x = width/2;
        text.y = 10;

        var background = new createjs.Shape();
        background.graphics.beginFill(this.color).drawRoundRect(0,0,width,height,10);

        this.addChild(background, text);
        this.on("click", this.handleClick);
        this.on("rollover", this.handleRollOver);
        this.on("rollout", this.handleRollOver);
        this.cursor = "pointer";

        this.mouseChildren = false;

        this.offset = Math.random()*10;
        this.count = 0;
    }

    p.handleClick = function (event) {
        alert("You clicked on a button: "+this.label);
    } ;

    p.handleRollOver = function(event) {
        this.alpha = event.type == "rollover" ? 0.4 : 1;
    };

    window.Button = createjs.promote(Button, "Container");

}());
定义非常简单,构造函数中使用传递来的两个参数,创建了两个私有变量color和label,最后调用setup来绘制按钮,放上标签,这样在你的js代码中,任何时候当你需要一个按钮,只需要调用
var b1 = new Button("red", "OK!click it");
        stage.addChild(b1);
就会在你的stage中显示一个按钮了。
当然你可以给你自定义的类添加一些EaselJS基类中所没有的方法,比如可以使用Shape,做一个可以随时间明暗变化的气泡,只要做一个继承自Shape的类,然后添加一个调节透明的自定义方法,并在tick中调用。
<pre class="javascript" name="code">(function(){
    function Orb(color, size){
        this.Shape_constructor();
        this.color = color;
        this.size = size;
        this.setup();
    }

    var p = createjs.extend(Orb, createjs.Shape);

    p.count = 0;

    p.setup = function(){
        this.alpha = Math.random();
        this.graphics.beginFill(this.color).drawCircle(0, 0, this.size);
        this.on('tick', this.pulse);
    }

    p.pulse = function(){
        this.alpha = Math.cos(this.count++ * 0.1) * 0.4 + 0.6;
    }


    window.Orb = createjs.promote(Orb, "Shape");

}());格式都是一样,只有setup不同,这里给自定义类添加了一个pulse的方法,改变透明度,然后保存这段js并添加到你的网页中,我想在鼠标点击的位置产生一个气泡,代码如下:<pre class="javascript" name="code"><script>
var stage;
function init(){
stage = new createjs.Stage('game');
stage.enableMouseOver();
var bg = new createjs.Shape();
bg.graphics.beginFill('#A9BBC9').drawRect(0, 0, stage.canvas.width, stage.canvas.height);
stage.addChild(bg);
stage.on('stagemousedown', drawOrb);
createjs.Ticker.on('tick',stage);
}
function drawOrb(e){
var randomColor = '#' + Math.floor(Math.random() * 16777215).toString(16);
var randomSize = Math.floor(Math.random() * 100) + 20;
var orb = new Orb(randomColor, randomSize);
orb.x = e.stageX;
orb.y = e.stageY;
stage.addChild(orb);
}
</script>随着点击,桌面上会产生一个个大小颜色不同的气泡,忽明忽暗.所有的气泡都可以随时间产生明暗不同的变化,这说明没有用prototype, pulse方法在所有实例中都是存在的,而且彼此独立,最重要的是你可以在你的代码中直接调用。比如给Orb再添加一个类方法
p.say = function(str){
        if(!str){
        alert("hello,i am shape!");
        }else{
            alert(str);
        }
    }
新建一个页面,添加两个气泡b1,b2:
var b1 = new Orb("red", 20);
        var b2 = new Orb("blue", 30);
        b1.say();
        b2.say();
这时候的效果肯定是弹出一个hello,i am shape!的对话框
现在把代码改成这样:
var b1 = new Orb("red", 20);
        var b2 = new Orb("blue", 30);
        b1.say("i am red");
        b2.say("i am blue");
显示则变成:
好了,你可以通过扩展EaselJS中的任何元素去定义一个自己的类了,不管是Shape还是Sprite都可以,这个故事教育我们你的女朋友虽然可能没有天然的virginal membrane,人造的同样好用!