需求:在vue项目中使quill富文本编辑器支持图片上传功能。
思路:修改quill.js的重新编译vue-quill-editor
1.在GitHub上下载quill.js 的源码https://github.com/quilljs/quill
2.在本地新建myQuill项目。
从Quill的使用文档中我们知道了在实例化Quill时传了两个参数,一个是个选择器第二个是配置参数options,
所以我们将上传文件的地址添加在配置参数options中,命名为upload。
根据官网的例子在点击图片上传按钮时会插入input的文件域
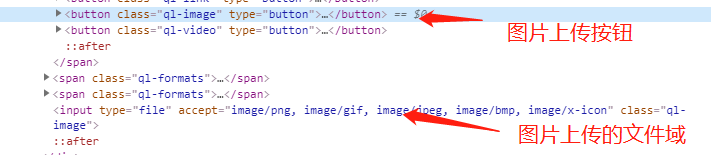
所以我们在qiull.js文件中搜索“image/png, image/gif, image/jpeg, image/bmp, image/x-icon”关键字
就会找到这么一段代码,我这个是压缩过的min版本
 image: function() {
                            var t = this
                              , e = this.container.querySelector("input.ql-image[type=file]");
                            null == e && (e = document.createElement("input"),
                            e.setAttribute("type", "file"),
                            e.setAttribute("accept", "image/png, image/gif, image/jpeg, image/bmp, image/x-icon"),
                            e.classList.add("ql-image"),
                            e.addEventListener("change", function() {
                                if (null != e.files && null != e.files[0]) {
                                    var n = new FileReader;
                                    n.onload = function(n) {
                                        var r = t.quill.getSelection(!0);
                                        t.quill.updateContents((new d.default).retain(r.index).delete(r.length).insert({
                                            image: n.target.result
                                        }), v.default.sources.USER),
                                        t.quill.setSelection(r.index + 1, v.default.sources.SILENT),
                                        e.value = ""
                                    }
                                    ,
                                    n.readAsDataURL(e.files[0])
                                }
                            }),
                            this.container.appendChild(e)),
                            e.click()
                        },
这段代码主要说的是插入资格y一个input框,并设置一些属性,并绑定一个change事件,并实例化一个FileReader对象,然后通过对象的onload事件的回调函数的第一个参数的target.result属性就能拿到当前选中图片的base64为的值,这个值直接可以赋值个img的src属性,一般图片预览就是这么实现的。
所以我们只需要将这个n.target.result替换成我们服务器端返回的图片地址就可以了。在这就会有人问,为什么不直接上传base64数据,要换成图片地址,那是因为普通的post携带数据大小是有限制的,小图片是可以这样做,大图片就不行了。
现在回到我们自己的Myquill项目中,全局搜索new FileReader(),会在两个文件中用到每一个是dist文件,这个是打包过的,不管。还有一个是modules/uploader.js,所以我们就在这改。
在这没有用原生的ajax请求,用到的是axios。
1.安装axios => npm i axios
2.更改core/module.js
import axios from 'axios';

class Module {
  constructor(quill, options = {}) {
    this.quill = quill;
    this.options = options;
    const config = {
      timeout: 60 * 1000, // Timeout
      headers: this.quill.options.headers || {},自定义请求头
    };
    const _axios = axios.create(config);
    _axios.interceptors.response.use(
      response => {
        return response.data;
      },
      error => {
        // Do something with response error
        return Promise.reject(error);
      },
    );
    this.$http = _axios;
  }
}

Module.DEFAULTS = {};

export default Module;
3.更改modules/uploader.js下的Uploader.DEFAULTS 对象的handler方法中的const promises改为
    const promises = files.map(file => {
      return new Promise(async resolve => {
        let res1;
        if (this.quill.options.upload) {
          res1 = await this.$http.get(this.quill.options.upload);
        }
        if (res1 && res1.msg === 'quilljs') {
          const format = new FormData();
          format.append('img', file);
          const res = await this.$http.post(this.quill.options.upload, format);
          if (res.url) {
            resolve(res.url);
          } else {
            const reader = new FileReader();
            reader.onload = e => {
              resolve(e.target.result);
            };
            reader.readAsDataURL(file);
            console.log(
              '%c后端配置有误!请在对应的地址上返回真确的数据',
              'color: red',
            );
          }
        } else {
          const reader = new FileReader();
          reader.onload = e => {
            resolve(e.target.result);
          };
          reader.readAsDataURL(file);
        }
      });
    });
我自己设置的规则是:get请求返回{msg: quilljs},post请求返回{url: '图片的地址'}
4.将_develop/webpack.config.js的baseConfig.node设为production ,默认为development开发模式,这样对大大减小打包的体积
5.运行npm run build:webpack得到dist/quill.js
3.在GitHub现在vue-quill-editor的源码https://github.com/cfj1996/vue-quill-img-editor
1.新建vue-quill-my-editor本地项目将vue-quill-editor的代码解压到本地项目中
2.package.json中的name改为自己想要的名字如:my-quill-editor,删除private,license,注意main配置项,这个是在我们import 引包是指项的文件,如果要改要与webpack配置的打包输出文件路径,文件名匹配。
3.新建plugins文件夹,将我们上一个myQuill中的项目中打包的qiull.js复制过来,
4.更改src/editor.vue文件
将原先的import _Quill from 'quill'改为import _Quill from '../plugins/quill'
添加props下的upload: String,headers: {type: Object,default: () => ({})}
在initialize方法中改this._options = Object.assign({upload: this.upload, headers: this.headers}, this.defaultOptions, this.globalOptions, this.options)
5.更改src/index.js
将原先的import _Quill from 'quill'改为import _Quill from '../plugins/quill'
6.运行npm run build ,打包项目
7.运行npm link 将包my-quill-editor链接到全局方便本地测试
8.如果想上传到npm上请自行百度。
4.本地测试项目包
1.用vue-cli3.0新建一个项目,
2.将babel.config.js改为
module.exports = {
  presets: [
      ['@vue/app',{modules: 'umd', useBuiltIns: 'entry'}]
  ]
}
3.运行npm link my-quill-editor 将刚刚链接的全局my-quill-editor包再链接带项目依赖中。
4.运行npm i quill
4.设置代理vue.config.js
// vue.config.js
module.exports = {
    devServer: {
        proxy: {
            '/api': {
                target: 'http://127.0.0.1:7001/',// 我的后端接口为127.0.0.1:7001
                changeOrigin: true,
                pathRewrite: {
                    '^/api': ''
                },
            }
        }
    }
}
5.在main.js中添加
import Editor from 'my-quill-editor'
import 'quill/dist/quill.core.css'
import 'quill/dist/quill.snow.css'
import 'quill/dist/quill.bubble.css'
Vue.use(Editor, {upload: '/api/quillImgUpload'})
由于我们在my-quill-editor项目中的src/index.js 中有Vue.component(quillEditor.name, quillEditor)
其中quillEditor.name就是quill-editor,所以我们就可以在其他的组件中用quill-editor 组件了
6.用node 的egg.js或者其他的后端语言新建一个后端接口
接口名为quillImgUpload
get请求返回值{code: 200, msg: 'quilljs',}
post请求返回值:{code: 200,url: '图片地址‘,}
5.注意事项
在本地测试的时候一定要在babel.config.js中添加{modules: 'umd', useBuiltIns: 'entry'},由于vue的项目中找不到exports,根据webpack打包的规则,引入的模块就会挂载在的window上。