QQ技术互动交流群:ESP8266&32 物联网开发 群号622368884,不喜勿喷
1.前言
SSD1306屏幕驱动库,最出名应该就是u8g2,读者可以参考
玩转u8g2 OLED库,一篇就够。
但是u8g2有个弊端就是:一个超级庞大的第三方库,性能并不是非常好(但是基本上支持了市面上绝大部分的LED屏)。
我们这里深入学习 Adafruit_GFX 和 Adafruit_SSD1306。
那么,读者可能就有疑问了?Adafruit_SSD1306是什么鬼?
- Adafruit_SSD1306 是针对 SSD1306这款OLED屏幕的显示图形库
那么,Adafruit_GFX又是什么鬼?它和Adafruit_SSD1306之间有什么关系呢?博哥直接翻阅了官网解析,读者可以点击查看 官网解析。
博哥这里截取了最关键的解析:
- Arduino的Adafruit_GFX库为我们所有的LCD和OLED显示器提供了通用语法和图形功能集,也就是说这是一个通用图形库,并不针对特定的显示器型号,它是父类。
- Adafruit_GFX库始终与每种特定显示类型唯一的附加库一起使用,子类库依赖父类库-例如,ST7735 1.8英寸彩色LCD需要安装Adafruit_GFX,Adafruit_ZeroDMA 和 Adafruit_ST7735库。以下库现在以这种方式运行:

当然,博主也去查阅了Adafruit_SSD1306源码,也是证明了上面两点说明:

Adafruit_GFX 定义了一系列的绘画方法(线,矩形,圆....),属于基础类,并且最重要的一点,drawPixel方法由子类来实现。

Adafruit_SSD1306 定义了一系列跟SSD1306有关的方法,并且重写了drawPixel方法,属于扩展类。
综上两点,要想使用这个Adafruit_SSD1306库功能,必须同时安装 Adafruit_GFX 和 Adafruit_SSD1306。
2.Arduino 安装 Adafruit_SSD1306
工欲善其事,必先利其器,我们首先安装库。
2.1 安装 Adafruit_GFX
- Adafruit_GFX库可以使用安装Arduino的库管理。从Arduino的“草图”菜单中,选择“包含库”,然后选择“管理库…”

- 在搜索字段中键入“ gfx”以快速找到它:

2.2 安装 Adafruit_SSD1306
- 在搜索字段中键入“ ssd1306”以快速找到它:

接下来,我们就可以深入学习该库了。
3.库方法
在讲解之前,博哥非常强调两个重要意识点:
- 无论什么OLED屏幕,最终都可以抽象为像素点阵,想显示什么内容就把具体位置的像素点亮起来。比如SSD1306-12864就是一个128X64像素点阵。
- 在坐标系中,左上角是原点,向右是X轴,向下是Y轴。

接下来,开始方法讲解。
3.1 初始化方法
3.1.1 Adafruit_SSD1306—— 初始化构造器
SSD1306包括IIC和SPI总线版本,所以针对不同版本又有对应的构造器方法
3.1.1.1 IIC版本
函数1说明:
/*!
    @brief  Constructor for I2C-interfaced SSD1306 displays.
    @param  w
            Display width in pixels(屏幕宽度像素)
    @param  h
            Display height in pixels(屏幕高度像素)
    @param  twi(IIC总线实例)
            Pointer to an existing TwoWire instance (e.g. &Wire, the
            microcontroller's primary I2C bus).
    @param  rst_pin
            Reset pin (using Arduino pin numbering), or -1 if not used
            (some displays might be wired to share the microcontroller's
            reset pin).
    @param  clkDuring(SSD1306库调用期间的传输速率)
            Speed (in Hz) for Wire transmissions in SSD1306 library calls.
            Defaults to 400000 (400 KHz), a known 'safe' value for most
            microcontrollers, and meets the SSD1306 datasheet spec.
            Some systems can operate I2C faster (800 KHz for ESP32, 1 MHz
            for many other 32-bit MCUs), and some (perhaps not all)
            SSD1306's can work with this -- so it's optionally be specified
            here and is not a default behavior. (Ignored if using pre-1.5.7
            Arduino software, which operates I2C at a fixed 100 KHz.)
    @param  clkAfter(SSD1306库非调用期间的传输速率,为了兼容IIC总线上的其他设备)
            Speed (in Hz) for Wire transmissions following SSD1306 library
            calls. Defaults to 100000 (100 KHz), the default Arduino Wire
            speed. This is done rather than leaving it at the 'during' speed
            because other devices on the I2C bus might not be compatible
            with the faster rate. (Ignored if using pre-1.5.7 Arduino
            software, which operates I2C at a fixed 100 KHz.)
    @return Adafruit_SSD1306 object.
    @note   Call the object's begin() function before use -- buffer
            allocation is performed there!
*/
Adafruit_SSD1306(uint8_t w, uint8_t h, TwoWire *twi=&Wire, int8_t rst_pin=-1,
uint32_t clkDuring=400000UL, uint32_t clkAfter=100000UL);用法:
#include <SPI.h>
#include <Wire.h>
#include <Adafruit_GFX.h>
#include <Adafruit_SSD1306.h>
//屏幕分辨率
#define SCREEN_WIDTH 128 // OLED display width, in pixels
#define SCREEN_HEIGHT 64 // OLED display height, in pixels
// Declaration for an SSD1306 display connected to I2C (SDA, SCL pins)
#define OLED_RESET     4 // Reset pin # (or -1 if sharing Arduino reset pin)
Adafruit_SSD1306 display(SCREEN_WIDTH, SCREEN_HEIGHT, &Wire, OLED_RESET);
3.1.1.2 SPI版本
函数1说明:
/*!
    @brief  Constructor for SPI SSD1306 displays, using software (bitbang)
            SPI.(软件SPI总线)
    @param  w
            Display width in pixels
    @param  h
            Display height in pixels
    @param  mosi_pin
            MOSI (master out, slave in) pin (using Arduino pin numbering).
            This transfers serial data from microcontroller to display.
    @param  sclk_pin
            SCLK (serial clock) pin (using Arduino pin numbering).
            This clocks each bit from MOSI.
    @param  dc_pin
            Data/command pin (using Arduino pin numbering), selects whether
            display is receiving commands (low) or data (high).
    @param  rst_pin
            Reset pin (using Arduino pin numbering), or -1 if not used
            (some displays might be wired to share the microcontroller's
            reset pin).
    @param  cs_pin
            Chip-select pin (using Arduino pin numbering) for sharing the
            bus with other devices. Active low.
    @return Adafruit_SSD1306 object.
    @note   Call the object's begin() function before use -- buffer
            allocation is performed there!
*/
Adafruit_SSD1306(uint8_t w, uint8_t h, int8_t mosi_pin, int8_t sclk_pin,
    int8_t dc_pin, int8_t rst_pin, int8_t cs_pin);

/*!
    @brief  Constructor for SPI SSD1306 displays, using native hardware SPI.(硬件SPI总线)
    @param  w
            Display width in pixels
    @param  h
            Display height in pixels
    @param  spi
            Pointer to an existing SPIClass instance (e.g. &SPI, the
            microcontroller's primary SPI bus).
    @param  dc_pin
            Data/command pin (using Arduino pin numbering), selects whether
            display is receiving commands (low) or data (high).
    @param  rst_pin
            Reset pin (using Arduino pin numbering), or -1 if not used
            (some displays might be wired to share the microcontroller's
            reset pin).
    @param  cs_pin
            Chip-select pin (using Arduino pin numbering) for sharing the
            bus with other devices. Active low.
    @param  bitrate
            SPI clock rate for transfers to this display. Default if
            unspecified is 8000000UL (8 MHz).
    @return Adafruit_SSD1306 object.
    @note   Call the object's begin() function before use -- buffer
            allocation is performed there!
*/
Adafruit_SSD1306(uint8_t w, uint8_t h, SPIClass *spi,
int8_t dc_pin, int8_t rst_pin, int8_t cs_pin, uint32_t bitrate=8000000UL);用法1:
#include <SPI.h>
#include <Wire.h>
#include <Adafruit_GFX.h>
#include <Adafruit_SSD1306.h>
#define SCREEN_WIDTH 128 // OLED display width, in pixels
#define SCREEN_HEIGHT 64 // OLED display height, in pixels
// 软件SPI总线
// Declaration for SSD1306 display connected using software SPI (default case):
#define OLED_MOSI   9
#define OLED_CLK   10
#define OLED_DC    11
#define OLED_CS    12
#define OLED_RESET 13
Adafruit_SSD1306 display(SCREEN_WIDTH, SCREEN_HEIGHT,
OLED_MOSI, OLED_CLK, OLED_DC, OLED_RESET, OLED_CS);用法2:
//硬件spi总线
#define OLED_DC     6
#define OLED_CS     7
#define OLED_RESET  8
Adafruit_SSD1306 display(SCREEN_WIDTH, SCREEN_HEIGHT,
  &SPI, OLED_DC, OLED_RESET, OLED_CS);
3.1.2 OLED初始化方法
3.1.2.1 begin方法
函数说明:
// ALLOCATE & INIT DISPLAY -------------------------------------------------
// 分配内存和初始化屏幕
/*!
    @brief  Allocate RAM for image buffer, initialize peripherals and pins.
    @param  vcs
            VCC selection. Pass SSD1306_SWITCHCAPVCC to generate the display
            voltage (step up) from the 3.3V source, or SSD1306_EXTERNALVCC
            otherwise. Most situations with Adafruit SSD1306 breakouts will
            want SSD1306_SWITCHCAPVCC.
    @param  addr
            I2C address of corresponding SSD1306 display (or pass 0 to use
            default of 0x3C for 128x32 display, 0x3D for all others).
            SPI displays (hardware or software) do not use addresses, but
            this argument is still required (pass 0 or any value really,
            it will simply be ignored). Default if unspecified is 0.
    @param  reset
            If true, and if the reset pin passed to the constructor is
            valid, a hard reset will be performed before initializing the
            display. If using multiple SSD1306 displays on the same bus, and
            if they all share the same reset pin, you should only pass true
            on the first display being initialized, false on all others,
            else the already-initialized displays would be reset. Default if
            unspecified is true.
    @param  periphBegin
            If true, and if a hardware peripheral is being used (I2C or SPI,
            but not software SPI), call that peripheral's begin() function,
            else (false) it has already been done in one's sketch code.
            Cases where false might be used include multiple displays or
            other devices sharing a common bus, or situations on some
            platforms where a nonstandard begin() function is available
            (e.g. a TwoWire interface on non-default pins, as can be done
            on the ESP8266 and perhaps others).
    @return true on successful allocation/init, false otherwise.
            Well-behaved code should check the return value before
            proceeding.
    @note   MUST call this function before any drawing or updates!
*/
boolean Adafruit_SSD1306::begin(uint8_t switchvcc=SSD1306_SWITCHCAPVCC,
                 uint8_t i2caddr=0, boolean reset=true,
                 boolean periphBegin=true) {
  // 分配内存空间 空间大小为 WIDTH * ((HEIGHT + 7) / 8),这里做了一个向上取8的倍数
  if((!buffer) && !(buffer = (uint8_t *)malloc(WIDTH * ((HEIGHT + 7) / 8))))
    return false;
  //把Buffer清零,其实就是把OLED对应的缓存(缓存对应点阵数据)清掉
  clearDisplay();
  // 显示一个启动图形....
  if(HEIGHT > 32) {
    drawBitmap((WIDTH - splash1_width) / 2, (HEIGHT - splash1_height) / 2,
      splash1_data, splash1_width, splash1_height, 1);
  } else {
    drawBitmap((WIDTH - splash2_width) / 2, (HEIGHT - splash2_height) / 2,
      splash2_data, splash2_width, splash2_height, 1);
  }

  vccstate = vcs;

  // Setup pin directions 配置引脚
  // I2C总线
  if(wire) { // Using I2C
    // If I2C address is unspecified, use default
    // (0x3C for 32-pixel-tall displays, 0x3D for all others).
    i2caddr = addr ? addr : ((HEIGHT == 32) ? 0x3C : 0x3D);
    // TwoWire begin() function might be already performed by the calling
    // function if it has unusual circumstances (e.g. TWI variants that
    // can accept different SDA/SCL pins, or if two SSD1306 instances
    // with different addresses -- only a single begin() is needed).
    if(periphBegin) wire->begin();
  } else { // Using one of the SPI modes, either soft or hardware
    // SPI总线
    pinMode(dcPin, OUTPUT); // Set data/command pin as output
    pinMode(csPin, OUTPUT); // Same for chip select
#ifdef HAVE_PORTREG
    dcPort    = (PortReg *)portOutputRegister(digitalPinToPort(dcPin));
    dcPinMask = digitalPinToBitMask(dcPin);
    csPort    = (PortReg *)portOutputRegister(digitalPinToPort(csPin));
    csPinMask = digitalPinToBitMask(csPin);
#endif
    // #define SSD1306_SELECT       *csPort &= ~csPinMask; ///< Device select
    // #define SSD1306_SELECT       digitalWrite(csPin, LOW);  ///< Device select
    SSD1306_DESELECT
    if(spi) { // Hardware SPI 硬件spi
      // SPI peripheral begin same as wire check above.
      if(periphBegin) spi->begin();
    } else {  // Soft SPI  软件spi
      pinMode(mosiPin, OUTPUT); // MOSI and SCLK outputs
      pinMode(clkPin , OUTPUT);
#ifdef HAVE_PORTREG
      mosiPort    = (PortReg *)portOutputRegister(digitalPinToPort(mosiPin));
      mosiPinMask = digitalPinToBitMask(mosiPin);
      clkPort     = (PortReg *)portOutputRegister(digitalPinToPort(clkPin));
      clkPinMask  = digitalPinToBitMask(clkPin);
      *clkPort   &= ~clkPinMask; // Clock low
#else
      digitalWrite(clkPin, LOW); // Clock low
#endif
    }
  }

  // Reset SSD1306 if requested and reset pin specified in constructor
  if(reset && (rstPin >= 0)) {
    pinMode(     rstPin, OUTPUT);
    digitalWrite(rstPin, HIGH);
    delay(1);                   // VDD goes high at start, pause for 1 ms
    digitalWrite(rstPin, LOW);  // Bring reset low
    delay(10);                  // Wait 10 ms
    digitalWrite(rstPin, HIGH); // Bring out of reset
  }

  // 开启事务操作
  // #define SPI_TRANSACTION_START spi->beginTransaction(spiSettings) ///< Pre-SPI
  TRANSACTION_START

  // 以下一系列是一系列控制命令
  // Init sequence
  static const uint8_t PROGMEM init1[] = {
    SSD1306_DISPLAYOFF,                   // 0xAE 关显示
    SSD1306_SETDISPLAYCLOCKDIV,           // 0xD5 设置显示时钟分频率、振荡器频率
    0x80,                                 // the suggested ratio 0x80 A[3:0]:分频频率1到16,A[7:4]频率
    SSD1306_SETMULTIPLEX };               // 0xA8  duty设置
  ssd1306_commandList(init1, sizeof(init1));
  ssd1306_command1(HEIGHT - 1);

  static const uint8_t PROGMEM init2[] = {
    SSD1306_SETDISPLAYOFFSET,             // 0xD3  显示偏移
    0x0,                                  // no offset  不偏移
    SSD1306_SETSTARTLINE | 0x0,           // line #0  起始行 40~7F
    SSD1306_CHARGEPUMP };                 // 0x8D  升压允许
  ssd1306_commandList(init2, sizeof(init2));

  ssd1306_command1((vccstate == SSD1306_EXTERNALVCC) ? 0x10 : 0x14);

  static const uint8_t PROGMEM init3[] = {
    SSD1306_MEMORYMODE,                   // 0x20 设置内存地址模式
    0x00,                                 // 0x0 act like ks0108 00水平地址模式,01垂直模式,02页地址模式
    SSD1306_SEGREMAP | 0x1,   //列扫描顺序:从左到右a1
    SSD1306_COMSCANDEC };//行扫描顺序:从上到下c8
  ssd1306_commandList(init3, sizeof(init3));

  // 这里可以看到 支持 128X32  128X64  96X16 这三款SSD1306
  if((WIDTH == 128) && (HEIGHT == 32)) {
    static const uint8_t PROGMEM init4a[] = {
      SSD1306_SETCOMPINS,                 // 0xDA
      0x02,
      SSD1306_SETCONTRAST,                // 0x81
      0x8F };
    ssd1306_commandList(init4a, sizeof(init4a));
  } else if((WIDTH == 128) && (HEIGHT == 64)) {
    static const uint8_t PROGMEM init4b[] = {
      SSD1306_SETCOMPINS,                 // 0xDA
      0x12,
      SSD1306_SETCONTRAST };              // 0x81
    ssd1306_commandList(init4b, sizeof(init4b));
    ssd1306_command1((vccstate == SSD1306_EXTERNALVCC) ? 0x9F : 0xCF);
  } else if((WIDTH == 96) && (HEIGHT == 16)) {
    static const uint8_t PROGMEM init4c[] = {
      SSD1306_SETCOMPINS,                 // 0xDA
      0x2,    // ada x12
      SSD1306_SETCONTRAST };              // 0x81
    ssd1306_commandList(init4c, sizeof(init4c));
    ssd1306_command1((vccstate == SSD1306_EXTERNALVCC) ? 0x10 : 0xAF);
  } else {
    // Other screen varieties -- TBD
  }

  ssd1306_command1(SSD1306_SETPRECHARGE); // 0xd9  Set Pre-Charge Period
  ssd1306_command1((vccstate == SSD1306_EXTERNALVCC) ? 0x22 : 0xF1);
  static const uint8_t PROGMEM init5[] = {
    SSD1306_SETVCOMDETECT,               // 0xDB  //Set VCOMH Deselect Level
    0x40,
    SSD1306_DISPLAYALLON_RESUME,         // 0xA4
    SSD1306_NORMALDISPLAY,               // 0xA6
    SSD1306_DEACTIVATE_SCROLL,
    SSD1306_DISPLAYON };                 // Main screen turn on  //开显示
  ssd1306_commandList(init5, sizeof(init5));

  // 事务结束 执行这个过程中的操作 基本上都是SSD1306寄存器命令操作
  TRANSACTION_END

  return true; // Success
}注意点:
- 这里的buffer对应的是arduino上的RAM,并非SSD1306上显示的RAM,需要严格区分;
- 仅仅支持 128X32 128X64 96X16 这三款SSD1306;
- 此方法必须成功,否则表示整个模块无法使用,无法使用可能就需要检测硬件模块;
3.2 显示类方法
3.2.1 clearDisplay——清除显示
函数说明:
/*!
    @brief  Clear contents of display buffer (set all pixels to off).
    @return None (void).
    @note   Changes buffer contents only, no immediate effect on display.
            Follow up with a call to display(), or with other graphics
            commands as needed by one's own application.
*/
void Adafruit_SSD1306::clearDisplay(void) {
  memset(buffer, 0, WIDTH * ((HEIGHT + 7) / 8));
}注意点:
此方法仅仅是清除Arduino缓存,不会立即显示在display上,可以通过调用display来立即清除;
3.2.2 display——显示内容
函数说明:
/*!
    @brief  Push data currently in RAM to SSD1306 display.
    @return None (void).
    @note   Drawing operations are not visible until this function is
            called. Call after each graphics command, or after a whole set
            of graphics commands, as best needed by one's own application.
*/
void Adafruit_SSD1306::display(void) {
  TRANSACTION_START
  // 以下是一堆页面操作
  static const uint8_t PROGMEM dlist1[] = {
    SSD1306_PAGEADDR,
    0,                         // Page start address
    0xFF,                      // Page end (not really, but works here)
    SSD1306_COLUMNADDR,
    0 };                       // Column start address
  ssd1306_commandList(dlist1, sizeof(dlist1));
  ssd1306_command1(WIDTH - 1); // Column end address
// 这里针对8266做了处理 也就是 8266可以用了哈哈哈
#if defined(ESP8266)
  // ESP8266 needs a periodic yield() call to avoid watchdog reset.
  // With the limited size of SSD1306 displays, and the fast bitrate
  // being used (1 MHz or more), I think one yield() immediately before
  // a screen write and one immediately after should cover it.  But if
  // not, if this becomes a problem, yields() might be added in the
  // 32-byte transfer condition below.
  yield();
#endif
  // 往ssd1306 ram写数据
  uint16_t count = WIDTH * ((HEIGHT + 7) / 8);
  uint8_t *ptr   = buffer;
  if(wire) { // I2C
    wire->beginTransmission(i2caddr);
    WIRE_WRITE((uint8_t)0x40);
    uint8_t bytesOut = 1;
    while(count--) {
      if(bytesOut >= WIRE_MAX) {
        wire->endTransmission();
        wire->beginTransmission(i2caddr);
        WIRE_WRITE((uint8_t)0x40);
        bytesOut = 1;
      }
      WIRE_WRITE(*ptr++);
      bytesOut++;
    }
    wire->endTransmission();
  } else { // SPI
    SSD1306_MODE_DATA
    while(count--) SPIwrite(*ptr++);
  }
  TRANSACTION_END
#if defined(ESP8266)
  yield();
#endif
}注意点:
- 这个方法才是真正把绘制内容画在display上(非常重要)
3.3 绘制类方法
上面介绍了显示类方法,那么到底要显示什么内容呢?接下来就是构造显示内容,这些都是绘制类方法的控制范围了。绘制类方法,博哥理解为影响绘制过程的一系列操作。
绘制类方法分为父类绘制方法(Adafruit_GFX内部实现,子类不需要重写,直接调用)以及子类绘制方法(Adafruit_SSD1306实现)。
Adafruit_GFX 绘制类方法包括:
- drawCircle——绘制空心圆
- fillCircle——绘制实心圆
- drawTriangle——绘制空心三角形
- fillTriangle——绘制实心三角形
- drawRoundRect——绘制空心圆角方形
- fillRoundRect——绘制实心圆角方形
- drawBitmap——绘制图片
- drawXBitmap
- drawGrayscaleBitmap
- drawRGBBitmap
- drawChar——绘制字符
- getTextBounds
- setTextSize
- setFont
- setCursor
- setTextColor
- setTextWrap
Adafruit_SSD1306绘制类方法包括:
- drawPixel——绘制像素点
- drawFastHLine——绘制水平线
- drawFastVLine——绘制垂直线
- startscrollright
- startscrollleft
- startscrolldiagright
- startscrolldiagleft
- stopscroll
3.3.1 drawPixel —— 绘制像素点
函数说明:
/*!
    @brief  Set(设置)/clear(清除)/invert(反转) a single pixel. This is also invoked by the
            Adafruit_GFX library in generating many higher-level graphics
            primitives.
    @param  x(x坐标,列坐标)
            Column of display -- 0 at left to (screen width - 1) at right.
    @param  y(y坐标,行坐标)
            Row of display -- 0 at top to (screen height -1) at bottom.
    @param  color(绘制颜色)
            Pixel color, one of: SSD1306_BLACK, SSD1306_WHITE or SSD1306_INVERT.
    @return None (void).
    @note   Changes buffer contents only, no immediate effect on display.
            Follow up with a call to display(), or with other graphics
            commands as needed by one's own application.
*/
void Adafruit_SSD1306::drawPixel(int16_t x, int16_t y, uint16_t color) {
  if((x >= 0) && (x < width()) && (y >= 0) && (y < height())) {
    // Pixel is in-bounds. Rotate coordinates if needed.
    // 判断旋转角度
    switch(getRotation()) {
     case 1:
      ssd1306_swap(x, y);
      x = WIDTH - x - 1;
      break;
     case 2:
      x = WIDTH  - x - 1;
      y = HEIGHT - y - 1;
      break;
     case 3:
      ssd1306_swap(x, y);
      y = HEIGHT - y - 1;
      break;
    }
    switch(color) {
     //修改对应的buffer
     case SSD1306_WHITE:   buffer[x + (y/8)*WIDTH] |=  (1 << (y&7)); break;
     case SSD1306_BLACK:   buffer[x + (y/8)*WIDTH] &= ~(1 << (y&7)); break;
     case SSD1306_INVERSE: buffer[x + (y/8)*WIDTH] ^=  (1 << (y&7)); break;
    }
  }
}注意点:
- 此方法只是改变arduino上的buffer缓存,并不会显示在display上面;
3.3.2 drawFastHLine —— 绘制水平线
函数说明:
/*!
    绘制一条水平线,x,y为出发点,w为长度,color为颜色
    @brief  Draw a horizontal line. This is also invoked by the Adafruit_GFX
            library in generating many higher-level graphics primitives.
    @param  x
            Leftmost column -- 0 at left to (screen width - 1) at right.
    @param  y
            Row of display -- 0 at top to (screen height -1) at bottom.
    @param  w
            Width of line, in pixels.
    @param  color
            Line color, one of: SSD1306_BLACK, SSD1306_WHITE or SSD1306_INVERT.
    @return None (void).
    @note   Changes buffer contents only, no immediate effect on display.
            Follow up with a call to display(), or with other graphics
            commands as needed by one's own application.
*/
void Adafruit_SSD1306::drawFastHLine(
  int16_t x, int16_t y, int16_t w, uint16_t color) {
  boolean bSwap = false;
  switch(rotation) {
   case 1:
    // 90 degree rotation, swap x & y for rotation, then invert x
    bSwap = true;
    ssd1306_swap(x, y);
    x = WIDTH - x - 1;
    break;
   case 2:
    // 180 degree rotation, invert x and y, then shift y around for height.
    x  = WIDTH  - x - 1;
    y  = HEIGHT - y - 1;
    x -= (w-1);
    break;
   case 3:
    // 270 degree rotation, swap x & y for rotation,
    // then invert y and adjust y for w (not to become h)
    bSwap = true;
    ssd1306_swap(x, y);
    y  = HEIGHT - y - 1;
    y -= (w-1);
    break;
  }
  // 这里才是真正的绘制方法 因为涉及到旋转角度,如果旋转了90度意味着变成了竖直线
  if(bSwap) drawFastVLineInternal(x, y, w, color);
  else      drawFastHLineInternal(x, y, w, color);
}

/**
 * 绘制水平线
 */
void Adafruit_SSD1306::drawFastHLineInternal(
  int16_t x, int16_t y, int16_t w, uint16_t color) {
   //判断y是不是在有效范围
  if((y >= 0) && (y < HEIGHT)) { // Y coord in bounds?
    //裁剪左边,重新计算宽度
    if(x < 0) { // Clip left
      w += x;
      x  = 0;
    }
    //裁剪右边 重新计算宽度
    if((x + w) > WIDTH) { // Clip right
      w = (WIDTH - x);
    }
    // 处理buffer缓冲区数据
    if(w > 0) { // Proceed only if width is positive
      uint8_t *pBuf = &buffer[(y / 8) * WIDTH + x],
               mask = 1 << (y & 7);
      switch(color) {
       case SSD1306_WHITE:               while(w--) { *pBuf++ |= mask; }; break;
       case SSD1306_BLACK: mask = ~mask; while(w--) { *pBuf++ &= mask; }; break;
       case SSD1306_INVERSE:             while(w--) { *pBuf++ ^= mask; }; break;
      }
    }
  }
}
3.3.3 drawFastVLine—— 绘制竖直线
函数说明:
/*!
    绘制一条竖直线,x,y表示起点,h表示高度,color表示颜色
    @brief  Draw a vertical line. This is also invoked by the Adafruit_GFX
            library in generating many higher-level graphics primitives.
    @param  x
            Column of display -- 0 at left to (screen width -1) at right.
    @param  y
            Topmost row -- 0 at top to (screen height - 1) at bottom.
    @param  h
            Height of line, in pixels.
    @param  color
            Line color, one of: SSD1306_BLACK, SSD1306_WHITE or SSD1306_INVERT.
    @return None (void).
    @note   Changes buffer contents only, no immediate effect on display.
            Follow up with a call to display(), or with other graphics
            commands as needed by one's own application.
*/
void Adafruit_SSD1306::drawFastVLine(
  int16_t x, int16_t y, int16_t h, uint16_t color) {
  boolean bSwap = false;
  switch(rotation) {
   case 1:
    // 90 degree rotation, swap x & y for rotation,
    // then invert x and adjust x for h (now to become w)
    bSwap = true;
    ssd1306_swap(x, y);
    x  = WIDTH - x - 1;
    x -= (h-1);
    break;
   case 2:
    // 180 degree rotation, invert x and y, then shift y around for height.
    x = WIDTH  - x - 1;
    y = HEIGHT - y - 1;
    y -= (h-1);
    break;
   case 3:
    // 270 degree rotation, swap x & y for rotation, then invert y
    bSwap = true;
    ssd1306_swap(x, y);
    y = HEIGHT - y - 1;
    break;
  }
  //判断是否有旋转角度 旋转90或者270度表示变成水平线了
  if(bSwap) drawFastHLineInternal(x, y, h, color);
  else      drawFastVLineInternal(x, y, h, color);
}

/**
 * 绘制竖直线
 */
void Adafruit_SSD1306::drawFastVLineInternal(
  int16_t x, int16_t __y, int16_t __h, uint16_t color) {
  //判断x点的有效位置
  if((x >= 0) && (x < WIDTH)) { // X coord in bounds?
   //裁剪顶部 计算高度
    if(__y < 0) { // Clip top
      __h += __y;
      __y = 0;
    }
    //裁剪底部 计算高度
    if((__y + __h) > HEIGHT) { // Clip bottom
      __h = (HEIGHT - __y);
    }
    if(__h > 0) { // Proceed only if height is now positive
      // this display doesn't need ints for coordinates,
      // use local byte registers for faster juggling
      uint8_t  y = __y, h = __h;
      uint8_t *pBuf = &buffer[(y / 8) * WIDTH + x];

      // do the first partial byte, if necessary - this requires some masking
      uint8_t mod = (y & 7);
      if(mod) {
        // mask off the high n bits we want to set
        mod = 8 - mod;
        // note - lookup table results in a nearly 10% performance
        // improvement in fill* functions
        // uint8_t mask = ~(0xFF >> mod);
        static const uint8_t PROGMEM premask[8] =
          { 0x00, 0x80, 0xC0, 0xE0, 0xF0, 0xF8, 0xFC, 0xFE };
        uint8_t mask = pgm_read_byte(&premask[mod]);
        // adjust the mask if we're not going to reach the end of this byte
        if(h < mod) mask &= (0XFF >> (mod - h));

        switch(color) {
         case SSD1306_WHITE:   *pBuf |=  mask; break;
         case SSD1306_BLACK:   *pBuf &= ~mask; break;
         case SSD1306_INVERSE: *pBuf ^=  mask; break;
        }
        pBuf += WIDTH;
      }

      if(h >= mod) { // More to go?
        h -= mod;
        // Write solid bytes while we can - effectively 8 rows at a time
        if(h >= 8) {
          if(color == SSD1306_INVERSE) {
            // separate copy of the code so we don't impact performance of
            // black/white write version with an extra comparison per loop
            do {
              *pBuf ^= 0xFF;  // Invert byte
              pBuf  += WIDTH; // Advance pointer 8 rows
              h     -= 8;     // Subtract 8 rows from height
            } while(h >= 8);
          } else {
            // store a local value to work with
            uint8_t val = (color != SSD1306_BLACK) ? 255 : 0;
            do {
              *pBuf = val;    // Set byte
              pBuf += WIDTH;  // Advance pointer 8 rows
              h    -= 8;      // Subtract 8 rows from height
            } while(h >= 8);
          }
        }

        if(h) { // Do the final partial byte, if necessary
          mod = h & 7;
          // this time we want to mask the low bits of the byte,
          // vs the high bits we did above
          // uint8_t mask = (1 << mod) - 1;
          // note - lookup table results in a nearly 10% performance
          // improvement in fill* functions
          static const uint8_t PROGMEM postmask[8] =
            { 0x00, 0x01, 0x03, 0x07, 0x0F, 0x1F, 0x3F, 0x7F };
          uint8_t mask = pgm_read_byte(&postmask[mod]);
          switch(color) {
           case SSD1306_WHITE:   *pBuf |=  mask; break;
           case SSD1306_BLACK:   *pBuf &= ~mask; break;
           case SSD1306_INVERSE: *pBuf ^=  mask; break;
          }
        }
      }
    } // endif positive height
  } // endif x in bounds
}
3.3.4 drawLine—— 绘制线
函数说明:
/**************************************************************************/
/*!
   @brief    Draw a line(绘制一条线)
    @param    x0  Start point x coordinate
    @param    y0  Start point y coordinate
    @param    x1  End point x coordinate
    @param    y1  End point y coordinate
    @param    color 16-bit 5-6-5 Color to draw with
*/
/**************************************************************************/
void Adafruit_GFX::drawLine(int16_t x0, int16_t y0, int16_t x1, int16_t y1,
        uint16_t color) {
    // Update in subclasses if desired!
    if(x0 == x1){
        //竖直线
        // 交换数据 尽可能从上到下画
        if(y0 > y1) _swap_int16_t(y0, y1);
        drawFastVLine(x0, y0, y1 - y0 + 1, color);
    } else if(y0 == y1){
        //水平线
        // 交换数据 尽可能从左到右画
        if(x0 > x1) _swap_int16_t(x0, x1);
        drawFastHLine(x0, y0, x1 - x0 + 1, color);
    } else {
        //随意两点成线
        startWrite();
        writeLine(x0, y0, x1, y1, color);
        endWrite();
    }
}

/**************************************************************************/
/*!
   核心绘制线方法,核心在于线路算法
   @brief    Write a line.  Bresenham's algorithm - thx wikpedia
    @param    x0  Start point x coordinate
    @param    y0  Start point y coordinate
    @param    x1  End point x coordinate
    @param    y1  End point y coordinate
    @param    color 16-bit 5-6-5 Color to draw with
*/
/**************************************************************************/
void Adafruit_GFX::writeLine(int16_t x0, int16_t y0, int16_t x1, int16_t y1,
        uint16_t color) {
#if defined(ESP8266)
    yield();
#endif
    // 判断线的角度,看看是不是偏y轴
    int16_t steep = abs(y1 - y0) > abs(x1 - x0);
    if (steep) {
        _swap_int16_t(x0, y0);
        _swap_int16_t(x1, y1);
    }

    if (x0 > x1) {
        _swap_int16_t(x0, x1);
        _swap_int16_t(y0, y1);
    }

    int16_t dx, dy;
    dx = x1 - x0;
    dy = abs(y1 - y0);

    int16_t err = dx / 2;
    int16_t ystep;
    //因为考虑到像素点 不可能做到真的是一条直线
    if (y0 < y1) {
        ystep = 1;
    } else {
        ystep = -1;
    }

    for (; x0<=x1; x0++) {
        if (steep) {
            //最终都要调用到核心方法 writePixel
            writePixel(y0, x0, color);
        } else {
            writePixel(x0, y0, color);
        }
        err -= dy;
        if (err < 0) {
            y0 += ystep;
            err += dx;
        }
    }
}

/**************************************************************************/
/*!
   绘制点核心方法,由子类实现
   @brief    Write a pixel, overwrite in subclasses if startWrite is defined!
    @param   x   x coordinate
    @param   y   y coordinate
   @param    color 16-bit 5-6-5 Color to fill with
*/
/**************************************************************************/
void Adafruit_GFX::writePixel(int16_t x, int16_t y, uint16_t color){
    drawPixel(x, y, color);
}
3.3.5 drawRect—— 绘制空心方形
函数说明:
/**************************************************************************/
/*!
   方形主要由四条边组成
   @brief   Draw a rectangle with no fill color
    @param    x   Top left corner x coordinate
    @param    y   Top left corner y coordinate
    @param    w   Width in pixels
    @param    h   Height in pixels
    @param    color 16-bit 5-6-5 Color to draw with
*/
/**************************************************************************/
void Adafruit_GFX::drawRect(int16_t x, int16_t y, int16_t w, int16_t h,
        uint16_t color) {
    startWrite();
    writeFastHLine(x, y, w, color);
    writeFastHLine(x, y+h-1, w, color);
    writeFastVLine(x, y, h, color);
    writeFastVLine(x+w-1, y, h, color);
    endWrite();
}注意点:
- 主要应用了绘制线方法 writeFastHLine 和 writeFastVLine;
3.3.6 fillRect—— 绘制实心方形
函数说明:
/**************************************************************************/
/*!
   绘制实心方形,代码非常巧妙,一行行调用 writeFastVLine即可
   @brief    Fill a rectangle completely with one color. Update in subclasses if desired!
    @param    x   Top left corner x coordinate
    @param    y   Top left corner y coordinate
    @param    w   Width in pixels
    @param    h   Height in pixels
   @param    color 16-bit 5-6-5 Color to fill with
*/
/**************************************************************************/
void Adafruit_GFX::fillRect(int16_t x, int16_t y, int16_t w, int16_t h,
        uint16_t color) {
    startWrite();
    for (int16_t i=x; i<x+w; i++) {
        writeFastVLine(i, y, h, color);
    }
    endWrite();
}
3.3.7 fillScreen—— 绘制填充整个屏幕
函数说明:
/**************************************************************************/
/*!
   填充屏幕
   @brief    Fill the screen completely with one color. Update in subclasses if desired!
    @param    color 16-bit 5-6-5 Color to fill with
*/
/**************************************************************************/
void Adafruit_GFX::fillScreen(uint16_t color) {
    //其实就是调用fillRect 一行行去填充 最终全部填充
    fillRect(0, 0, _width, _height, color);
}
3.3.8 drawCircle—— 绘制空心圆
函数说明:
/**************************************************************************/
/*!
   绘制空心圆,x0,y0为圆点,r为半径
   @brief    Draw a circle outline
    @param    x0   Center-point x coordinate
    @param    y0   Center-point y coordinate
    @param    r   Radius of circle
    @param    color 16-bit 5-6-5 Color to draw with
*/
/**************************************************************************/
void Adafruit_GFX::drawCircle(int16_t x0, int16_t y0, int16_t r,
        uint16_t color) {
#if defined(ESP8266)
    yield();
#endif
    int16_t f = 1 - r;
    int16_t ddF_x = 1;
    int16_t ddF_y = -2 * r;
    int16_t x = 0;
    int16_t y = r;

    startWrite();
    // 先画好圆的四个关键点 上下左右
    writePixel(x0  , y0+r, color);
    writePixel(x0  , y0-r, color);
    writePixel(x0+r, y0  , color);
    writePixel(x0-r, y0  , color);
    // 以下算法没看懂 应该数学公式走起。。。。
    while (x<y) {
        if (f >= 0) {
            y--;
            ddF_y += 2;
            f += ddF_y;
        }
        x++;
        ddF_x += 2;
        f += ddF_x;

        writePixel(x0 + x, y0 + y, color);
        writePixel(x0 - x, y0 + y, color);
        writePixel(x0 + x, y0 - y, color);
        writePixel(x0 - x, y0 - y, color);
        writePixel(x0 + y, y0 + x, color);
        writePixel(x0 - y, y0 + x, color);
        writePixel(x0 + y, y0 - x, color);
        writePixel(x0 - y, y0 - x, color);
    }
    endWrite();
}
3.3.9 fillCircle—— 绘制实心圆
函数说明:
/**************************************************************************/
/*!
   @brief    Draw a circle with filled color
    @param    x0   Center-point x coordinate
    @param    y0   Center-point y coordinate
    @param    r   Radius of circle
    @param    color 16-bit 5-6-5 Color to fill with
*/
/**************************************************************************/
void Adafruit_GFX::fillCircle(int16_t x0, int16_t y0, int16_t r,
        uint16_t color) {
    startWrite();
    writeFastVLine(x0, y0-r, 2*r+1, color);
    fillCircleHelper(x0, y0, r, 3, 0, color);
    endWrite();
}
3.3.10 drawTriangle—— 绘制空心三角形
函数说明:
/**************************************************************************/
/*!
   @brief   Draw a triangle with no fill color
    @param    x0  Vertex #0 x coordinate
    @param    y0  Vertex #0 y coordinate
    @param    x1  Vertex #1 x coordinate
    @param    y1  Vertex #1 y coordinate
    @param    x2  Vertex #2 x coordinate
    @param    y2  Vertex #2 y coordinate
    @param    color 16-bit 5-6-5 Color to draw with
*/
/**************************************************************************/
void Adafruit_GFX::drawTriangle(int16_t x0, int16_t y0,
        int16_t x1, int16_t y1, int16_t x2, int16_t y2, uint16_t color) {
    //两两顶点连成一条线,就是空心三角形
    drawLine(x0, y0, x1, y1, color);
    drawLine(x1, y1, x2, y2, color);
    drawLine(x2, y2, x0, y0, color);
}
3.3.11 fillTriangle—— 绘制实心三角形
函数说明:
/**************************************************************************/
/*!
   @brief     Draw a triangle with color-fill
    @param    x0  Vertex #0 x coordinate
    @param    y0  Vertex #0 y coordinate
    @param    x1  Vertex #1 x coordinate
    @param    y1  Vertex #1 y coordinate
    @param    x2  Vertex #2 x coordinate
    @param    y2  Vertex #2 y coordinate
    @param    color 16-bit 5-6-5 Color to fill/draw with
*/
/**************************************************************************/
void Adafruit_GFX::fillTriangle(int16_t x0, int16_t y0,
        int16_t x1, int16_t y1, int16_t x2, int16_t y2, uint16_t color) {

    int16_t a, b, y, last;

    // Sort coordinates by Y order (y2 >= y1 >= y0)
    if (y0 > y1) {
        _swap_int16_t(y0, y1); _swap_int16_t(x0, x1);
    }
    if (y1 > y2) {
        _swap_int16_t(y2, y1); _swap_int16_t(x2, x1);
    }
    if (y0 > y1) {
        _swap_int16_t(y0, y1); _swap_int16_t(x0, x1);
    }

    startWrite();
    if(y0 == y2) { // Handle awkward all-on-same-line case as its own thing
        a = b = x0;
        if(x1 < a)      a = x1;
        else if(x1 > b) b = x1;
        if(x2 < a)      a = x2;
        else if(x2 > b) b = x2;
        writeFastHLine(a, y0, b-a+1, color);
        endWrite();
        return;
    }

    int16_t
    dx01 = x1 - x0,
    dy01 = y1 - y0,
    dx02 = x2 - x0,
    dy02 = y2 - y0,
    dx12 = x2 - x1,
    dy12 = y2 - y1;
    int32_t
    sa   = 0,
    sb   = 0;

    // For upper part of triangle, find scanline crossings for segments
    // 0-1 and 0-2.  If y1=y2 (flat-bottomed triangle), the scanline y1
    // is included here (and second loop will be skipped, avoiding a /0
    // error there), otherwise scanline y1 is skipped here and handled
    // in the second loop...which also avoids a /0 error here if y0=y1
    // (flat-topped triangle).
    if(y1 == y2) last = y1;   // Include y1 scanline
    else         last = y1-1; // Skip it

    for(y=y0; y<=last; y++) {
        a   = x0 + sa / dy01;
        b   = x0 + sb / dy02;
        sa += dx01;
        sb += dx02;
        /* longhand:
        a = x0 + (x1 - x0) * (y - y0) / (y1 - y0);
        b = x0 + (x2 - x0) * (y - y0) / (y2 - y0);
        */
        if(a > b) _swap_int16_t(a,b);
        writeFastHLine(a, y, b-a+1, color);
    }

    // For lower part of triangle, find scanline crossings for segments
    // 0-2 and 1-2.  This loop is skipped if y1=y2.
    sa = (int32_t)dx12 * (y - y1);
    sb = (int32_t)dx02 * (y - y0);
    for(; y<=y2; y++) {
        a   = x1 + sa / dy12;
        b   = x0 + sb / dy02;
        sa += dx12;
        sb += dx02;
        /* longhand:
        a = x1 + (x2 - x1) * (y - y1) / (y2 - y1);
        b = x0 + (x2 - x0) * (y - y0) / (y2 - y0);
        */
        if(a > b) _swap_int16_t(a,b);
        writeFastHLine(a, y, b-a+1, color);
    }
    endWrite();
}
3.3.12 drawRoundRect—— 绘制空心圆角矩形
函数说明:
/*!
   @brief   Draw a rounded rectangle with no fill color
    @param    x   Top left corner x coordinate
    @param    y   Top left corner y coordinate
    @param    w   Width in pixels
    @param    h   Height in pixels
    @param    r   Radius of corner rounding
    @param    color 16-bit 5-6-5 Color to draw with
*/
/**************************************************************************/
void Adafruit_GFX::drawRoundRect(int16_t x, int16_t y, int16_t w,
  int16_t h, int16_t r, uint16_t color) {
    int16_t max_radius = ((w < h) ? w : h) / 2; // 1/2 minor axis
    if(r > max_radius) r = max_radius;
    // smarter version
    // 绘制四条线
    startWrite();
    writeFastHLine(x+r  , y    , w-2*r, color); // Top
    writeFastHLine(x+r  , y+h-1, w-2*r, color); // Bottom
    writeFastVLine(x    , y+r  , h-2*r, color); // Left
    writeFastVLine(x+w-1, y+r  , h-2*r, color); // Right
    // draw four corners
    // 绘制四个圆角边
    drawCircleHelper(x+r    , y+r    , r, 1, color);
    drawCircleHelper(x+w-r-1, y+r    , r, 2, color);
    drawCircleHelper(x+w-r-1, y+h-r-1, r, 4, color);
    drawCircleHelper(x+r    , y+h-r-1, r, 8, color);
    endWrite();
}
3.3.12 fillRoundRect—— 绘制实心圆角矩形
函数说明:
/*!
   @brief   Draw a rounded rectangle with fill color
    @param    x   Top left corner x coordinate
    @param    y   Top left corner y coordinate
    @param    w   Width in pixels
    @param    h   Height in pixels
    @param    r   Radius of corner rounding
    @param    color 16-bit 5-6-5 Color to draw/fill with
*/
/**************************************************************************/
void Adafruit_GFX::fillRoundRect(int16_t x, int16_t y, int16_t w,
  int16_t h, int16_t r, uint16_t color) {
    int16_t max_radius = ((w < h) ? w : h) / 2; // 1/2 minor axis
    if(r > max_radius) r = max_radius;
    // smarter version
    startWrite();
    writeFillRect(x+r, y, w-2*r, h, color);
    // draw four corners
    fillCircleHelper(x+w-r-1, y+r, r, 1, h-2*r-1, color);
    fillCircleHelper(x+r    , y+r, r, 2, h-2*r-1, color);
    endWrite();
}
3.3.13 drawBitmap—— 绘制Bitmap图形
函数说明:
/*!
   绘制一个图形 图形内容从 PROGMEM区来
   @brief      Draw a PROGMEM-resident 1-bit image at the specified (x,y) position, using the specified foreground color (unset bits are transparent).
    @param    x   Top left corner x coordinate(左上顶点x坐标)
    @param    y   Top left corner y coordinate(右上顶点x坐标)
    @param    bitmap  byte array with monochrome bitmap(图形数组)
    @param    w   Width of bitmap in pixels(图形宽度像素点)
    @param    h   Height of bitmap in pixels(图形高度像素点)
    @param    color 16-bit 5-6-5 Color to draw with(如果支持多颜色,设置绘制颜色)
*/
drawBitmap(int16_t x, int16_t y, const uint8_t bitmap[],
      int16_t w, int16_t h, uint16_t color)

/*!
   绘制一个图形 图形内容从 PROGMEM区来
   @brief      Draw a PROGMEM-resident 1-bit image at the specified (x,y) position, using the specified foreground (for set bits) and background (unset bits) colors.
    @param    x   Top left corner x coordinate(左上顶点x坐标)
    @param    y   Top left corner y coordinate(右上顶点x坐标)
    @param    bitmap  byte array with monochrome bitmap(图形数组)
    @param    w   Width of bitmap in pixels(图形宽度像素点)
    @param    h   Height of bitmap in pixels(图形高度像素点)
    @param    color 16-bit 5-6-5 Color to draw pixels with(如果支持多颜色,设置绘制颜色)
    @param    bg 16-bit 5-6-5 Color to draw background with(如果支持,设置图形背景颜色)
*/
drawBitmap(int16_t x, int16_t y, const uint8_t bitmap[],
      int16_t w, int16_t h, uint16_t color, uint16_t bg)

/*!
   绘制图形,图形内容从ram区来
   @brief      Draw a RAM-resident 1-bit image at the specified (x,y) position, using the specified foreground color (unset bits are transparent).
    @param    x   Top left corner x coordinate
    @param    y   Top left corner y coordinate
    @param    bitmap  byte array with monochrome bitmap
    @param    w   Width of bitmap in pixels
    @param    h   Height of bitmap in pixels
    @param    color 16-bit 5-6-5 Color to draw with
*/
drawBitmap(int16_t x, int16_t y, uint8_t *bitmap,
      int16_t w, int16_t h, uint16_t color)

/*!
   绘制图形,图形内容从ram区来
   @brief      Draw a PROGMEM-resident 1-bit image at the specified (x,y) position, using the specified foreground (for set bits) and background (unset bits) colors.
    @param    x   Top left corner x coordinate(左上顶点x坐标)
    @param    y   Top left corner y coordinate(右上顶点x坐标)
    @param    bitmap  byte array with monochrome bitmap(图形数组)
    @param    w   Width of bitmap in pixels(图形宽度像素点)
    @param    h   Height of bitmap in pixels(图形高度像素点)
    @param    color 16-bit 5-6-5 Color to draw pixels with(如果支持多颜色,设置绘制颜色)
    @param    bg 16-bit 5-6-5 Color to draw background with(如果支持,设置图形背景颜色)
*/
drawBitmap(int16_t x, int16_t y, uint8_t *bitmap,
int16_t w, int16_t h, uint16_t color, uint16_t bg),注意点:
- 需要区分 PROGMEM 和 RAM(PROGMEM 区意味着需要使用 pgm_read_byte方法来读取)
3.3.14 drawXBitmap—— 绘制XBitmap图形
函数说明:
/**************************************************************************/
/*!
  绘制XBitmap图形,可以类比 drawBitmap,*.xbm的图形文件,博主也没有用过
   @brief      Draw PROGMEM-resident XBitMap Files (*.xbm), exported from GIMP.
   Usage: Export from GIMP to *.xbm, rename *.xbm to *.c and open in editor.
   C Array can be directly used with this function.
   There is no RAM-resident version of this function; if generating bitmaps
   in RAM, use the format defined by drawBitmap() and call that instead.
    @param    x   Top left corner x coordinate(左上顶点x坐标)
    @param    y   Top left corner y coordinate(右上顶点x坐标)
    @param    bitmap  byte array with monochrome bitmap(图形数组)
    @param    w   Width of bitmap in pixels(图形宽度像素点)
    @param    h   Height of bitmap in pixels(图形高度像素点)
    @param    color 16-bit 5-6-5 Color to draw pixels with
*/
/**************************************************************************/
void Adafruit_GFX::drawXBitmap(int16_t x, int16_t y,
  const uint8_t bitmap[], int16_t w, int16_t h, uint16_t color) {

    int16_t byteWidth = (w + 7) / 8; // Bitmap scanline pad = whole byte
    uint8_t byte = 0;

    startWrite();
    for(int16_t j=0; j<h; j++, y++) {
        for(int16_t i=0; i<w; i++ ) {
            if(i & 7) byte >>= 1;
            else      byte   = pgm_read_byte(&bitmap[j * byteWidth + i / 8]);
            // Nearly identical to drawBitmap(), only the bit order
            // is reversed here (left-to-right = LSB to MSB):
            if(byte & 0x01) writePixel(x+i, y, color);
        }
    }
    endWrite();
}注意点:
- 只有PROGMEM版本
3.3.15 drawChar—— 绘制单个字母
函数说明:
// Draw a character
/**************************************************************************/
/*!
   @brief   Draw a single character
    @param    x   Bottom left corner x coordinate(字母左下角X坐标)
    @param    y   Bottom left corner y coordinate(字母左下角Y坐标)
    @param    c   The 8-bit font-indexed character (likely ascii)(绘制字母)
    @param    color 16-bit 5-6-5 Color to draw chraracter with(绘制颜色)
    @param    bg 16-bit 5-6-5 Color to fill background with (if same as color, no background)(绘制底色)
    @param    size  Font magnification level, 1 is 'original' size)(绘制倍数)
*/
/**************************************************************************/
void Adafruit_GFX::drawChar(int16_t x, int16_t y, unsigned char c,
  uint16_t color, uint16_t bg, uint8_t size) {
    drawChar(x, y, c, color, bg, size, size);
}

// Draw a character
/**************************************************************************/
/*!
   @brief   Draw a single character
    @param    x   Bottom left corner x coordinate(字母左下角X坐标)
    @param    y   Bottom left corner y coordinate(字母左下角Y坐标)
    @param    c   The 8-bit font-indexed character (likely ascii)(绘制字母)
    @param    color 16-bit 5-6-5 Color to draw chraracter with(绘制颜色)
    @param    bg 16-bit 5-6-5 Color to fill background with (if same as color, no background)(绘制底色)
    @param    size_x  Font magnification level in X-axis, 1 is 'original' size
    @param    size_y  Font magnification level in Y-axis, 1 is 'original' size
*/
/**************************************************************************/
void Adafruit_GFX::drawChar(int16_t x, int16_t y, unsigned char c,
  uint16_t color, uint16_t bg, uint8_t size_x, uint8_t size_y) {

    // 判断有没有设置自定义字体,默认是NULL,也就是标准字体
    if(!gfxFont) { // 'Classic' built-in font

        if((x >= _width)            || // Clip right
           (y >= _height)           || // Clip bottom
           ((x + 6 * size_x - 1) < 0) || // Clip left
           ((y + 8 * size_y - 1) < 0))   // Clip top
            return;

        if(!_cp437 && (c >= 176)) c++; // Handle 'classic' charset behavior

        startWrite();
        for(int8_t i=0; i<5; i++ ) { // Char bitmap = 5 columns
            uint8_t line = pgm_read_byte(&font[c * 5 + i]);
            for(int8_t j=0; j<8; j++, line >>= 1) {
                if(line & 1) {
                    if(size_x == 1 && size_y == 1)
                        writePixel(x+i, y+j, color);
                    else
                        writeFillRect(x+i*size_x, y+j*size_y, size_x, size_y, color);
                } else if(bg != color) {
                    if(size_x == 1 && size_y == 1)
                        writePixel(x+i, y+j, bg);
                    else
                        writeFillRect(x+i*size_x, y+j*size_y, size_x, size_y, bg);
                }
            }
        }
        if(bg != color) { // If opaque, draw vertical line for last column
            if(size_x == 1 && size_y == 1) writeFastVLine(x+5, y, 8, bg);
            else          writeFillRect(x+5*size_x, y, size_x, 8*size_y, bg);
        }
        endWrite();

    } else { // Custom font 以下是自定义字体

        // Character is assumed previously filtered by write() to eliminate
        // newlines, returns, non-printable characters, etc.  Calling
        // drawChar() directly with 'bad' characters of font may cause mayhem!

        c -= (uint8_t)pgm_read_byte(&gfxFont->first);
        GFXglyph *glyph  = pgm_read_glyph_ptr(gfxFont, c);
        uint8_t  *bitmap = pgm_read_bitmap_ptr(gfxFont);

        uint16_t bo = pgm_read_word(&glyph->bitmapOffset);
        uint8_t  w  = pgm_read_byte(&glyph->width),
                 h  = pgm_read_byte(&glyph->height);
        int8_t   xo = pgm_read_byte(&glyph->xOffset),
                 yo = pgm_read_byte(&glyph->yOffset);
        uint8_t  xx, yy, bits = 0, bit = 0;
        int16_t  xo16 = 0, yo16 = 0;

        if(size_x > 1 || size_y > 1) {
            xo16 = xo;
            yo16 = yo;
        }

        // Todo: Add character clipping here

        // NOTE: THERE IS NO 'BACKGROUND' COLOR OPTION ON CUSTOM FONTS.
        // THIS IS ON PURPOSE AND BY DESIGN.  The background color feature
        // has typically been used with the 'classic' font to overwrite old
        // screen contents with new data.  This ONLY works because the
        // characters are a uniform size; it's not a sensible thing to do with
        // proportionally-spaced fonts with glyphs of varying sizes (and that
        // may overlap).  To replace previously-drawn text when using a custom
        // font, use the getTextBounds() function to determine the smallest
        // rectangle encompassing a string, erase the area with fillRect(),
        // then draw new text.  This WILL infortunately 'blink' the text, but
        // is unavoidable.  Drawing 'background' pixels will NOT fix this,
        // only creates a new set of problems.  Have an idea to work around
        // this (a canvas object type for MCUs that can afford the RAM and
        // displays supporting setAddrWindow() and pushColors()), but haven't
        // implemented this yet.

        startWrite();
        for(yy=0; yy<h; yy++) {
            for(xx=0; xx<w; xx++) {
                if(!(bit++ & 7)) {
                    bits = pgm_read_byte(&bitmap[bo++]);
                }
                if(bits & 0x80) {
                    if(size_x == 1 && size_y == 1) {
                        writePixel(x+xo+xx, y+yo+yy, color);
                    } else {
                        writeFillRect(x+(xo16+xx)*size_x, y+(yo16+yy)*size_y,
                          size_x, size_y, color);
                    }
                }
                bits <<= 1;
            }
        }
        endWrite();

    } // End classic vs custom font
}注意点:
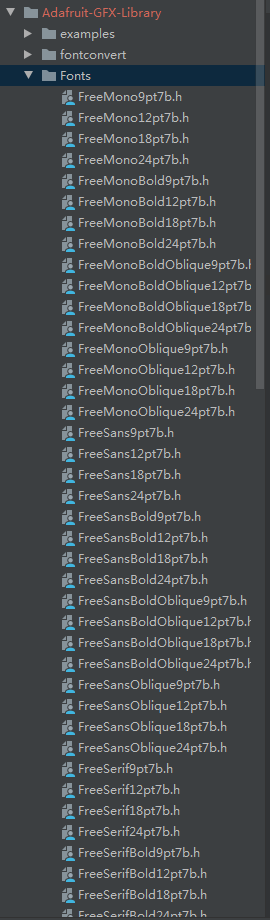
- 目前支持的字体全在这里:
具体什么效果,得一个个去试试了。
3.3.16 getTextBounds—— 绘制单个字母
函数说明:
/**************************************************************************/
/*!
    计算字符串在当前字体大小下的像素大小,返回左上角坐标以及宽度高度像素值
    @brief    Helper to determine size of a string with current font/size. Pass string and a cursor position, returns UL corner and W,H.
    @param    str    The ascii string to measure (as an arduino String() class)
    @param    x      The current cursor X
    @param    y      The current cursor Y
    @param    x1     The boundary X coordinate, set by function
    @param    y1     The boundary Y coordinate, set by function
    @param    w      The boundary width, set by function
    @param    h      The boundary height, set by function
*/
/**************************************************************************/
void Adafruit_GFX::getTextBounds(const String &str, int16_t x, int16_t y,
        int16_t *x1, int16_t *y1, uint16_t *w, uint16_t *h)

/**************************************************************************/
/*!
    计算字符串在当前字体大小下的像素大小,返回左上角坐标以及宽度高度像素值,针对PROGMEM 字符串
    @brief    Helper to determine size of a PROGMEM string with current font/size. Pass string and a cursor position, returns UL corner and W,H.
    @param    str     The flash-memory ascii string to measure
    @param    x       The current cursor X
    @param    y       The current cursor Y
    @param    x1      The boundary X coordinate, set by function
    @param    y1      The boundary Y coordinate, set by function
    @param    w      The boundary width, set by function
    @param    h      The boundary height, set by function
*/
/**************************************************************************/
void Adafruit_GFX::getTextBounds(const __FlashStringHelper *str,
        int16_t x, int16_t y, int16_t *x1, int16_t *y1, uint16_t *w, uint16_t *h)
3.3.17 setTextSize—— 设置字体大小
函数说明:
/**************************************************************************/
/*!
    @brief   Set text 'magnification' size. Each increase in s makes 1 pixel that much bigger.
    @param  s  Desired text size. 1 is default 6x8, 2 is 12x16, 3 is 18x24, etc
*/
/**************************************************************************/
void Adafruit_GFX::setTextSize(uint8_t s) {
    setTextSize(s, s);
}

/**************************************************************************/
/*!
    @brief   Set text 'magnification' size. Each increase in s makes 1 pixel that much bigger.
    @param  s_x  Desired text width magnification level in X-axis. 1 is default
    @param  s_y  Desired text width magnification level in Y-axis. 1 is default
*/
/**************************************************************************/
void Adafruit_GFX::setTextSize(uint8_t s_x, uint8_t s_y) {
    textsize_x = (s_x > 0) ? s_x : 1;
    textsize_y = (s_y > 0) ? s_y : 1;
}
3.3.18 setFont—— 设置字体
函数说明:
/**************************************************************************/
/*!
    @brief Set the font to display when print()ing, either custom or default
    @param  f  The GFXfont object, if NULL use built in 6x8 font
*/
/**************************************************************************/
void Adafruit_GFX::setFont(const GFXfont *f) {
    if(f) {            // Font struct pointer passed in?
        if(!gfxFont) { // And no current font struct?
            // Switching from classic to new font behavior.
            // Move cursor pos down 6 pixels so it's on baseline.
            cursor_y += 6;
        }
    } else if(gfxFont) { // NULL passed.  Current font struct defined?
        // Switching from new to classic font behavior.
        // Move cursor pos up 6 pixels so it's at top-left of char.
        cursor_y -= 6;
    }
    gfxFont = (GFXfont *)f;
}
3.3.19 setCursor—— 设置光标位置
函数说明:
/**********************************************************************/
  /*!
    @brief  Set text cursor location
    @param  x    X coordinate in pixels
    @param  y    Y coordinate in pixels
  */
  /**********************************************************************/
  void setCursor(int16_t x, int16_t y) { cursor_x = x; cursor_y = y; }
3.3.20 setTextColor—— 设置字体颜色
函数说明:
/**********************************************************************/
  /*!
    @brief   Set text font color with transparant background
    @param   c   16-bit 5-6-5 Color to draw text with(字体绘制颜色)
    @note    For 'transparent' background, background and foreground
             are set to same color rather than using a separate flag.
  */
  /**********************************************************************/
  void setTextColor(uint16_t c) { textcolor = textbgcolor = c; }

  /**********************************************************************/
  /*!
    @brief   Set text font color with custom background color
    @param   c   16-bit 5-6-5 Color to draw text with
    @param   bg  16-bit 5-6-5 Color to draw background/fill with(字体背景颜色)
  */
  /**********************************************************************/
  void setTextColor(uint16_t c, uint16_t bg) {
    textcolor   = c;
    textbgcolor = bg;
  }
3.3.21 setTextWrap—— 设置是否自动换行
函数说明:
/**********************************************************************/
  //当字符串太长以致一行无法显示,是否自动换行
  /*!
  @brief  Set whether text that is too long for the screen width should
          automatically wrap around to the next line (else clip right).
  @param  w  true for wrapping, false for clipping
  */
  /**********************************************************************/
  void setTextWrap(boolean w) { wrap = w; }
3.4 屏幕参数类方法
3.4.1 width——获取屏幕宽度
函数说明:
/************************************************************************/
  /*!
    @brief      Get width of the display, accounting for current rotation
    @returns    Width in pixels
  */
  /************************************************************************/
int16_t width(void) const { return _width; };注意点:
- WIDTH、HEIGHT是屏幕的原始宽高度,_width、_height跟屏幕当前旋转角度有关。
3.4.2 height——获取屏幕高度
函数说明:
/************************************************************************/
  /*!
    @brief      Get height of the display, accounting for current rotation
    @returns    Height in pixels
  */
  /************************************************************************/
  int16_t height(void) const { return _height; }
3.4.3 getRotation——获取屏幕旋转角度
函数说明:
/************************************************************************/
  /*!
    @brief      Get rotation setting for display
    @returns    0 thru 3 corresponding to 4 cardinal rotations
  */
  /************************************************************************/
  uint8_t getRotation(void) const { return rotation; }
3.4.4 getCursorX——获取text光标X坐标
函数说明:
// get current cursor position (get rotation safe maximum values,
  // using: width() for x, height() for y)
  /************************************************************************/
  /*!
    @brief  Get text cursor X location
    @returns    X coordinate in pixels
  */
  /************************************************************************/
  int16_t getCursorX(void) const { return cursor_x; }
3.4.5 getCursorY——获取text光标Y坐标
函数说明:
/************************************************************************/
  /*!
    @brief      Get text cursor Y location
    @returns    Y coordinate in pixels
  */
  /************************************************************************/
  int16_t getCursorY(void) const { return cursor_y; };
3.5 滚动类方法
3.5.1 startscrollright —— 滚动到右边
函数说明:
/*!
    触发一个滚动部分或者整个屏幕内容到右边
    @brief  Activate a right-handed scroll for all or part of the display.
    @param  start(设置滚动的第一行)
            First row.
    @param  stop(设置滚动的最后一行)
            Last row.
    @return None (void).
*/
// To scroll the whole display, run: display.startscrollright(0x00, 0x0F)
void Adafruit_SSD1306::startscrollright(uint8_t start, uint8_t stop) {
  TRANSACTION_START
  static const uint8_t PROGMEM scrollList1a[] = {
    SSD1306_RIGHT_HORIZONTAL_SCROLL,
    0X00 };
  ssd1306_commandList(scrollList1a, sizeof(scrollList1a));
  ssd1306_command1(start);
  ssd1306_command1(0X00);
  ssd1306_command1(stop);
  static const uint8_t PROGMEM scrollList1b[] = {
    0X00,
    0XFF,
    SSD1306_ACTIVATE_SCROLL };
  ssd1306_commandList(scrollList1b, sizeof(scrollList1b));
  TRANSACTION_END
}
3.5.2 startscrollleft—— 滚动到左边
函数说明:
/*!
    触发一个滚动部分或者整个屏幕内容到左边
    @brief  Activate a right-handed scroll for all or part of the display.
    @param  start(设置滚动的第一行)
            First row.
    @param  stop(设置滚动的最后一行)
            Last row.
    @return None (void).
*/
// To scroll the whole display, run: display.startscrollleft(0x00, 0x0F)
void Adafruit_SSD1306::startscrollleft(uint8_t start, uint8_t stop) {
  TRANSACTION_START
  static const uint8_t PROGMEM scrollList2a[] = {
    SSD1306_LEFT_HORIZONTAL_SCROLL,
    0X00 };
  ssd1306_commandList(scrollList2a, sizeof(scrollList2a));
  ssd1306_command1(start);
  ssd1306_command1(0X00);
  ssd1306_command1(stop);
  static const uint8_t PROGMEM scrollList2b[] = {
    0X00,
    0XFF,
    SSD1306_ACTIVATE_SCROLL };
  ssd1306_commandList(scrollList2b, sizeof(scrollList2b));
  TRANSACTION_END
}
3.5.3 startscrolldiagright—— 沿着对角线滚动到右边
函数说明:
/*!
    触发一个对角线滚动部分或者整个屏幕内容到右边
    @brief  Activate a diagonal scroll for all or part of the display.
    @param  start(设置滚动的第一行)
            First row.
    @param  stop(设置滚动的最后一行)
            Last row.
    @return None (void).
*/
// display.startscrolldiagright(0x00, 0x0F)
void Adafruit_SSD1306::startscrolldiagright(uint8_t start, uint8_t stop) {
  TRANSACTION_START
  static const uint8_t PROGMEM scrollList3a[] = {
    SSD1306_SET_VERTICAL_SCROLL_AREA,
    0X00 };
  ssd1306_commandList(scrollList3a, sizeof(scrollList3a));
  ssd1306_command1(HEIGHT);
  static const uint8_t PROGMEM scrollList3b[] = {
    SSD1306_VERTICAL_AND_RIGHT_HORIZONTAL_SCROLL,
    0X00 };
  ssd1306_commandList(scrollList3b, sizeof(scrollList3b));
  ssd1306_command1(start);
  ssd1306_command1(0X00);
  ssd1306_command1(stop);
  static const uint8_t PROGMEM scrollList3c[] = {
    0X01,
    SSD1306_ACTIVATE_SCROLL };
  ssd1306_commandList(scrollList3c, sizeof(scrollList3c));
  TRANSACTION_END
}
3.5.4 startscrolldiagleft—— 沿着对角线滚动到左边
函数说明:
/*!
    触发一个对角线滚动部分或者整个屏幕内容到左边
    @brief  Activate alternate diagonal scroll for all or part of the display.
    @param  start(设置滚动的第一行)
            First row.
    @param  stop(设置滚动的最后一行)
            Last row.
    @return None (void).
*/
// To scroll the whole display, run: display.startscrolldiagleft(0x00, 0x0F)
void Adafruit_SSD1306::startscrolldiagleft(uint8_t start, uint8_t stop) {
  TRANSACTION_START
  static const uint8_t PROGMEM scrollList4a[] = {
    SSD1306_SET_VERTICAL_SCROLL_AREA,
    0X00 };
  ssd1306_commandList(scrollList4a, sizeof(scrollList4a));
  ssd1306_command1(HEIGHT);
  static const uint8_t PROGMEM scrollList4b[] = {
    SSD1306_VERTICAL_AND_LEFT_HORIZONTAL_SCROLL,
    0X00 };
  ssd1306_commandList(scrollList4b, sizeof(scrollList4b));
  ssd1306_command1(start);
  ssd1306_command1(0X00);
  ssd1306_command1(stop);
  static const uint8_t PROGMEM scrollList4c[] = {
    0X01,
    SSD1306_ACTIVATE_SCROLL };
  ssd1306_commandList(scrollList4c, sizeof(scrollList4c));
  TRANSACTION_END
}
3.5.5 stopscroll—— 停止滚动
函数说明:
/*!
    @brief  Cease a previously-begun scrolling action.
    @return None (void).
*/
void Adafruit_SSD1306::stopscroll(void) {
  TRANSACTION_START
  ssd1306_command1(SSD1306_DEACTIVATE_SCROLL);
  TRANSACTION_END
}
4.实例操作
使用Adafruit_SSD1306库分为三个步骤:
- 初始化OLED —— 调用构造函数、调用begin
- 初始化成功后,调用绘制类函数,当然可以设置颜色、字体等
- 绘制完毕,调用显示类函数display
4.1 实例一——官方测试用例
具体代码:
/**************************************************************************
 This is an example for our Monochrome OLEDs based on SSD1306 drivers

 Pick one up today in the adafruit shop!
 ------> http://www.adafruit.com/category/63_98

 This example is for a 128x32 pixel display using I2C to communicate
 3 pins are required to interface (two I2C and one reset).

 Adafruit invests time and resources providing this open
 source code, please support Adafruit and open-source
 hardware by purchasing products from Adafruit!

 Written by Limor Fried/Ladyada for Adafruit Industries,
 with contributions from the open source community.
 BSD license, check license.txt for more information
 All text above, and the splash screen below must be
 included in any redistribution.
 **************************************************************************/

#include <SPI.h>
#include <Wire.h>
#include <Adafruit_GFX.h>
#include <Adafruit_SSD1306.h>

// 这里的屏幕是128X64 SSD1306
#define SCREEN_WIDTH 128 // OLED display width, in pixels
#define SCREEN_HEIGHT 64 // OLED display height, in pixels

// Declaration for an SSD1306 display connected to I2C (SDA, SCL pins)
#define OLED_RESET     4 // Reset pin # (or -1 if sharing Arduino reset pin)
// 构造类函数 IIC版本
Adafruit_SSD1306 display(SCREEN_WIDTH, SCREEN_HEIGHT, &Wire, OLED_RESET);

#define NUMFLAKES     10 // Number of snowflakes in the animation example

// drawBitmap
#define LOGO_HEIGHT   16
#define LOGO_WIDTH    16
static const unsigned char PROGMEM logo_bmp[] =
{ B00000000, B11000000,
  B00000001, B11000000,
  B00000001, B11000000,
  B00000011, B11100000,
  B11110011, B11100000,
  B11111110, B11111000,
  B01111110, B11111111,
  B00110011, B10011111,
  B00011111, B11111100,
  B00001101, B01110000,
  B00011011, B10100000,
  B00111111, B11100000,
  B00111111, B11110000,
  B01111100, B11110000,
  B01110000, B01110000,
  B00000000, B00110000 };

void setup() {
  Serial.begin(9600);

  // 第一个步骤 begin启动函数 创建buffer缓存
  // SSD1306_SWITCHCAPVCC = generate display voltage from 3.3V internally
  if(!display.begin(SSD1306_SWITCHCAPVCC, 0x3D)) { // Address 0x3D for 128x64
    Serial.println(F("SSD1306 allocation failed"));
    for(;;); // Don't proceed, loop forever
  }

  // Show initial display buffer contents on the screen --
  // the library initializes this with an Adafruit splash screen.
  // 显示内容 默认显示 Adafruit 启动页面
  display.display();
  delay(2000); // Pause for 2 seconds

  // Clear the buffer 清理缓存
  display.clearDisplay();

  // Draw a single pixel in white 绘制类函数(单一像素点)
  display.drawPixel(10, 10, SSD1306_WHITE);

  // Show the display buffer on the screen. You MUST call display() after
  // drawing commands to make them visible on screen!
  // 执行显示类函数
  display.display();
  delay(2000);
  // display.display() is NOT necessary after every single drawing command,
  // unless that's what you want...rather, you can batch up a bunch of
  // drawing operations and then update the screen all at once by calling
  // display.display(). These examples demonstrate both approaches...

  // 测试绘制线方法
  testdrawline();      // Draw many lines
  // 测试绘制空心矩形方法
  testdrawrect();      // Draw rectangles (outlines)
  // 测试绘制实心矩形方法
  testfillrect();      // Draw rectangles (filled)
  // 测试绘制空心圆方法
  testdrawcircle();    // Draw circles (outlines)
  // 测试绘制实心圆方法
  testfillcircle();    // Draw circles (filled)
  // 测试绘制空心圆角矩形方法
  testdrawroundrect(); // Draw rounded rectangles (outlines)
  // 测试绘制实心圆角矩形方法
  testfillroundrect(); // Draw rounded rectangles (filled)
  // 测试绘制空心三角形方法
  testdrawtriangle();  // Draw triangles (outlines)
  // 测试绘制实心三角形方法
  testfilltriangle();  // Draw triangles (filled)
  // 测试绘制字符方法
  testdrawchar();      // Draw characters of the default font

  testdrawstyles();    // Draw 'stylized' characters
  // 测试滚动方法
  testscrolltext();    // Draw scrolling text
  // 测试绘制图片方法
  testdrawbitmap();    // Draw a small bitmap image

  // Invert and restore display, pausing in-between
  display.invertDisplay(true);
  delay(1000);
  display.invertDisplay(false);
  delay(1000);

  testanimate(logo_bmp, LOGO_WIDTH, LOGO_HEIGHT); // Animate bitmaps
}

void loop() {
}

void testdrawline() {
  int16_t i;
  // 清理缓存
  display.clearDisplay(); // Clear display buffer

  for(i=0; i<display.width(); i+=4) {
    display.drawLine(0, 0, i, display.height()-1, SSD1306_WHITE);
    display.display(); // Update screen with each newly-drawn line
    delay(1);
  }
  for(i=0; i<display.height(); i+=4) {
    display.drawLine(0, 0, display.width()-1, i, SSD1306_WHITE);
    display.display();
    delay(1);
  }
  delay(250);

  display.clearDisplay();

  for(i=0; i<display.width(); i+=4) {
    display.drawLine(0, display.height()-1, i, 0, SSD1306_WHITE);
    display.display();
    delay(1);
  }
  for(i=display.height()-1; i>=0; i-=4) {
    display.drawLine(0, display.height()-1, display.width()-1, i, SSD1306_WHITE);
    display.display();
    delay(1);
  }
  delay(250);

  display.clearDisplay();

  for(i=display.width()-1; i>=0; i-=4) {
    display.drawLine(display.width()-1, display.height()-1, i, 0, SSD1306_WHITE);
    display.display();
    delay(1);
  }
  for(i=display.height()-1; i>=0; i-=4) {
    display.drawLine(display.width()-1, display.height()-1, 0, i, SSD1306_WHITE);
    display.display();
    delay(1);
  }
  delay(250);

  display.clearDisplay();

  for(i=0; i<display.height(); i+=4) {
    display.drawLine(display.width()-1, 0, 0, i, SSD1306_WHITE);
    display.display();
    delay(1);
  }
  for(i=0; i<display.width(); i+=4) {
    display.drawLine(display.width()-1, 0, i, display.height()-1, SSD1306_WHITE);
    display.display();
    delay(1);
  }

  delay(2000); // Pause for 2 seconds
}

void testdrawrect(void) {
  display.clearDisplay();

  for(int16_t i=0; i<display.height()/2; i+=2) {
    display.drawRect(i, i, display.width()-2*i, display.height()-2*i, SSD1306_WHITE);
    display.display(); // Update screen with each newly-drawn rectangle
    delay(1);
  }

  delay(2000);
}

void testfillrect(void) {
  display.clearDisplay();

  for(int16_t i=0; i<display.height()/2; i+=3) {
    // The INVERSE color is used so rectangles alternate white/black
    display.fillRect(i, i, display.width()-i*2, display.height()-i*2, SSD1306_INVERSE);
    display.display(); // Update screen with each newly-drawn rectangle
    delay(1);
  }

  delay(2000);
}

void testdrawcircle(void) {
  display.clearDisplay();

  for(int16_t i=0; i<max(display.width(),display.height())/2; i+=2) {
    display.drawCircle(display.width()/2, display.height()/2, i, SSD1306_WHITE);
    display.display();
    delay(1);
  }

  delay(2000);
}

void testfillcircle(void) {
  display.clearDisplay();

  for(int16_t i=max(display.width(),display.height())/2; i>0; i-=3) {
    // The INVERSE color is used so circles alternate white/black
    display.fillCircle(display.width() / 2, display.height() / 2, i, SSD1306_INVERSE);
    display.display(); // Update screen with each newly-drawn circle
    delay(1);
  }

  delay(2000);
}

void testdrawroundrect(void) {
  display.clearDisplay();

  for(int16_t i=0; i<display.height()/2-2; i+=2) {
    display.drawRoundRect(i, i, display.width()-2*i, display.height()-2*i,
      display.height()/4, SSD1306_WHITE);
    display.display();
    delay(1);
  }

  delay(2000);
}

void testfillroundrect(void) {
  display.clearDisplay();

  for(int16_t i=0; i<display.height()/2-2; i+=2) {
    // The INVERSE color is used so round-rects alternate white/black
    display.fillRoundRect(i, i, display.width()-2*i, display.height()-2*i,
      display.height()/4, SSD1306_INVERSE);
    display.display();
    delay(1);
  }

  delay(2000);
}

void testdrawtriangle(void) {
  display.clearDisplay();

  for(int16_t i=0; i<max(display.width(),display.height())/2; i+=5) {
    display.drawTriangle(
      display.width()/2  , display.height()/2-i,
      display.width()/2-i, display.height()/2+i,
      display.width()/2+i, display.height()/2+i, SSD1306_WHITE);
    display.display();
    delay(1);
  }

  delay(2000);
}

void testfilltriangle(void) {
  display.clearDisplay();

  for(int16_t i=max(display.width(),display.height())/2; i>0; i-=5) {
    // The INVERSE color is used so triangles alternate white/black
    display.fillTriangle(
      display.width()/2  , display.height()/2-i,
      display.width()/2-i, display.height()/2+i,
      display.width()/2+i, display.height()/2+i, SSD1306_INVERSE);
    display.display();
    delay(1);
  }

  delay(2000);
}

void testdrawchar(void) {
  display.clearDisplay();

  display.setTextSize(1);      // Normal 1:1 pixel scale
  display.setTextColor(SSD1306_WHITE); // Draw white text
  display.setCursor(0, 0);     // Start at top-left corner
  display.cp437(true);         // Use full 256 char 'Code Page 437' font

  // Not all the characters will fit on the display. This is normal.
  // Library will draw what it can and the rest will be clipped.
  for(int16_t i=0; i<256; i++) {
    if(i == '\n') display.write(' ');
    else          display.write(i);
  }

  display.display();
  delay(2000);
}

void testdrawstyles(void) {
  display.clearDisplay();

  display.setTextSize(1);             // Normal 1:1 pixel scale
  display.setTextColor(SSD1306_WHITE);        // Draw white text
  display.setCursor(0,0);             // Start at top-left corner
  display.println(F("Hello, world!"));

  display.setTextColor(SSD1306_BLACK, SSD1306_WHITE); // Draw 'inverse' text
  display.println(3.141592);

  display.setTextSize(2);             // Draw 2X-scale text
  display.setTextColor(SSD1306_WHITE);
  display.print(F("0x")); display.println(0xDEADBEEF, HEX);

  display.display();
  delay(2000);
}

void testscrolltext(void) {
  display.clearDisplay();

  display.setTextSize(2); // Draw 2X-scale text
  display.setTextColor(SSD1306_WHITE);
  display.setCursor(10, 0);
  display.println(F("scroll"));
  display.display();      // Show initial text
  delay(100);

  // Scroll in various directions, pausing in-between:
  display.startscrollright(0x00, 0x0F);
  delay(2000);
  display.stopscroll();
  delay(1000);
  display.startscrollleft(0x00, 0x0F);
  delay(2000);
  display.stopscroll();
  delay(1000);
  display.startscrolldiagright(0x00, 0x07);
  delay(2000);
  display.startscrolldiagleft(0x00, 0x07);
  delay(2000);
  display.stopscroll();
  delay(1000);
}

void testdrawbitmap(void) {
  display.clearDisplay();

  display.drawBitmap(
    (display.width()  - LOGO_WIDTH ) / 2,
    (display.height() - LOGO_HEIGHT) / 2,
    logo_bmp, LOGO_WIDTH, LOGO_HEIGHT, 1);
  display.display();
  delay(1000);
}

#define XPOS   0 // Indexes into the 'icons' array in function below
#define YPOS   1
#define DELTAY 2

void testanimate(const uint8_t *bitmap, uint8_t w, uint8_t h) {
  int8_t f, icons[NUMFLAKES][3];

  // Initialize 'snowflake' positions
  for(f=0; f< NUMFLAKES; f++) {
    icons[f][XPOS]   = random(1 - LOGO_WIDTH, display.width());
    icons[f][YPOS]   = -LOGO_HEIGHT;
    icons[f][DELTAY] = random(1, 6);
    Serial.print(F("x: "));
    Serial.print(icons[f][XPOS], DEC);
    Serial.print(F(" y: "));
    Serial.print(icons[f][YPOS], DEC);
    Serial.print(F(" dy: "));
    Serial.println(icons[f][DELTAY], DEC);
  }

  for(;;) { // Loop forever...
    display.clearDisplay(); // Clear the display buffer

    // Draw each snowflake:
    for(f=0; f< NUMFLAKES; f++) {
      display.drawBitmap(icons[f][XPOS], icons[f][YPOS], bitmap, w, h, SSD1306_WHITE);
    }

    display.display(); // Show the display buffer on the screen
    delay(200);        // Pause for 1/10 second

    // Then update coordinates of each flake...
    for(f=0; f< NUMFLAKES; f++) {
      icons[f][YPOS] += icons[f][DELTAY];
      // If snowflake is off the bottom of the screen...
      if (icons[f][YPOS] >= display.height()) {
        // Reinitialize to a random position, just off the top
        icons[f][XPOS]   = random(1 - LOGO_WIDTH, display.width());
        icons[f][YPOS]   = -LOGO_HEIGHT;
        icons[f][DELTAY] = random(1, 6);
      }
    }
  }
}
重点:
- 记住绘制三部曲 clearDisplay->绘制类方法->display真正显示
4.2 实例二—— 博哥自定义测试 + 显示16X16中文字
具体代码:
/**
* 日期:2017/09/24
* 功能:OLED12864  SSD1306测试
* 作者:单片机菜鸟
* 16X16点阵显示 取模方式 阴码+逐行式+顺向
**/
#include <Wire.h>
#include <Adafruit_GFX.h>
#include <Adafruit_SSD1306.h>

#define OLED_RESET 4
Adafruit_SSD1306 display(OLED_RESET);

#define NUMFLAKES 10
#define XPOS 0
#define YPOS 1
#define DELTAY 2

#define LOGO16_GLCD_HEIGHT 16
#define LOGO16_GLCD_WIDTH  16

#if (SSD1306_LCDHEIGHT != 64)
#error("Height incorrect, please fix Adafruit_SSD1306.h!");
#endif

//显示一个心形
static const uint8_t PROGMEM Heart_16x16[] = {
  0x00,0x00,0x18,0x18,0x3C,0x3C,0x7E,0x7E,0xFF,0xFF,0xFF,0xFF,0xFF,0xFF,0xFF,0xFF,
  0xFF,0xFF,0x7F,0xFE,0x3F,0xFC,0x1F,0xF8,0x0F,0xF0,0x07,0xE0,0x03,0xC0,0x00,0x00//未命名文件0
};

//"猛"
static const uint8_t PROGMEM Strong_16x16[] = {
  0x00,0x00,0x45,0xFC,0x28,0x08,0x10,0x10,0x28,0x20,0x4B,0xFE,0x88,0x20,0x08,0xA0,
  0x18,0x40,0x29,0xFC,0x49,0x54,0x89,0x54,0x09,0x54,0x09,0x54,0x57,0xFE,0x20,0x00//猛0
};

static const uint8_t PROGMEM Welcome_16x16[] ={
0x00,0x80,0x00,0x80,0xFC,0x80,0x04,0xFC,0x05,0x04,0x49,0x08,0x2A,0x40,0x14,0x40,
0x10,0x40,0x28,0xA0,0x24,0xA0,0x45,0x10,0x81,0x10,0x02,0x08,0x04,0x04,0x08,0x02,//欢0
0x00,0x00,0x20,0x80,0x13,0x3C,0x12,0x24,0x02,0x24,0x02,0x24,0xF2,0x24,0x12,0x24,
0x12,0x24,0x12,0xB4,0x13,0x28,0x12,0x20,0x10,0x20,0x28,0x20,0x47,0xFE,0x00,0x00,//迎1
0x01,0x00,0x01,0x00,0x01,0x00,0x7F,0xFC,0x01,0x00,0x11,0x10,0x09,0x10,0x09,0x20,
0xFF,0xFE,0x03,0x80,0x05,0x40,0x09,0x20,0x31,0x18,0xC1,0x06,0x01,0x00,0x01,0x00,//来2
0x00,0x04,0xFF,0x84,0x08,0x04,0x10,0x24,0x22,0x24,0x41,0x24,0xFF,0xA4,0x08,0xA4,
0x08,0x24,0x08,0x24,0x7F,0x24,0x08,0x24,0x08,0x04,0x0F,0x84,0xF8,0x14,0x40,0x08,//到3
0x00,0x00,0x7F,0xFC,0x01,0x00,0x01,0x00,0x01,0x00,0x01,0x00,0x01,0x00,0x3F,0xF8,
0x01,0x00,0x01,0x00,0x01,0x00,0x01,0x00,0x01,0x00,0x01,0x00,0xFF,0xFE,0x00,0x00,//王4
0x02,0x00,0x02,0x08,0x3F,0xD0,0x02,0x20,0x02,0x40,0xFF,0xFE,0x01,0x00,0x02,0x00,
0x0F,0xF0,0x18,0x10,0x28,0x10,0x4F,0xF0,0x88,0x10,0x08,0x10,0x0F,0xF0,0x08,0x10,//者5
0x08,0x20,0x08,0x20,0xFF,0xFE,0x08,0x20,0x00,0x00,0x7F,0xFE,0x40,0x02,0x81,0x04,
0x01,0x00,0x7F,0xFC,0x03,0x80,0x05,0x40,0x09,0x20,0x31,0x18,0xC1,0x06,0x01,0x00,//荣6
0x10,0x00,0x11,0xDC,0x90,0x44,0x55,0x54,0x58,0xCC,0x11,0x54,0xFC,0x00,0x28,0x48,
0x28,0xFE,0x29,0x90,0x2A,0xFC,0x28,0x90,0x2A,0xFC,0x4C,0x90,0x48,0xFE,0x80,0x80//耀7
};

static const uint8_t PROGMEM Author_16x16[] ={
0x10,0x10,0x08,0x20,0x04,0x40,0x3F,0xF8,0x21,0x08,0x21,0x08,0x3F,0xF8,0x21,0x08,
0x21,0x08,0x3F,0xF8,0x01,0x00,0x01,0x00,0xFF,0xFE,0x01,0x00,0x01,0x00,0x01,0x00,//单0
0x00,0x40,0x10,0x40,0x10,0x40,0x10,0x40,0x10,0x40,0x1F,0xFC,0x10,0x00,0x10,0x00,
0x10,0x00,0x1F,0xE0,0x10,0x20,0x10,0x20,0x10,0x20,0x20,0x20,0x20,0x20,0x40,0x20,//片1
0x10,0x00,0x11,0xF0,0x11,0x10,0x11,0x10,0xFD,0x10,0x11,0x10,0x31,0x10,0x39,0x10,
0x55,0x10,0x55,0x10,0x91,0x10,0x11,0x12,0x11,0x12,0x12,0x12,0x12,0x0E,0x14,0x00,//机2
0x08,0x20,0x08,0x20,0xFF,0xFE,0x08,0x20,0x00,0x10,0x00,0xF8,0x3F,0x00,0x11,0x10,
0x08,0x20,0x01,0x00,0x7F,0xFC,0x05,0x40,0x09,0x20,0x31,0x18,0xC1,0x06,0x01,0x00,//菜3
0x01,0x00,0x02,0x00,0x1F,0xF0,0x10,0x10,0x12,0x10,0x11,0x10,0x11,0x50,0x10,0x20,
0x10,0x00,0x1F,0xFC,0x00,0x04,0x00,0x04,0x7F,0xE4,0x00,0x04,0x00,0x28,0x00,0x10,//鸟4
};

void setup()   {
  Serial.begin(115200);
  delay(500);
  // by default, we'll generate the high voltage from the 3.3v line internally! (neat!)
  display.begin(SSD1306_SWITCHCAPVCC, 0x3C);  // initialize with the I2C addr 0x3D (for the 128x64)
}

void loop() {
  test_SSD1306();
}

void test_SSD1306(void){
    //1.检测全屏显示(看看有没有大面积坏点)
  display.fillScreen(WHITE);
  display.display();
  delay(2000);

  //2.画点 点坐标(10,10)
  display.clearDisplay();   // clears the screen and buffer
  display.drawPixel(10, 10, WHITE);
  display.display();
  delay(2000);

  //3. 画线 从(0,0)到(50,50)
  display.clearDisplay();   // clears the screen and buffer
  display.drawLine(0, 0,50,50, WHITE);
  display.display();
  delay(2000);

  //4.画空心矩形  左上角坐标(x0,y0)  右下角坐标(x1,y1)
  display.clearDisplay();   // clears the screen and buffer
  display.drawRect(0,0,128,64,WHITE);
  display.display();
  delay(2000);

  //5.来画个实心矩形
  display.clearDisplay();   // clears the screen and buffer
  display.fillRect(0,0,64,64,WHITE);
  display.display();
  delay(2000);

  //6.画空心圆
  display.clearDisplay();   // clears the screen and buffer
  display.drawCircle(20,20,20,WHITE);
  display.display();
  delay(2000);

  //7.画实心圆
  display.clearDisplay();   // clears the screen and buffer
  display.fillCircle(20,20,20,WHITE);
  display.display();
  delay(2000);

  //8.画空心三角形
  display.clearDisplay();   // clears the screen and buffer
  display.drawTriangle(20,0,0,20,40,20,WHITE);
  display.display();
  delay(2000);

  //9.画实心三角形
  display.clearDisplay();   // clears the screen and buffer
  display.fillTriangle(20,0,0,20,40,20,WHITE);
  display.display();
  delay(2000);

  //10.画空心圆角矩形
  display.clearDisplay();   // clears the screen and buffer
  display.drawRoundRect(0,0,40,40,5,WHITE);
  display.display();
  delay(2000);

  //11.画实心圆角矩形
  display.clearDisplay();   // clears the screen and buffer
  display.fillRoundRect(0,0,40,40,5,WHITE);
  display.display();
  delay(2000);

  //12.画心形(楼主自己用取模软件画的)
  display.clearDisplay();   // clears the screen and buffer
  display.drawBitmap(16,16,Heart_16x16,16,16,WHITE);
  display.display();
  delay(2000);

  //13.显示英文 数字
  display.clearDisplay();   // clears the screen and buffer
  display.setTextSize(1);
  display.setTextColor(WHITE);
  display.setCursor(0,0);
  display.println("Hello, Arduino!");
  display.setTextColor(BLACK, WHITE); // 'inverted' text
  display.println(3.141592);
  display.setTextSize(2);
  display.setTextColor(WHITE);
  display.print("0x"); display.println(0xDEADBEEF, HEX);
  display.display();
  delay(2000);

  //14.显示单个文字 有木有发现就是调用drawBitmap
  display.clearDisplay();   // clears the screen and buffer
  display.drawBitmap(16,16,Strong_16x16,16,16,WHITE);
  display.display();
  delay(2000);

  //15.显示多个文字(楼主在库里面加入一个ShowCN_16方法  就是为了同时显示多个中文 16X16 ,不然的话 就得一个一个drawBitmap)
  display.clearDisplay();   // clears the screen and buffer
  display.ShowCN_16(0,0, Welcome_16x16,sizeof(Welcome_16x16)/32,WHITE);
  display.ShowCN_16(48,16, Author_16x16,sizeof(Author_16x16)/32,WHITE);
  display.display();
  delay(2000);
}注意点:
- 原生库中并没有ShowCN_16这个方法,是博哥后面在库中添加的。由于博客没有可以上传文件的地方,需要改进库的同学可以在这里下载

具体显示效果:

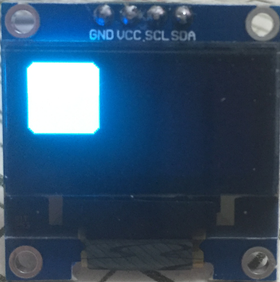
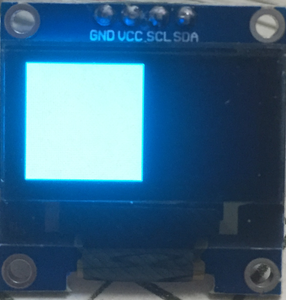
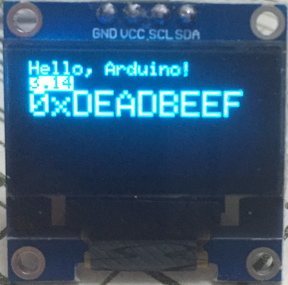
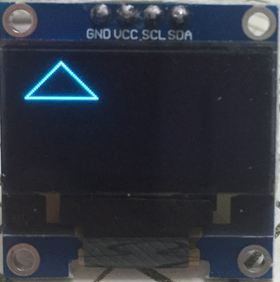
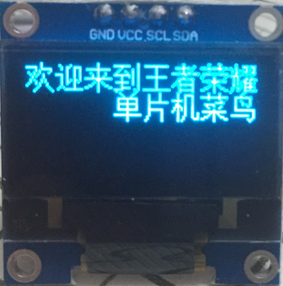
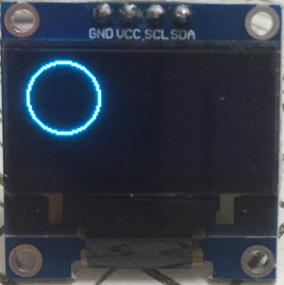
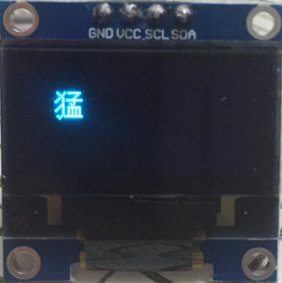
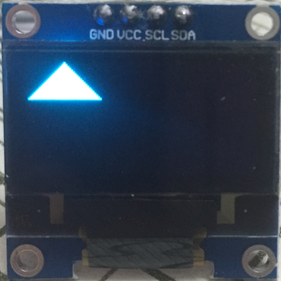
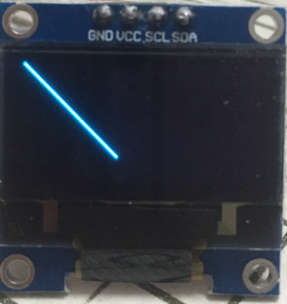
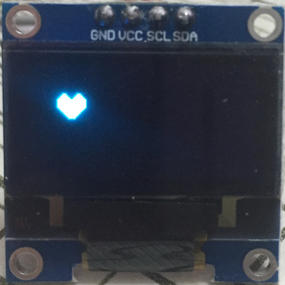
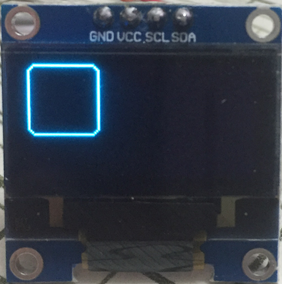
注意点:
- 这里用到了字体取模软件(取模方式(阴码+逐行式+顺向),我也上传到了个人技术群)

到此,基本上理论解答完毕。
5.总结
- Adafruit_SSD1306 是针对 SSD1306这款OLED屏幕的显示图形库。
- 性能上会比U8G2库更好,毕竟专人做专门的事情。
- 博主这里只是抛砖引玉,希望读者在理解基础上去发掘更好的玩法。
- 欢迎关注点赞博主,给予精神支持。