一、下载
1.登陆官网:https://jmeter.apache.org/
2.点击Download Releases跳转到下载地址下载
二、安装
将下载得到的压缩包解压即可,这里我解压到自己电脑的路径为D:\tools\apache-jmeter-5.0。
三、运行
点击bin目录下的jmeter.bat即可启动Jmeter。
四、创建一个简单的自动化脚本
1.创建线程组【Thread Group】:右击【TestPlan】选择【Add】——【Thread(Users)】——【Thread Group】
2.定义用户自定义的变量:右击【Thread Group(线程组)】选择【Add】—【Config Element(配置元件)】—【User Defined Variables】
3.创建HTTP信息头管理器:右击【Thread Group(线程组)】选择【Add】—【Config Element(配置元件)】—【HTTP Header Manager】
4.创建HTTP Cookie 管理器:右击【Thread Group(线程组)】选择【Add】—【Config Element(配置元件)】—【HTTP Cookie Manager】
(1)(Clear cookies each iteration?)每次反复清除Cookies?:选择后,则每次线程组运行时,都会清除 cookie。(若是手动添加的cookie,则不会被清除)
(2)Cookie Policy:Cookie的管理策略
compatibility:推荐选择此种策略。这种兼容性设计要求是适应尽可能多的不同的服务器,尽管不是完全按照标准来实现的。如果你遇到了解析 Cookies 的问题,你就可能要用到这一个规范。有太多的web站点是用CGI脚本去实现的,而导致只有将所有的 Cookies 都放入 Request header 才可以正常的工作。这种情况下最好设置 http.protocol.single-cookie-header 参数为 true。
rfc2109:是HttpClient使用的默认Cookies协议。
rfc2965:定义了版本2并且尝试去弥补在版本1中 Cookie 的 RFC2109 标准的缺点。规定 RFC2965 最终取代 RFC2109 发送 RFC2965 标准 Cookies 的服务端,将会使用 Set-Cookie2 header 添加到 Set-Cookie Header 信心中,RFC2965 Cookies 是区分端口的。
ignorecookies:此规格忽略所有 Cookie。被用来防止 HttpClient 接受和发送的 Cookie。
netscape:是最原始的 Cookies 规范,同时也是 RFC2109 的基础。尽管如此,还是在很多重要的方面与 RFC2109 不同,可能需要特定服务器才可以兼容。
default:默认。
best-match:
standard:
standard-strict:
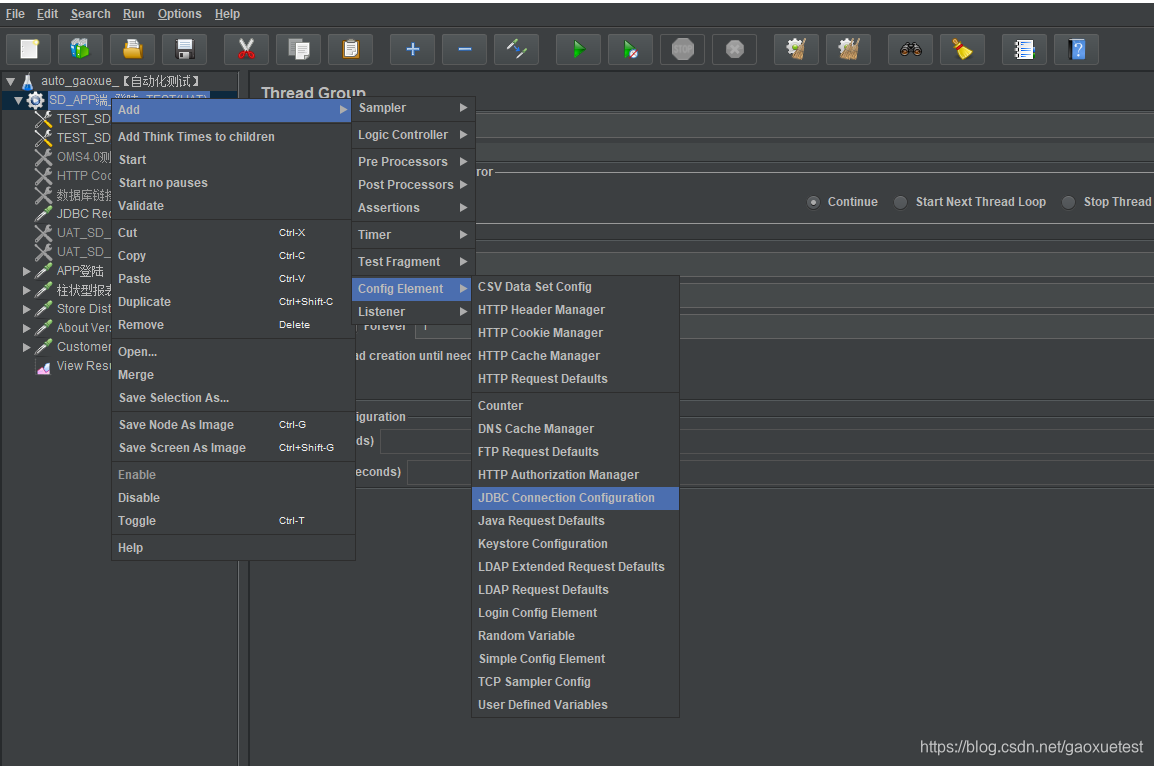
5.创建JDBC Connection Configuration:右击【Thread Group(线程组)】选择【Add】—【Config Element(配置元件)】—【JDBC Connection Configuration】
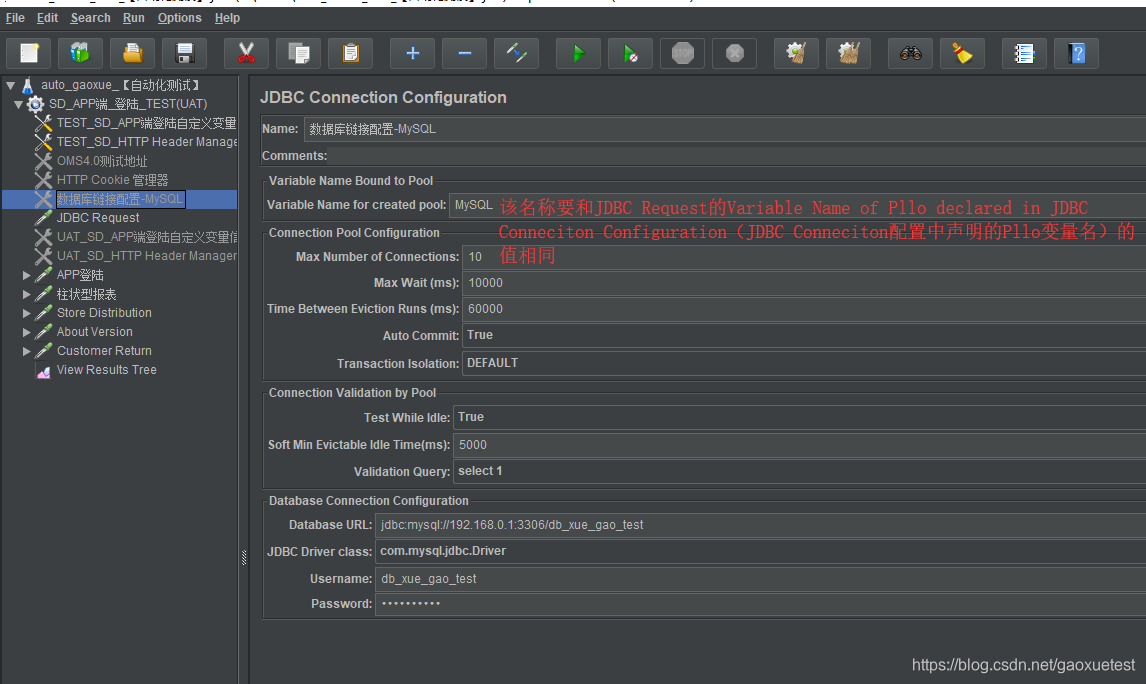
(1) Variable Name Bound to Pool
Variable Name,数据库连接池的变量名,之后JDBC request可以通过选择不同的连接池名来选择不同的数据库连接
Variable name变量名称:与JDBC Request的Variable name保持一致
原因:因为链接数据库是需要在JDBC Connection Configuration中配置好的,然后赋予一个变量名称,那么JDBC Request想要去访问数据库,就必须通过这个配置好的元件去链接,所以JDBC Reques就需要通过读取JDBC Connection Configuration的变量中的信息,那怎么读取呢,JDBC Reques就需要用到这个变量了,就需要到名称为mysql的元件中去应用。
(2) Connection Pool Configuration
Max Number of Connections 该数据库连接池的最大连接数,一般可设置为0,意思是每个线程都使用单独的数据库连接,线程之间数据库连接不共享
中文:池中允许的最大连接数。在大多数情况下,将其设置为0,这意味着每个线程将得到它自己的池,其中只有一个连接,即线程之间不共享连接。如果您真的想要使用共享池(为什么?),那么将max count与线程数相同,以确保线程不会相互等待。
原文:aximum number of connections allowed in the pool. In most cases, set this to zero (0) . This means that each thread will get its own pool with a single connection in it, i.e. the connections are not shared between threads. If you really want to use shared pooling (why?), then set the max count to the same as the number of threads to ensure threads don't wait on each other.
Max Wait (ms) 在连接池中取回连接最大等待时间
中文:如果在试图检索连接过程中(取回连接)超过所设置期限,连接池抛出一个错误
原文:ool throws an error if the timeout period is exceeded in the process of trying to retrieve a connection
Time Between Eviction Runs (ms) 疏散时间
中文:在空闲对象驱逐线程运行期间,可以休眠的毫秒数。当非正值时,将运行无空闲对象驱逐器线程。(默认为“60000”,1分钟)(如果当前连接池中某个连接在空闲了time Between Eviction Runs Millis时间后任然没有使用,则被物理性的关闭掉。)
原文:The number of milliseconds to sleep between runs of the idle object evictor thread. When non-positive, no idle object evictor thread will be run. (Defaults to " 60000 ", 1 minute)
Auto Commit 自动提交sql语句
中文:打开或关闭连接的自动提交。
原文:Turn auto commit on or off for the connections.
Transaction Isolation:
事务间隔级别设置,主要有如下几个选项:(对JMX加解密)
TRANSACTION_NODE 事务节点
TRANSACTION_READ_UNCOMMITTED 事务未提交读
TRANSACTION_READ_COMMITTED 事务已提交读
TRANSACTION_SERIALIZABLE 事务序列化
DEFAULT 默认
TRANSACTION_REPEATABLE_READ 事务重复读
(3) Connection Validation by Pool
这是Jmeter用来检验数据库连接是否有效的一种机制,超过5秒没有使用的话,就会用validation query去测试下这个连接是否有效
Test While Idle 当空闲的时候测试连接是否断开
中文:测试连接池的空闲连接,验证查询将会被使用去测试。
原文:Test idle connections of the pool, see BasicDataSource.html#getTestWhileIdle . Validation Query will be used to test it.
Soft Min Evictable Idle Time(ms)
中文:最少的时间连接可能在池中闲置,然后才有资格被闲置的对象驱逐出去,额外的条件是至少在池中保持连接。默认值为5000(5秒)
原文:Minimum amount of time a connection may sit idle in the pool before it is eligible for eviction by the idle object evictor, with the extra condition that at least minIdle connections remain in the pool. See BasicDataSource.html#getSoftMinEvictableIdleTimeMillis . Defaults to 5000 (5 seconds)
Validation Query:验证查询,检验连接是否有效(数据库重启后之前的连接都失效,需要验证查询)
(4) Database Connection Configuration
Database URL: jdbc:mysql://服务器地址:3306/数据库名
(比如:jdbc:mysql://ip:3306/数据库名?useUnicode=true&characterEncoding=utf8&allowMultiQueries=true)
备注:“&allowMultiQueries=true” 这句话的意思呢 是为了在JDBC中执行多条select语句的时候用的!
JDBC Driver class:数据库JDBC驱动类名:com.mysql.jdbc.Driver
Username:数据库连接用户名
password:数据库连接密码
不同数据库具体的填写方式,可以参考下面的表格:
| Datebase |
Driver class |
Database URL |
| MySQL |
com.mysql.jdbc.Driver |
jdbc:mysql://host:port/{dbname} |
| PostgreSQL |
org.postgresql.Driver |
jdbc:postgresql:{dbname} |
| Oracle |
oracle.jdbc.driver.OracleDriver |
jdbc:oracle:thin:user/pass@//host:port/service |
| Ingres (2006) |
ingres.jdbc.IngresDriver |
jdbc:ingres://host:port/db[;attr=value] |
| MSSQL |
com.microsoft.sqlserver.jdbc.SQLServerDriver 或者 net.sourceforge.jtds.jdbc.Driver |
jdbc:sqlserver://IP:1433;databaseName=DBname 或者 jdbc:jtds:sqlserver://localhost:1433/"+"library" |
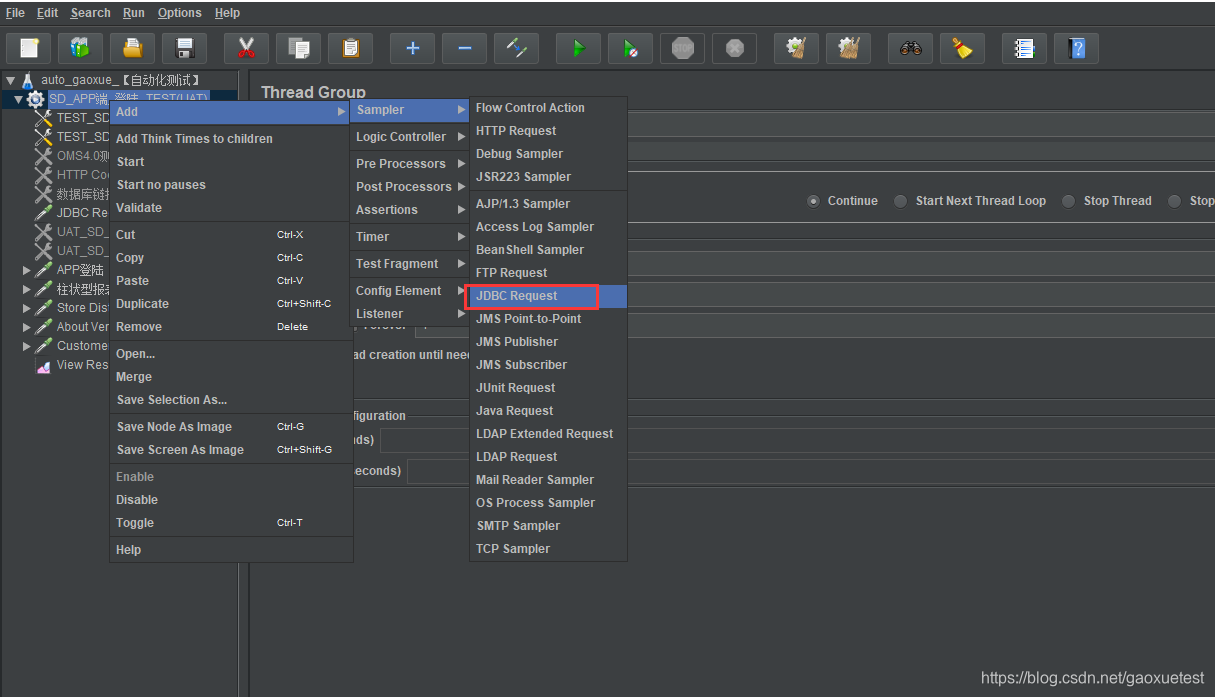
5.创建JDBC Request:右击【Thread Group(线程组)】选择【Add】—【Sampler(取样器)】—【JDBC Request】

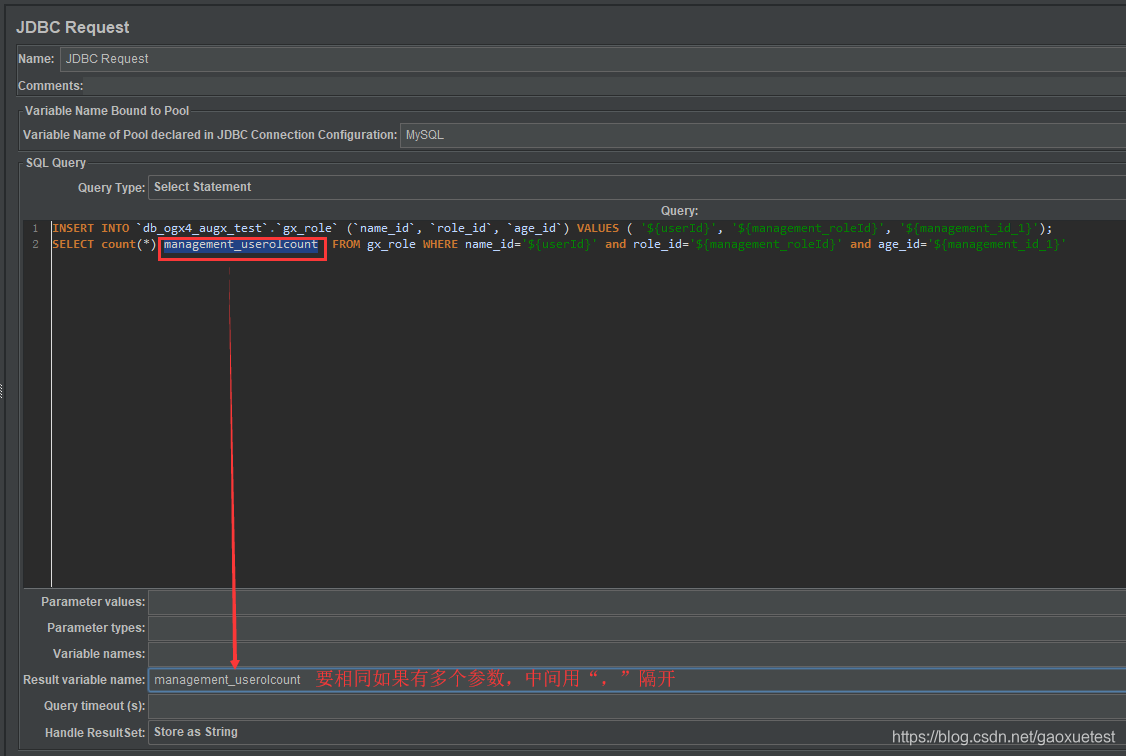
重要的参数说明:
Variable Name:数据库连接池的名字,需要与JDBC Connection Configuration的Variable Name Bound Pool名字保持一致
Query:填写的sql语句未尾不要加“;”
Parameter valus:参数值
Parameter types:参数类型,可参考:Javadoc for java.sql.Types
Variable names:保存sql语句返回结果的变量名
Result variable name:创建一个对象变量,保存所有返回的结果
Query timeout:查询超时时间
Handle result set:定义如何处理由callable statements语句返回的结果
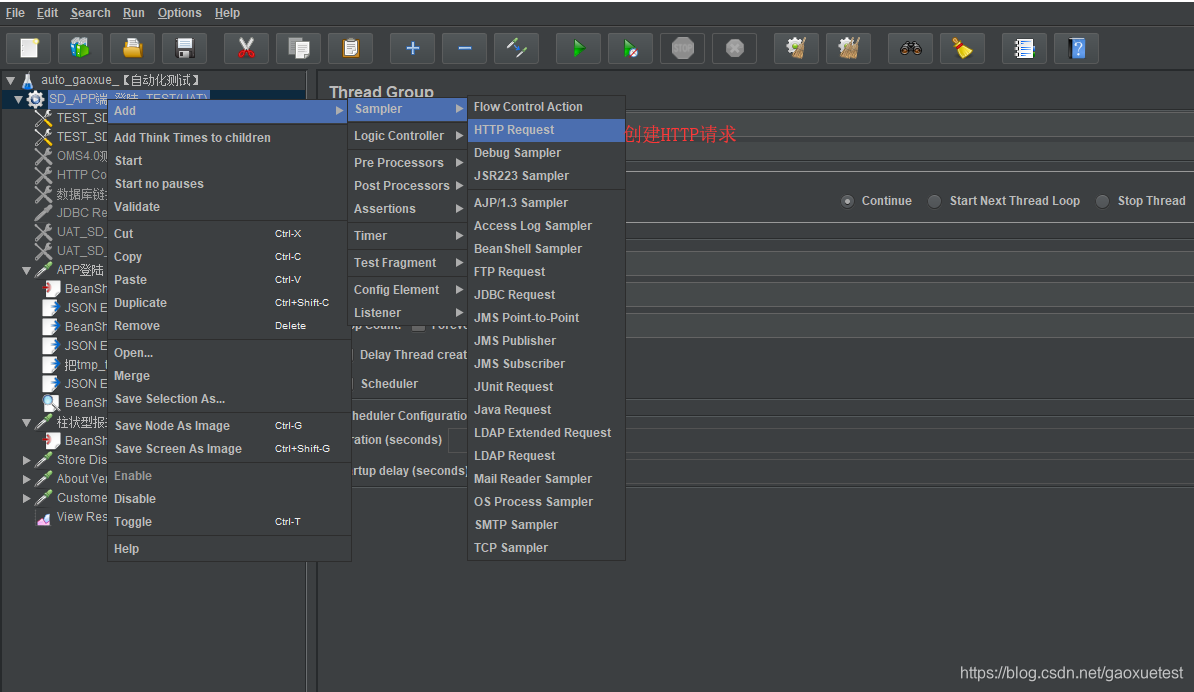
5.创建HTTP Request:右击【Thread Group(线程组)】选择【Add】—【Sampler(取样器)】—【HTTP Request】

(1)添加Bean Shell PreProcessor:选择右击【httprequest】—【add】—【preprocessors】前置处理器—【Bean Shell PreProcessor】


(2)添加json提取器提取加密结果

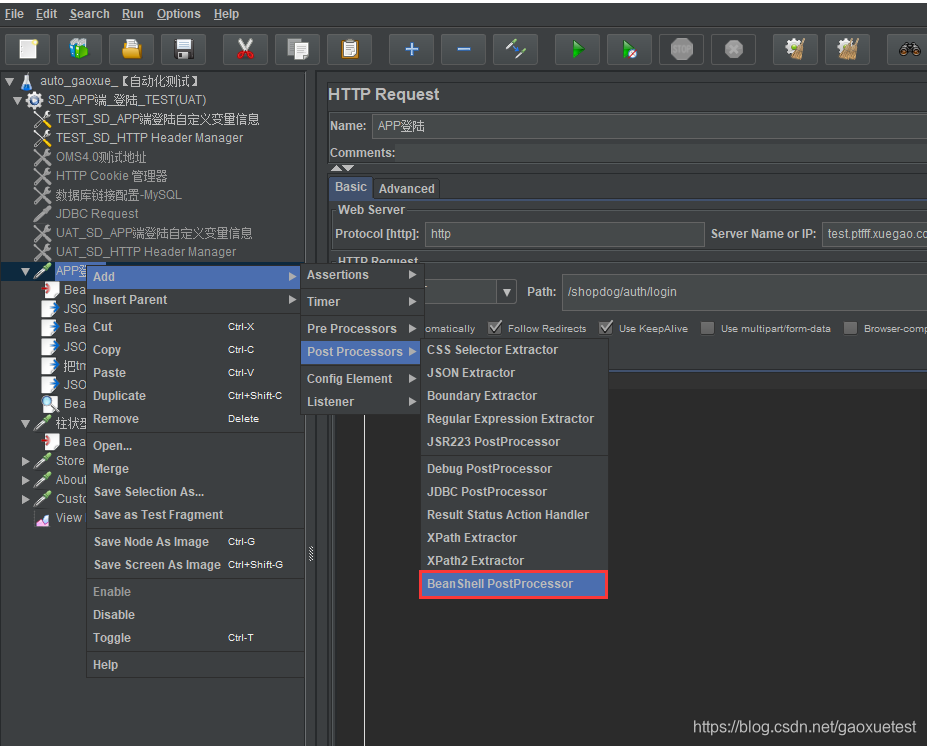
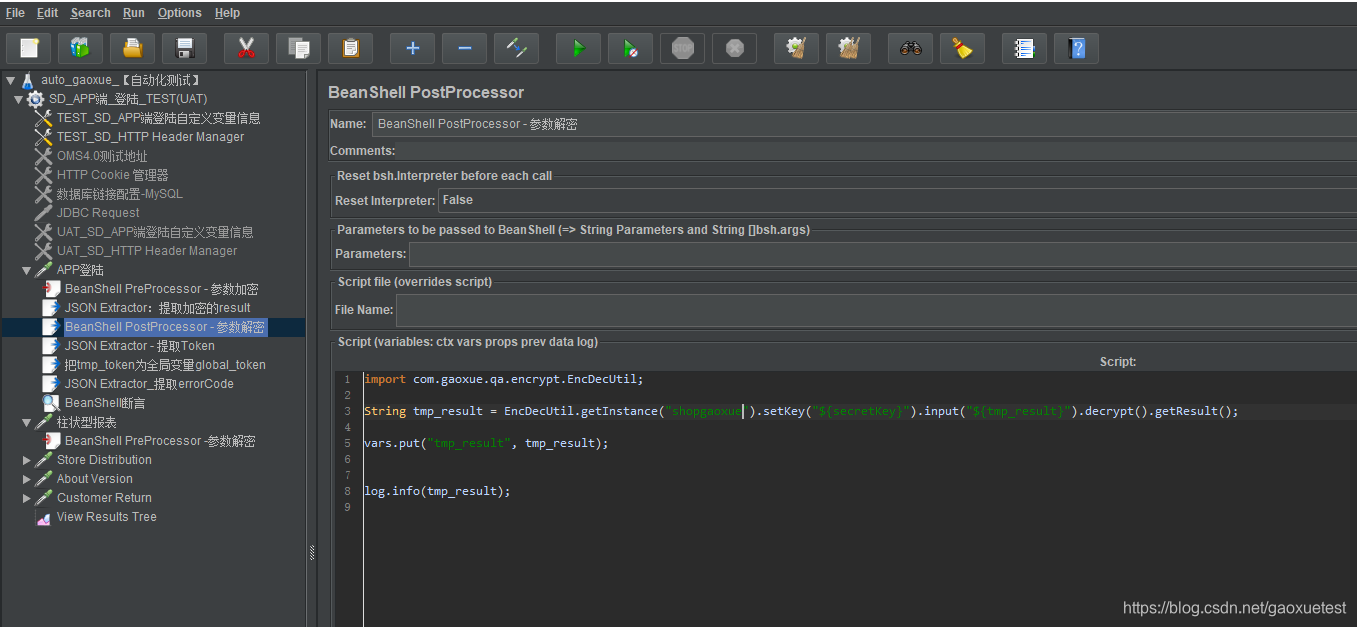
(3)添加Bean Shell PostProcessor:选择右击【httprequest】—【add】—【Post Processors】后置处理器—【Bean Shell PostProcessor】
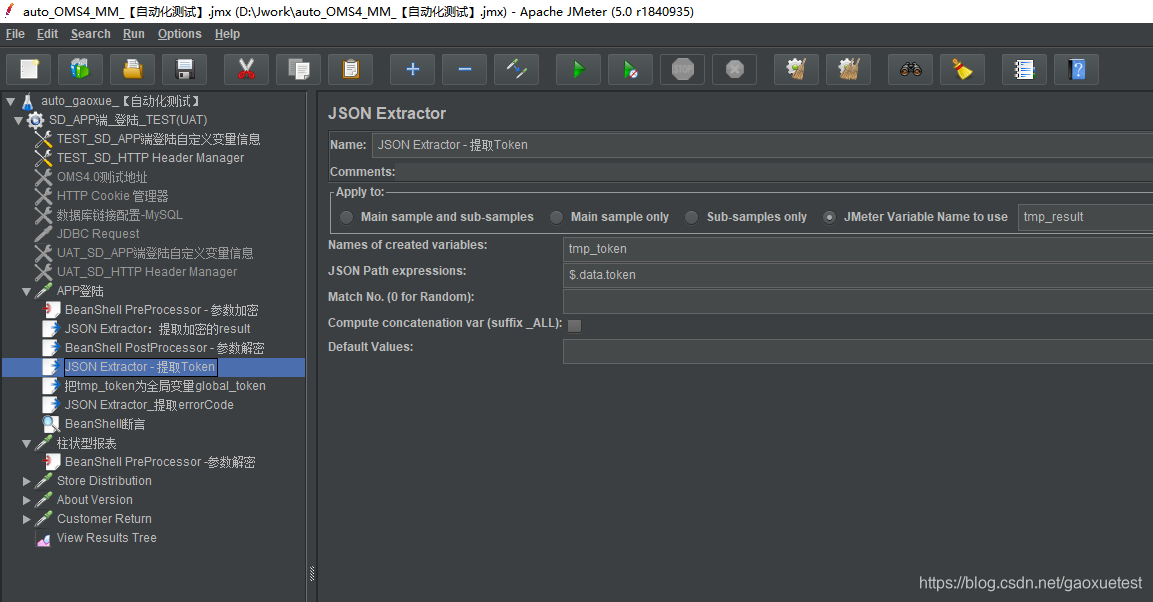
(4)添加json提取器提取Token结果
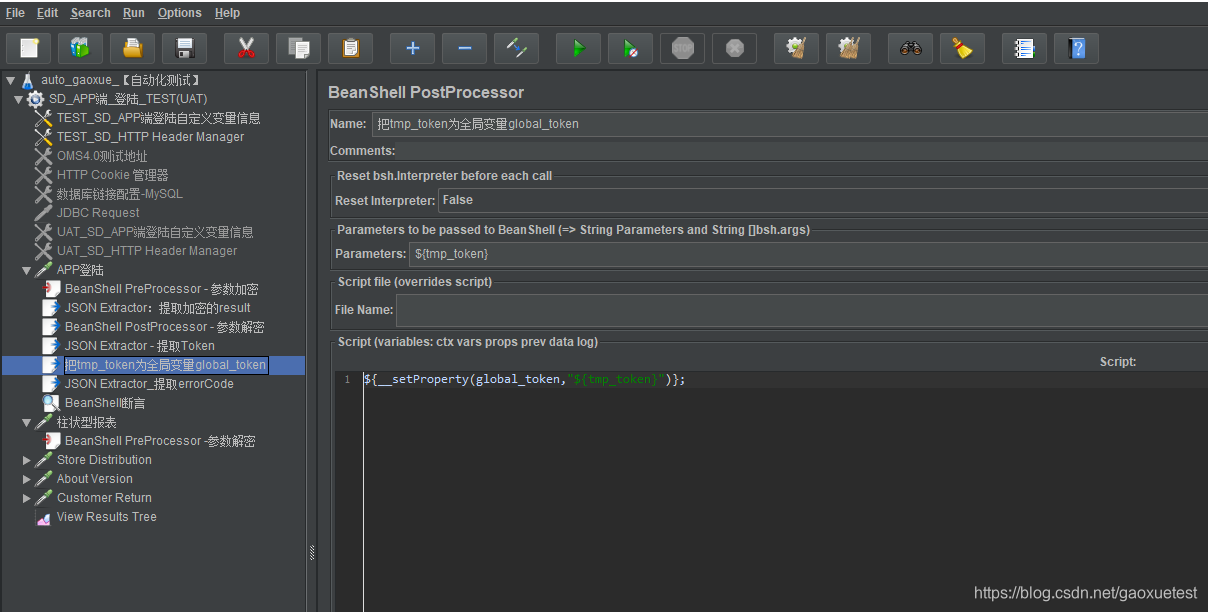
(5)添加Bean Shell PostProcessor:选择右击【httprequest】—【add】—【Post Processors】后置处理器—【Bean Shell PostProcessor】
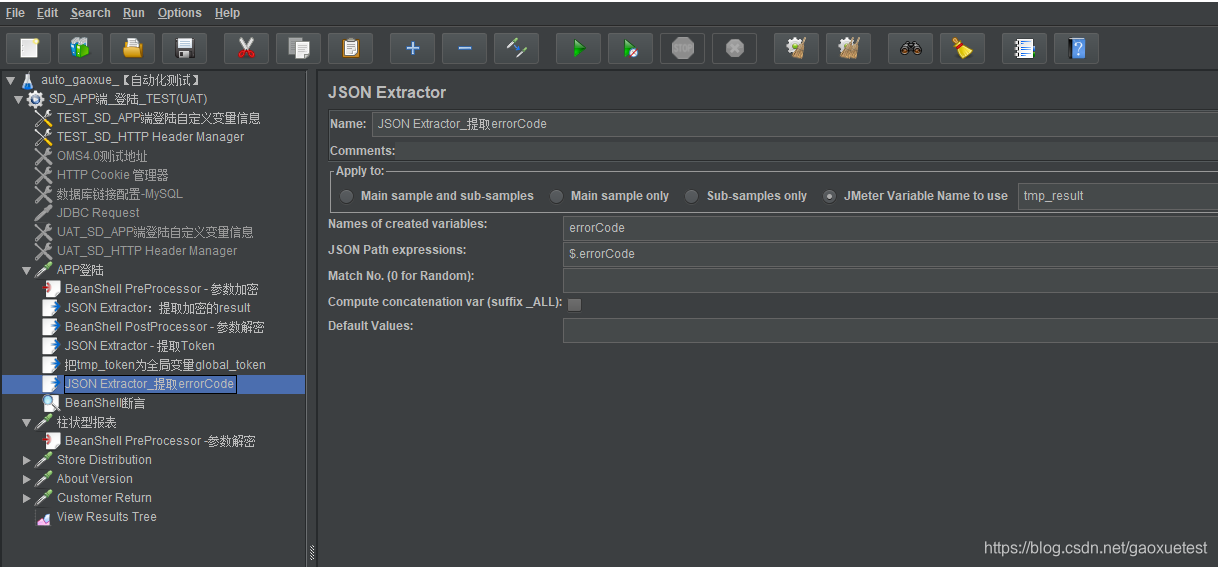
(6)添加json提取器提取执行结果
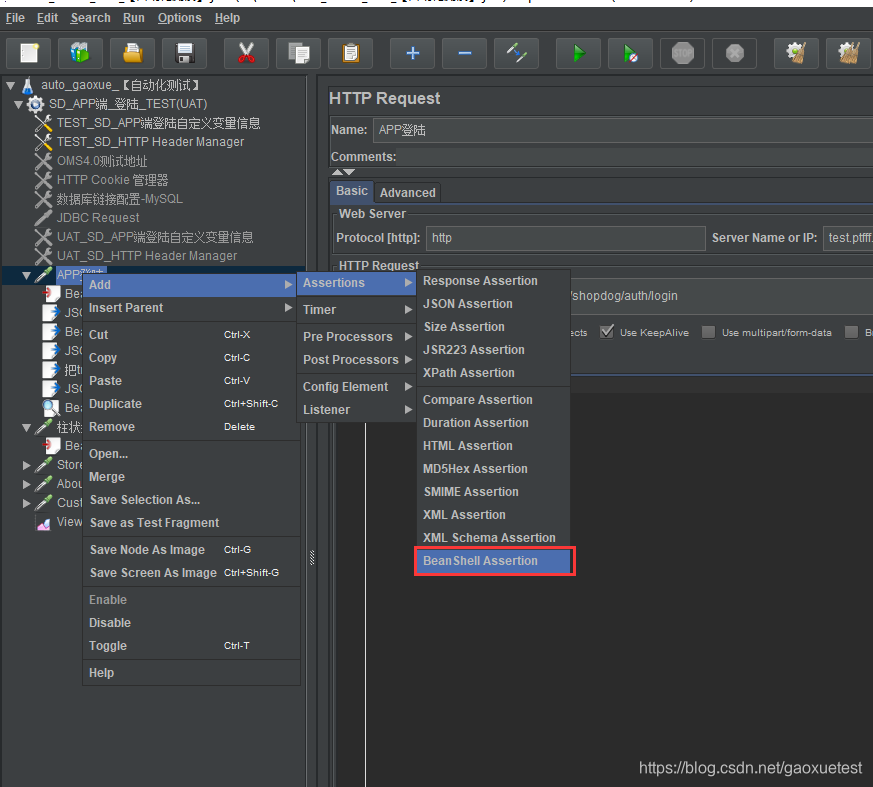
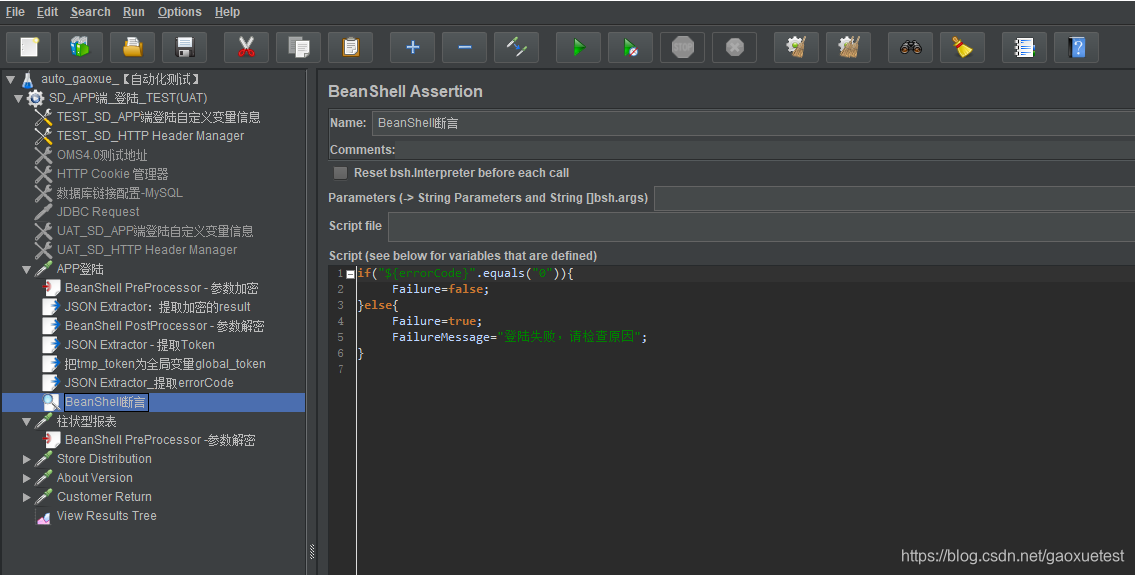
(7)添加BeanShell Assertion(beanshell断言):右击【httprequest】选择【Add】—【Assertions(断言)】—【BeanShell Assertion】
五、个人中心登陆