前言
相关arduino 全部分类:
https://blog.csdn.net/freewebsys/category_8799254.html
本文的原文连接是:
https://blog.csdn.net/freewebsys/article/details/104130911
未经博主允许不得转载。
博主地址是:http://blog.csdn.net/freewebsys
1,关于arduino 超声波传感器
HC-SR04 needs 5v
HC-SR04P can use 3.3V - 5V
尝试了几次,使用HC-SR04 是不能直接在 esp8266 上面直接使用的。
必须得外接电压 5v 才可以。等找到合适的设备再实验吧。虽然没有实验成功但是也记录下。
参考:
https://www.instructables.com/id/Distance-Measurement-Using-HC-SR04-Via-NodeMCU/


2,使用
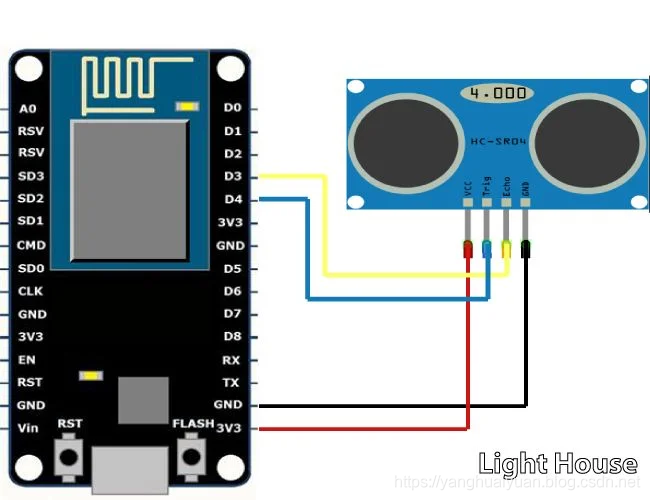
代码,特别要注意接线:

扫描二维码关注公众号,回复:
8967347 查看本文章


const int trigPin = 2;  //D4
const int echoPin = 0;  //D3

// defines variables
float duration;
float distance;

void setup() {
  pinMode(trigPin, OUTPUT); // Sets the trigPin as an Output
  pinMode(echoPin, INPUT); // Sets the echoPin as an Input
  Serial.begin(9600); // Starts the serial communication
}

void loop() {
  // Clears the trigPin
  digitalWrite(trigPin, LOW);
  delayMicroseconds(2);

  // Sets the trigPin on HIGH state for 10 micro seconds
  digitalWrite(trigPin, HIGH);
  delayMicroseconds(10);
  digitalWrite(trigPin, LOW);

  // Reads the echoPin, returns the sound wave travel time in microseconds
  duration = pulseIn(echoPin, HIGH);
  Serial.print("echoPin: ");
  Serial.print(echoPin);
  // Calculating the distance
  distance= duration*0.034/2.0;
  // Prints the distance on the Serial Monitor
  Serial.print(" ,Distance: ");
  Serial.println(distance);
  delay(200);
}
3,总结
arduino 现在已经非常的成熟了,是一个非常成熟的解决方案了。
可以链接到超声波传感器上面,就是电压的问题,不支持 5v 电压。还是没有有数据。
没有实验成功。也记录下。
本文的原文连接是:
https://blog.csdn.net/freewebsys/article/details/104130911
