文章目录
前言:
与之前博客中Apache网站服务器一样,在不同的生产环境中,我们需要作出不同的优化方案,在考虑稳定性、负载能力之上更重要的是安全性。
本篇博客主要从:Nginx的版本号、缓存时间、日志分隔、网页压缩和防盗链这几个方面的优化进行介绍
一、Nginx版本隐藏优化
1.1 Nginx隐藏版本号
-
在生产环境中,隐藏Nginx的版本号,是避免安全漏洞的一个最简单最必要的基础优化
-
查看版本方法
① 可以直接在windows客户端使用fiddler抓包工具捕捉访问的站点信息,其中包含Nginx版本号
② 在Centos系统中使用 curl -l 网址 命令查看Nginx版本号
-
Nginx隐藏版本号的方法
① 修改配置文件
② 修改源码
1.2 Nginx隐藏版本号
方式一:Nginx的配置文件中的server_tokens的选项设为off(关闭显示版本)
[root@www ~]# vim /usr/local/nginx/conf/nginx.conf
http {
    include       mime.types;
    default_type  application/octet-stream;
    server_tokens off;	##不显示版本
}- 重启服务后,可以使用curl -l 命令查看版本信息
示例:
[root@www conf]# service nginx restart
[root@www conf]# curl -I http://192.168.181.129/  #查看版本号
HTTP/1.1 200 OK
Server: nginx			#此处已不显示版本
Date: Wed, 05 Feb 2020 12:25:02 GMT
Content-Type: text/html
Content-Length: 612
Last-Modified: Wed, 05 Feb 2020 12:19:05 GMT
Connection: keep-alive
ETag: "5e3ab2b9-264"
Accept-Ranges: bytes-
若PHP配置文件中配置了 fastcgi_param SERVER SOFTWARE选项
则编辑 php-fpm配置文件,将fastcgi_param SERVER SOFTWARE对应的值修改为 fast_param SERVER_SOFTWARE nginx
方式二:修改Nginx源码
-
Nginx源码文件/usr/src/ nginx-1.12.2/src/ core/nginx. h包含了版本信息,可进行修改
-
重新编译安装,隐藏版本信息
示例:
define NGINX_VERSION “1.1.1″,修改版本号为1.1.1
define NGINX_VER “IIS/",修改软件类型为lls
[root@www ~]# vim /opt/nginx-1.12.2/src/core/nginx.h	#进入nginx内核文件中
#define nginx_version      1012002
#define NGINX_VERSION      "1.12.2"	##1.12.2是版本号,可直接修改版本号为1.1.1显示(版本欺骗)
#define NGINX_VER          "nginx/" NGINX_VERSION

#重新编译:
[root@localhost nginx-1.12.2]# ./configure \
> --prefix=/usr/local/nginx \
> --user=nginx \
> --group=nginx \
> --with-http_stub_status_module
[root@localhost nginx-1.12.2]# make && make install
#重启服务:
[root@localhost nginx-1.12.2]# service nginx restart
[root@localhost nginx-1.12.2]# curl -I http://192.168.181.129/  #查看版本号、
HTTP/1.1 200 OK
Server: nginx/1.1.1		#版本已被伪造成1.1.1
Date: Wed, 05 Feb 2020 12:30:33 GMT
Content-Type: text/html
Content-Length: 612
Last-Modified: Wed, 05 Feb 2020 12:19:05 GMT
Connection: keep-alive
ETag: "5e3ab2b9-264"
Accept-Ranges: bytes
二、Nginx用户与组优化
-
Nginx运行时进程需要有用户与组的支持,以实现对网站文件读取时进行访问控制
-
Nginx默认使用nobody用户账号与组账号,一般也要进行修改
-
修改的方法:
① 编译安装时指定用户与组
② 修改配置文件指定用户与组
2.1 修改主配置文件指定用户和组
vim /usr/local/nginx/conf/nginx.conf
user  nginx nginx;			#第二行,去掉注释,将nobody修改为nginx nginx(用户、组)
worker_processes 1;- 查看进程
[root@localhost nginx-1.12.2]# ps aux | grep nginx
root      20143  0.0  0.0  20544   604 ?        Ss   20:30   0:00 nginx: master process /usr/local/nginx/sbin/nginx
nginx     20145  0.0  0.0  23072  1640 ?        S    20:30   0:00 nginx: worker process
root      20217  0.0  0.0 112728   972 pts/0    R+   20:34   0:00 grep --color=auto nginx
[root@localhost nginx-1.12.2]#
主进程由root创建,子进程由nginx创建
三、配置Nginx网页缓存优化
3.1 Nginx网页缓存
-
当Nginx将网页数据返回给客户端后,可设置缓存的时间,以方便在日后进行相同内容的请求时直接返回,避免重复请求,加快了访问速度
-
一般针对静态网页设置,对动态网页不设置缓存时间
-
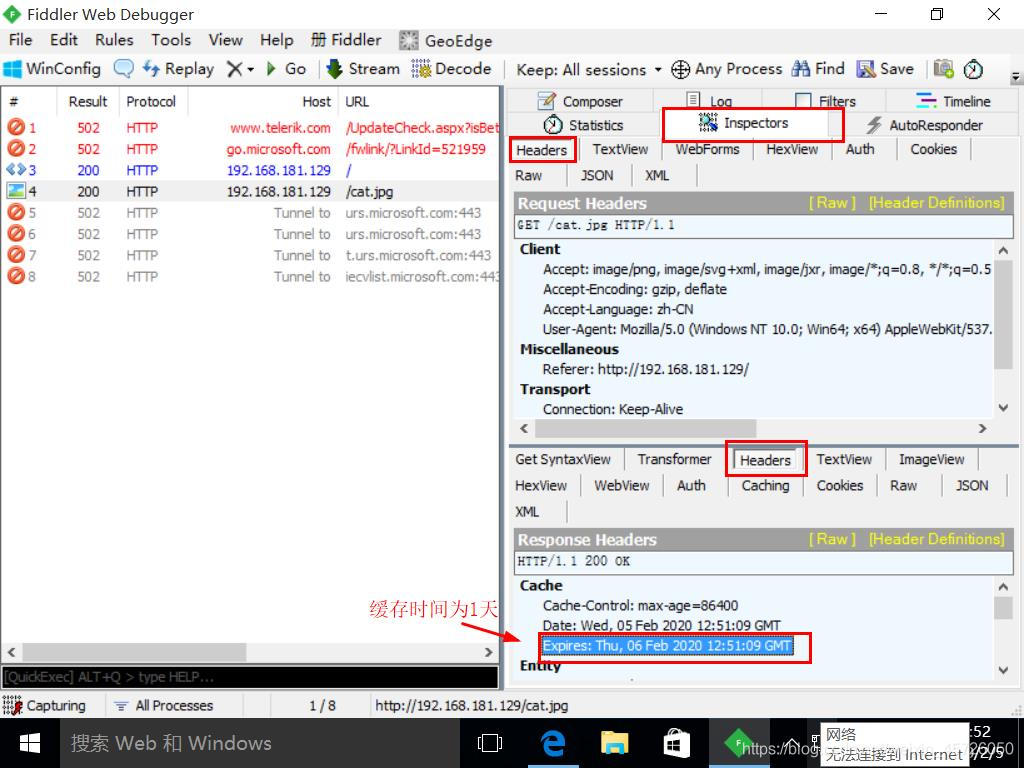
可在Windows客户端中使用fiddler查看网页缓存时间
-
设置方法:
可修改配置文件,在http段、 或者server段、 或者location段加入对特定内容的过期参数
3.2 Nginx网页缓存配置(实验)
① 先拷贝一张图片到nginx站点目录中
[root@localhost nginx-1.12.2]# cd /mnt
[root@localhost mnt]# ls
amoeba-mysql-binary-2.2.0.tar.gz  Discuz_X2.5_SC_UTF8.zip  mha
apr-1.6.2.tar.gz                  dog.jpg                  mha.rar
apr-util-1.6.0.tar.gz             error.png                mysql-5.6.26.tar.gz
awstats-7.6.tar.gz                httpd-2.4.29.tar.bz2     php-5.6.11.tar.bz2
cat.jpg                           LNMP-C7
cronolog-1.6.2-14.el7.x86_64.rpm  LNMP-C7.rar
[root@localhost mnt]# cp cat.jpg /usr/local/nginx/html/- ② 将图片加入到网页中
[root@localhost mnt]# cd /usr/local/nginx/html/
[root@localhost html]# ls
50x.html  cat.jpg  index.html
[root@localhost html]# vim index.html
<h1>Welcome to nginx!</h1>
<img src="cat.jpg"/>		#在此处添加图片信息
<p>If you see this page, the nginx web server is successfully installed and
working. Further configuration is required.</p>- ③ 访问站点验证
[root@localhost html]# service nginx start
- ④ 修改主配置文件
@localhost html]# vim /etc/nginx.conf
#讲一下内容加载http{}段内
location ~ \.(gif|jepg|jpg|ico|bmp|png)$ {
            root html;
            expires 1d;
        }
---------->wq- ⑤ 使用抓包工具进行验证
四、Nginx 日志分隔优化
4.1 Nginx 日志分隔
-
随着Nginx运行时间增加,日志也会增加。为了方便掌握Nginx运行状态,需要时刻关注Nginx日志文件
-
太大的日志文件对监控是一个大灾难
定期进行日志文件的切割
-
Nginx自身不具备日志分割处理的功能,但可以通过Nginx信号控制功能的脚本实现日志的自动切割,并通过Linux的计划任务周期性地进行日志切割
-
编写脚本进行日志切割的思路:
设置时间变量
设置保存日志路径;
将目前的日志文件进行重命名
删除时间过长的日志文件
设置cron任务,定期执行脚本自动进行日志分
4.2 Nginx日志分隔配置
- ① 编写脚本实验自动分隔
[root@localhost html]# vim /opt/fenge.sh
#!/bin/bash
#filename:fenge.sh
d=$(date -d "-1 day" "+%Y%m%d")		#-1 day代表昨天的日志 “+” 连接符
logs_path="/var/log/nginx"
pid_path="/usr/local/nginx/logs/nginx.pid"	#pid文件放的是进程号
[ -d $logs_path ] || mkdir -p $logs_path
mv /usr/local/nginx/logs/access.log ${logs_path}/test.com-access.log-$d
kill -USR1 $(cat $pid_path)
find $logs_path -mtime +30 | xargs rm -rf	#xargs 可以将 "|"之前的结果作为参数给 “|”后的命令执行
-----》wq
[root@localhost opt]# chmod +x fenge.sh- ② 执行脚本,查看日志文件目录
[root@localhost opt]# ./fenge.sh
[root@localhost opt]# cd /var/log/nginx/
[root@localhost nginx]# ls
test.com-access.log-20200204	#指的是前一天的日志
可以使用命令将时间设置提前一天,再次执行脚本查看
[root@localhost nginx]# date -s 2020-2-6
2020年 02月 06日 星期四 00:00:00 CST
[root@localhost nginx]# cd -
/opt
[root@localhost opt]# ./fenge.sh
[root@localhost opt]# cd -
/var/log/nginx
[root@localhost nginx]# ls
test.com-access.log-20200204 test.com-access.log-20200205- ③ 设置周期性计划任务,定期自动执行日志文革
[root@localhost nginx]# crontab -e
0 1 * * * /opt/fenge.sh
五、Nginx网页连接超时优化
5.1 Nginx网页连接超时
-
在企业网站中,为了避免同- -个客户长时间占用连接,造成资源浪费,可设置相应的连接超时参数,实现控制连接访问时间
-
使用Fiddler工具查看connection参数
-
超时参数讲解
Keepalive_timeout
设置连接保持超时时间,一般可只设置该参数,默认为75秒,可根据网站的情况设置,或者关闭,可在http段、server段、 或者location段设置
Client_header_timeout:指定等待客户端发送请求头的超时时间
Client_body_timeout:设置请求体读超时时间
5.2 Nginx网页连接超时优化
- ① 修改主配置文件
[root@localhost nginx]# vim /etc/nginx.conf
    keepalive_timeout  65 188;		#以最后的数为准,可以在http/server/location中设置
    client_header_timeout 80;		#等待客户端发送请求头的超时时间,超时后会发送408错误码
    client_body_timeout 80;			#设置客户端发送请求体超时时间
----->wq
[root@localhost nginx]# service nginx stop
[root@localhost nginx]# service nginx start- ② 使用抓包工具验证

中间虚拟机机重启了一次,导致了IP变化(此处可以忽略)
总结:
本篇博客介绍了Nginx网页的一般优化,之后会介绍Nginx的深入优化(压缩、防盗链)
