一.搭建静态网站-----基于http协议的静态网站服务器端:
在Linux上面实现网页服务器需要Apache这套服务器软件,httpd提供Apache主程序。
1.静态网站:要求搭建的web网站基于IP访问,当前web网站的根目录为/openlab,网站内容自定义。
[root@localhost ~]# mount /dev/sr0 /mnt //挂载
mount: /dev/sr0 is write-protected, mounting read-only
[root@localhost ~]# vim /etc/yum.repos.d/base.repo //创建仓库
[base] //仓库配置
name=base
baseurl=file:///mnt
gpgcheck=0
[root@localhost ~]#yum install httpd -y //下载安装
[root@localhost ~]# systemctl stop firewalld //关闭防火墙
[root@localhost ~]# setenforce 0//关闭selinux规则策略
[root@localhost ~]# rpm -qa httpd //查看是否安装
httpd-2.4.6-40.el7.x86_64
[root@localhost ~]# systemctl status httpd //查看状态
[root@localhost ~]# vim /etc/httpd/conf/httpd.conf //查看主配置文件
[root@localhost ~]# vim /etc/httpd/conf.d/vhost.conf //子配置文件
<Directory /openlab>
AllowOverride none //设置文件系统权限 允许覆盖
Require all granted //设置访问目录权限
<VirtualHost 192.168.40.133:80> //设置主机网络精确匹配信息 DocumentRoot /openlab //指定当前主机访问网站根目录
ServerName 192.168.40.133 //指定访问网站名称
[root@localhost ~]# mkdir /openlab
[root@localhost ~]# vim /openlab/index.html
Hello,welcome to openlab!
[root@localhost haha]# systemctl restart httpd //启动服务
[root@localhost haha]# curl http://192.168.40.133 //测试
**2. 基于IP地址对web服务器的访问:一个ip对应一个网。
3. 基于端口:基于不同端口访问不同网站4
4.基于域名:基于域名的网站,需要用到域名解析。域名------->ip地址
windows下的hosts文件路径:C:\Windows\System32\drivers\etc\hosts
Linux下的hosts文件路径:/etc/hosts
二.搭建静态网站-----基于https协议的静态网站
http--------->ssl------>tcp
[root@localhost ~]# mount /dev/sr0 /mnt //挂载
[root@localhost ~]# systemctl stop firewalld.service
[root@localhost ~]# setenforce 0
[root@localhost ~]# vim /etc/yum.repos.d/base.repo
[base]
name=base
baseurl=file:///mnt
gpgcheck=0
[root@localhost ~]# yum install httpd -y
[root@localhost ~]# rpm -qa httpd
httpd-2.4.6-40.el7.x86_64 1.
1.安装加密模块
[root@localhost ~]# yum install mod_ssl -y
[root@localhost ~]# rpm -ql mod_ssl
/etc/httpd/conf.d/ssl.conf
/etc/httpd/conf.modules.d/00-ssl.conf
/usr/lib64/httpd/modules/mod_ssl.so
/usr/libexec/httpd-ssl-pass-dialog
/var/cache/httpd/ssl
2.自定义加密信息
[root@localhost ~]# vim /etc/httpd/conf.d/vhost.conf
<Directory /openlab>
AllowOverride none
Require all granted
<VirtualHost 192.168.40.133:443>
DocumentRoot /openlab S
erverName 192.168.40.133
SSLEngine on //ssl认证开启
SSLProtocol all -SSLv2 //ssl支持的协议
SSLCipherSuite HIGH:MEDIUM:!MD5:!SEED:!IDEA //ssl算法套件 SSLCertificateFile /etc/pki/tls/certs/openlab.crt //ssl验证证书文件 SSLCertificateKeyFile /etc/pki/tls/private/openlab.key //ssl密钥文件
3.制作证书
[root@localhost ~]# cd /etc/pki/tls/certs/
[root@localhost certs]# make openlab.crt
[root@localhost certs]# ll
total 24
lrwxrwxrwx. 1 root root 49 Sep 9 19:06 ca-bundle.crt ->
/etc/pki/ca-trust/extracted/pem
/tls-ca-bundle.pemlrwxrwxrwx. 1 root root 55 Sep 9 19:06 ca-bundle.trust.crt ->
/etc/pki/ca-trust/extracted/openssl/ca-bundle.trust.crt
-rw-------. 1 root root 1468 Sep 17 03:19 localhost.crt-rwxr-xr-x. 1 root root 610 Jun 23 2015 make-dummy-cert
-rw-r–r--. 1 root root 2388 Jun 23 2015 Makefile
-rw-------. 1 root root 1387 Sep 17 03:31 openlab.crt
-rw-------. 1 root root 1766 Sep 17 03:28 openlab.key
-rwxr-xr-x. 1 root root 829 Jun 23 2015 renew-dummy-cert
[root@localhost certs]# mv openlab.key /etc/pki/tls/private/ //要与子配置文件要一致[root@localhost certs]# systemctl restart httpd
Enter SSL pass phrase for 192.168.40.133:443 (RSA) : ******
[root@localhost certs]# mkdir /openlab
[root@localhost certs]# echo this is openlab > /openlab/index.html
进行测试。
三.虚拟目录和用户控制:

修改:AuthUserFile /etc/httpd/userfile
往其添加用户的密码:
[root@localhost httpd]# htpasswd -c /etc/httpd/userfile song
New password:
Re-type new password:
Adding password for user song
[root@localhost httpd]# htpasswd -c /etc/httpd/userfile tian
New password:
Re-type new password:
Adding password for user tian
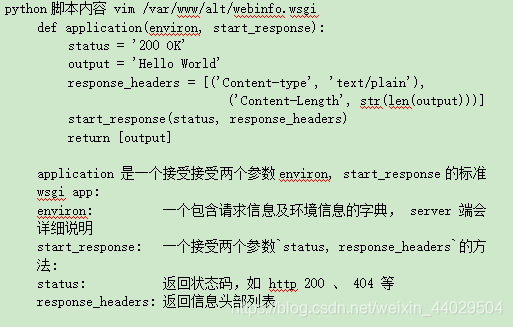
四.动态网站搭建:
安装包mod_wsgi / mod_python //web server Gateway Interface//
mkdir /var/www/alt
<Directory “/var/www/alt”>
AllowOverride None
Require all granted
LISTEN 8909
<VirtualHost 192.168.0.129:8909>
WSGIScriptAlias / /var/www/alt/webinfo.wsgi