esp8266 at命令开发
无论哪个平台,我感觉at命令开发是及其重要的,本文介绍下如何依赖于串口通信实现at命令开发。
**1.和前面添加功能模块一样,先创建一个at命令处理任务。
void app_main(void)
{
   //modify cdb 2019-12-19
   // printf("SDK version:%s\n", esp_get_idf_version());
   // Initialize NVS
    esp_err_t ret = nvs_flash_init();
    char sys_time[64] = {0};

    if (ret == ESP_ERR_NVS_NO_FREE_PAGES) {
        ESP_ERROR_CHECK(nvs_flash_erase());
        ret = nvs_flash_init();
    }

    ESP_ERROR_CHECK(ret);
    //初始化wifi,并且联网
    initialise_wifi();
    //创建mqtt 处理任务
    ret = xTaskCreate((void*)mqtt_client_thread,
                  MQTT_CLIENT_THREAD_NAME,
                  MQTT_CLIENT_THREAD_STACK_WORDS,
                  NULL,
                  MQTT_CLIENT_THREAD_PRIO,
                  NULL);

    if (ret != pdPASS)  {
        DBG_C("mqtt create client thread %s failed\n", MQTT_CLIENT_THREAD_NAME);
    }

    //创建gpio led key处理任务
    ret = xTaskCreate((void*)gpio_task,
                  GPIO_THREAD_NAME,
                  GPIO_THREAD_STACK_WORDS,
                  NULL,
                  GPIO_THREAD_PRIO,
                  NULL);
    if (ret != pdPASS)  {
        DBG_C("qpio thread %s failed\n", GPIO_THREAD_NAME);
    }

    //创建sntp处理任务
    ret = xTaskCreate((void*)sntp_example_task,
                  SNTP_THREAD_NAME,
                  SNTP_THREAD_STACK_WORDS,
                  NULL,
                  SNTP_THREAD_PRIO,
                  NULL);
    if (ret != pdPASS)  {
        DBG_C("sntp thread %s failed\n", SNTP_THREAD_NAME);
    }

    //创建atcmd处理任务
    ret = xTaskCreate((void*)atcmd_task,
                  ATCMD_THREAD_NAME,
                  ATCMD_THREAD_STACK_WORDS,
                  NULL,
                  ATCMD_THREAD_PRIO,
                  NULL);
    if (ret != pdPASS)  {
        DBG_C("atcmd thread %s failed\n", SNTP_THREAD_NAME);
    }

    //程序将进入死循环,防止退出,并且打印运行时间log,单位s,也开启rtos任务调度
    while(1)
    {
        memset(sys_time,0,64);
        get_system(sys_time);
        DBG_C("the system is runing,runtime:%s\n",sys_time);
        vTaskDelay(1000 / portTICK_RATE_MS);
    }

}
2.实现at命令处理任务,并且作为一个独立模块。

user_atcmd.c
// Copyright 2018-2025 Espressif Systems (Shanghai) PTE LTD
//
// Licensed under the Apache License, Version 2.0 (the "License");
// you may not use this file except in compliance with the License.
// You may obtain a copy of the License at
//
//     http://www.apache.org/licenses/LICENSE-2.0
//
// Unless required by applicable law or agreed to in writing, software
// distributed under the License is distributed on an "AS IS" BASIS,
// WITHOUT WARRANTIES OR CONDITIONS OF ANY KIND, either express or implied.
// See the License for the specific language governing permissions and
// limitations under the License.

#include <stdio.h>
#include <stdlib.h>
#include <string.h>

#include "freertos/FreeRTOS.h"
#include "freertos/task.h"

#include "driver/uart.h"

/**
 * This is an example which echos any data it receives on UART0 back to the sender,
 * with hardware flow control turned off. It does not use UART driver event queue.
 *
 * - Port: UART0
 * - Receive (Rx) buffer: on
 * - Transmit (Tx) buffer: off
 * - Flow control: off
 * - Event queue: off
 */

#define BUF_SIZE (512)


typedef struct atcmd_table
{
    char atcmd_name[16];
    void  (* atcmd_fun)(int,char*);
}atcmd_table_t;

//at test处理函数
void at_test_fun(int argc,char * argv )
{
    printf("-----this is test at  command---\n");
}

//at 命令处理表格,也是at命令添加处,再实现对应的处理函数。
atcmd_table_t at_table[] = {
    {"AT+TEST",at_test_fun},

};

//at 命令处理,其实是读串口数据
void atcmd_task(void)
{
    char recvbuf[64];
    char *p;
    int len = 0;
    char cmd[16];
    char cmd_parameter[64];
    int cmd_parameter_len = 0;
    int at_cmd_number = 0;
    int i=0;
    // Configure parameters of an UART driver,
    // communication pins and install the driver
    uart_config_t uart_config = {
        .baud_rate = 74880,
        .data_bits = UART_DATA_8_BITS,
        .parity    = UART_PARITY_DISABLE,
        .stop_bits = UART_STOP_BITS_1,
        .flow_ctrl = UART_HW_FLOWCTRL_DISABLE
    };
    uart_param_config(UART_NUM_0, &uart_config);
    uart_driver_install(UART_NUM_0, BUF_SIZE * 2, 0, 0, NULL);

    // Configure a temporary buffer for the incoming data
    uint8_t *data = (uint8_t *) malloc(BUF_SIZE);
    at_cmd_number = sizeof(at_table)/sizeof(atcmd_table_t);

    while (1) {
        memset(recvbuf,0,64);
        memset(cmd,0,16);
        memset(cmd_parameter,0,64);
        while(1)
        {
            // Read data from the UART(从串口读数据)
            len = uart_read_bytes(UART_NUM_0, data, BUF_SIZE, 20 / portTICK_RATE_MS);
            //拷贝并且解析数据--start
            memcpy(recvbuf,data,len);
            p = strchr(recvbuf,'=');
            if(p != NULL)
            {
                printf("recvbuf:%s,cmd name len:%d\n",recvbuf,(p-recvbuf));
                break;
            // Write data back to the UART
            //uart_write_bytes(UART_NUM_0, (const char *) data, len);
            }
        }
        memcpy(cmd,recvbuf,(p-recvbuf));
        memcpy(cmd_parameter,(p+1),(len-(p-recvbuf)-1));
        printf("cmd:%s\n",cmd);
        cmd_parameter_len = strlen(cmd_parameter);
        printf("cmd parameter:%s,len:%d\n",cmd_parameter,cmd_parameter_len);
 		//拷贝并且解析数据--end

		//将解析处理的at命令在at命令表中查找,如果找到,则处理相对应的处理函数
        for(i = 0;i<at_cmd_number;i++)
        {
            printf("cmd:%s,attable:%s,attable nub:%d\n",cmd,at_table[i].atcmd_name,at_cmd_number);
            if(0 == strncmp(cmd,at_table[i].atcmd_name,sizeof(cmd)))
            {
                printf("find the same at cmd\n");
                at_table[i].atcmd_fun(cmd_parameter_len,cmd_parameter);
                break;
            }
        }

    }
}
3.user_atcmd.h
#ifndef _ESP8266_MY_ATCMD_H_
#define _ESP8266_MY_ATCMD_H_

void atcmd_task(void);

#endif
4.修改component.mk
#
# Component Makefile
#

COMPONENT_SRCDIRS := mqtt gpio sntp atcmd

COMPONENT_ADD_INCLUDEDIRS += mqtt/include
COMPONENT_ADD_INCLUDEDIRS += gpio/include
COMPONENT_ADD_INCLUDEDIRS += sntp/include
COMPONENT_ADD_INCLUDEDIRS += atcmd/include
5.编译
make clean
make
注意如果想快速编译,不要make clean,直接make app即可,只会编译修改的.c代码。
6.烧录运行加测试
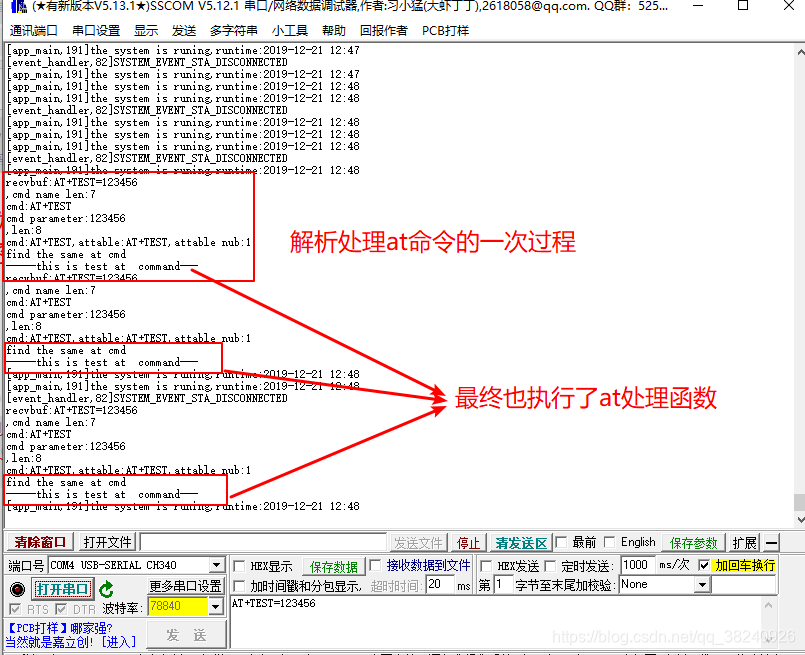
至此,at命令框架已经搭建好了,下一篇博客准备介绍esp8266 nvs机制,主要用于设备关机保存一些数据使用,比如,需要保存下联网信息(ssid password),下篇通过at命令,写入ssid 和 密码,重新开机读取后,在执行联网操作。
