chirpstack-helm-chart
Open source lorawan server project chirpstack helm chart, project source code
How to contribute
If you want to contribute to this project, you can click the forkbutton forkthis project and initiatePR
Fork
Preparation for contribution: Forkthis project.
Contribution process
$ git remote add chirpstack-helm-chart [email protected]:liangyuanpeng/chirpstack-helm-chart.git
# sync with the remote master
$ git checkout master
$ git fetch chirpstack-helm-chart
$ git rebase chirpstack-helm-chart/master
$ git push origin master
# create a PR branch
$ git checkout -b your_branch
# do something
$ git add [your change files]
$ git commit -sm "xxx"
$ git push origin your_branch
Install helm chart
$ git clone https://github.com/liangyuanpeng/chirpstack-helm-chart.git
$ cd chirpstack-helm-chart/
# install helm chart from this repo
$ helm install chirpstack .
注意:默认使用名叫longorn的storageClass存储.
$ kubectl get po
# 执行命令后可以看到以下pod
NAME                              READY   STATUS    RESTARTS   AGE
chirpstack-as-84b68cb7fd-zgs5j    1/1     Running   0          45s
chirpstack-ns-7d9b9867f-zftn6     1/1     Running   0          45s
mosquitto-0                       1/1     Running   0          45s
pgsql-0                           1/1     Running   0          45s
redis-0                           1/1     Running   0          45s
redis-exporter-64f8bf4f46-2rcgl   1/1     Running   0          45s
$ kubectl get svc
# 执行命令后可以看到以下svc
NAME             TYPE        CLUSTER-IP       EXTERNAL-IP   PORT(S)                      AGE
chirpstack-as    ClusterIP   10.98.227.61     <none>        8080/TCP,8001/TCP,8003/TCP   77s
chirpstack-ns    ClusterIP   10.108.182.238   <none>        8000/TCP                     77s
mosquitto        ClusterIP   10.104.149.103   <none>        1883/TCP                     77s
pgsql            ClusterIP   10.102.33.231    <none>        5432/TCP                     77s
redis            ClusterIP   10.109.138.95    <none>        6379/TCP                     77s
redis-exporter   ClusterIP   10.106.66.131    <none>        9121/TCP                     77s
$ kubectl get pvc
# 执行命令后可以看到以下pvc
NAME                               STATUS   VOLUME                                     CAPACITY   ACCESS MODES   STORAGECLASS   AGE
pgsql-pvc-pgsql-0                  Bound    pvc-c1c6adf4-32ef-4431-bd6a-3825a6ef408c   96Mi       RWO            longhorn       3d
redis-pvc-redis-0                  Bound    pvc-e464d0e8-e04a-4958-858e-5efef1aeba9c   48Mi       RWO            longhorn       3d
$ helm list
# 执行命令后可以看到以下chart
NAME            NAMESPACE       REVISION        UPDATED                                 STATUS          CHART                           APP VERSION
chirpstack      default         1               2021-01-29 16:11:48.984574857 +0800 CST deployed        chirpstack-helm-chart-0.1.0     1.16.0
Expose svc of application-server, access application-server
kubectl port-forward svc/chirpstack-as 8080:8080 --address 0.0.0.0
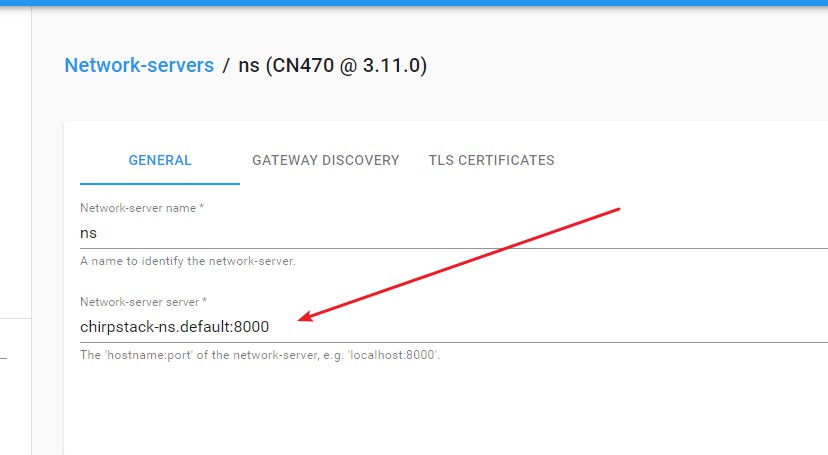
Set network-server on application-server
You can set chirpstack-ns.{namespace}:8000orchirpstack-ns.{namespace}.svc.cluster.local:8000
Here {namespace} is replaced with the real namespace
If you use the gateway-bridge component, you can use the following command to expose svc
kubectl expose deploy gateway-bridge --port 1700 --target-port=1700 --protocol=UDP --name udpservice --type=NodePort
to sum up
So far, ChirpStack has been deployed on K8S. The default service is to create SVC but not further exposed. The specific exposure method is currently for users to choose. After the AS port is exposed, the AS can be accessed. The same is true for MQTT service and gateway-bridge service. Data needs to be uploaded to the server and the service needs to be exposed.