1. Why use GPU Instancing?
In the past, when we optimized the cpu, in order to reduce the consumption of Drawcall, we usually used static batch processing, dynamic batch processing and other technologies, but this also has drawbacks. Usually in a large scene, there are a large number of the same vegetation and other objects. After static batch processing, the increase in memory is very large, and the dynamic is tens of megabytes of memory. The dynamic batch processing requires a lot of batching, and may exist at the same time. The dynamic batching consumes too much, and the gain is not worth the loss. If we perform dynamic batching in the logic code, the readwrite attribute of the mesh is required to be turned on, which will undoubtedly increase the memory usage, and complex batch processing may consume more CPU time.

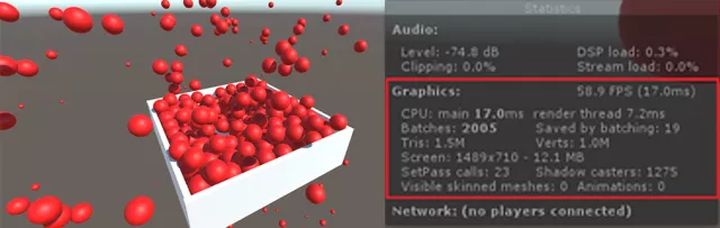
Unity has added a new feature in version 5.4 and later, that is GPU Instancing . The emergence of GPU Instancing provides us with new ideas. For large scenes, all scene objects are loaded at one time, which is very stressful for memory. We can remove all these static objects such as vegetation from Cull out the scene, and save its position, zoom, uv offset, lightmapindex and other related information. When rendering is required, it is rendered through Instance according to the saved information , which can reduce those large quantities that cannot be batched due to memory reasons. The rendering time of batches of the same objects. The following two figures are rendering multiple gameobjects in the same scene . Figure 1 enables GPU Instancing , but Figure 2 does not.
figure 1
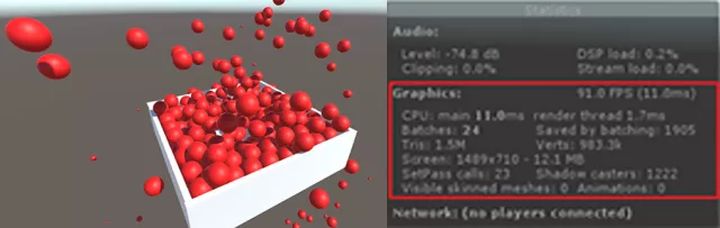
figure 2
At the Unite2017 conference, Unity’s development engineers demonstrated some implementations of GPU Instancing for us , but currently it only supports standard surface instances , and does not support functions such as lightmap , light detectors, shadows, and cropping. All these need to be realized by ourselves. (Here only refers to Unity 5.6 and previous versions)
2. How to use GPU Instancing?
First, let’s take a look at Unity’s built-in support for standard surface shaders, through
Create->Shader->StandardSurfaceShader(Instanced)
You can create a standard surface shader (instance), the following is a piece of code in this shader (PS: I am experimenting with the version of Unity 5.5, and Unity 5.6 does not have this option, and Unity 5.6 is in the material properties There is an Enable Instance Variants check option in the panel, check it means that Instance is supported)
SubShader {
  Tags { "RenderType"="Opaque" }
  LOD 200

  CGPROGRAM
  // Physically based Standard lighting model, and enable shadows on all light types
  // And generate the shadow pass with instancing support
  #pragma surface surf Standard fullforwardshadows addshadow
  // Use shader model 3.0 target, to get nicer looking lighting
  #pragma target 3.0
  // Enable instancing for this shader
  #pragma multi_compile_instancing
  // Config maxcount. See manual page.
  // #pragma instancing_options
  sampler2D _MainTex;
  struct Input {
                 float2 uv_MainTex;
               };
  half _Glossiness;
  half _Metallic;
  // Declare instanced properties inside a cbuffer.
  // Each instanced property is an array of by default 500(D3D)/128(GL) elements. Since D3D and GL imposes a certain limitation
  // of 64KB and 16KB respectively on the size of a cubffer, the default array size thus allows two matrix arrays in one cbuffer.
  // Use maxcount option on #pragma instancing_options directive to specify array size other than default (divided by 4 when used
  // for GL).
  UNITY_INSTANCING_CBUFFER_START(Props)
  UNITY_DEFINE_INSTANCED_PROP(fixed4, _Color) // Make _Color an instanced property (i.e. an array)
  UNITY_INSTANCING_CBUFFER_END
  void surf (Input IN, inout SurfaceOutputStandard o) {
      // Albedo comes from a texture tinted by color
      fixed4 c = tex2D (_MainTex, IN.uv_MainTex) *  UNITY_ACCESS_INSTANCED_PROP(_Color);
      o.Albedo = c.rgb;
      // Metallic and smoothness come from slider variables
      o.Metallic = _Metallic;
      o.Smoothness = _Glossiness;
      o.Alpha = c.a;
    }
   ENDCG
  }
Then let’s take a look at the Vertex/Fragment shader example on the official website. The shader code is as follows
Shader "SimplestInstancedShader"
{
   Properties
   {
       _Color   ("Color", Color) = (1, 1, 1, 1)
   }
   SubShader
   {
       Tags   { "RenderType"="Opaque" }
       LOD   100
       Pass
       {
           CGPROGRAM
           #pragma   vertex vert
           #pragma   fragment frag
           #pragma   multi_compile_instancing
           #include   "UnityCG.cginc"
           struct appdata
           {
               float4   vertex : POSITION;
               UNITY_VERTEX_INPUT_INSTANCE_ID
           };
           struct v2f
           {
               float4   vertex : SV_POSITION;
               UNITY_VERTEX_INPUT_INSTANCE_ID //   necessary only if you want to access instanced properties in fragment Shader.
           };
           UNITY_INSTANCING_CBUFFER_START(MyProperties)
           UNITY_DEFINE_INSTANCED_PROP(float4,   _Color)
           UNITY_INSTANCING_CBUFFER_END

           v2f   vert(appdata v)
           {
               v2f   o;
               UNITY_SETUP_INSTANCE_ID(v);
               UNITY_TRANSFER_INSTANCE_ID(v,   o); // necessary only if you want to access instanced properties in the fragment Shader.
               o.vertex   = UnityObjectToClipPos(v.vertex);
               return o;
           }

           fixed4   frag(v2f i) : SV_Target
           {
               UNITY_SETUP_INSTANCE_ID(i); //   necessary only if any instanced properties are going to be accessed in the fragment Shader.
               return UNITY_ACCESS_INSTANCED_PROP(_Color);
           }
           ENDCG
       }
   }
}
Finally, explain some of the key macros for the above Shader.
UNITY_VERTEX_INPUT_INSTANCE_ID
Used to define an element with the semantics of SV_InstanceID in the Vertex Shader input/output structure .
UNITY_INSTANCING_CBUFFER_START(name) / UNITY_INSTANCING_CBUFFER_END
Unique attributes of each Instance must be defined in a Constant Buffer that follows special naming rules. Use this pair of macros to define these Constant Buffers. The "name" parameter can be any string.
UNITY_DEFINE_INSTANCED_PROP(float4, _Color)
定义一个具有特定类型和名字的每个Instance独有的Shader属性。这个宏实际会定义一个Uniform数组。
UNITY_SETUP_INSTANCE_ID(v)
这个宏必须在Vertex Shader的最开始调用,如果你需要在Fragment Shader里访问Instanced属性,则需要在Fragment Shader的开始也用一下。这个宏的目的在于让Instance ID在Shader函数里也能够被访问到。
UNITY_TRANSFER_INSTANCE_ID(v, o)
在Vertex Shader中把Instance ID从输入结构拷贝至输出结构中。只有当你需要在Fragment Shader中访问每个Instance独有的属性时才需要写这个宏。
UNITY_ACCESS_INSTANCED_PROP(_Color)
访问每个Instance独有的属性。这个宏会使用Instance ID作为索引到Uniform数组中去取当前Instance对应的数据。(这个宏在上面的shader中没有出现,在下面我自定义的shader中有引用到)。
三、如何使用lightmap、阴影、裁剪功能?
当然首先我们还是得在我们的通道中包含指令,不然都是白搭。
#pragma multi_compile_instancing
- lightmap的支持 -
对Unity内置lightmap的获取。我们定义两个编译开关,然后在自定义顶点输入输出结构包含lightmap的uv。
#pragma   multi_compile LIGHTMAP_OFF LIGHTMAP_ON  //开关编译选项
struct v2f
{
   float4   pos : SV_POSITION;
   float3   lightDir : TEXCOORD0;
   float3   normal : TEXCOORD1;
   float2   uv : TEXCOORD2;
   LIGHTING_COORDS(3,   4)
#ifdef   LIGHTMAP_ON
   flost2   uv_LightMap : TEXCOORD5;
#endif
   UNITY_VERTEX_INPUT_INSTANCE_ID
}
然后在顶点函数中进行如下处理
#ifdef   LIGHTMAP_ON
   o.uv_LightMap   = v.texcoord1.xy * _LightMap_ST.xy + _LightMap_ST.zw;
#endif
最后在像素函数中进行解码处理。
DecodeLightmap函数可以针对不同的平台对光照贴图进行解码。
#ifdef LIGHTMAP_ON
   fixed3 lm = DecodeLightmap(UNITY_SAMPLE_TEX2D(_LightMap, i.uv_LightMap.xy));
   finalColor.rgb *= lm;
#endif
当然我们也可以通过属性来将lightmap传递给shader,这里就不写了。
- 阴影 -
当使用标准表面着色器时,Unity可以轻易的为我们提供阴影支持,但Vertex/fragment着色器中我们需要增加一些指令,同时还需要自己添加阴影投射通道。首先增加标签,表示接收正向基础光照为主光源。
Tags{ "LightMode" = "ForwardBase" }
然后增加如下指令,确保shder为所需要的通道执行正确的编译,同时因为我们需要里面的光照处理。
#ifdef   LIGHTMAP_ON
   o.uv_LightMap   = v.texcoord1.xy * _LightMap_ST.xy + _LightMap_ST.zw;
#endif
同时在我们的输入输出结构中添加
LIGHTING_COORDS宏,这个宏指令定义了对阴影贴图和光照贴图采样所需的参数。
LIGHTING_COORDS(3, 4)
完整的代码如下:
pass
{
  Tags{ "LightMode" = "ForwardBase" }
  CGPROGRAM
  #pragma target 3.0
  #pragma fragmentoption
  ARB_precision_hint_fastest
  #pragma vertex vertShadow
  #pragma fragment fragShadow
  #pragma multi_compile_fwdbase
  #pragma multi_compile_instancing
  #include "UnityCG.cginc"
  #include "AutoLight.cginc"
  #pragma multi_compile LIGHTMAP_OFF LIGHTMAP_ON  //开关编译选项
  sampler2D _DiffuseTexture;
  float4 _DiffuseTint;
  float4 _LightColor0;
  sampler2D _LightMap;//传进来的lightmap
  float4 _LightMap_ST;//
  struct v2f
   {
      float4 pos : SV_POSITION;
      float3 lightDir : TEXCOORD0;
      float3 normal : TEXCOORD1;
      float2 uv : TEXCOORD2;
      LIGHTING_COORDS(3, 4)
      #ifdef LIGHTMAP_ON
      flost2 uv_LightMap : TEXCOORD5;
      #endif
      UNITY_VERTEX_INPUT_INSTANCE_ID
    };
  UNITY_INSTANCING_CBUFFER_START(Props)
  UNITY_DEFINE_INSTANCED_PROP(fixed4, _Color) // Make _Color an instanced property (i.e. an array)
  UNITY_INSTANCING_CBUFFER_END
  v2f vertShadow(appdata_base v)
   {
      v2f o;
      UNITY_SETUP_INSTANCE_ID(v);
      UNITY_TRANSFER_INSTANCE_ID(v, o);
      o.pos = mul(UNITY_MATRIX_MVP, v.vertex);
      o.uv = v.texcoord;
      o.lightDir = normalize(ObjSpaceLightDir(v.vertex));
      o.normal = normalize(v.normal).xyz;
      #ifdef LIGHTMAP_ON
      //o.uv_LightMap = v.texcoord1.xy * unity_LightmapST.xy + unity_LightmapST.zw;
      o.uv_LightMap = v.texcoord1.xy * _LightMap_ST.xy + _LightMap_ST.zw;
      #endif
      TRANSFER_VERTEX_TO_FRAGMENT(o);
      return o;
    }
  float4 fragShadow(v2f i) : SV_Target
    {
       UNITY_SETUP_INSTANCE_ID(i);
       float3 L = normalize(i.lightDir);
       float3 N = normalize(i.normal);
       float attenuation = LIGHT_ATTENUATION(i) * 2;
       float4 ambient =  UNITY_LIGHTMODEL_AMBIENT * 2;
       float NdotL = saturate(dot(N, L));
       float4 diffuseTerm = NdotL * _LightColor0 * _DiffuseTint * attenuation;
       float4 diffuse = tex2D(_DiffuseTexture, i.uv)*UNITY_ACCESS_INSTANCED_PROP(_Color);//这里用宏访问Instance的颜色属性
       float4 finalColor = (ambient + diffuseTerm) * diffuse;
       #ifdef LIGHTMAP_ON
       //fixed3 lm = DecodeLightmap(UNITY_SAMPLE_TEX2D(unity_Lightmap, i.uv_LightMap.xy));
       fixed3 lm = DecodeLightmap(UNITY_SAMPLE_TEX2D(_LightMap, i.uv_LightMap.xy));
       finalColor.rgb *= lm;
       #endif
       return finalColor;
    }
    ENDCG
  }
有了上面的通道还不够,那只是告诉着色器,我们能够捕获到其阴影所需的一切了;最后我们需要阴影投射通道
/*阴影投射需要自定义,否则不支持GPU Instance同时需要包括指令multi_compile_instancing以及
在vert及frag函数中取instance id否则多个对象将得不到阴影投射
*/
Pass{
  Tags{ "LightMode" = "ShadowCaster" }
  CGPROGRAM
   #pragma vertex vert
   #pragma fragment frag
   #pragma multi_compile_shadowcaster
   #pragma multi_compile_instancing
   #include "UnityCG.cginc"
   sampler2D _Shadow;
   struct v2f {
                V2F_SHADOW_CASTER;
                float2 uv:TEXCOORD2;
                UNITY_VERTEX_INPUT_INSTANCE_ID
              };
  v2f vert(appdata_base v)
        {
          v2f o;
          UNITY_SETUP_INSTANCE_ID(v);
          UNITY_TRANSFER_INSTANCE_ID(v, o);//
          o.uv = v.texcoord.xy;
          TRANSFER_SHADOW_CASTER_NORMALOFFSET(o);
          return o;
        }
  float4 frag(v2f i) : SV_Target
        {
          UNITY_SETUP_INSTANCE_ID(i);
          fixed alpha = tex2D(_Shadow, i.uv).a;
          clip(alpha - 0.5);
          SHADOW_CASTER_FRAGMENT(i)
        }
  ENDCG
}
- 裁剪 -
裁剪,我们可以通过逻辑控制来进行处理,一是场景加载策略,如四叉树场景管理,根据当前所在区块来决定渲染目标,二是通过当前摄像机空间来裁剪目标,这里简单的说下通过摄像机视锥体空间裁剪的方法(四叉树动态场景管理网上搜索是有demo的)
bool IsCanCulling(Transform tran)
{
  //必要时候,摄像机的视域体的计算 放置在裁剪判断之外,避免多次坐标变换开销,保证每帧只有一次
  Vector3 viewVec = Camera.main.WorldToViewportPoint(tran.position);
  var far = Camera.main.farClipPlane ;
  var near = Camera.main.nearClipPlane;
  if (viewVec.x > 0 && viewVec.x < 1 && viewVec.y > 0 && viewVec.y < 1 && viewVec.z > near && viewVec.z < far)
      return false;
  else
      return true;
}
四、C#端调用
在C#端,我们可以通过Graphics.DrawMeshInstanced 接口直接向GPU输送绘制调用,这里在初始化阶段随机的生成了一些位置信息,然后在每帧更新阶段调用
Graphics.DrawMeshInstanced 接口进行绘制
public class testInstance : MonoBehaviour
{
   //草材质用到的mesh
   Mesh   mesh;
   Material   mat;
   public GameObject m_prefab;
   Matrix4x4[]   matrix;
   ShadowCastingMode   castShadows;//阴影选项
   public int InstanceCount = 10;
   //树的预制体由树干和树叶两个mesh组成
   MeshFilter[]   meshFs;
   Renderer[]   renders;

  //这个变量类似于unity5.6材质属性的Enable Instance Variants勾选项
   public bool turnOnInstance = true;
   void Start()
   {
       if (m_prefab == null)
         return;
       Shader.EnableKeyword("LIGHTMAP_ON");//开启lightmap
       //Shader.DisableKeyword("LIGHTMAP_OFF");
       var   mf = m_prefab.GetComponent<MeshFilter>();
       if (mf)
         {
           mesh   = m_prefab.GetComponent<MeshFilter>().sharedMesh;
           mat   = m_prefab.GetComponent<Renderer>().sharedMaterial;
         }
      //如果一个预制体 由多个mesh组成,则需要绘制多少次
      if(mesh   == null)
         {
           meshFs   = m_prefab.GetComponentsInChildren<MeshFilter>();
         }
      if(mat   == null)
         {
           renders   = m_prefab.GetComponentsInChildren<Renderer>();
         }
      matrix   = new Matrix4x4[InstanceCount];

      castShadows   = ShadowCastingMode.On;

//随机生成位置与缩放
 for (int i = 0; i < InstanceCount;   i++)
       {
          ///   random position
          float x = Random.Range(-50, 50);
          float y = Random.Range(-3, 3);
          float z = Random.Range(-50, 50);
          matrix[i]   =   Matrix4x4.identity;   ///   set default identity
           //设置位置
          matrix[i].SetColumn(3, new Vector4(x, 0.5f, z, 1));  /// 4th colummn: set   position
           //设置缩放
           //matrix[i].m00   = Mathf.Max(1, x);
           //matrix[i].m11   = Mathf.Max(1, y);
           //matrix[i].m22   = Mathf.Max(1, z);
       }
   }
   void Update()
   {
     if (turnOnInstance)
       {
          castShadows   = ShadowCastingMode.On;
          if(mesh)
               Graphics.DrawMeshInstanced(mesh,   0, mat, matrix, matrix.Length, props, castShadows, true, 0, null);
          else
          {
            for(int i = 0; i < meshFs.Length; ++i)
               {
                   Graphics.DrawMeshInstanced(meshFs[i].sharedMesh,   0, renders[i].sharedMaterial, matrix, matrix.Length, props,   castShadows, true, 0, null);
               }
           }
       }
   }
}
五、效果展示
下面场景中使用了1023棵树,8*1023棵草。用1023这个数是因为DrawMeshInstanced传递的矩阵长度为1023,而1023个mesh其实是分成3个drawcall完成的。
UnityInstance.cginc中是这么定义的:
#define UNITY_MAX_INSTANCE_COUNT 500
Therefore, a drawcall can only allow a maximum of 500 instances. In addition, the shader of grass and tree here is the resource that I used js, so I did not increase the shadow and lightmap . This aspect is handled in the demo I made with the cube model.
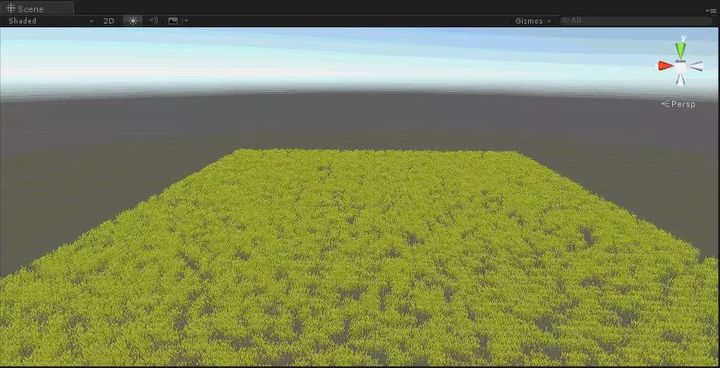
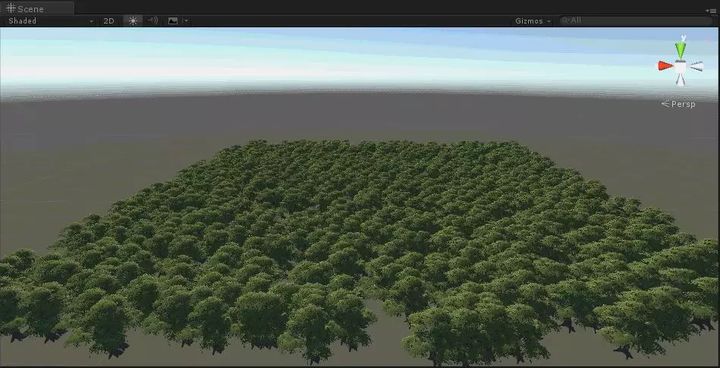
Image source: game http://www.cungun.com/game
6. Conclusion
In OpenGL ES3.0 and above devices, we can use GpuInsttance technology to better improve our game performance, leaving more CPU time for complex logic, such as combat and other modules with higher requirements for game experience; In the older ES2.0 equipment, we can fully adopt existing practices to be compatible, and at this time we may need to do more to streamline the model and optimize it through other strategies such as Lod .