☞ ░LaoYuanPython blog post directory: https://blog.csdn.net/LaoYuanPython ░
I. Introduction
Recently I saw several blog posts similar to "n lines of Python code...". They look pretty good. They are concise and practical. They spread knowledge and brought reading volume. They moved the heart of the old ape and decided to follow suit and push one. " N Lines of Python Code Series " article.
Today, write a minimalist implementation of three lines of code that intercepts the video output of the sub-window of the video window. For more " n-line Python code series " articles, please refer to the free column " https://blog.csdn.net/laoyuanpython/category_10858655.html n-line Python code series ".
2. Functional requirements
Lao Yuan downloaded the short video "Aipin Will Win" on Douyin. In the playback screen, there are some fixed images in the upper and lower parts, as shown in the figure:
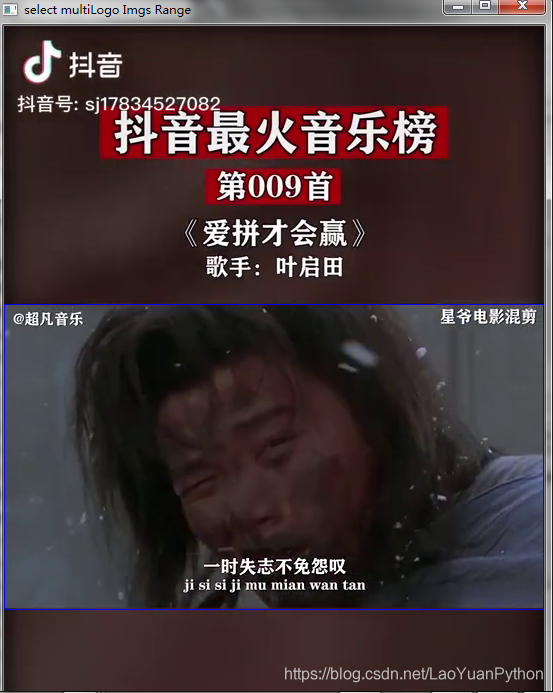
I hope to remove it, and only keep the sub-windows within the blue box. Corresponding to the video content.
Three, realize
To achieve the above requirements, only the following three lines of code are required:
from  moviepy.editor import *

clipVideo = VideoFileClip(r"F:\video\WinBasedWorkHard_src.mp4")
clipVideo.crop(0, 278, 540, 580).write_videofile (r"F:\video\WinBasedWorkHard_crop.mp4")
The first one imports the moviepy library, the second one reads the source video file, and the third one outputs the video content of the specified range of the sub-window in the source video file to the save file.
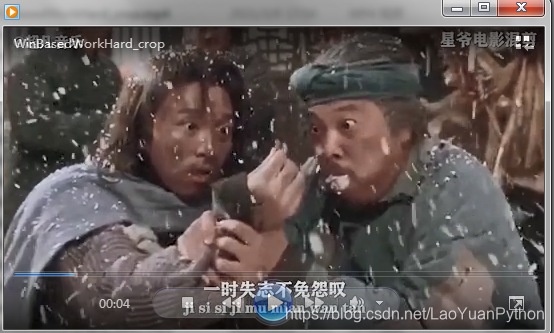
Screenshot of the playback video screen of the saved file :
Four, background knowledge
4.1 Introduction to moviepy
MoviePy is a Python module for video editing, which can be used to perform basic video operations (such as cutting, joining, and title insertion), video synthesis (also called non-linear editing), video processing or creating advanced effects.
It can read and write the most common video formats, including GIF. The video that MoviePy can handle is in ffmpeg format. Laoyuan understands that the supported file types include at least: *.mp4 *.wmv *.rm *.avi *.flv *.webm *.wav *rmvb.
MoviePy uses ffmpeg to read and export video and audio files, and ImageMagick to generate text and output GIF files. Python's fast digital library Numpy guarantees the processing of different media. Advanced effects and enhancements use many image processing libraries of Python (PIL, Scikit-image, scipy, etc.).
The core object of moviepy is clips, including AudioClips and VideoClips. They can be modified (cut, slowed down, darkened...) or mixed with the clip to form a new clip, can be previewed using PyGame or IPython Notebook, and can be output to the corresponding type of file (such as MP4, GIF, MP3, etc.). For example, VideoClips can be created from video files, images, text, or custom animations. VideoClips can have an audio track (this is an AudioClip) and a mask (a special VideoClip that indicates which parts to hide when the clip is mixed with other clips).
4.2, moviepy installation
MoviePy installation is very simple. When using pip to install, please point the site to a domestic mirror site, otherwise the download will be slow or cannot be downloaded. The old monkey uses Tsinghua's mirror. The instruction is:
pip install -i https://pypi.tuna.tsinghua.edu.cn/simple moviepy
note:
1. Moviepy is all lowercase, and related dependencies will be automatically installed during installation;
2. It is recommended to install the latest version 1.0.3, because there is a relatively large bug in 1.0.2, please see " When using moviepy for video editing in Python The output file reports an error'NoneType' object has no attribute'stdout' problem ";
3. If the latest version is not installed, you can perform a version upgrade, command:
pip install -i https://pypi.tuna.tsinghua.edu.cn/simple moviepy --upgrade
For more introduction to Moviepy, please refer to Laoyuan’s free column " https://blog.csdn.net/laoyuanpython/category_9991887.html PyQt+moviepy audio and video editing combat ".
4.3, related functions
The related functions involved in the above code include VideoFileClip, crop and write_videofile.
4.3.1、VideoFileClip
VideoFileClip is actually a class, and its construction method is as follows:
__init__(self, filename, has_mask=False,
                 audio=True, audio_buffersize=200000,
                 target_resolution=None, resize_algorithm='bicubic',
                 audio_fps=44100, audio_nbytes=2, verbose=False,
                 fps_source='tbr')
Parameter Description:
- filename: the name of the video file, which can include a path
- has_mask: Whether there is a mask, if the video file has a mask, set has_mask to True. Generally, video files rarely have masks, but some video codecs support masking functions. For example, if moviepy synthesizes a masked clip, you can use VideoClip.write_videofile introduced in " Moviepy Audio and Video Clip: Detailed Explanation of the Properties and Methods of Video Clip Base Class VideoClip " to save the clip, mask, and audio information to the video file. in
- audio: If the video file does not have audio or do not want to load the audio of the video file, you can set the audio parameter to False
- audio_buffersize: The size of the audio file read buffer, in bytes. Generally, the default value is sufficient. If audio_buffersize is smaller than the size of an audio frame, the size of the audio frame will be automatically used instead
- target_resolution: Set to the resolution that needs to be transformed after loading, the type is list or tuple, the first element is the height of the resolution, the second is the width, if either the height or the width is None, the existing aspect is maintained Than adjust the size of the frame. If you keep the original resolution unchanged, you don't need to set this parameter or set it to None. If a new resolution is set, the frame size will be adjusted according to the new resolution before calling ffmpeg to return the frame of the video clip. This is much faster than converting to a high-resolution stream and then adjusting the resolution
- resize_algorithm: To change the resolution of the loaded video, you can specify the resolution adjustment algorithm through resize_algorithm. The default value is "bicubic", or "bilinear", "fast_bilinear", etc. For more information about the algorithm, please refer to: https://ffmpeg.org/ffmpeg-scaler.html
- audio_fps: the sampling frequency of the sound
- audio_nbytes: the number of bits of audio samples
- verbose: Whether to display processing information on the standard output device
- fps_source: Get the fps value from the metadata of the video. The default setting is'tbr', but it can be set to'fps'. This may help import slow-motion videos, otherwise accidents may occur.
4.3.2, crop function
The crop function obtains the clip content of a rectangular area from the clip as a new clip.
调用语法:
crop( clip, x1=None, y1=None, x2=None, y2=None, width=None, height=None, x_center=None, y_center=None)
Parameters :
x1, y1: represent the coordinates of the upper left corner of the rectangular area
x2, y2: represent the coordinates of the lower right corner of the rectangular area
width, height: width and height
x_center, y_center: the coordinates of x1 are x_center-width/2, and the coordinates of x2 are x_center +width/2, y_center is similar to processing
data calculation logic
The following takes the data of the abscissa system as an example to illustrate the calculation logic of the rectangle position coordinates (unit: pixel):
As long as any two of the abscissa data x1, x2, and width appear, the other one can be calculated:
- If x_center appears, you can calculate x1 and x2
- If only one of x1, x2, width appears or none of them appears, then the abscissa of the upper left corner or lower right corner of the original clip is taken for the x1, x2 that does not appear, so there is no meaning to appearing width alone
The above calculation process is sequential, and only the previous ones are not satisfied will the latter be executed. The same is true for the ordinate system data.
4.3.3 write_videofile method
The write_videofile method is used to output video clips to a file. The calling syntax is as follows:
write_videofile(self, filename, fps=None, codec=None,
                        bitrate=None, audio=True, audio_fps=44100,
                        preset="medium",
                        audio_nbytes=4, audio_codec=None,
                        audio_bitrate=None, audio_bufsize=2000,
                        temp_audiofile=None,
                        rewrite_audio=True, remove_temp=True,
                        write_logfile=False, verbose=True,
                        threads=None, ffmpeg_params=None,
                        logger='bar')
The parameter description is as follows:
- filename: The name of the video file, as long as it is a video file supported by ffmpeg, such as .ogv, .mp4, .mpeg, .avi, .mov, etc.
- fps: frame rate, the number of frames encoded per second
- codec: The codec used for image encoding, which can be any codec supported by ffmpeg. If the file name extension is ".mp4", ".ogv", ".webm", the codec will be set accordingly, but if you don't like the default value, you can still set it. For other extensions, the output file name must be set accordingly. Some commonly used codecs are as follows:
√.'libx264': a codec with good video compression effect, the default codec of MP4, video quality is adjusted by bitrate parameter
√.'mpeg4': an optional MP4 codec can replace 'libx264', you can get better video quality
√.'rawvideo ': perfect video quality, but the file will be huge, the corresponding video file' .avi '
√.' PNG ': perfect Video quality, the corresponding video file is'.avi', but the file size is smaller than that of'rawvideo'
√.'libvorbis': a completely open and free codec, there are good video formats, but if it is not wide, corresponding The video file is'.ogv'
√.'libvpx': a lightweight open source codec for web video that is very suitable for use in HTML5, and the corresponding video file is'.webm' - bitrate: The bit rate of the output video, that is, the bit rate BPS (Bits Per Second), which refers to the number of data bits transmitted per second
- audio: It can be True, False or a file name. If True and audio is attached to the clip, the audio will be saved as the audio of the video. If it is False, the audio will not be saved. If it is an audio file name, the audio file will be the video. Audio
- audio_fps: the sampling frequency of the sound
- preset: Set the time used by FFMPEG to optimize compression. String type, optional values are: ultrafast, superfast, veryfast, faster, fast, medium, slow, slower, veryslow, placebo. Please note that this will not affect the quality of the video, only the size of the video file. So if you are in a hurry and the file size is not very important, you can set it to ultrafast
- audio_nbytes: The number of bits used in audio, corresponding to the number of channels based on bytes;
- audio_codec: Audio decoder, such as'libmp3lame' of'.mp3','libvorbis' of'ogg','libfdk_aac' of'm4a', 16-bit sound of'pcm_s16le' and 32-bit sound of'pcm_s32le'. The default value is "libmp3lame", unless the video extension is "ogv" or "webm". In these two cases, the default value is "libvorbis".
- audio_bitrate: Audio bitrate, string form, such as "50k", "500k", "3000k", used to determine the size/quality of the audio in the output file. Please note that this is mainly an indicative target, and the bit rate of the output file may not be set according to this.
- audio_bufsize: audio buffer size
- temp_audiofile: If the output is audio, this parameter is used to specify the name of the temporary audio file to be generated and merged into the movie, if not specified, the temporary file name in the default mode is used
- rewrite_audio: This parameter currently has no effect, it is estimated to be compatible with the previous version
- remove_temp: Whether to delete temporary files
- write_logfile: If True, a log file will be recorded for audio and video output. The log file will end with ".log" and contain the name of the output file
- verbose: It has been deprecated and is left for compatibility. It was used to turn on/off messages before. Now use logger=None.
- threads: the number of threads used for ffmpeg, which can speed up the video output speed on a multi-core computer
- ffmpeg_params: other ffmpeg parameters that need to be passed additionally, passed as a list, like: ['-option1','value1','-option2','value2']
- logger: string type, "bar" means progress bar, None means not set, or the name of any program logger
V. Summary
This article introduces the implementation method of using Python+Moviepy three lines of code to intercept the corresponding content of the MP4 video part of the sub-window and output it to the video file. This method can intercept the corresponding video output in the middle rectangular window of the video, thereby eliminating some of the surrounding video Useless information. This method uses Moviepy's video object operation functions VideoFileClip, crop and write_videofile. The specific syntax is also introduced in this article.
For more information about moviepy knowledge, please refer to the guided introduction of " https://blog.csdn.net/LaoYuanPython/article/details/108184832 Python audio and video editing library MoviePy1.0.3 Chinese tutorial guide and executable tool download " .
Blogging is not easy, please support:
If you have gained something from reading this article, please like, comment, and bookmark. Thank you for your support!
If you have any questions about the content of the article, you can leave a message in the blog comment area, or follow: Lao Yuan Python WeChat public account to send a message for consultation.
Paid column about the old ape
- The paid column " https://blog.csdn.net/laoyuanpython/category_9607725.html Using PyQt to Develop Graphical Interface Python Applications" specifically introduces the basic tutorials of Python-based PyQt graphical interface development. The corresponding article directory is " https://blog.csdn .net/LaoYuanPython/article/details/107580932 Use PyQt to develop a graphical interface Python application column directory ";
- The paid column " https://blog.csdn.net/laoyuanpython/category_10232926.html moviepy audio and video development column ) details the related methods of moviepy audio and video editing and synthesis processing and the use of related methods to process related editing and synthesis scenes, corresponding to the article The directory is " https://blog.csdn.net/LaoYuanPython/article/details/107574583 moviepy audio and video development column article directory ";
- The paid column " https://blog.csdn.net/laoyuanpython/category_10581071.html OpenCV-Python Difficult Questions for Beginners " is " https://blog.csdn.net/laoyuanpython/category_9979286.html OpenCV-Python graphics and image processing "The companion column" is an integration of the author’s personal perceptions of some of the problems encountered in the learning of OpenCV-Python graphics and image processing. The relevant information is basically the result of repeated research by the old ape, which helps OpenCV-Python beginners to more in-depth To understand OpenCV, the corresponding article directory is " https://blog.csdn.net/LaoYuanPython/article/details/109713407 OpenCV-Python Beginners Difficult Question Collection Column Directory "
- The paid column " https://blog.csdn.net/laoyuanpython/category_10762553.html Introduction to Python Crawlers" introduces the content of crawler development from the perspective of an Internet front-end developer, including the basic knowledge of crawler introduction and crawling Take CSDN article information, blogger information, like articles, comments and other actual content.
The first two columns are suitable for novice readers who have a certain Python foundation but no relevant knowledge. The third column, please combine " https://blog.csdn.net/laoyuanpython/category_9979286.html OpenCV-Python graphics and image processing " Learning to use.
For those who lack Python foundation, you can learn Python from scratch through Lao Yuan’s free column " https://blog.csdn.net/laoyuanpython/category_9831699.html column: Python basic tutorial directory ).
If you are interested and willing to support the readers of Old Ape, welcome to buy paid columns.

If you have any questions about the content of the article, you can leave a message in the blog comment area, or follow: Lao Yuan Python WeChat public account to send a message for consultation.