content
1. Get command help information
Fourth, file and directory operations
5. Install and uninstall software packages by RPM
6. Use yum to install and uninstall packages
Seven, file archiving, compression operation
Nine, mount the USB storage device
1. Get command help information
1. Obtain internal command help information: (usually in pure English)

2. Obtain external command help information: (with Chinese)

The difference between internal commands and external commands:
- Internal commands exist in the shell of the Linux system, not in the disk
The Shell is loaded into the memory by the Linux system, and the internal commands are in a state of being called at any time, and the user can use it directly
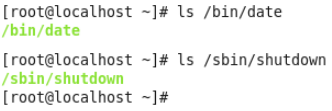
- External commands exist as files: usually stored on the hard disk
External commands are mainly in directories such as "/bin, /sbin"
For example: the date command is under "/bin", and the shutdown command is under "/sbin"
2. View system information
1. View CPU information: cat /proc/cpuinfo

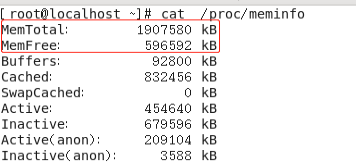
2. Check the memory: cat /proc/meminfo
3. Check the system kernel version: cat /proc/version

4. View the mounted file system: cat /proc/mounts

5. View the system date: date
![]()
6. Set date and time (month, day, hour, minute, year. second) date 041217002007.00

3. Shutdown operation
1. Shut down the system:
Method 1: shutdown now Method 2: poweroff
2. Restart the system:
Method 1: shutdown -r now Method 2: reboot
3. Log out of the system: logout
Fourth, file and directory operations
1. Change the path (cd)
1) Enter a directory: cd /home
![]()
2) Return to the previous directory: cd ..
![]()
3) Enter the personal home directory: cd ~user home directory name
For example: cd ~user1 to enter the personal home directory
![]()
4) Return to the directory where you were last time: cd -
![]()
5) Show the full working path: pwd
![]()
2. View (ls) directory or file
1) View files or subdirectories in a directory: ls /etc directory: blue file: black or other colors

2) ls -F directory: with slash "/" file: without slash "/"

3) View the details of a directory or file: ls -l

Uploading... Reupload Cancel
Uploading... Reupload Cancel
Transfer FailedReupload Cancel
w: not only write, but also change and delete permissions
x: execution right
- Directory execution rights: the user can enter the directory
- Script file or command file execution right: the user can run the script or command
4) Show files or directories with hidden attributes: ls -a

A file or directory with a dot "." has a hidden attribute
3. Create and delete directories
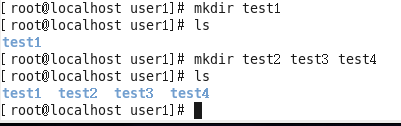
1) Create a directory: mkdir directory 1 [directory 2] [directory 3] …
2) Create a directory tree: mkdir -p / first-level directory name / second-level directory name / third-level directory name…
![]()
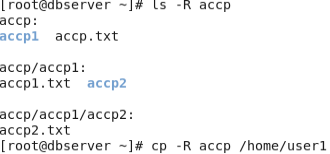
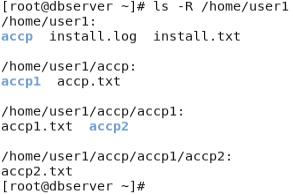
3) View the directory tree (recursive display): ls -R /first-level directory name

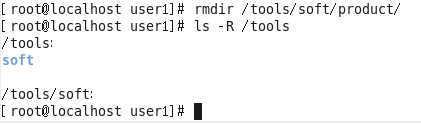
4) Delete the empty directory (rmdir): delete the product subdirectory
5) Delete the directory tree: rmdir -p /first-level directory name
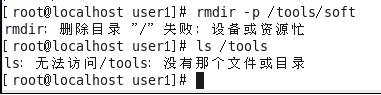
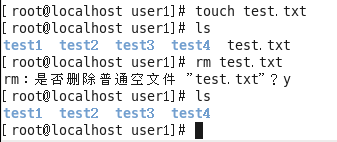
4. Delete files and directories (rm)
1) Delete the file: rm the file name and its path
2) Delete files and directories
- rm -rf /first-level directory
- -r: delete the directory tree recursively (delete the included files together)
- -f: close the human-machine session (when deleting, the system will no longer ask whether to delete)

5. touch command
1) Create an empty file: touch the new file name and path

2) Update the creation time stamp of the old file: touch the old file name and path

6. Modify or edit file content: gedit file name and path
![]()
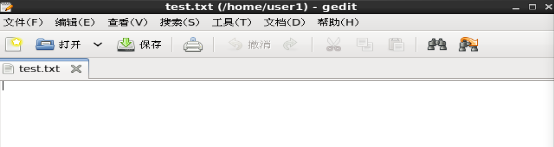
You can also edit and modify the file content through the vim (or vi) command
7. mv command
1) Rename files and directories
- mv original file name and path new file name and path
- The 2 paths must be the same (if they are different, move the file or directory)

2) Move files or directories
- mv source file name and path new file name and path
- 2 paths must be different

8. cp command
1) Copy the file (original name copy)
cp source file and path destination file path

- The asterisk "*" wildcard can be used, for example:
- Copy all files: cp /root/* /home/user1
- Copy all files of the same type: cp /root/*.txt /home/user1
2) Copy the file (renamed copy - the source file path and the target file path are the same)
cp source file and path object file and path

3) Copy the entire directory tree (including directories, subdirectories and files)
cp -R source directory target directory
9. Create a soft link file
- Soft links: equivalent to shortcuts (soft links can be created for files or directories)
- ln -s source file (directory) path soft link file and path

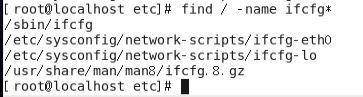
10. Find a file or directory: Find the ifcfg-eth0 file in the root directory
find specifies the search path -name specifies the file name and directory name to be searched for

Use an asterisk (*) for fuzzy search
1) To find files whose file names start with ifcfg
2) To find files whose file type is cfg

5. Install and uninstall software packages by RPM
1. Load the system CD:
Load the linux system CD image file in the virtual machine

1) Mount CD: mount CD device file name and path Mount point directory and path

2) Uninstall the CD (after using it):
Method 1: umount CD device file name and path

Method 2: umount mount point directory For example: umount /mnt
2. Install and uninstall software packages
- -q: query packages
- -a: all packages
- rpm -iUvh package file name and its mount directory
- -i: install
- -U: upgrade
- -v: Display detailed process information
- -h: Display process progress in # mode
- -e: uninstall
Exact query: rpm -qa package name (package name is wrong, it will not be able to query correctly)
Fuzzy query: use the pipe character ( | ) followed by the grep filter command
![]()
- If it is blank, it means it is not installed
- grep: filter the display
- vsftpd: filter displayed strings
- " | ": pipe character (separator of the preceding and following commands; the output of the preceding command is used as the input of the following command)
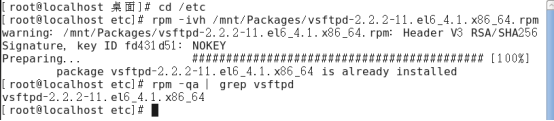
1) Install the package: rpm -ivh package file name and path
2) Uninstall the package: rpm -e package name
No result: Indicates that the uninstallation was successful
![]()
No query result: again, the uninstallation is successful
![]()
Dependency package problem:
The rpm command is simple to operate, but cannot solve the problem of dependent packages (some software will prompt to install or uninstall other software first when installing or uninstalling it), which makes installation or uninstallation complicated. As follows:
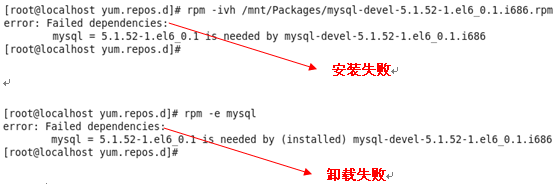
To solve the dependency package problem:
Method 1: Add a long option "--nodeps" at the end of the command to ignore the software dependency problem; however, ignoring the software dependency problem may cause the software to not work properly.
Method 2: Use yum to automatically resolve software dependencies.
6. Use yum to install and uninstall packages
Yum source is divided into: local source, network source
- Local source is divided into: hard disk source, CD source, using file protocol
- Network source: use http, ftp protocol, but need network environment support
The following uses the local source (CD-ROM source) method , and does not understand the network source.
1. Modify the yum repository file and determine the yum source
The yum repository file is located in the /etc/yum.repos.d directory, and the file extension is .repo

There are 3 files by default, 2 can be deleted and 1 can be kept!
![]()
Edit the repository file rhel-source.repo with gedit
![]()
The repository file class content is as follows:

The explanation is as follows:
- [ ]: Define the warehouse, base is the name of the warehouse, which can be arbitrary
- name: a short textual description of the repository
- baseurl: the location of the warehouse, file:// represents the local path, /mnt is the local CD path, and the network path is: http, ftp
- enabled : Whether to enable the warehouse, 1 is enabled, 0 is disabled
- gpgcheck : Whether to check the GPG signature (used to verify whether the installation package is official from Red Hat)
- GPGKEY : Specify the storage path of the key file for GPG signature
2. Mount the Linux system CD
![]()
3. Test yum function
Command: yum list (list the rpm package of the warehouse)
![]()
A message similar to the following appears, indicating that the yum function is normal

4. Install the package command: yum install package name


5. Uninstall the package command: yum erase package name


6. Automatically resolve dependency package problems
1) Install the software


2) Uninstall the software


Seven, file archiving, compression operation
1. tar command
Common options:
- -c: create archive
- -x: unarchive
- -v: show process
- -f: specify the file name
- -C: Specifies the directory path to unarchive
- -z: compress the packed file into gzip format
- -j: compress the packed file into bzip2 format
1) Archive: that is, packaging, often used to back up an important directory
Only archive without compression: the name and path of the archive file created by tar -cvf The directory to be archived

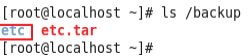
Both archive and compress (gzip, bzip2 compression formats)
The archive compressed file name and path created by tar -czvf The directory to be archived
![]()
![]()
The archive compressed file name and path created by tar -cjvf The directory to be archived

2) Unarchive
Unarchive to the original path: tar -xvf archive file name and path
![]()

Unarchive to the specified path: tar -xvf archive file name and path -C specifies the directory path to unarchive
![]()

unzip, unarchive
Unzip, unarchive to the original path
- tar -xzvf archive compressed file name and path
- For example: tar -xzvf /backup/root.tar.gz
- tar -xjvf archive compressed file name and path
- For example: tar -xjvf /backup/root.tar.bz2
Unzip, unarchive to the specified path
- tar -xzvf archive compressed file name and path -C specify the directory path for dearchive
- For example: tar -xzvf /backup/root.tar.gz -C /backup
- tar -xjvf archive compressed file name and path -C specify the directory path for dearchive
- For example: tar -xjvf /backup/root.tar.bz2 -C /backup2
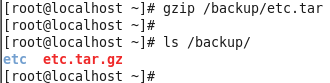
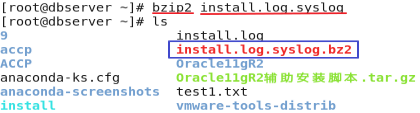
2, gzip, bzip command
Common options: -d: decompress
1) Compression:
- gzip

- bzip
2) Unzip:
- gzip
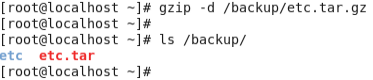

- bzip

8. Users and groups
Related concepts:
- Running the program requires a certain user identity and certain operating rights.
- Users can also join a group to inherit the group's permissions.
- There are private groups and additional groups in Linux systems.
The private group is the user's own group. This group does not need to be created separately. It is automatically created by the system when the user is created. The group name of the private group is the same as the user name.
Additional groups are groups other than private groups, and users can belong to multiple different additional groups and have permissions of multiple groups.
- Each distinct user and group has a unique name (username, groupname)
- 用户和组分别存放在/etc/目录下的passwd和group文件中
1、创建用户和组
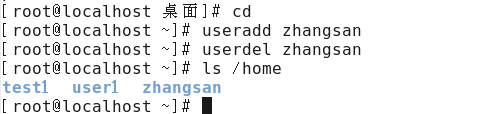
1)创建用户(useradd)
- 不指定附加组:useradd 新用户名 例如:useradd zhangsan
- 指定附加组:useradd -G 附加组组名 新用户名
- -G :指定用户所属的附加组(改组必须已存在)
创建用户test1,并将其加入到student组中


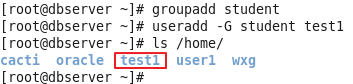

2)创建组(goupadd)
groupadd 新组名 例如:groupadd admin
3)设置用户的登录密码:
设置密码时,屏幕上将不显示任何信息(连星号*也没有)
passwd 用户名

2、删除用户和组
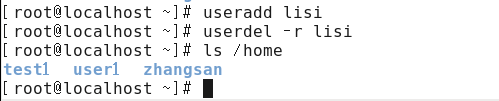
1)删除用户(userdel)
- 只删除用户,不删除宿主目录:userdel 用户名
- 用户和宿主目录同时删除
userdel -r 用户名 -r:删除宿主目录
lisi 目录不存在,已被删除
2)删除组(groupdel)
groupdel 组名 例如:groupdel admin
3、用户和组权限
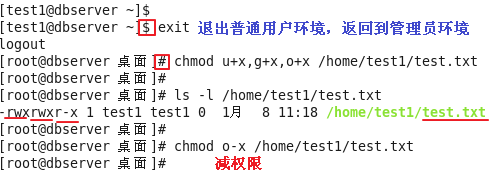
1)更改文件、目录权限:chmod
ugo操作方式:chmod ugo+-权限 要更改的文件或目录路径
- u:用户即文件目录的所有者(所有者权限)
- g:组即文件目录的隶属组(组权限)
- o:其它用户(其它用户权限)
以用户test1身份登录系统,在宿主目录下创建test.txt文件,则该文件的所有者为test1,隶属组也为test1(私有组)

![]()
八进制操作方式
- 4:r
- 2:w
- 1:x
- 0:无权限
660顺序和ugo顺序含义完全相同,即:所有者权限为6(rw),组权限为6(rw),其它用户权限为0(无权限)

2)更改文件、目录所有者:chown
只更改所有者:chown 用户名 文件或目录路径

只更该隶属组 chown :组名 文件或目录路径

Change owner and group at the same time chown username : groupname file or directory path

- -R option: recursively change the owner or group of the directory tree
- chown -R username:groupname directoryname
- For example: chown -R test1:test1 /pub
- The owner and subordinate group of the pub directory and its subdirectories under the root are changed to the test1 user and the test1 private group
Nine, mount the USB storage device
1. Use a USB storage device in a Linux virtual machine
1) Make sure that the keyboard and mouse are occupied by the virtual machine system (click once in the virtual machine system with the mouse)
2) Insert U disk or mobile hard disk
After inserting the U disk, the U disk only appears in the Windows system of the physical machine, but does not enter the Linux virtual machine. The solution: as shown in the following figure

After performing this operation, a prompt similar to the following will appear in the virtual machine Linux system:
If you can't see the above information, it may be a problem with the virtual machine version, or the U disk is not supported by the Linux system!
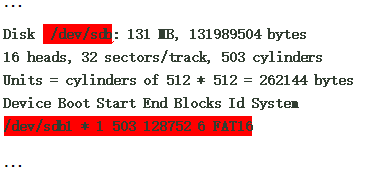
3) Use the "fdisk -l" command to view the device name of the U disk
In this example, the device name of the U disk is: sdb, and the partition number is 1. The specific situation is subject to the command result.
4) Use the mount and umount commands to mount and unmount the U disk (same as the CD-ROM), as shown below:
Mount U disk
mount /dev/sdb1 /mnt
ls /mnt (you can view the files or directories in the U disk)
Unmount the U disk:
umount /mnt or
umount /dev/sdb1
2. Use a USB storage device in a Linux physical machine (start from step 2 above)