Table of contents
First, the parent transmits data to the child
1. Transmission of fixed specific data
3. The child component calls the parent component
Second, the child transmits data to the parent
3. The same level of price and data transfer between any components
foreword
In the front, we have already understood the components of vue and the hierarchical relationship between the components of vue. This is in the blogger's previous blog, if you are interested, you can move forward. The address is:
This article mainly writes and records the mode and method of communication between components. Our components can only call their own properties and methods, and cannot call the properties and methods of other components, but if they are called, then It is to use data communication, so that the properties and methods of the component can be called.
The most prominent features of our vue components are data flow across components, custom event communication, and build tool integration.
First, the parent transmits data to the child
1. Transmission of fixed specific data
We understand through a code example that the parent component passes specific data to the child component.
Code example:
<!DOCTYPE html>
<html lang="en">
<head>
    <title>层级关系</title>
</head>
<body>
    <div id="app">
      <child msg="**大学"></child>
    </div>


    <script src="http://cdn.staticfile.org/vue/2.2.2/vue.min.js"></script>
    <script>
        Vue.component('child',{
            props:['msg'],
            template:
            `<h1>{

   {msg}}学生教务系统</h1>`
        });
var  vm = new Vue({
    el:"#app",

})

    </script>
</body>

</html>
operation result:
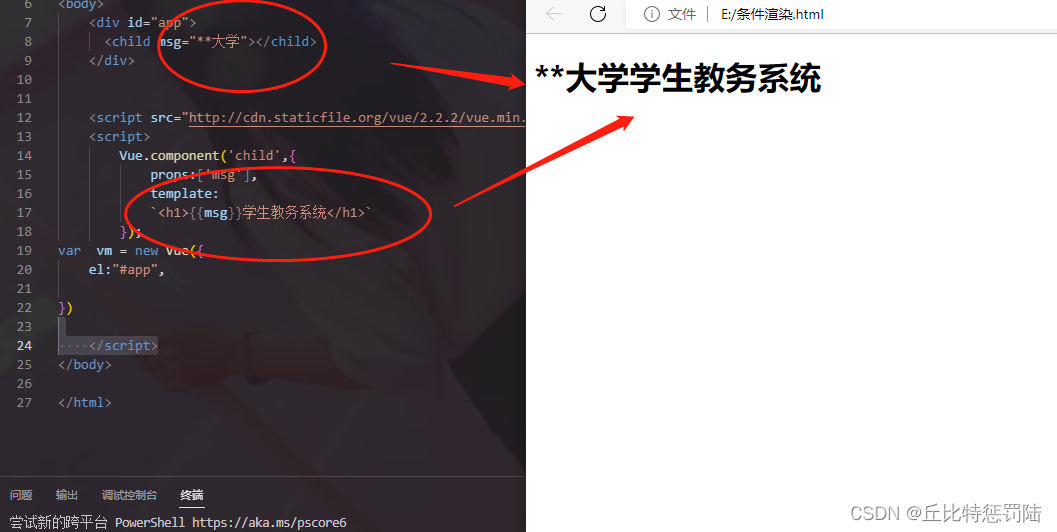
We can see an interface like this. When a property msg is defined in the child component through props: ['msg'], the root component will call the child component, pass the '**University' in the property msg, and pass this data. Give it to the child component, so this component can be displayed, because this value is a fixed and specific value and cannot be changed, so this method is also called literal value transfer.
2. Dynamic grammar
The dynamic syntax is actually very simple. It is similar to using v-bind to bind html features to an expression. You can use v-bind to bind dynamic props to the data of the parent component. When the data of the parent component changes, these changes are sent to the child component. This is not difficult to understand, let's take a look at some code:
Code example:
<!DOCTYPE html>
<html lang="en">
<head>
    <title>组件之间的传递</title>
</head>
<body>
    <div id="app">
      <child v-bind:msg='stage':open='open'></child>
    </div>


    <script src="http://cdn.staticfile.org/vue/2.2.2/vue.min.js"></script>
    <script>
        Vue.component('child',{

            template:
            `
            <div><h1>{

   {msg}}学生教务系统</h1>
                <h2 v-show='open'>放假了!进不了!!!</h2></div>`,
                props:['msg','open'],
        });
var  vm = new Vue({
    el:"#app",
     data:{
        stage:"放假",
        open:true
     }
})

    </script>
</body>

</html>
operation result:

We can see that in the child component, the attributes of two educational administration systems, msg and open, have been defined. The child component has been used in the parent component, and the v-bind instruction is used to bind our two attributes to receive Data from parent component. Between our components, we can use props to specify validation requirements. At this time, the value obtained by props is the value of an object.
3. The child component calls the parent component
Here we can explain that when the parent component calls our child component by binding the event, this method is passed to the child component, and the event can be triggered by $emit in the child component. This is not difficult to understand, we can understand it through code:
Code example:
<!DOCTYPE html>
<html lang="en">
<head>
    <title>组件之间的传递</title>
</head>
<body>
    <div id="app">
      <child v-on:fmethod="show"></child>
      <p>{

   {msg}}</p>
    </div>
<template id="n1">
    <div><button @click="myclick">调用父组件</button></div>
</template>

    <script src="http://cdn.staticfile.org/vue/2.2.2/vue.min.js"></script>
    <script>
    var clild = {
    template:"#n1",
    methods:{
        myclick(){this.$emit('fmethod');}
    }
};
var  vm = new Vue({
    el:"#app",
     data:{msg:""},
     methods:{
        show(){this.msg="这里是父级组件的方法";}
     },
     components:{child:clild}
})

    </script>
</body>

</html>
Running result: When we click, the show method of the parent component can be executed. as follows:
Second, the child transmits data to the parent
1. Use custom events
When the parent component calls the child component, we first bind a custom event through a v-on instruction. In the child component, we can trigger this function event through $emit, and then define the function event in the parent component. The method of processing the function, passing the data to the parent component through such passing parameters, this is still very simple and understandable, we understand our definition through the code example,
Example code:
<!DOCTYPE html>
<html lang="en">
<head>
    <title>组件之间的传递</title>
</head>
<body>
    <div id="app">
      <child v-on:fmethod="show"></child>
      <p>{

   {msg}}</p>
    </div>
<template id="n1">
    <div><button @click="myclick">调用父组件的方法</button></div>
</template>

    <script src="http://cdn.staticfile.org/vue/2.2.2/vue.min.js"></script>
    <script>
    var clild = {
    template:"#n1",
    data:function(){return {msg:"这里是来自子级组件的数据"}},
    methods:{
        myclick(){this.$emit('fmethod',this.msg);}
    }
};
var  vm = new Vue({
    el:"#app",
     data:{msg:""},
     methods:{
        show(data){this.msg=data;}
     },
     components:{child:clild}
})

    </script>
</body>

</html>
operation result:
When the button is clicked, the myclick method is executed. The this.$emit command in this method will trigger the fmethod event, call the show method in the parent component, and then pass this.msg as an argument. as follows:
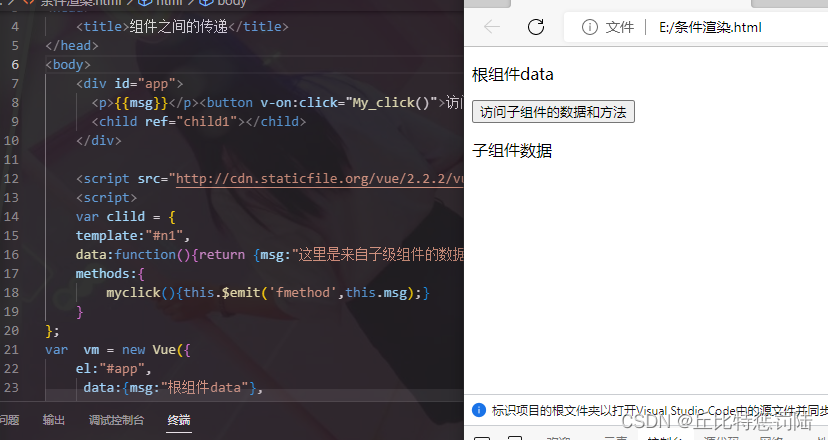
2. Use of $refs
When this concept is used, we can know that the ref attribute is used when calling the child component, and the instance of the component corresponding to the attribute value of ref is obtained through $refs. After obtaining the parent component, the child component can be used to control the data of the child component. At the same time, you can also get the method of sub-components. The concept is very simple. We can understand it through code:
Example code:
<!DOCTYPE html>
<html lang="en">
<head>
    <title>组件之间的传递</title>
</head>
<body>
    <div id="app">
      <p>{

   {msg}}</p><button v-on:click="My_click()">访问子组件的数据和方法</button>
      <child ref="child1"></child>
    </div>

    <script src="http://cdn.staticfile.org/vue/2.2.2/vue.min.js"></script>
    <script>
    var clild = {
    template:"#n1",
    data:function(){return {msg:"这里是来自子级组件的数据"}},
    methods:{
        myclick(){this.$emit('fmethod',this.msg);}
    }
};
var  vm = new Vue({
    el:"#app",
     data:{msg:"根组件data"},
     methods:{
        My_click(){
            console.log(this.$emit.child.msg1);
            this.$refs.child.show("已经被调用");
        }
     },
     components:{
        child:{
            template:'<p>{

   {msg1}}</p>',
            data:function(){
                return {msg1:"子组件数据"}
            },
            methods:{
                show(data){
                    console.log("子组件方法"+data)
                }
            }
        }
     }
})

    </script>
</body>

</html>
operation result:
3. The same level of price and data transfer between any components
We already know the data transfer before the parent and child components, so now we have to understand the sibling components, the time bus can be used for communication between any components, so as to use the method to solve the cross-level transfer.
In the program code, we must first define the event bus. Among the two components that use the event bus to transmit data, one component can use the listening time; the other component can use the trigger event. We can still learn about it through an example code:
Example code:
<!DOCTYPE html>
<html lang="en">
<head>
    <title>组件之间的传递</title>
</head>
<body>
    <div id="app">
     <component-one></component-one>
     <component-two></component-two>
    </div>

     <template id="n1">
        <div style="border: 1px solid blue;padding: 10px;margin: 10px;">
        我是哥哥,想要获取到弟弟的数据:{

   {msg1}}
        </div>
     </template>

     <template id="n2">
        <div style="border: 1px solid blue;padding: 10px;margin: 10px;">
        我是弟弟
        <button @click="send">把弟弟的数据传给哥哥</button>
        </div>
     </template>

    <script src="http://cdn.staticfile.org/vue/2.2.2/vue.min.js"></script>
    <script>
var bus = new Vue({});
var  vm = new Vue({
    el:"#app",
    components:{
        "component-one":{
            template:'#n1',
            data(){
                return {msg1:""}
            },
            mounted(){
                bus.$on("data-transmit",msgs2=>{
                    this.msg1 = msgs2
                })
            },
        },
        "component-two":{
            template:"#n2",
            data(){return {msg2:"我是弟弟的数据"}},
            methods:{
                send(){
                    bus.$emit("data-transmit",this.msg2);
                }
            }
        }
    }
})

    </script>
</body>

</html>
Running result: Click the button to transfer the data in the younger brother (component) to the older brother (component).