foreword
In the previous "Multiple Video Calls Based on the Acoustics Flutter SDK" , we perfectly realized the effect of cross-platform and multi-person video calls through Flutter + Acoustics SDK , so in this article we will advance on the basis of the previous examples Introduce some commonly used special effects functions, including virtual background, color enhancement, spatial audio, and basic sound changing functions.
This article mainly takes you to understand several practical API implementations in the SDK, which are relatively simple.
01 Virtual background
enableVirtualBackgroundVirtual background is one of the most common special effects in video conferencing, and virtual background support can be enabled through methods in the Agora SDK . ( Click here to view the virtual background interface documentation ).
First of all, because we are using it in Flutter, we can put a picture in Flutter assets/bg.jpgas the background, here are two points to note:
assets/bg.jpgThe picture needs to add a referencepubspec.yamlunder the fileassets
  assets:
    - assets/bg.jpg
- Need to
pubspec.yamladdpath_provider: ^2.0.8andpath: ^1.8.2depend on the file, because we need to save the picture in the App local path
rootBundleAs shown in the following code, first we read it in Flutter bg.jpg, and then convert it to bytes, and then call to getApplicationDocumentsDirectoryobtain the path, save it in the directory of the application /data", and then configure the image path to enableVirtualBackgroundthe method sourceto load the virtual background.
Future<void> _enableVirtualBackground() async {
  ByteData data = await rootBundle.load("assets/bg.jpg");
  List<int> bytes =
      data.buffer.asUint8List(data.offsetInBytes, data.lengthInBytes);
  Directory appDocDir = await getApplicationDocumentsDirectory();
  String p = path.join(appDocDir.path, 'bg.jpg');
  final file = File(p);
  if (!(await file.exists())) {
    await file.create();
    await file.writeAsBytes(bytes);
  }

  await _engine.enableVirtualBackground(
      enabled: true,
      backgroundSource: VirtualBackgroundSource(
          backgroundSourceType: BackgroundSourceType.backgroundImg,
          source: p),
      segproperty:
          const SegmentationProperty(modelType: SegModelType.segModelAi));
  setState(() {});
}
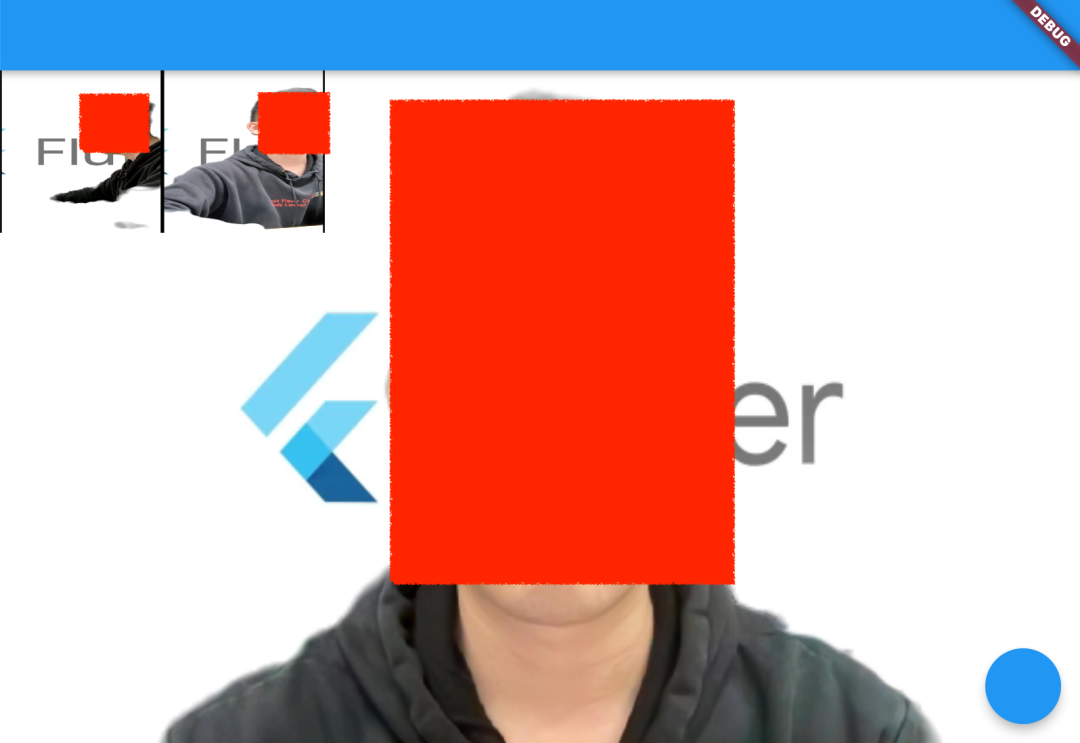
As shown in the figure below, it is the operation effect after the virtual background image is turned on. Of course, there are two parameters that need attention:
BackgroundSourceType: You can configurebackgroundColor(virtual background color),backgroundImg(virtual background picture),backgroundBlur(virtual background blur), these three situations can basically cover all the scenes in the video conferenceSegModelType: It can be configured as a matting algorithm in two different scenariossegModelAi(smart algorithm) or (green screen algorithm).segModelGreen
What needs to be noted here is that in the official prompt, it is recommended to use this function only on devices equipped with the following chips (should be required for GPU):
- Snapdragon 700 series 750G and above
- Snapdragon 800 series 835 and above
- Dimensity 700 series 720 and above
- Kirin 800 series 810 and above
- Kirin 900 series 980 and above
In addition, it should be noted that in order to adapt the resolution of the custom background image to the video capture resolution of the SDK, the SoundNet SDK will scale and crop the custom background image without deforming it. .
02 Beauty
Beautification is another most commonly used function in video conferencing, and Shengwang also provides setBeautyEffectOptionsmethods to support some basic beautification effect adjustments. ( Click to view the beauty interface document ).
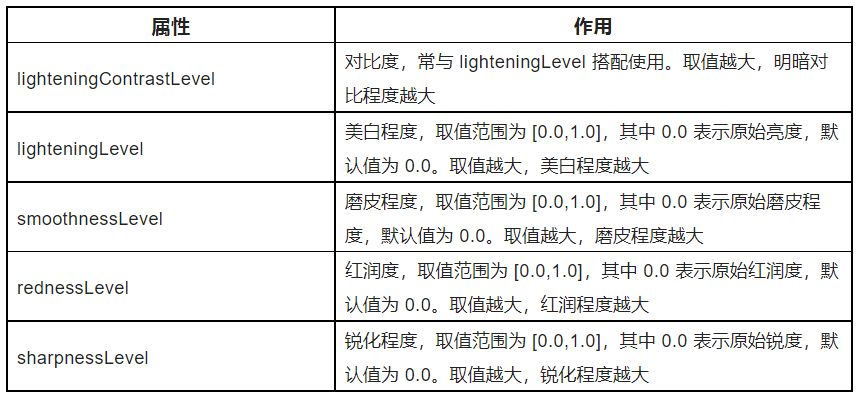
As shown in the code below, setBeautyEffectOptionsthe method is mainly to BeautyOptionsadjust the beauty style of the screen through the method, and the specific functions of the parameters are shown in the table below.
The .5 here is just a demo effect. Specifically, you can configure several fixed templates for users to choose according to your product requirements.
_engine.setBeautyEffectOptions(
  enabled: true,
  options: const BeautyOptions(
    lighteningContrastLevel:
        LighteningContrastLevel.lighteningContrastHigh,
    lighteningLevel: .5,
    smoothnessLevel: .5,
    rednessLevel: .5,
    sharpnessLevel: .5,
  ),
);
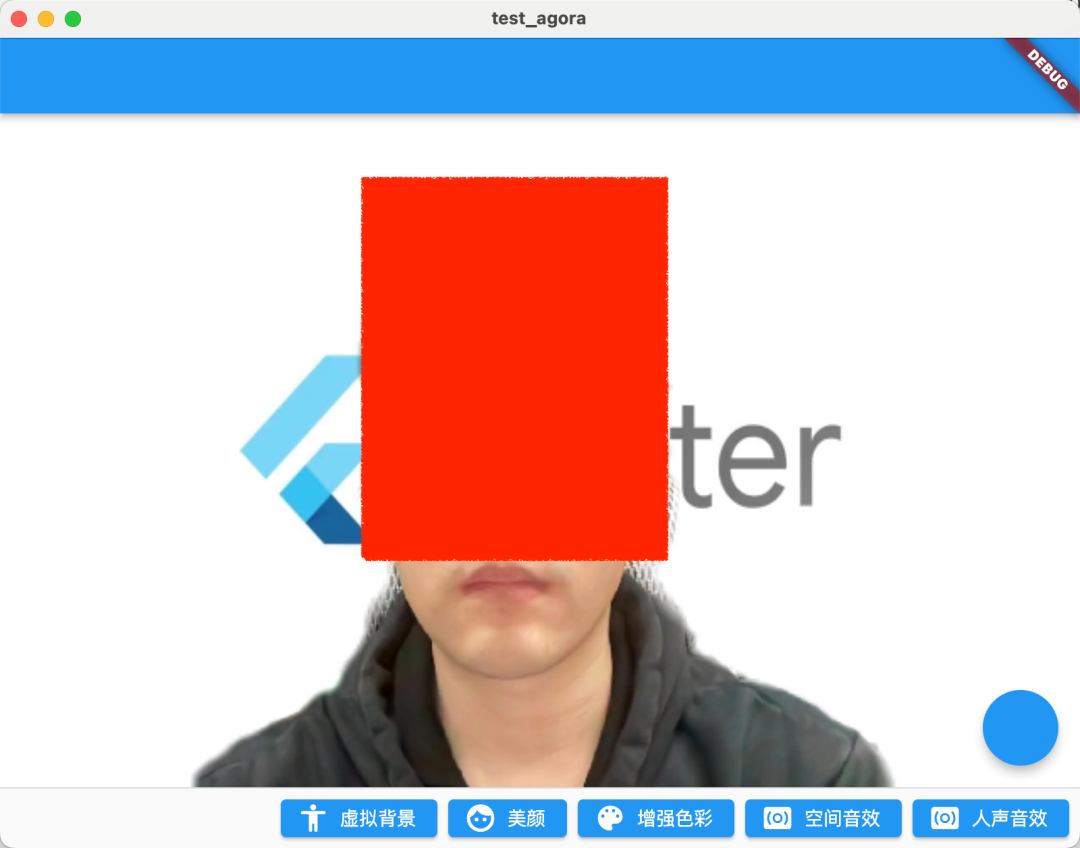
The effect after running is shown in the figure below. After turning on the 0.5 parameter, the overall picture of the beautification is more fair, and the lip color is also more obvious.
| no beauty | open beauty |
|---|---|
 |
 |
03 Color enhancement
The next API to be introduced is color enhancement: setColorEnhanceOptions, if the beauty is not enough to meet your needs, then the color enhancement API can provide more parameters to adjust the picture style you need. ( Click to view the color enhancement interface document )
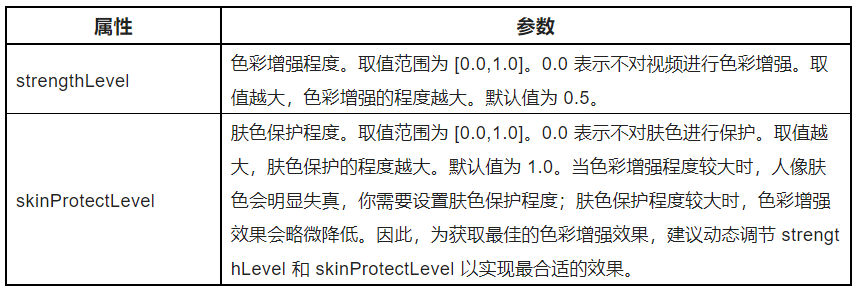
As shown in the following code, the color enhancement API is very simple, mainly adjusting ColorEnhanceOptionsl strengthLeveand skinProtectLevelparameters, that is, adjusting the effect of color intensity and skin color protection.
  _engine.setColorEnhanceOptions(
      enabled: true,
      options: const ColorEnhanceOptions(
          strengthLevel: 6.0, skinProtectLevel: 0.7));
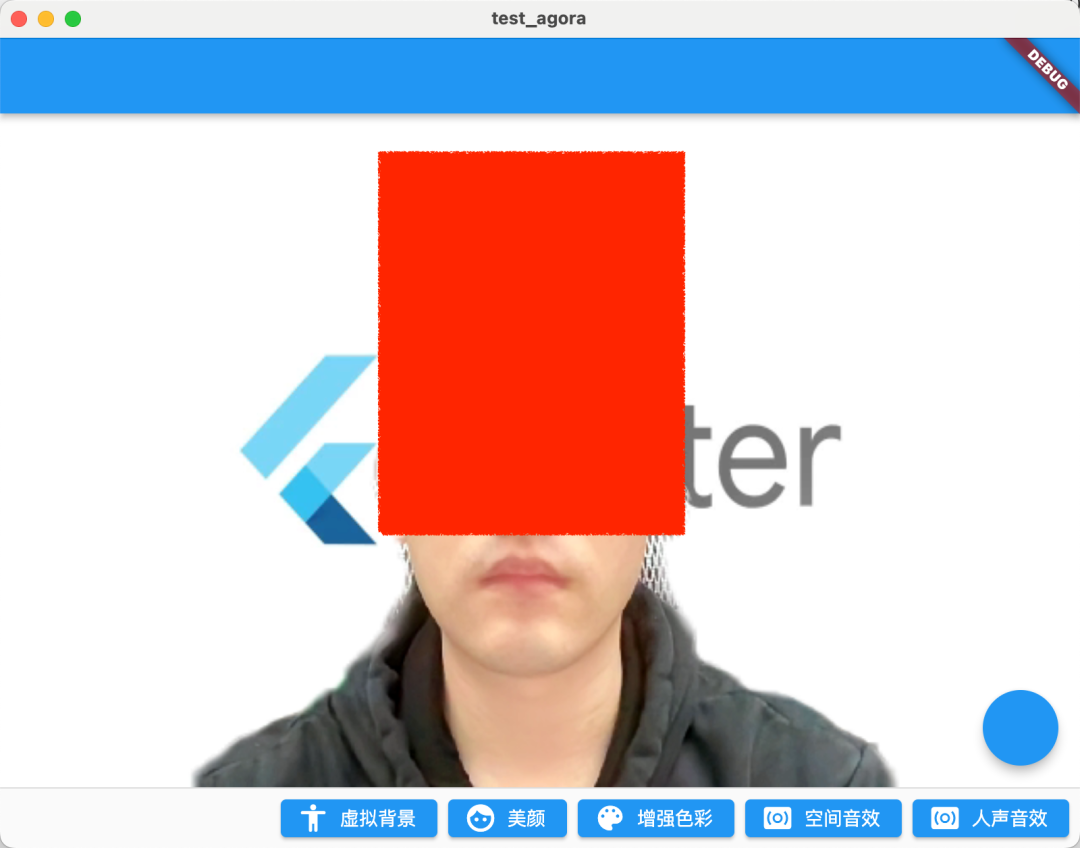
As shown in the figure below, because the video images captured by the camera may have color distortion, and the color enhancement function can intelligently adjust video characteristics such as saturation and contrast to improve video color richness and color reproduction, and finally make the video image more vivid.
After turning on the enhancement, the picture is more eye-catching.
| no enhancement | Turn on Beauty + Enhancement |
|---|---|
 |
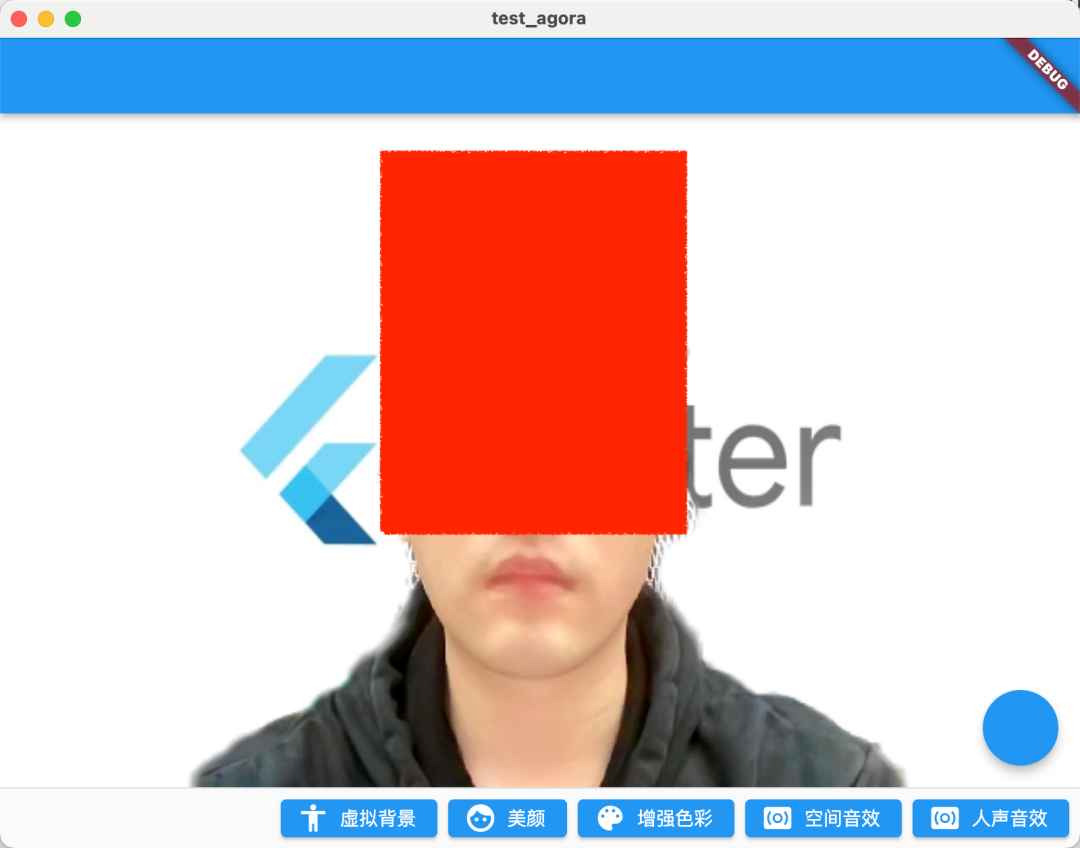 |
04 Spatial sound effects
In fact, sound tuning is the highlight. Since SoundNet is called SoundNet, it must not lag behind in audio processing. In the SoundNet SDK, you can open the enableSpatialAudioeffect of spatial sound effects. ( Click to view the spatial audio interface documentation )
_engine.enableSpatialAudio(true);
What is spatial sound? Simply put, it is a special 3D sound effect , which can virtualize the sound source to be emitted from a specific position in three-dimensional space, including the listener's horizontal plane, front, back, left, and right, and vertically above or below.
In essence, spatial sound effects are calculated by some acoustic-related algorithms to simulate the realization of sound effects similar to spatial 3D effects.
At the same time, you can also configure the relevant parameters of the spatial sound effect. As shown in the table below, you can see that the sound network provides a very rich set of parameters to allow us to adjust the spatial sound effect independently. For example, the sum setRemoteUserSpatialAudioParamseffect here is very interesting and highly recommended . Everyone go and try.enable_blurenable_air_absorb
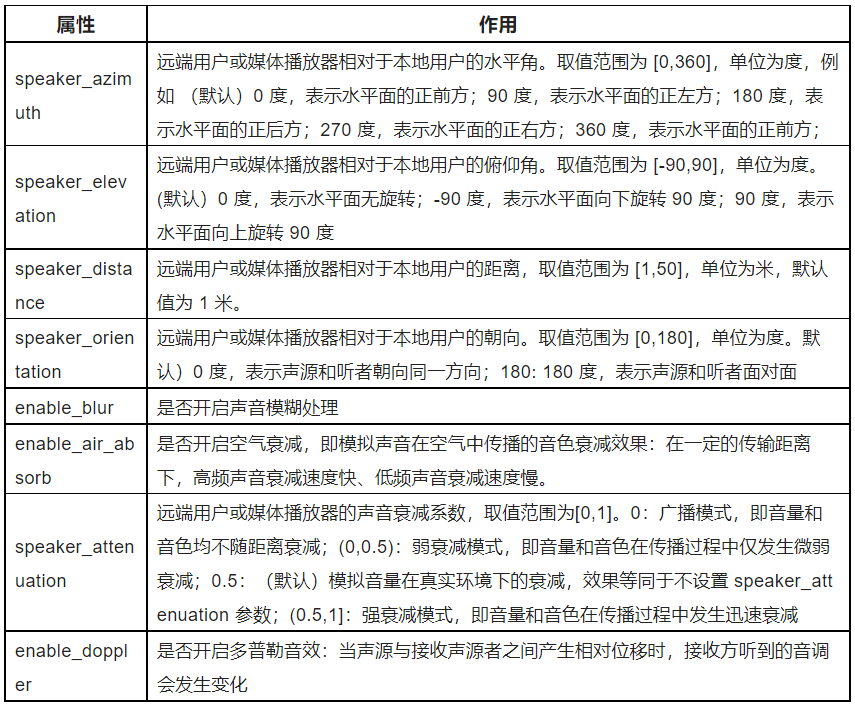
Audio effects cannot be shown here, and I strongly recommend that you try it yourself.
05 vocal effects
Another recommended API is human voice effect: setAudioEffectPreset, call this method to modify the user's voice without changing the gender characteristics of the original voice through the preset human voice effect of the SDK (click to view the human voice effect interface document ) Effects such as:
_engine.setAudioEffectPreset(AudioEffectPreset.roomAcousticsKtv);
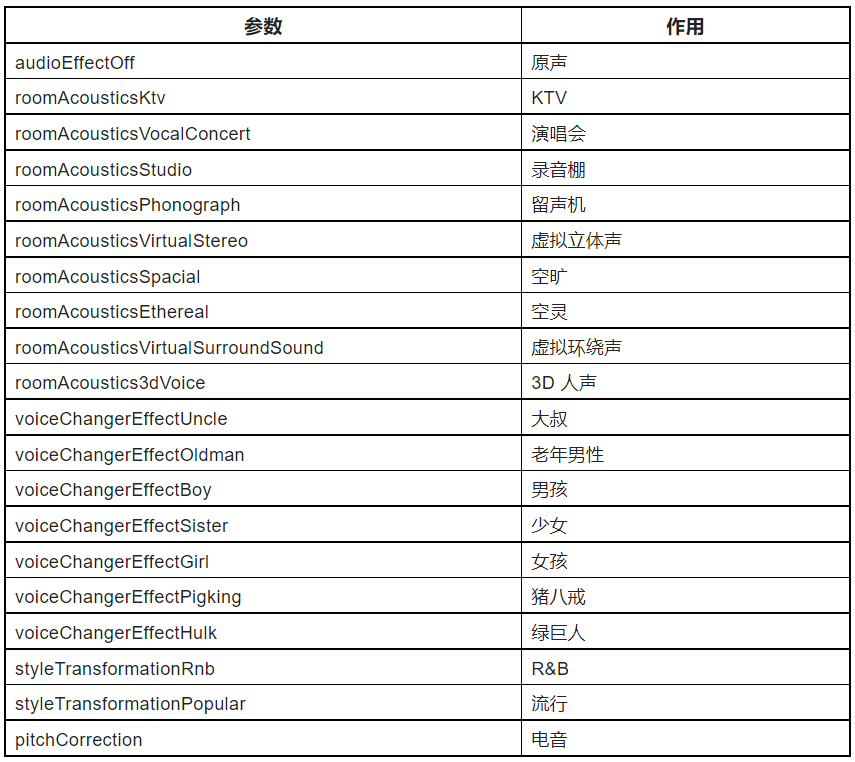
There are a lot of presets in the SoundNet SDK AudioEffectPreset, as shown in the table below, from scene effects such as KTV, recording studio, to male and female voice changing, to spoof sound effects such as Zhu Bajie, which can be said to be quite amazing.
PS: In order to obtain better vocal effects, you need to set setAudioProfile scenarioto :
_engine.setAudioProfile(
  profile: AudioProfileType.audioProfileDefault,
  scenario: AudioScenarioType.audioScenarioGameStreaming);
Of course, what needs to be noted here is that this method is only recommended for processing human voices, and is not recommended for processing audio data containing music.
Finally, the full code looks like this:
class VideoChatPage extends StatefulWidget {
  const VideoChatPage({Key? key}) : super(key: key);

  @override
  State<VideoChatPage> createState() => _VideoChatPageState();
}

class _VideoChatPageState extends State<VideoChatPage> {
  late final RtcEngine _engine;

  ///初始化状态
  late final Future<bool?> initStatus;

  ///当前 controller
  late VideoViewController currentController;

  ///是否加入聊天
  bool isJoined = false;

  /// 记录加入的用户id
  Map<int, VideoViewController> remoteControllers = {};

  @override
  void initState() {
    super.initState();
    initStatus = _requestPermissionIfNeed().then((value) async {
      await _initEngine();

      ///构建当前用户 currentController
      currentController = VideoViewController(
        rtcEngine: _engine,
        canvas: const VideoCanvas(uid: 0),
      );
      return true;
    }).whenComplete(() => setState(() {}));
  }

  Future<void> _requestPermissionIfNeed() async {
    if (Platform.isMacOS) {
      return;
    }
    await [Permission.microphone, Permission.camera].request();
  }

  Future<void> _initEngine() async {
    //创建 RtcEngine
    _engine = createAgoraRtcEngine();
    // 初始化 RtcEngine
    await _engine.initialize(const RtcEngineContext(
      appId: appId,
    ));

    _engine.registerEventHandler(RtcEngineEventHandler(
      // 遇到错误
      onError: (ErrorCodeType err, String msg) {
        if (kDebugMode) {
          print('[onError] err: $err, msg: $msg');
        }
      },
      onJoinChannelSuccess: (RtcConnection connection, int elapsed) {
        // 加入频道成功
        setState(() {
          isJoined = true;
        });
      },
      onUserJoined: (RtcConnection connection, int rUid, int elapsed) {
        // 有用户加入
        setState(() {
          remoteControllers[rUid] = VideoViewController.remote(
            rtcEngine: _engine,
            canvas: VideoCanvas(uid: rUid),
            connection: const RtcConnection(channelId: cid),
          );
        });
      },
      onUserOffline:
          (RtcConnection connection, int rUid, UserOfflineReasonType reason) {
        // 有用户离线
        setState(() {
          remoteControllers.remove(rUid);
        });
      },
      onLeaveChannel: (RtcConnection connection, RtcStats stats) {
        // 离开频道
        setState(() {
          isJoined = false;
          remoteControllers.clear();
        });
      },
    ));

    // 打开视频模块支持
    await _engine.enableVideo();
    // 配置视频编码器,编码视频的尺寸(像素),帧率
    await _engine.setVideoEncoderConfiguration(
      const VideoEncoderConfiguration(
        dimensions: VideoDimensions(width: 640, height: 360),
        frameRate: 15,
      ),
    );

    await _engine.startPreview();
  }

  @override
  void dispose() {
    _engine.leaveChannel();
    super.dispose();
  }

  @override
  Widget build(BuildContext context) {
    return Scaffold(
        appBar: AppBar(),
        body: Stack(
          children: [
            FutureBuilder<bool?>(
                future: initStatus,
                builder: (context, snap) {
                  if (snap.data != true) {
                    return const Center(
                      child: Text(
                        "初始化ing",
                        style: TextStyle(fontSize: 30),
                      ),
                    );
                  }
                  return AgoraVideoView(
                    controller: currentController,
                  );
                }),
            Align(
              alignment: Alignment.topLeft,
              child: SingleChildScrollView(
                scrollDirection: Axis.horizontal,
                child: Row(
                  ///增加点击切换
                  children: List.of(remoteControllers.entries.map(
                    (e) => InkWell(
                      onTap: () {
                        setState(() {
                          remoteControllers[e.key] = currentController;
                          currentController = e.value;
                        });
                      },
                      child: SizedBox(
                        width: 120,
                        height: 120,
                        child: AgoraVideoView(
                          controller: e.value,
                        ),
                      ),
                    ),
                  )),
                ),
              ),
            )
          ],
        ),
        floatingActionButton: FloatingActionButton(
          onPressed: () async {
            // 加入频道
            _engine.joinChannel(
              token: token,
              channelId: cid,
              uid: 0,
              options: const ChannelMediaOptions(
                channelProfile:
                    ChannelProfileType.channelProfileLiveBroadcasting,
                clientRoleType: ClientRoleType.clientRoleBroadcaster,
              ),
            );
          },
        ),
        persistentFooterButtons: [
          ElevatedButton.icon(
              onPressed: () {
                _enableVirtualBackground();
              },
              icon: const Icon(Icons.accessibility_rounded),
              label: const Text("虚拟背景")),
          ElevatedButton.icon(
              onPressed: () {
                _engine.setBeautyEffectOptions(
                  enabled: true,
                  options: const BeautyOptions(
                    lighteningContrastLevel:
                        LighteningContrastLevel.lighteningContrastHigh,
                    lighteningLevel: .5,
                    smoothnessLevel: .5,
                    rednessLevel: .5,
                    sharpnessLevel: .5,
                  ),
                );
                //_engine.setRemoteUserSpatialAudioParams();
              },
              icon: const Icon(Icons.face),
              label: const Text("美颜")),
          ElevatedButton.icon(
              onPressed: () {
                _engine.setColorEnhanceOptions(
                    enabled: true,
                    options: const ColorEnhanceOptions(
                        strengthLevel: 6.0, skinProtectLevel: 0.7));
              },
              icon: const Icon(Icons.color_lens),
              label: const Text("增强色彩")),
          ElevatedButton.icon(
              onPressed: () {
                _engine.enableSpatialAudio(true);
              },
              icon: const Icon(Icons.surround_sound),
              label: const Text("空间音效")),
          ElevatedButton.icon(
              onPressed: () {
                _engine.setAudioProfile(
                    profile: AudioProfileType.audioProfileDefault,
                    scenario: AudioScenarioType.audioScenarioGameStreaming);
                _engine
                    .setAudioEffectPreset(AudioEffectPreset.roomAcousticsKtv);
              },
              icon: const Icon(Icons.surround_sound),
              label: const Text("人声音效")),
        ]);
  }

  Future<void> _enableVirtualBackground() async {
    ByteData data = await rootBundle.load("assets/bg.jpg");
    List<int> bytes =
        data.buffer.asUint8List(data.offsetInBytes, data.lengthInBytes);
    Directory appDocDir = await getApplicationDocumentsDirectory();
    String p = path.join(appDocDir.path, 'bg.jpg');
    final file = File(p);
    if (!(await file.exists())) {
      await file.create();
      await file.writeAsBytes(bytes);
    }

    await _engine.enableVirtualBackground(
        enabled: true,
        backgroundSource: VirtualBackgroundSource(
            backgroundSourceType: BackgroundSourceType.backgroundImg,
            source: p),
        segproperty:
            const SegmentationProperty(modelType: SegModelType.segModelAi));
    setState(() {});
  }
}
06 last
The content of this article is a supplement to "Multiple Video Calls Based on the Acoustics Flutter SDK" . The content is relatively simple, but it can be seen that the Acoustics SDK provides a very Convenient API implementation, especially in sound processing. Because the article is limited, only a simple API introduction is shown here, so it is strongly recommended that you try these audio APIs yourself. It is really interesting. In addition, there are many scenes and gameplay, you can click here to visit the official website to learn more.
Developers are welcome to also try the SoundNet SDK to realize real-time audio and video interaction scenarios. Now register for a Shengwang account to download the SDK , and you can get a free 10,000-minute usage quota per month. If you have any questions during the development process, you can communicate with official engineers in the Shengwang developer community .