Most mini-program applications involve user identity-related data and functions, such as user order data and user payment functions. Before using these data or functions, user identity identification must be obtained and login verification performed. WeChat mini-programs allow mini-program applications to use Login authorization mechanism to verify user identity and obtain user information. WeChat applets use OpenID and UnionID as user IDs. Before introducing the login authorization mechanism, let’s introduce OpenID and UnionID.
6.1 Mini Program user identification
OpenID is the identification ID set by WeChat for each official account or mini-program user. Simply put, each WeChat user has a different OpenID under each official account or mini-program. A public account and small program applications have established a natural user system. If your application has only one applet, or there are multiple applets but the multiple applets do not need to communicate with each other, you can directly use OpenID.
If the developer has multiple mobile applications, website applications, and mini-program applications (or official account applications), UnionID can be used to distinguish the uniqueness of users, because as long as the mobile applications and website applications under the same WeChat open platform account , and applet applications (or official account applications), the user's UnionID is unique. In other words, the same user has the same UnionID for different applications under the same WeChat open platform account. To obtain a UnionID, you need to create a WeChat Open Platform account and bind your Mini Program to the WeChat Open Platform account.
6.2 Mini Program Login Process
Before describing the APIs related to the login of the applet, let me introduce the overall process of the login of the applet. The following figure is the sequence diagram of the login process of the applet given by the WeChat official document: Process description: 1) Call wx.login() to obtain a
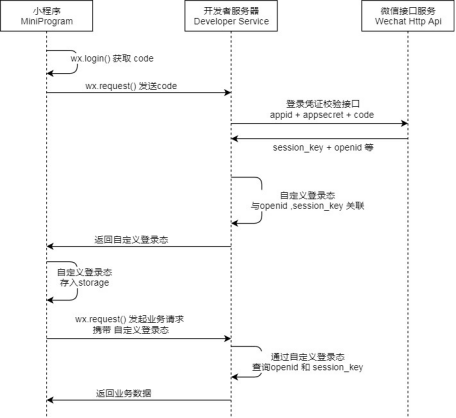
temporary
login Credential code and send it back to the developer server.
2) Call the auth.code2Session interface on the developer server to exchange for the user's unique identifier OpenID, UnionID and session key session_key.
3) The developer server can generate a custom login status according to the user ID, which is used to identify the user's identity when interacting with the front and back ends in the subsequent business logic.
6.3 Get WeChat login credentials
Call wx.login to obtain the temporary login credential: code, and send it back to the developer server. This code is generated by the WeChat platform when the user opens the applet, and each code can only be used once, so in theory this code is safe.
wx.login({


      success: res => {


        console.log(res.code);
        //访问开发者服务器
      }
});
The function of the wx.login API is to generate a temporary login credential: code for the current user. The validity period of this temporary code is only five minutes. After we get the code, we can proceed to the next step: send the code to the business server to obtain the login session ID:
function userLogin(app, code) {


  var url = 'http://127.0.0.1:80001/user_login';
  wx.request({


    url: url,
    data: {

     code: code },
    success: function (res) {


      if (res.statusCode === 200) {


        var ssid = res.data;
        app.globalData.ssid = ssid;
      }
    }
  });
}
After obtaining the session ID, save the session ID in the global object of the applet. You can also store the session ID in the local cache, so that even if the applet exits, the session ID can be restored at the next startup, thereby preventing frequent calls wx.login.
All pages that need to use the user's identity must fail to log in and obtain the login session ID. Therefore, it is more reasonable to arrange the logic related to user login in the app.js file. The following is the content of the app.js file after adding the login logic of the applet:
function userLogin(app, code, cb) {


  var domain = app.globalData.domain;
  var url = domain + '/user_login';
  wx.request({


    url: url,
    data: {

     code: code },
    success: function (res) {


      if (res.statusCode === 200) {


        var ssid = res.data;
        //保存session标识
        app.setUserSsid(ssid);
        //执行登录后的回调
        if(cb != null) {


          cb();
        }
      }
    }
  });
}
App({


  onLaunch: function () {


    //从Storage中加载session标识
    var ssid = wx.getStorageSync('ssid');
    if (ssid) {


      this.globalData.ssid = ssid;
    }
  },
  //获取登录标识
  getUserSsid:function(){


    var ssid = this.globalData.ssid;
    var vars = ssid.split("-");
    //登录是否超时
    var time_now=new Date().getTime();
    var stamp_now = parseInt(time_now/1000);
    var stamp_lgoin = parseInt(vars[0]);
    var idletm = stamp_now-stamp_lgoin;
    if(idletm > 3600){


      return ""
    }
    return ssid;
  },
  //保存登录标识
  setUserSsid:function(ssid){


    wx.setStorageSync('ssid', ssid);
    this.globalData.ssid = ssid;
  },
  //小程序登录
wxLogin:function(cb){


    var app = this;
    wx.login({


      success: res => {


        //访问开发者服务器
        userLogin(app, res.code, cb);
      }
    });
  },
  globalData: {


    domain: "http://127.0.0.1:8001",
    ssid:""
  }
})
After completing the login-related codes of app.js, you can add login checking logic to pages that need to obtain user IDs in the following manner:
index.js file:
//访问Web服务器,获取motto的显示内容
function getWebData(page) {


  var url = 'http://127.0.0.1:8001/hello';
  wx.request({


    url: url,
    success: function (res) {


      if (res.statusCode === 200) {


        page.setData({

     motto: res.data });
      }
    }
  });
}
Page({


  data: {


    motto: '',
  },
  //登录成功后的调用
  onLoginSuccess:function(){


    getWebData(this);
  },
  onLoad: function (options) {


    //若没有登录,则调用登录方法
    var ssdata = getApp().getLogInfo();
    if(ssdata.length < 1){


      getApp().wxLogin(this.onLoginSuccess);
    } else {


      this.onLoginSuccess();
    }
  }
})
6.4 Use of http.Client package
You can use the net/http package to call the server-side API provided by WeChat. The net/http package provides the most concise HTTP client implementation, which can directly send GET and POST requests without using a third-party network communication library (such as libcurl).
Let's first look at how to initiate an HTTP GET request to a third-party web server. The following code implements sending an HTTP GET request to the server through the net/http package:
func HttpGet(url string) (string, error) {


   client := &http.Client{

    Timeout: 5 * time.Second}
   resp, err := client.Get(url)
   if err != nil {


      return "", err
   }
   defer resp.Body.Close()

   result, err := ioutil.ReadAll(resp.Body)
   if err != nil {


      log.Fatal("Error:", err)
      return "", err
   }

   if resp.StatusCode != 200 {


      err := fmt.Errorf("status:%d", resp.StatusCode)
      return string(result),err
   }
   return string(result), nil
}
In the above code, we create an http.Client object, and set the network timeout to 5 seconds, and then access the web interface pointed to by the url through client.Get. The following code implements sending an HTTP POST request:
func HttpPost(url string, data []byte, dtype string) (string, error) {


   client := &http.Client{

    Timeout: 5 * time.Second}
   resp, err := client.Post(url, dtype, bytes.NewBuffer(data))
   if err != nil {


      log.Fatal("Error:", err)
      return "", err
   }
   defer resp.Body.Close()

   result, err := ioutil.ReadAll(resp.Body)
   if err != nil {


      log.Fatal("Error:", err)
      return "", err
   }

   if resp.StatusCode != 200 {


      err := fmt.Errorf("status:%d", resp.StatusCode)
      return string(result),err
   }
   return string(result), nil
}
Sometimes it is necessary to set the request header and cookie parameters when requesting, then use the http.NewRequest method and the Client.Do method. First call http.NewRequest to create a request object, and use the request object to set custom request header information. Then we need to manually instantiate the Client object, pass in the request object with custom request header information added, and then call the Client.Do method to initiate the HTTP request:
func HttpPostWidthHeader(url string, data []byte, dtype string, hdata map[string]string) (string, error) {


   req, err := http.NewRequest("POST", url, bytes.NewBuffer(data))
   if err != nil {


      log.Fatal("Error:", err)
      return "", err
   }
   req.Header.Set("Content-Type", dtype)
   for k, v := range hdata{


      req.Header.Set(k, v)
   }

   client := &http.Client{

    Timeout: 5 * time.Second}
   resp, err := client.Do(req)
   if err != nil {


      log.Fatal("Error:", err)
      return "", err
   }
   defer resp.Body.Close()

   result, _ := ioutil.ReadAll(resp.Body)
   if resp.StatusCode != 200 {


      err := fmt.Errorf("status:%d", resp.StatusCode)
      return string(result),err
   }
   return string(result), nil
}
6.5 Small program login server implementation
After the applet obtains the temporary login credentials, it needs to call the server interface to obtain the user identity. In addition, for security reasons, the server cannot directly return the OpenId to the applet after obtaining the user ID, but uses the OpenId to generate a Session ID and returns the Session ID to the applet. This section introduces the method of obtaining OpenId and the generation logic of Session ID.
6.5.1 Get OpenId
The server calls the auth.code2Session interface to obtain the user's OpenID, and the server calls the auth.code2Session interface with the AppId and AppSecret. AppId and AppSecret are important information for WeChat to identify the developer's identity. AppId is public information. Leaking AppId will not bring security risks, but AppSecret is the developer's private data and should not be leaked. The platform resets the AppSecret. The request address of the auth.code2Session interface is:
https://api.weixin.qq.com/sns/jscode2session?appid=APPID&secret=SECRET&js_code=JSCODE&grant_type=authorization_code
The definition of request parameters is as follows:
| Attributes | type | illustrate |
|---|---|---|
| appid | string | appId of the applet |
| secret | string | applet appSecret |
| js_code | string | The code obtained when logging in |
| grant_type | string | Authorization type, just fill in authorization_code here |
Description of returned results:
| Attributes | type | illustrate |
|---|---|---|
| openid | string | unique user ID |
| session_key | string | session key |
| unions | string | The unique identifier of the user on the open platform, if the current Mini Program has been bound to the WeChat open platform account, it will return |
| errcode | number | error code |
| errmsg | string | error message |
The following is the server code for calling the auth.code2Session interface to obtain the user's OpenID:
//根据code获取opendid以及session_key
func GetWxOpenIdByCode(appid string, secret string, code string) WxSessionData {


   wx_addr := "https://api.weixin.qq.com/sns/jscode2session"
   wx_addr = fmt.Sprintf("%s?appid=%s&secret=%s&js_code=%s&grant_type=%s",
      wx_addr, appid, secret, code, "authorization_code")

   var ent WxSessionData
   data_str, err := HttpGet(wx_addr)
   if err != nil {


      log.Fatal("Error:", err)
      return ent
   }
   err = json.Unmarshal([]byte(data_str), &ent)
   if err != nil {


      log.Fatal("Error:", err)
      return ent
   }
   return ent
}
Among them, WxSessionData is the return result of the WeChat interface, which is defined as follows:
type WxSessionData struct {


   OpenId string `json:"openid"`
   UnionId string `json:"unionid"`
   Sessionkey string `json:"session_key"`
   ErrCode int64  `json:"errcode"`
   ErrMsg  string `json:"errmsg"`
}
6.5.2 Generate Business Session ID
After the user authentication is successful, the developer server needs to generate a Session ID for the Mini Program client, and the subsequent requests initiated by the Mini Program need to carry the Session ID. The developer server can query the identity of the currently logged-in user through the Session ID, so that we will not It is necessary to re-acquire the code every time, which saves a lot of network consumption.
Developers should pay attention not to use session_key, openid and other fields directly as user ID or session ID, but to regenerate a Session ID (please refer to the login sequence diagram). For the Session ID generated by the developer, its security should be guaranteed and a long expiration time should not be set. After the Session ID is distributed to the Mini Program client, it can be stored in the local cache for subsequent communication. The following code is to call the server to obtain the Session ID after the applet logs in. The server code:
first set the HTTP request route
mux.HandleFunc("/user_login", HandlerWxLogin)
and then define the implementation of the processor function:
//登录微信后获取用户的openid
func HandlerWxLogin(w http.ResponseWriter, r *http.Request) {


   r.ParseForm()
   var code string=strings.Join(r.Form["code"],"")
   if len(code) < 1 {


      retmsng := "code不能为空!!!"
      fmt.Println(retmsng)
      w.WriteHeader(500)
      w.Write([]byte(retmsng))
      return
   }

   //获取openid以及Sessionkey
   app_id:= "xxxx"//这里需要替换为您的小程序appid
   app_secret:= "xxx"//这里需要替换为您小程序secret
   wxtoken := GetWxOpenIdByCode(app_id, app_secret, code)
   if len(wxtoken.OpenId) < 1 {


      retmsng := "没有获取到OpenId"
      fmt.Println(retmsng)
      w.WriteHeader(500)
      w.Write([]byte(retmsng))
      return
   }

   var userid int64 = 0//这里需要替换为您业务内部的用户id
   ssidstr := GenSessionString(userid, wxtoken.OpenId)
   fmt.Println(ssidstr)
   w.Write([]byte(ssidstr))
}
Call the GetWxOpenIdByCode method in the code to obtain the user's OpenID, and call GenSessionString to generate a business session ID for the applet client. The following code implements the GenSessionString function:
func GenSessionString(userid int64, openid string) string {


   tmstr := fmt.Sprintf("%d", time.Now().Unix())
   paramstr := fmt.Sprintf("%s-%d-%s", tmstr, userid, openid)
   md5 := md5.Sum([]byte(paramstr))
   md5str := fmt.Sprintf("%x", md5)
   return fmt.Sprintf("%s-%d-%s", tmstr, userid, md5str)
}
Note:
1) The session ID generation mechanism above is relatively simple, and it is only used to explain the logic of the login process. It is recommended that you design a more reasonable session ID generation mechanism when coding.
2) In the sample code, the AppId and AppSecret of the applet are "hard-coded" into the code. This is not a good coding practice. It is better to put the AppId and AppSecret in the configuration file.