Article directory
- foreword
- 1. Add panel (character backpack)
- 2. Disable character control when focusing on the UI
- 3. Item Action (item discarding, moving, etc.)
- 3. Item function panel
- 4. Floating Information Panel
- 5. Drag and drop
- 6. Cursor configuration
- 7. Item configuration (icon, description)
- 8. Role bar
- Nine, shortcut bar
- 10. Item restrictions (total upper limit, stacking)
- 11. Warehouse
- 12. Shops
- Thirteen, the production interface
- Summarize
foreword
This article is about customizing the view UI. We will explore how to customize various UIs and UI-related functions together.
In the previous article, we have mastered the basic functions of the inventory system. It can be said that if there is only one common store and one character in the game, then we can start to develop it. But it is far from enough to develop an RPG game, which requires a lot of complex custom UI functions. The students who have read this article have long been rare, so let's start without talking too much.
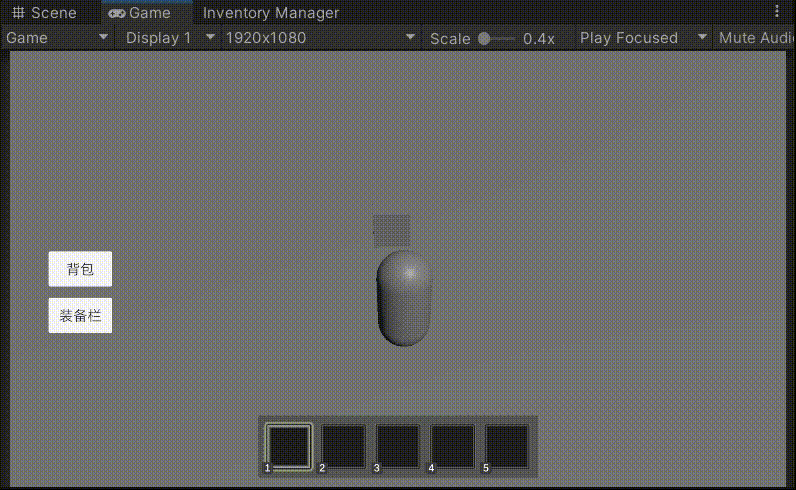
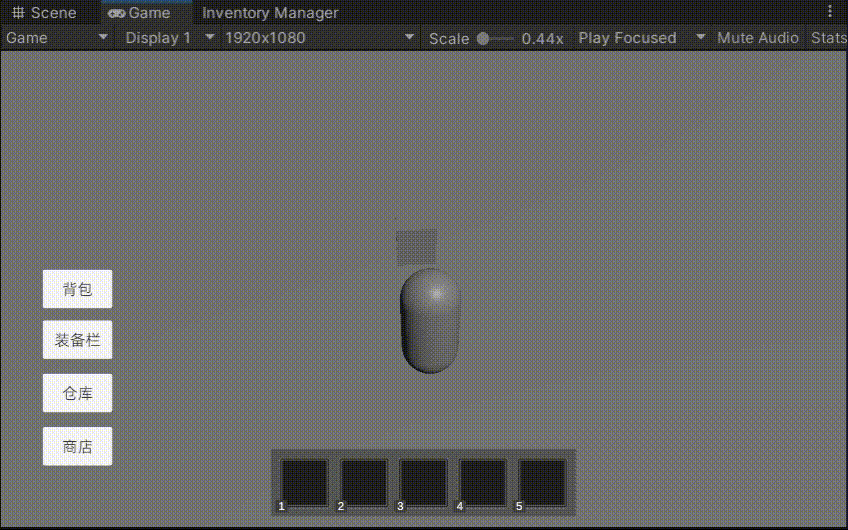
1. Add panel (character backpack)
1. Create a backpack
Open the Inventory Grid in the system function above the UI Designer, change the name of the backpack to be created to BagPanel, specify the role and UI manager as shown in the figure below, and click Create.
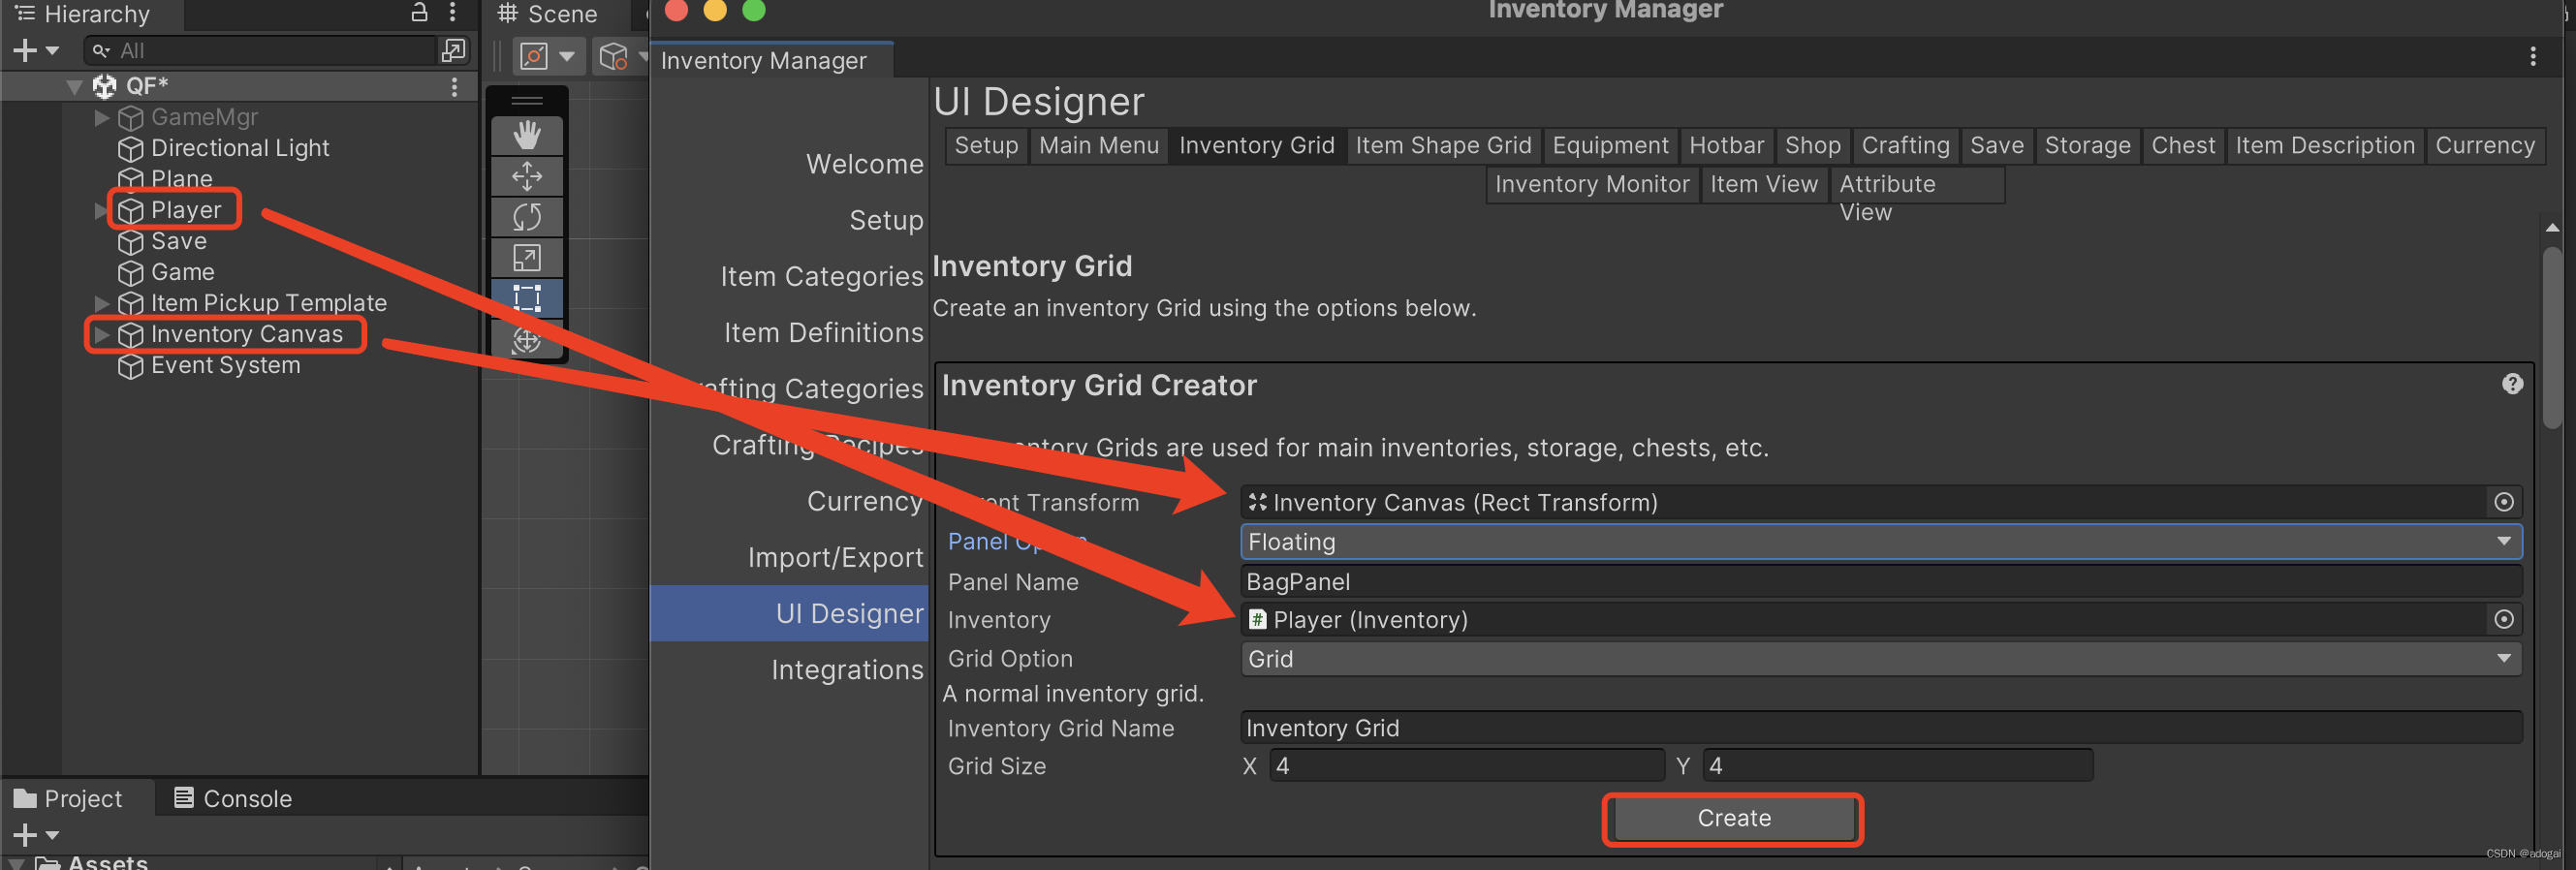
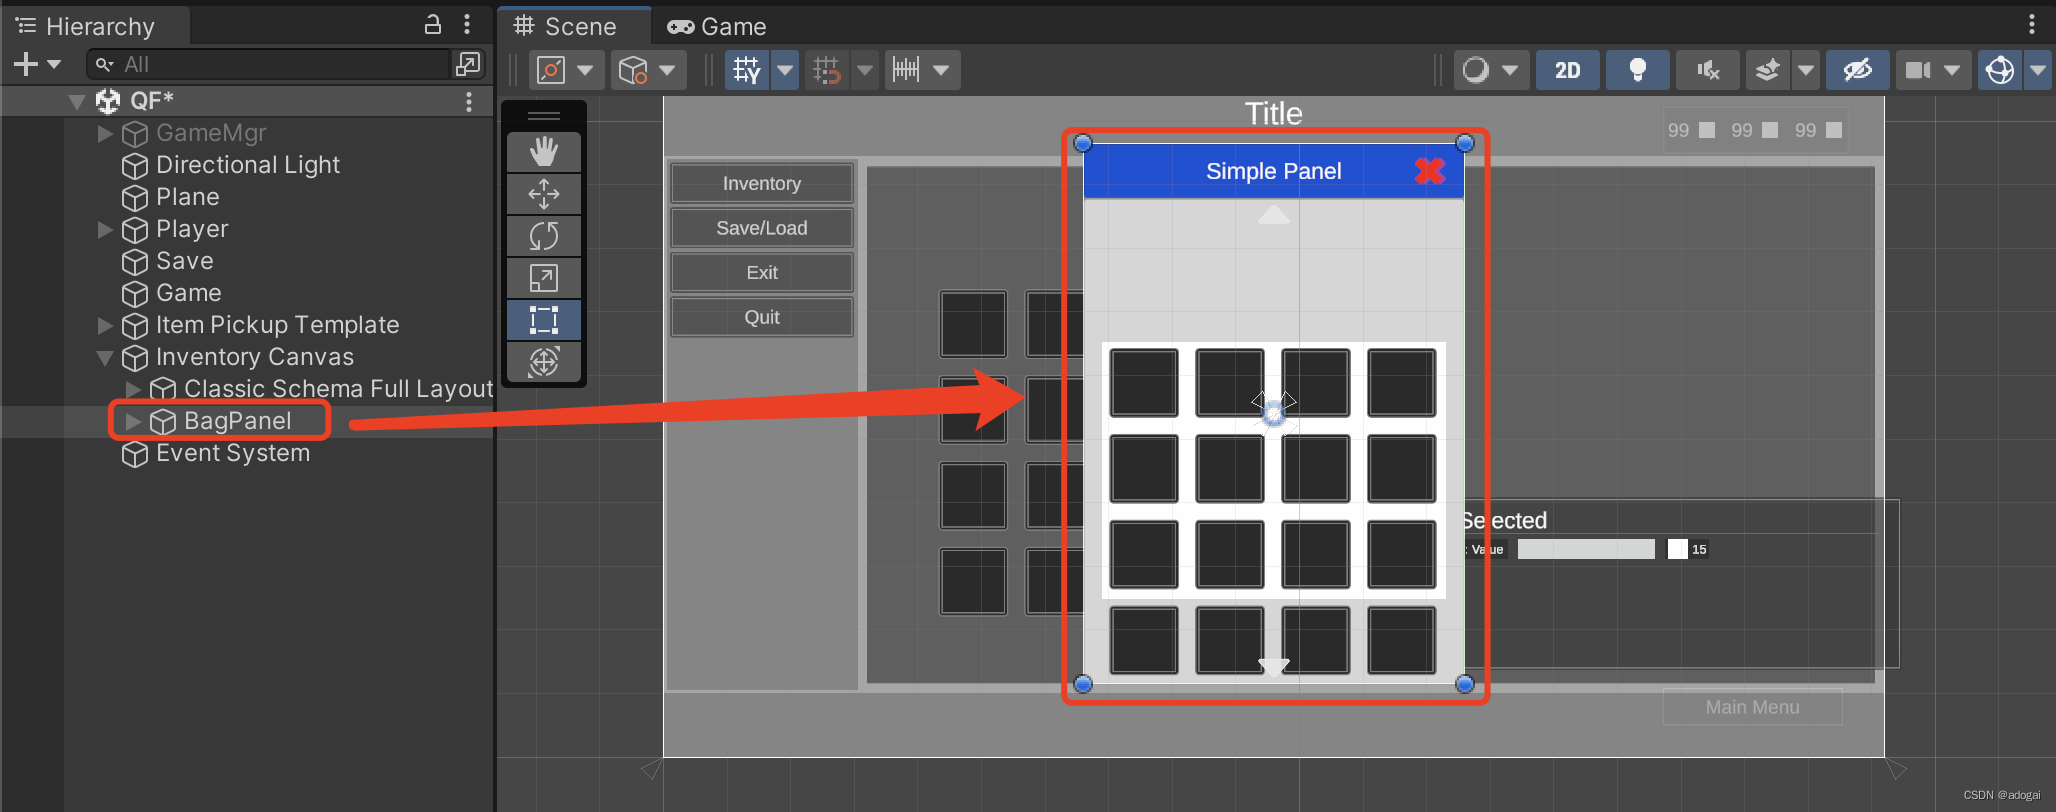
Generate backpack panel:
Parameters of the Panel Option , details- style description link
Basic (basic): just a simple inverse transformation with a panel component Simple (simple): the panel has a title with a title
Floating (floating): the panel has a title with a title , the title has a drag handler component that allows the player to move the panel with the mouse
Main Menu : Panels are made exclusively within the main menu. The parent transformation must be the parameter of the main menu panel transformation Grid Option
Grid (grid): display individual items in a separate grid List (list): display in the form of a list
2. Main interface
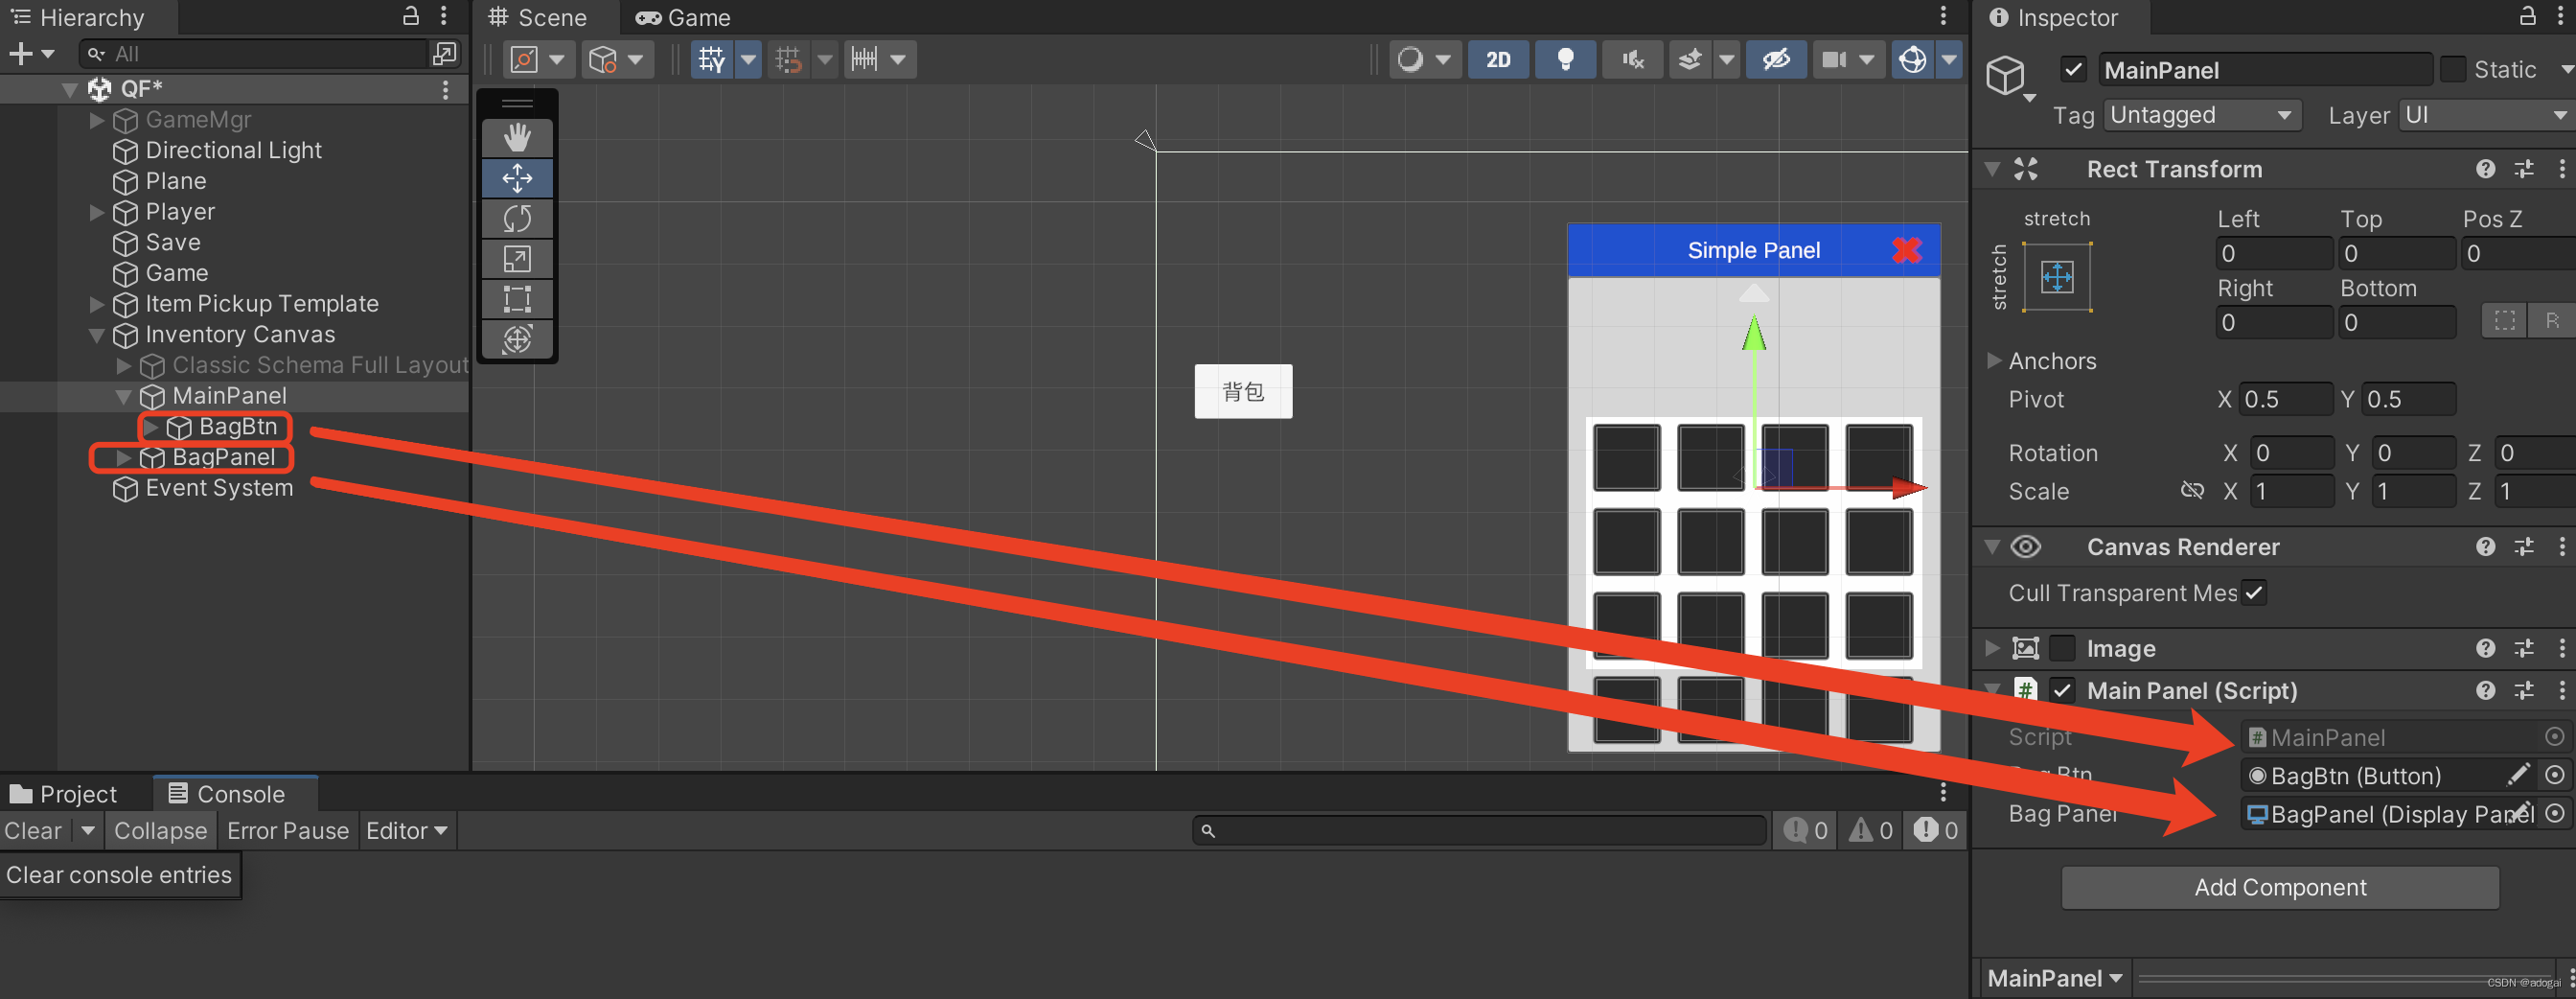
Create a UI panel, and then create a MainPanel script and hang it up, so that we can directly switch out the backpack by clicking the button or button B; the backpack will display the items on the protagonist.
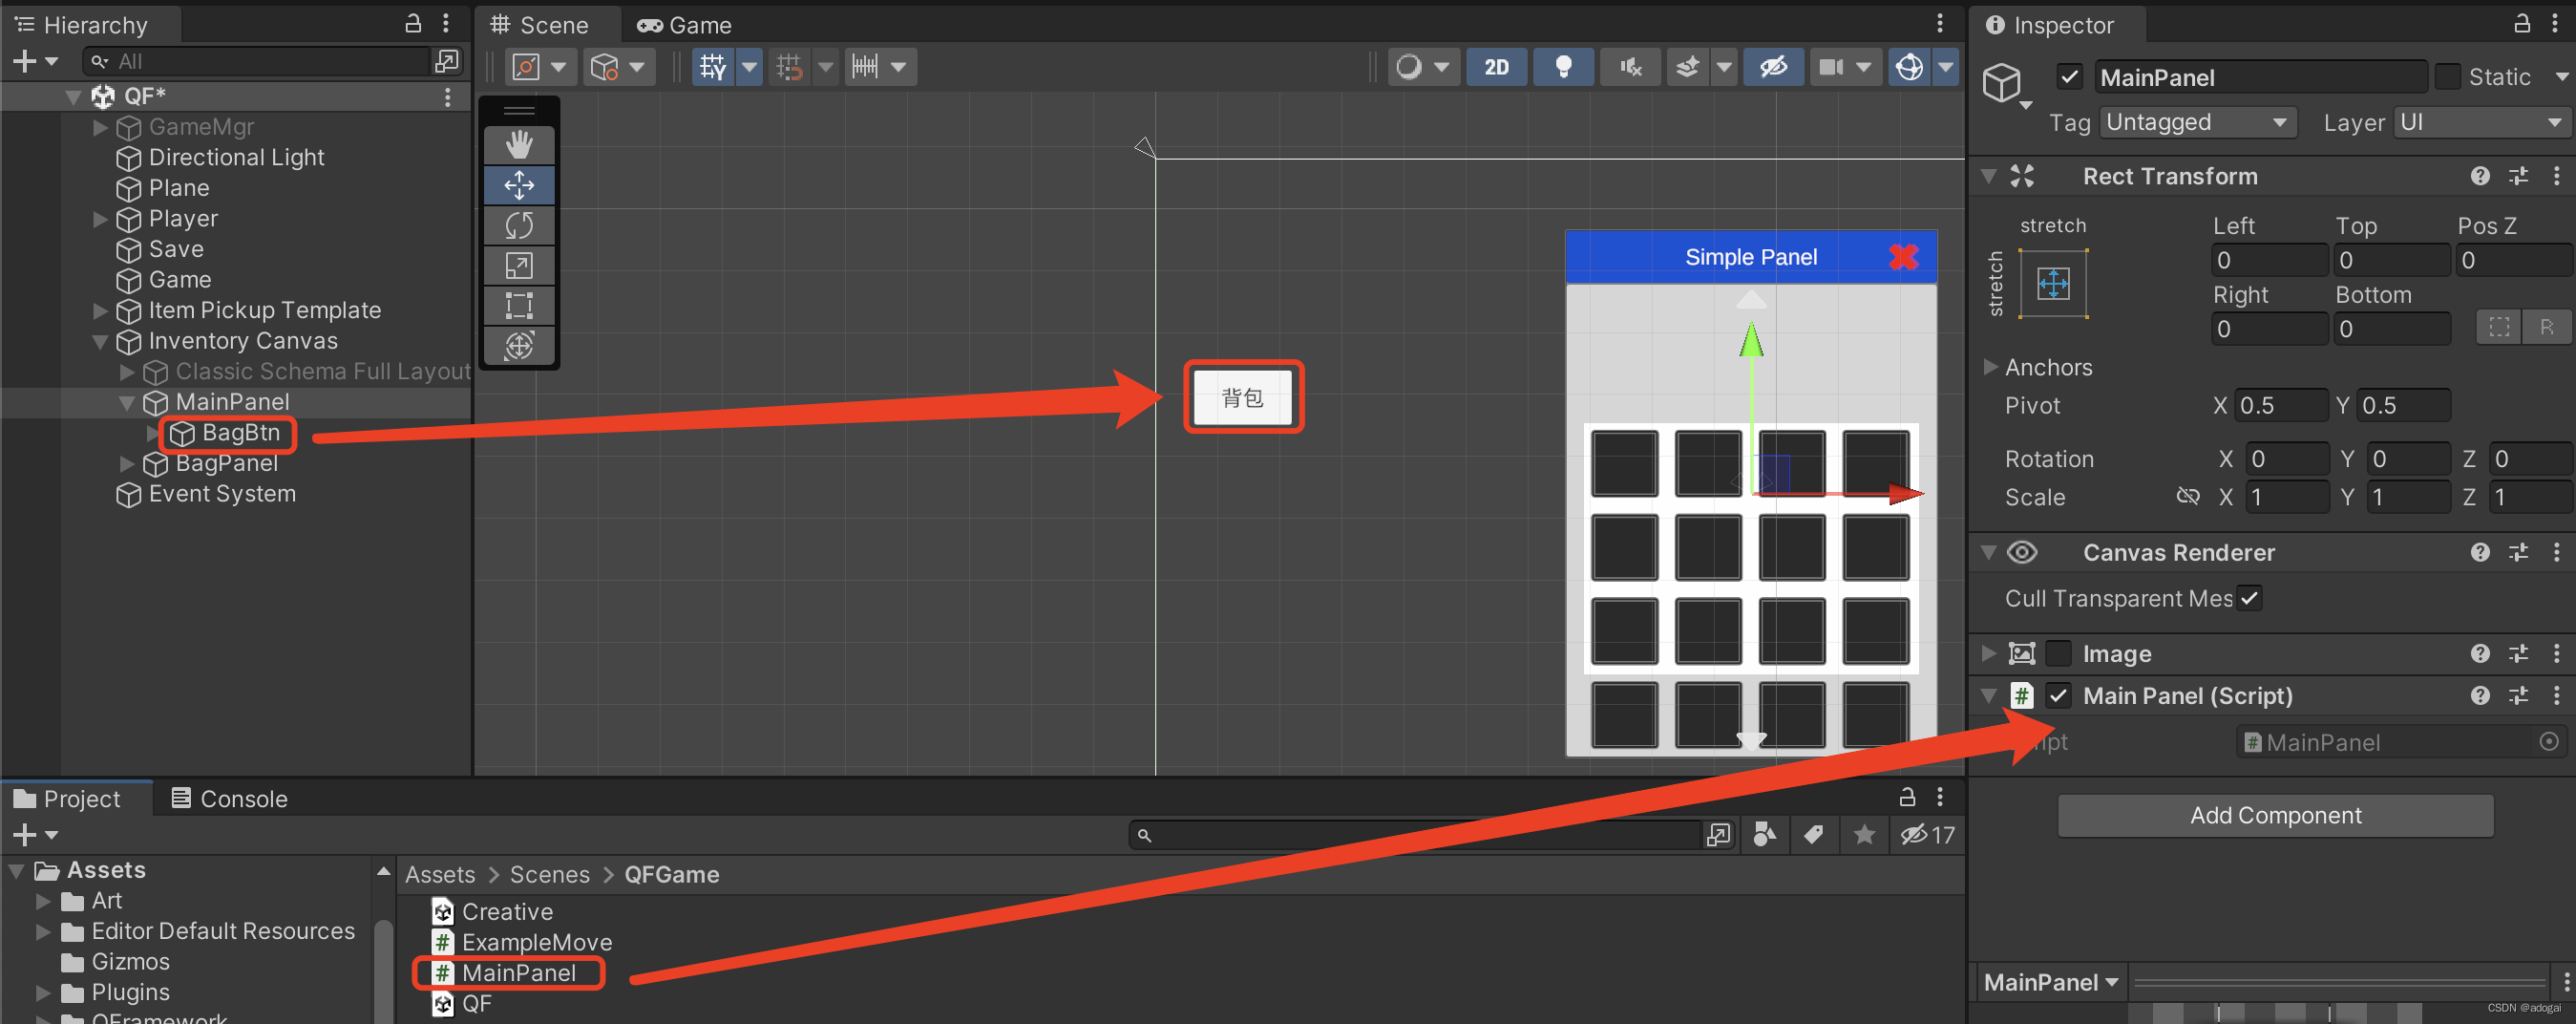
Don't forget to drag and drop the two components to the MainPanel script.
using System.Collections;
using System.Collections.Generic;
using Opsive.UltimateInventorySystem.UI.Panels;
using UnityEngine;
using UnityEngine.UI;

public class MainPanel : MonoBehaviour
{


    public Button BagBtn;
    public DisplayPanel BagPanel;
    // Start is called before the first frame update
    void Awake()
    {


        BagBtn.onClick.AddListener(() => {


            SwichPanel(BagPanel);
        });
    }

    // Update is called once per frame
    void Update()
    {


        if (Input.GetKeyDown(KeyCode.B))
        {


            SwichPanel(BagPanel);
        }
    }

    /// <summary>
    /// 切换界面
    /// </summary>
    /// <param name="displayPanel"></param>
    private void SwichPanel(DisplayPanel displayPanel) {


        if (!displayPanel.IsOpen)
        {


            displayPanel.SmartOpen();
        }
        else
        {


            displayPanel.SmartClose();
        }
    }
}
3. Configure a custom grid
Quickly locate and modify the UI panel 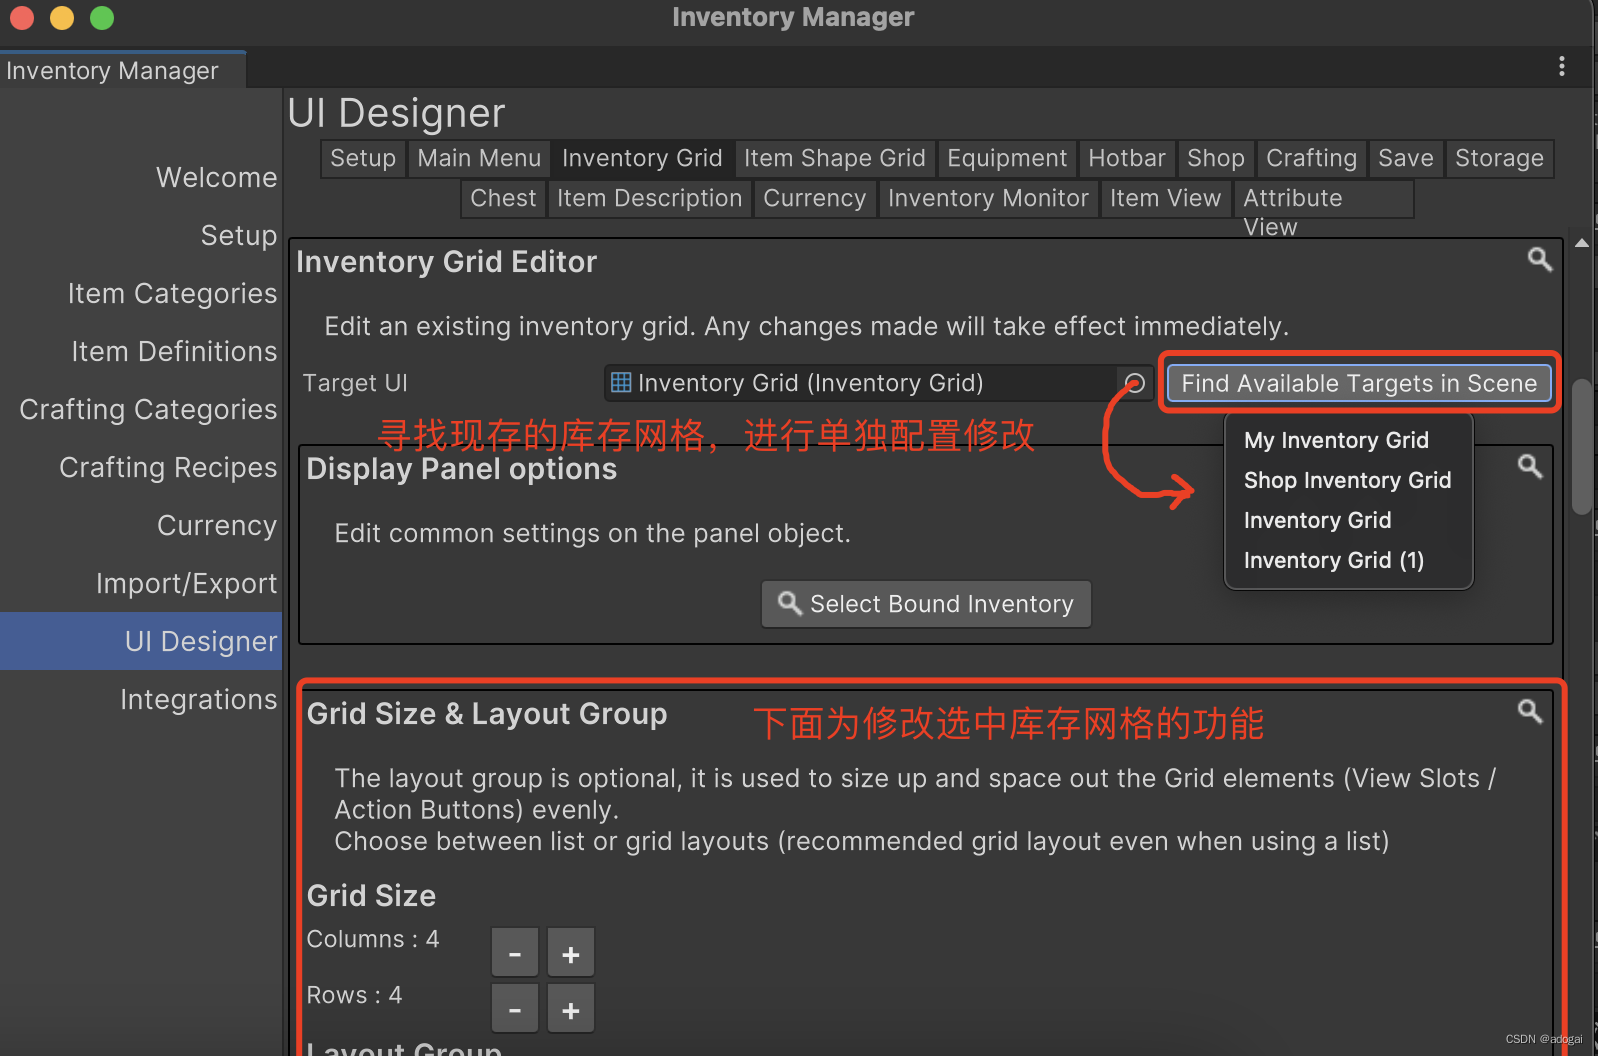
Grid layout
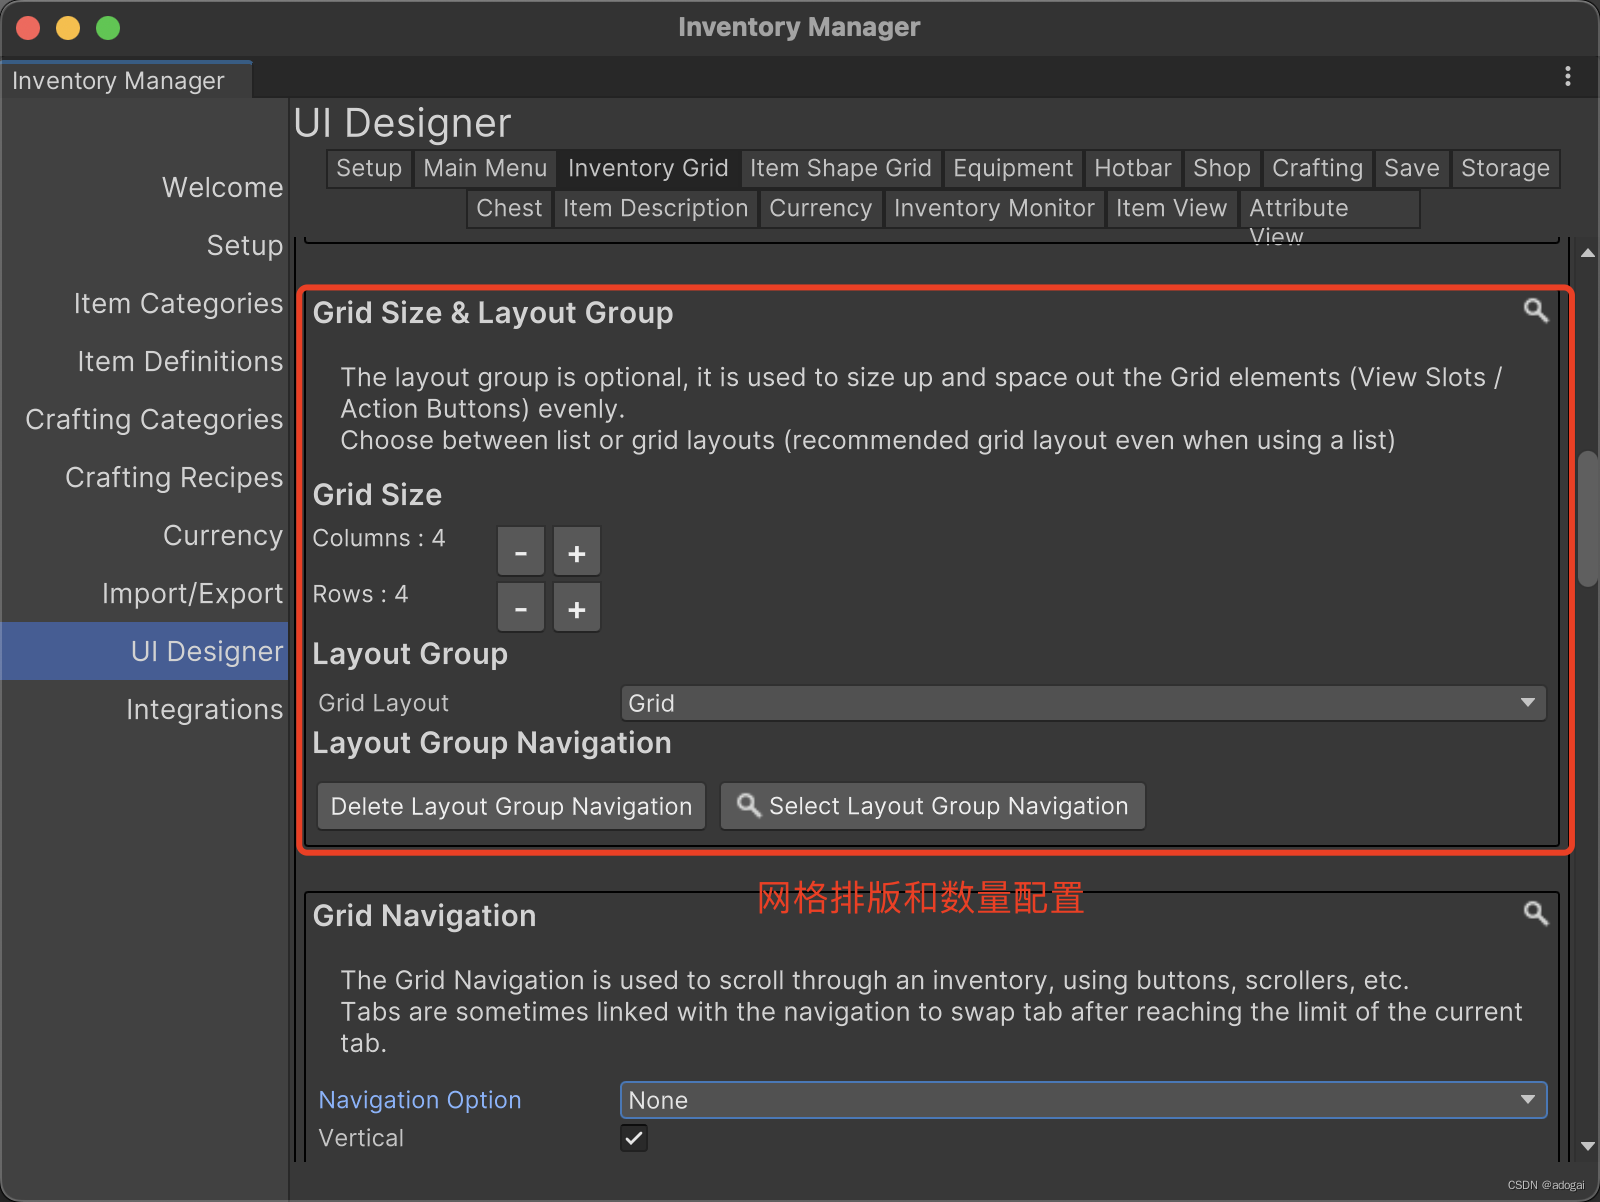
Grid navigation, which can be set as a scroll wheel, button switch, etc.
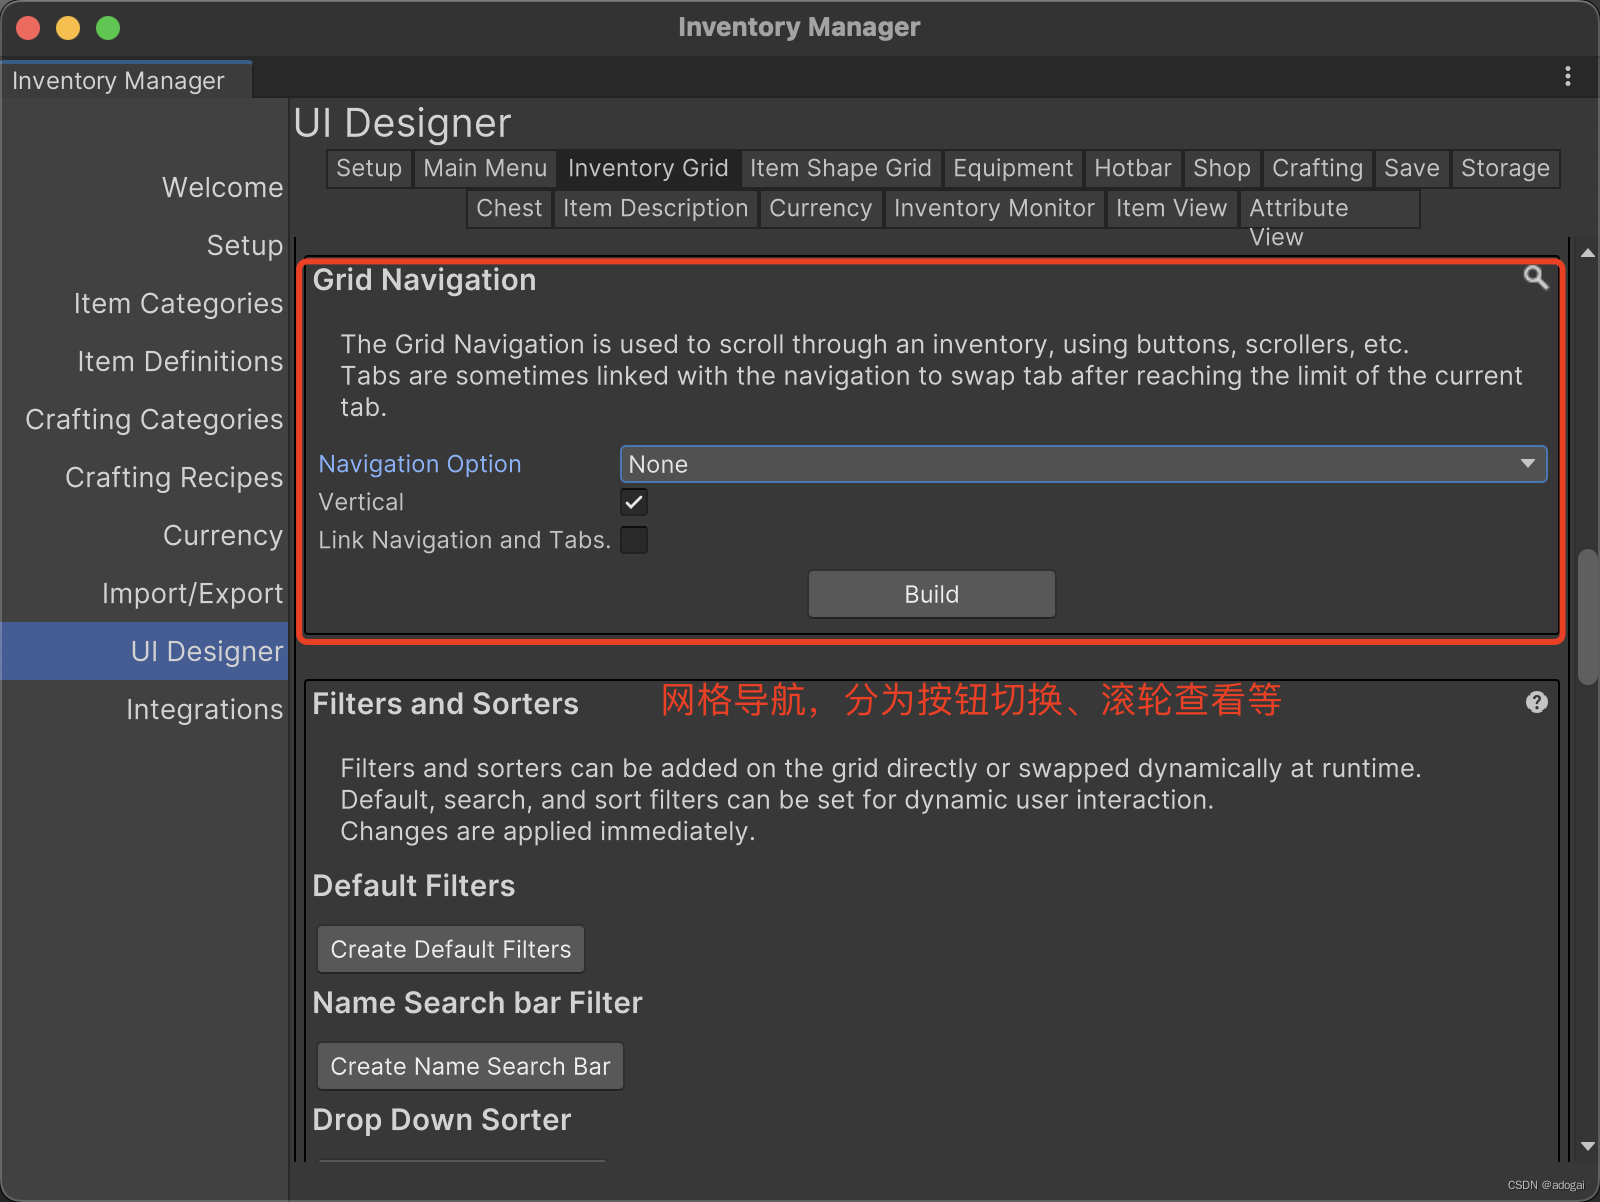
Filters - search box, category division, etc.

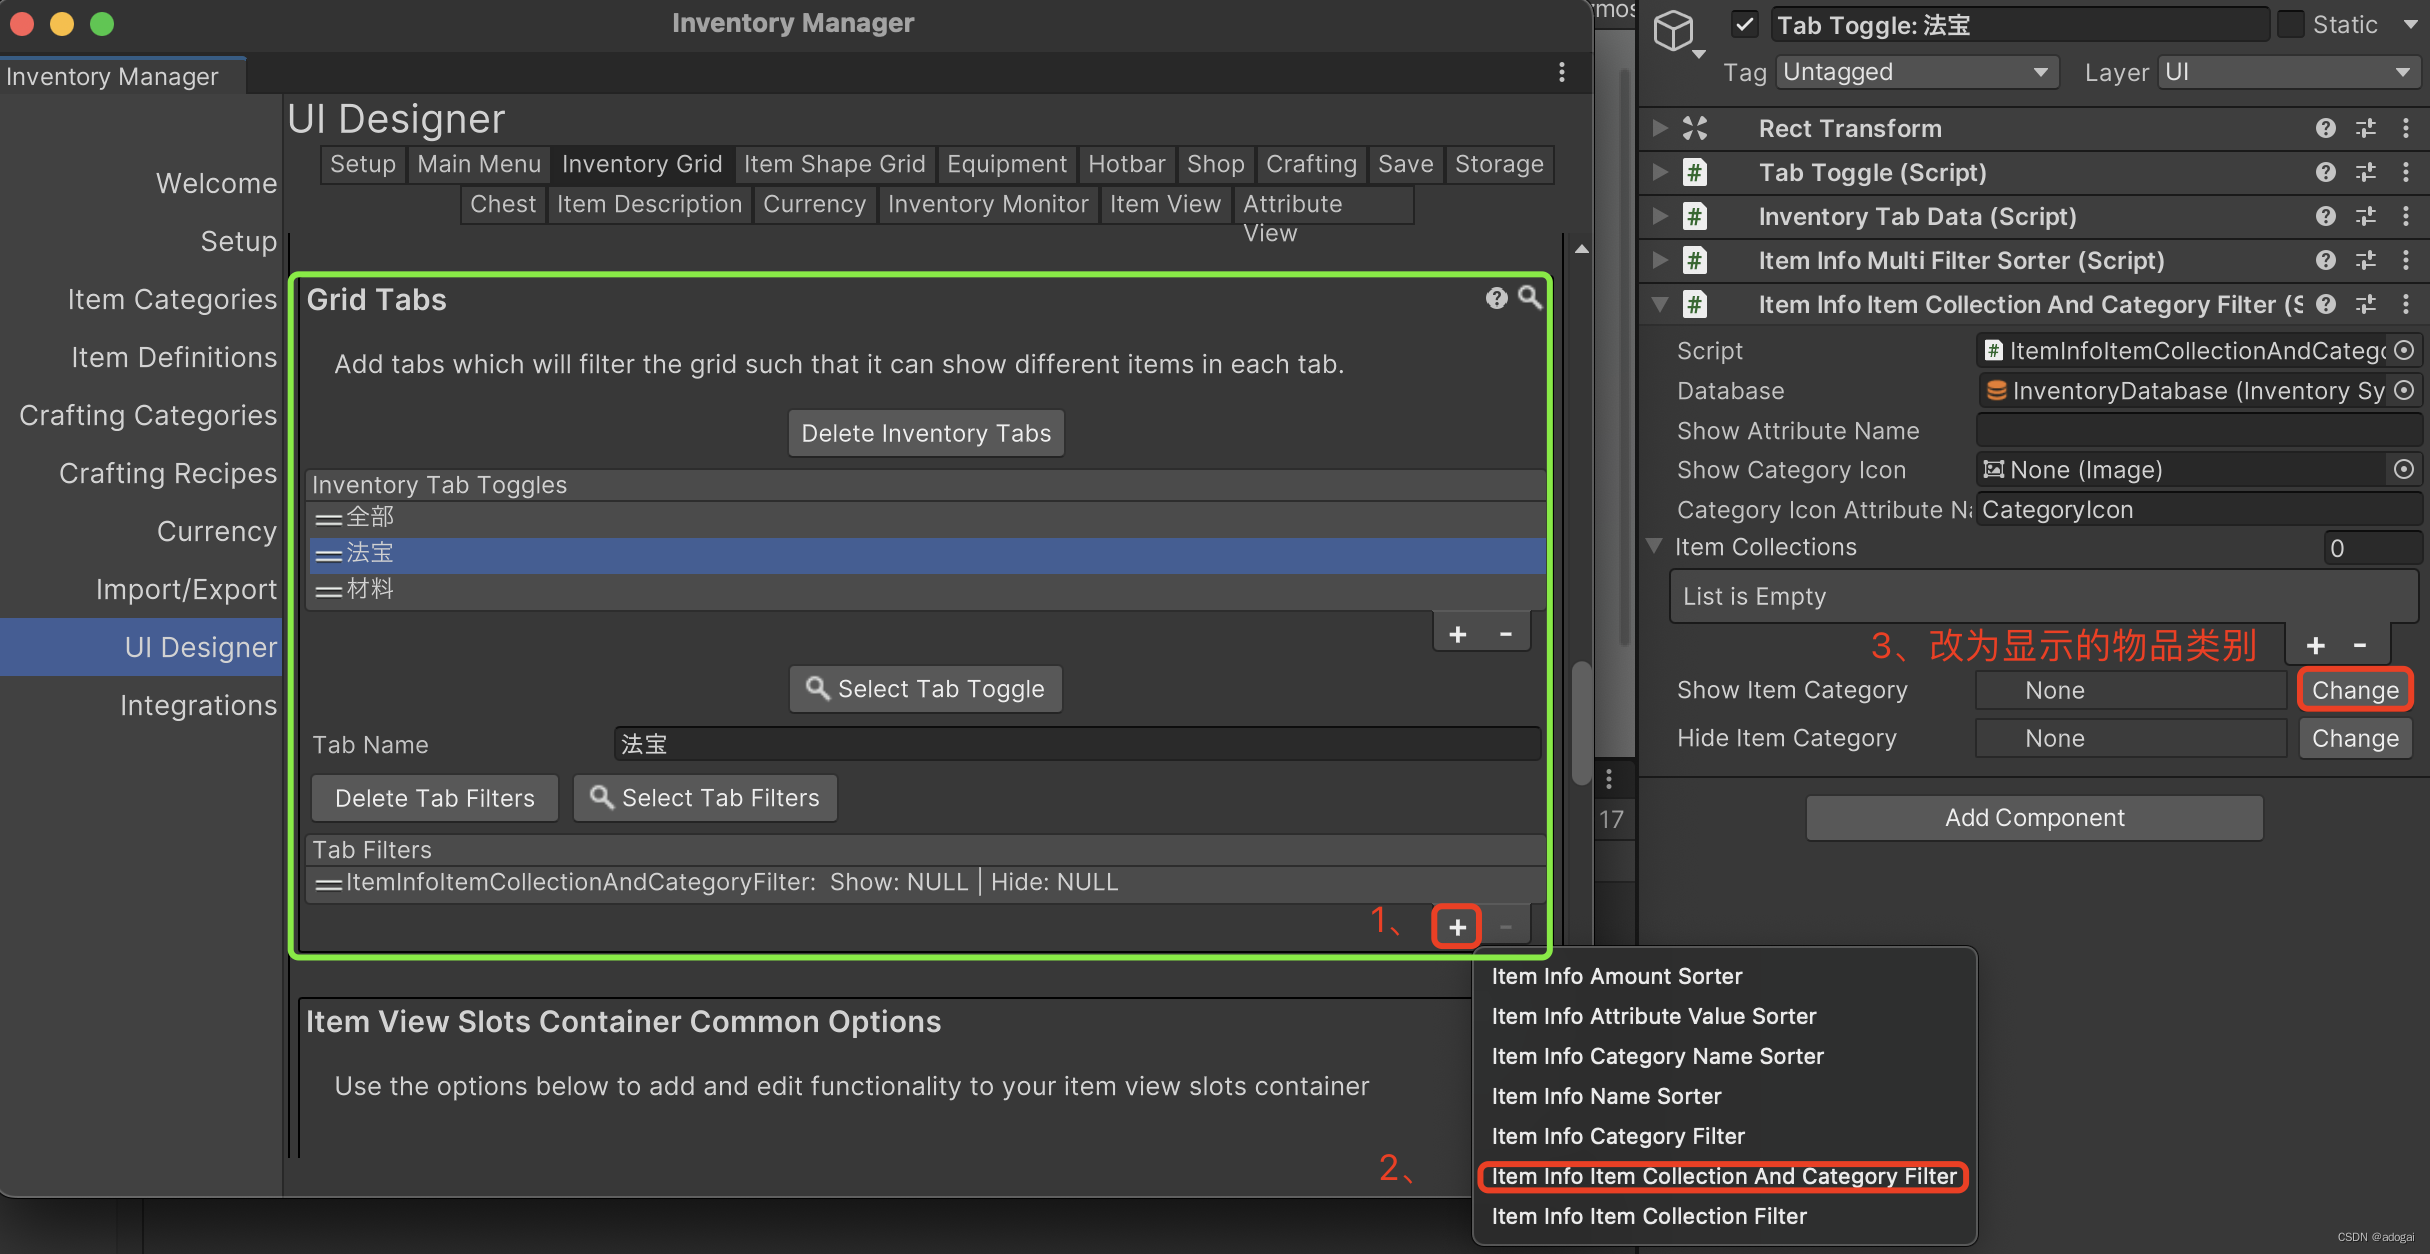
Grid classification, as shown in the figure below, is divided into three categories. There are three category buttons under the selected backpack UI, and you can configure the icons yourself

Remember that the last chapter fixed a lot of things to ensure that the default generation function can be used.
The following prefabs need to be changed to the prefabs modified in the previous chapter.
2. Disable character control when focusing on the UI
Add new panels and scripts to determine whether to focus on the UI, and be careful not to have other UI components.
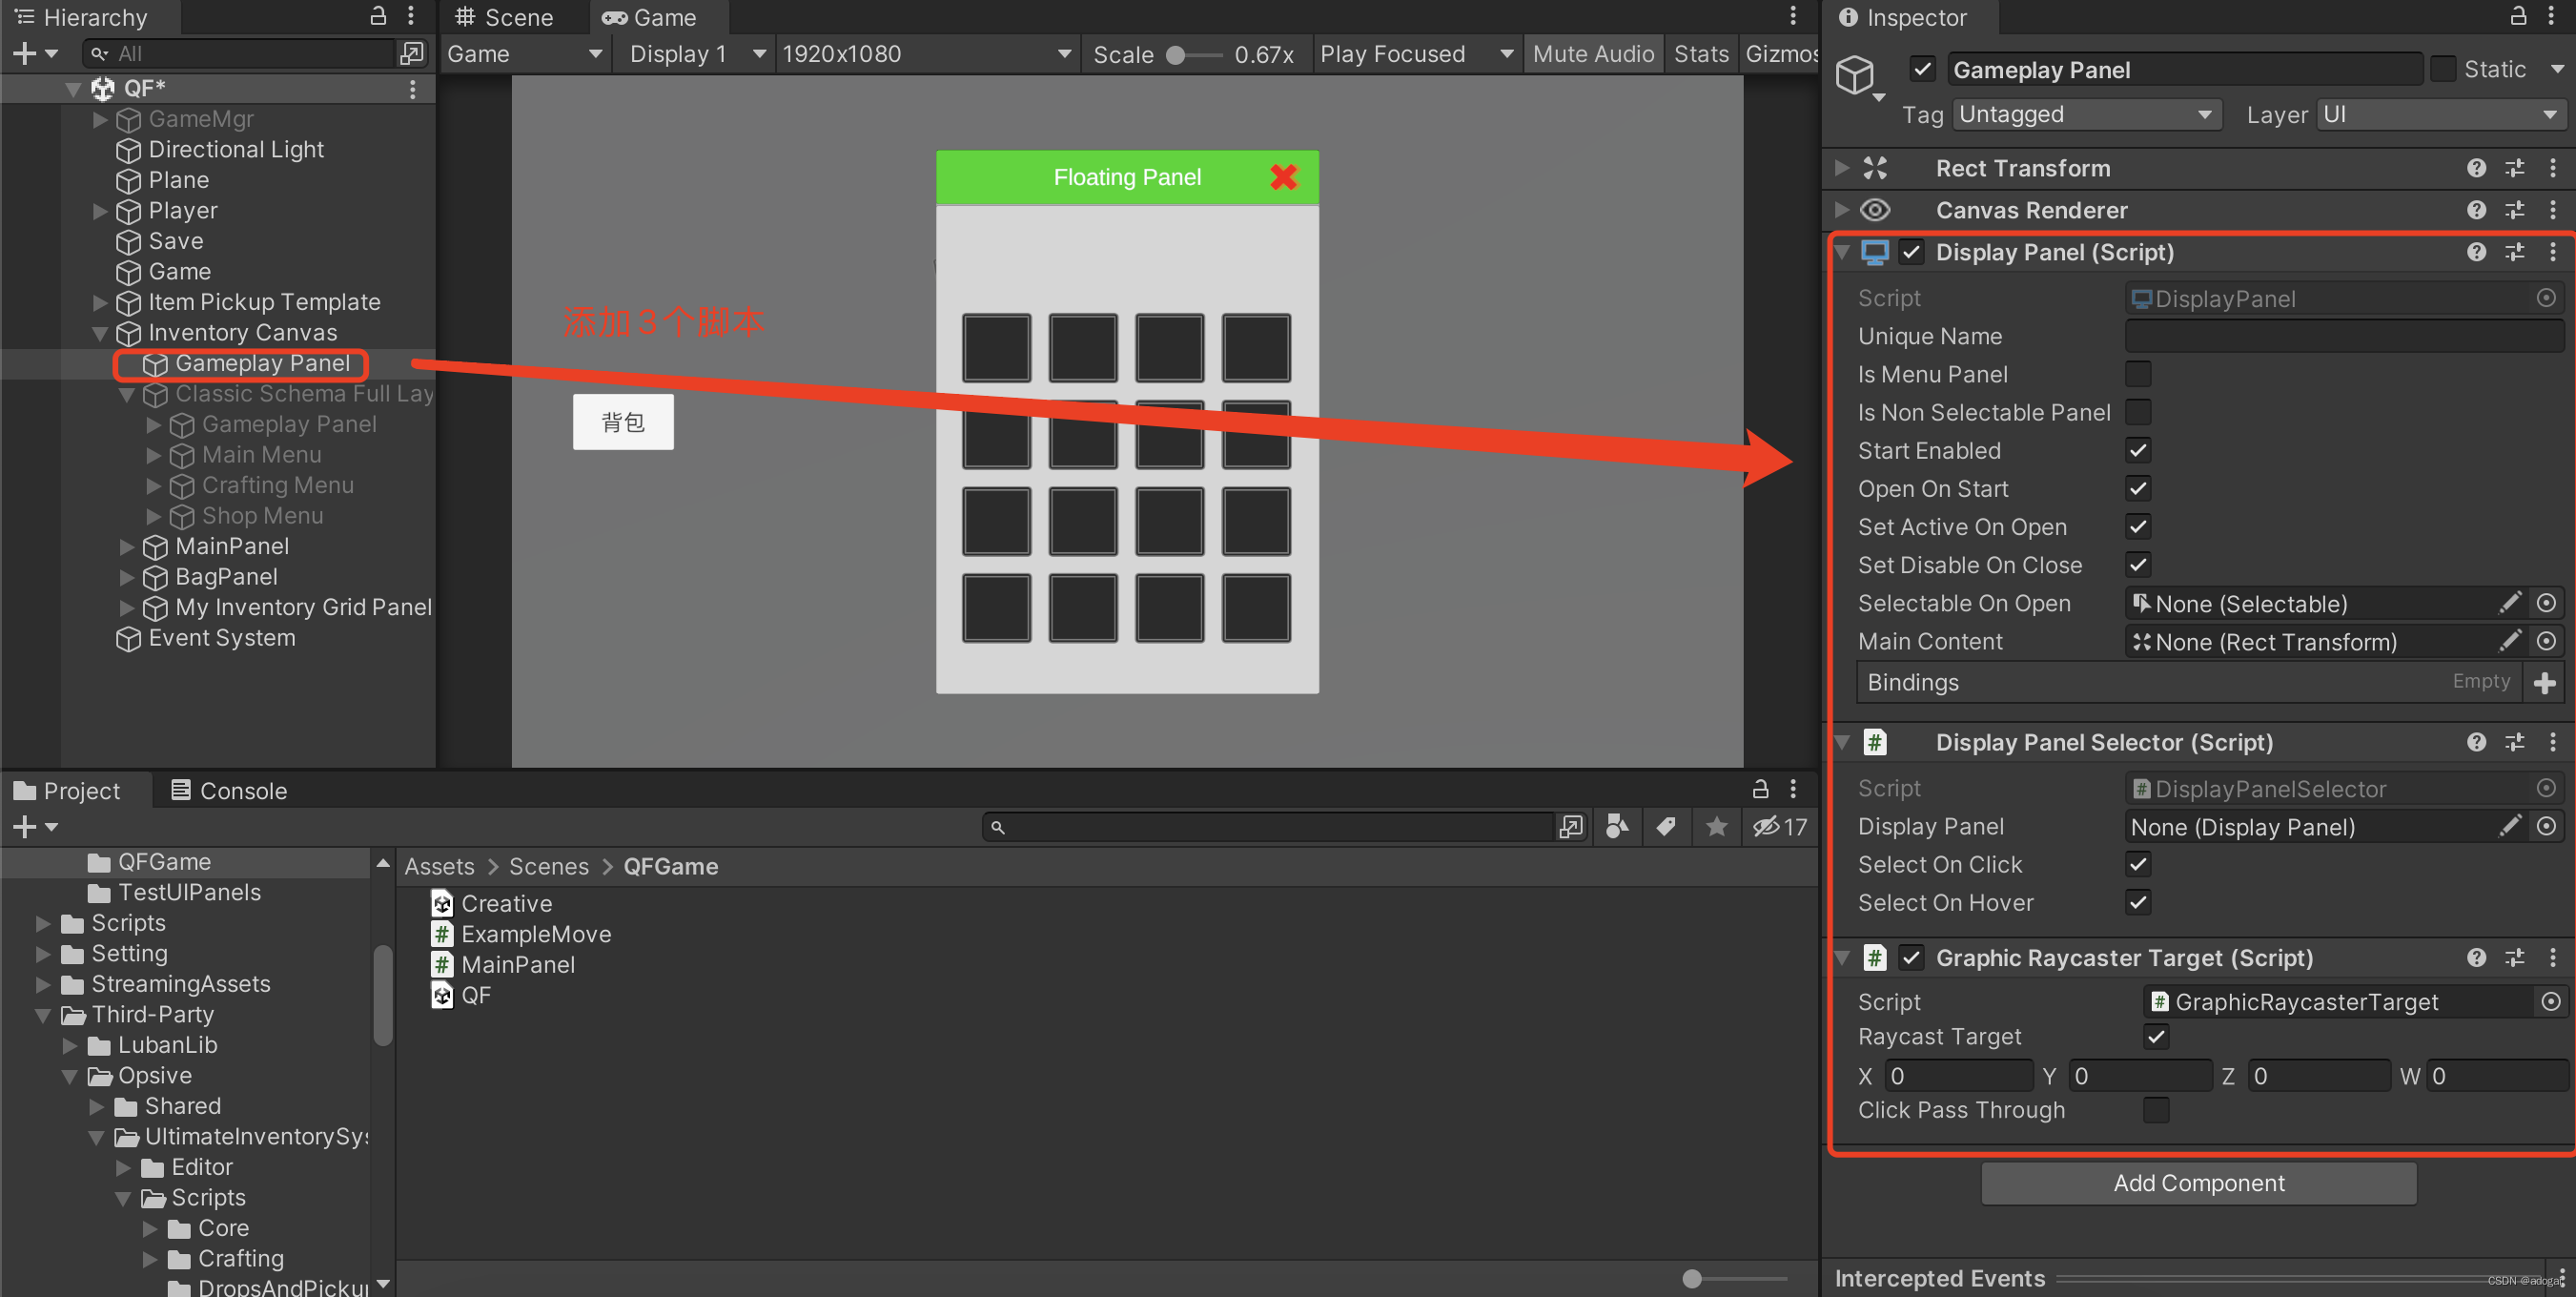
Replace the UI-managed GamePlay Panel with the one you just created.
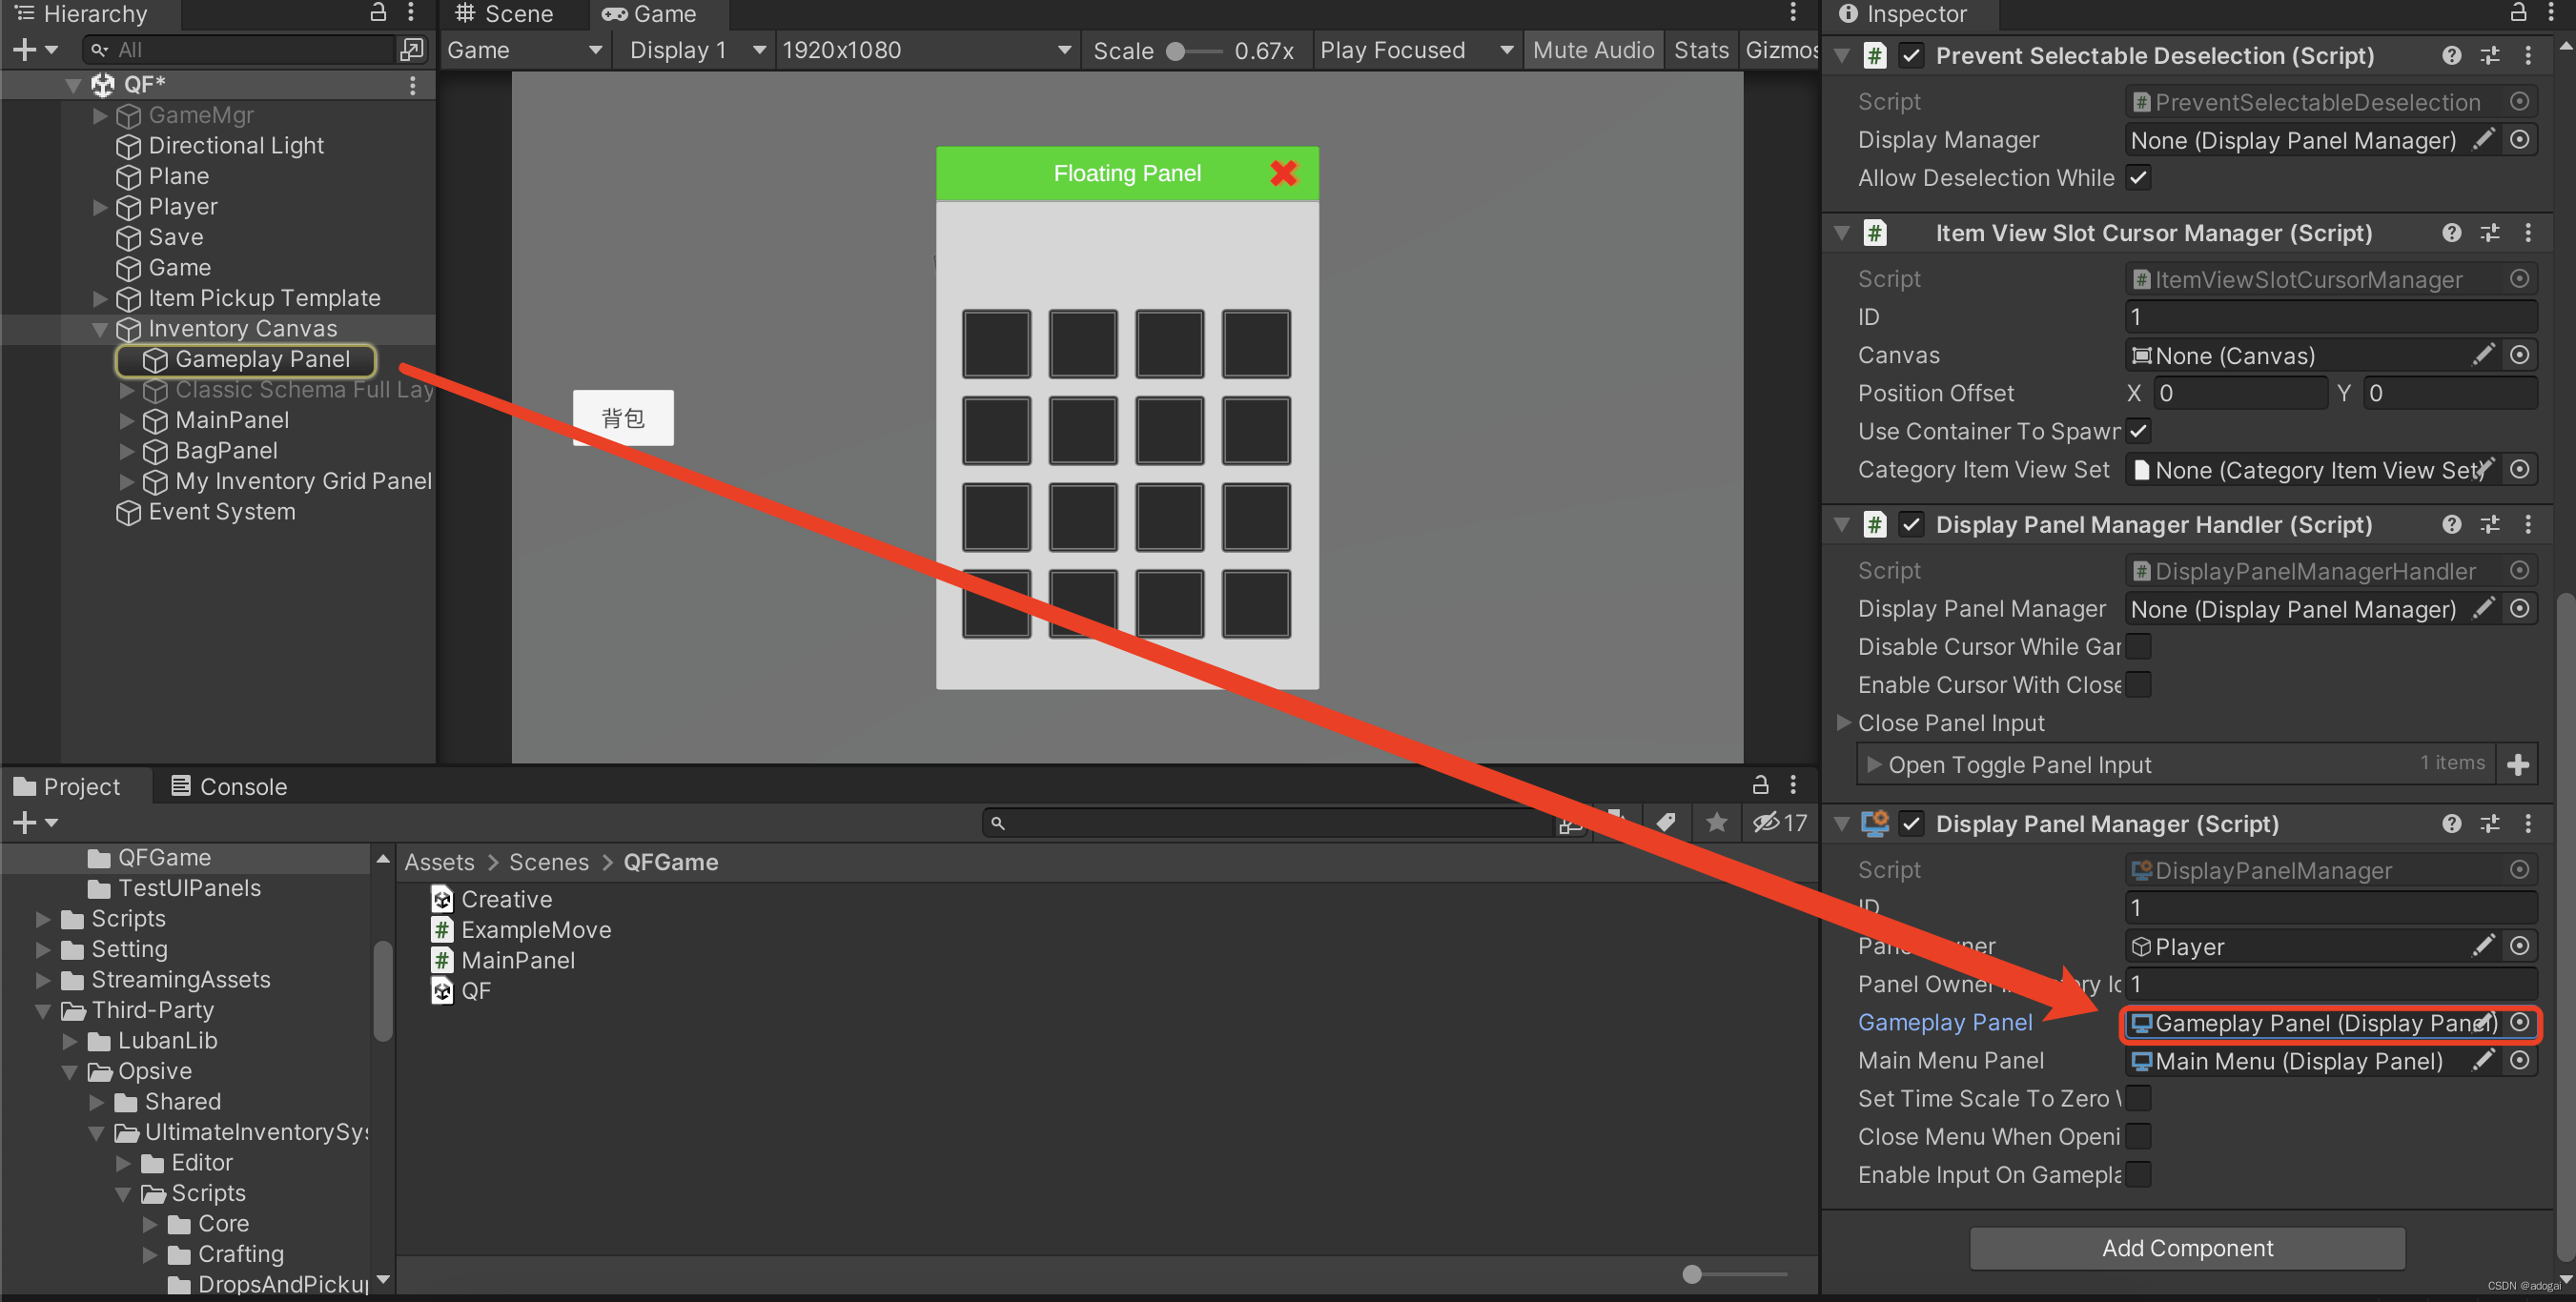
Find the PreventSelectableDeselection script in the Inventory Canvas, and set the above bool type to true. Test it, and found that it is only half right, the character can still be moved when the mouse is placed on the UI;
we found the DisplayPanelSelector on the GamePlay Panel and removed it, and added a new script UIPanelSelector to hang on the UI, specifically to inherit this class , rewrite the method inside, the UIPanelSelector script is as follows (play freely, if the mouse does not need to shield the operation in the shortcut bar, then remove the interface, or switch to customize multiple interfaces):
using Opsive.UltimateInventorySystem.UI.Panels;
using System.Collections;
using System.Collections.Generic;
using UnityEngine;
using UnityEngine.EventSystems;

public class UIPanelSelector : DisplayPanelSelector
{


    public override void OnPointerClick(PointerEventData eventData)
    {


        base.OnPointerClick(eventData);
        SetPlayer(false);
    }

    public override void OnPointerEnter(PointerEventData eventData)
    {


        base.OnPointerEnter(eventData);
        SetPlayer(false);
    }

    public override void OnPointerExit(PointerEventData eventData)
    {


        base.OnPointerExit(eventData);
        SetPlayer(true);
    }

    /// <summary>
    /// 设置Player无法移动
    /// </summary>
    /// <param name="b"></param>
    private void SetPlayer(bool b) {


        GameObject.FindGameObjectWithTag("Player").GetComponent<ExampleMove>().enabled = b;
    }
}
Run it again, and find that the problem is solved.
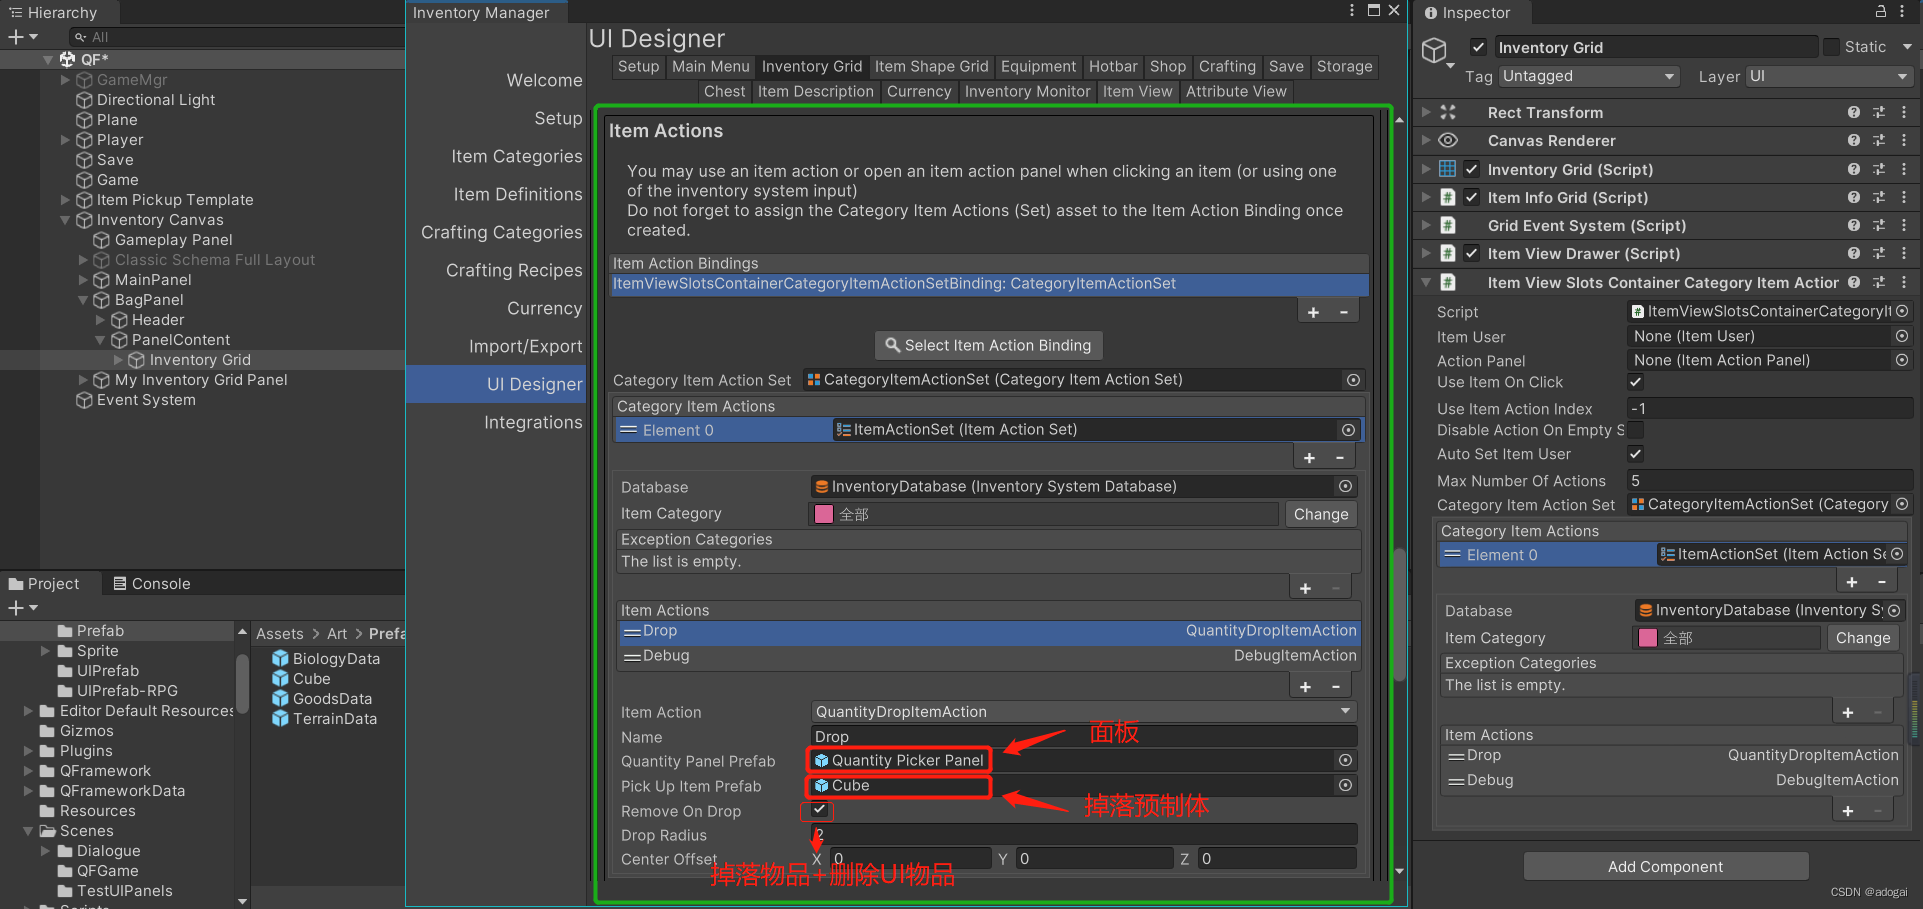
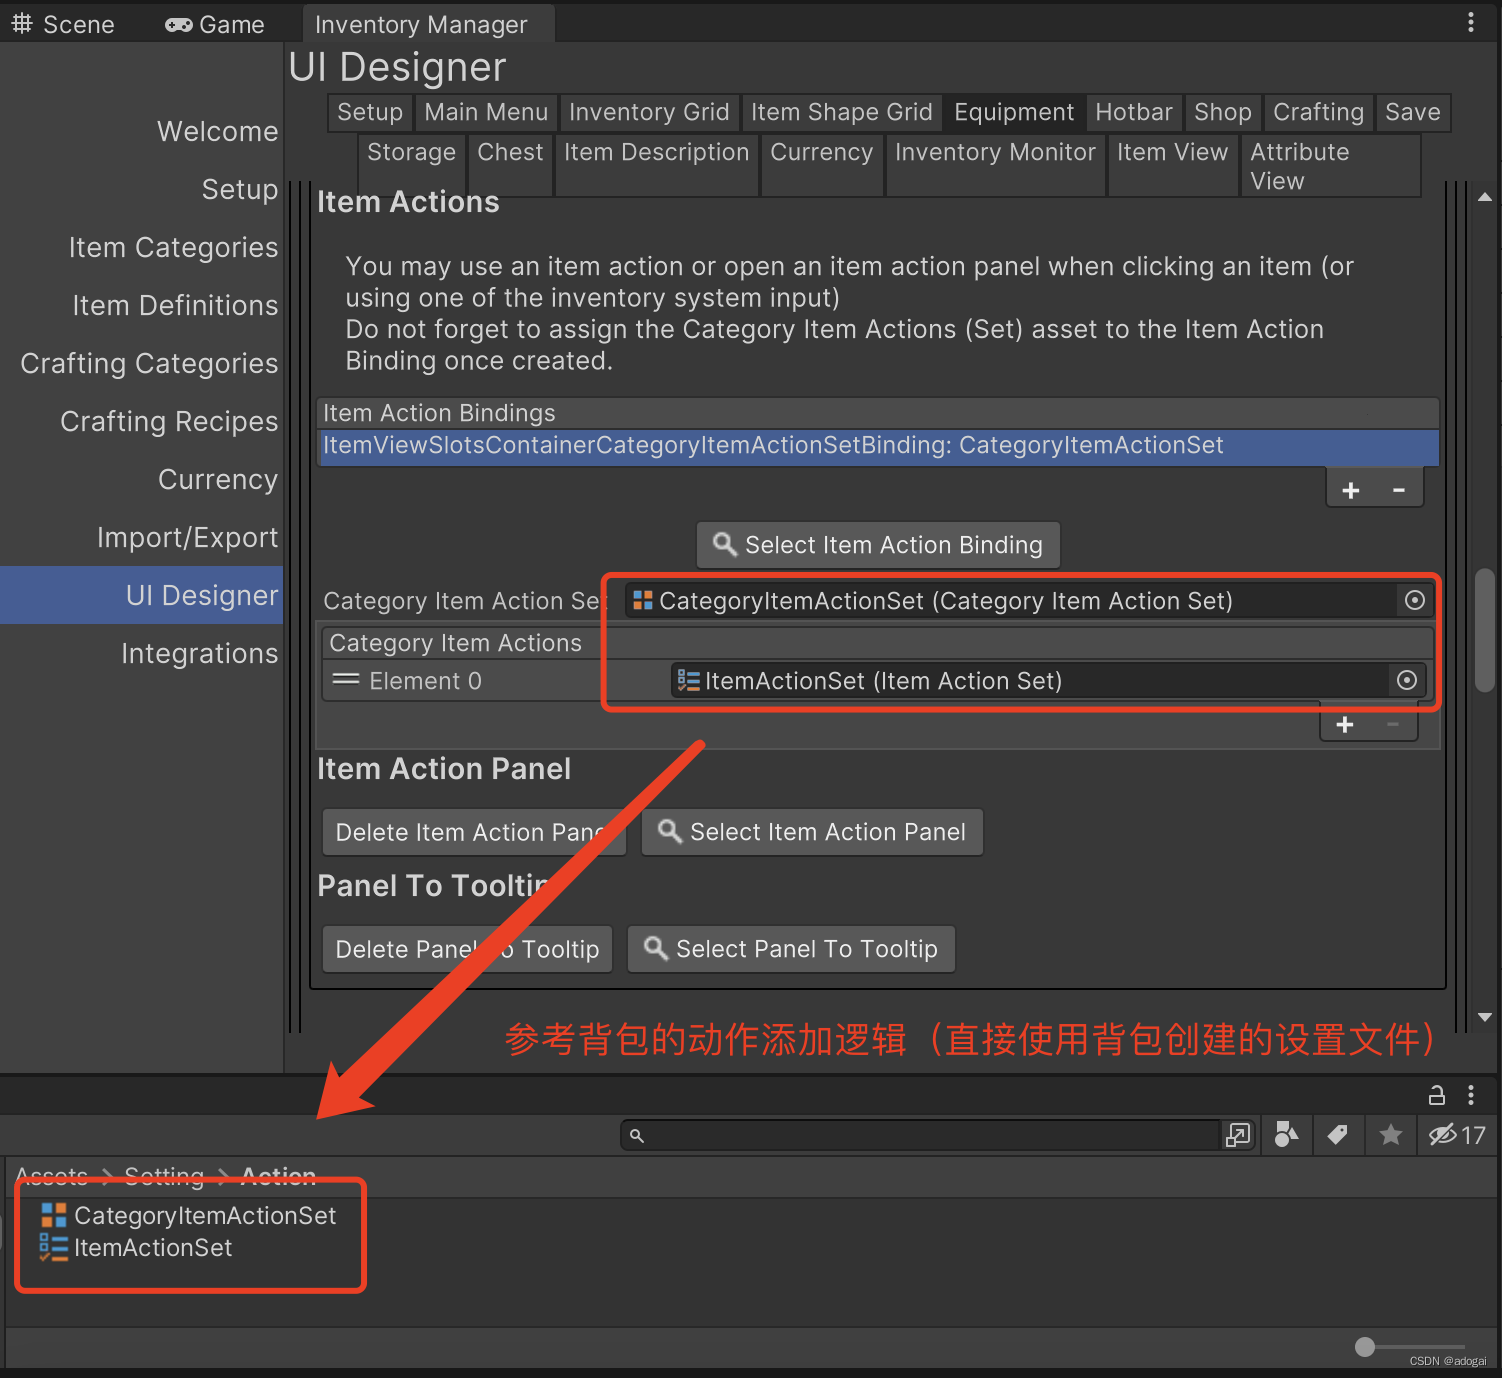
3. Item Action (item discarding, moving, etc.)
Interaction (various interactions, including discarding, deleting, moving (to warehouse) and other actions, can be entrusted by Li Jiecheng)
Enter Item Actions to create two resources into the project (the process will not be shown)
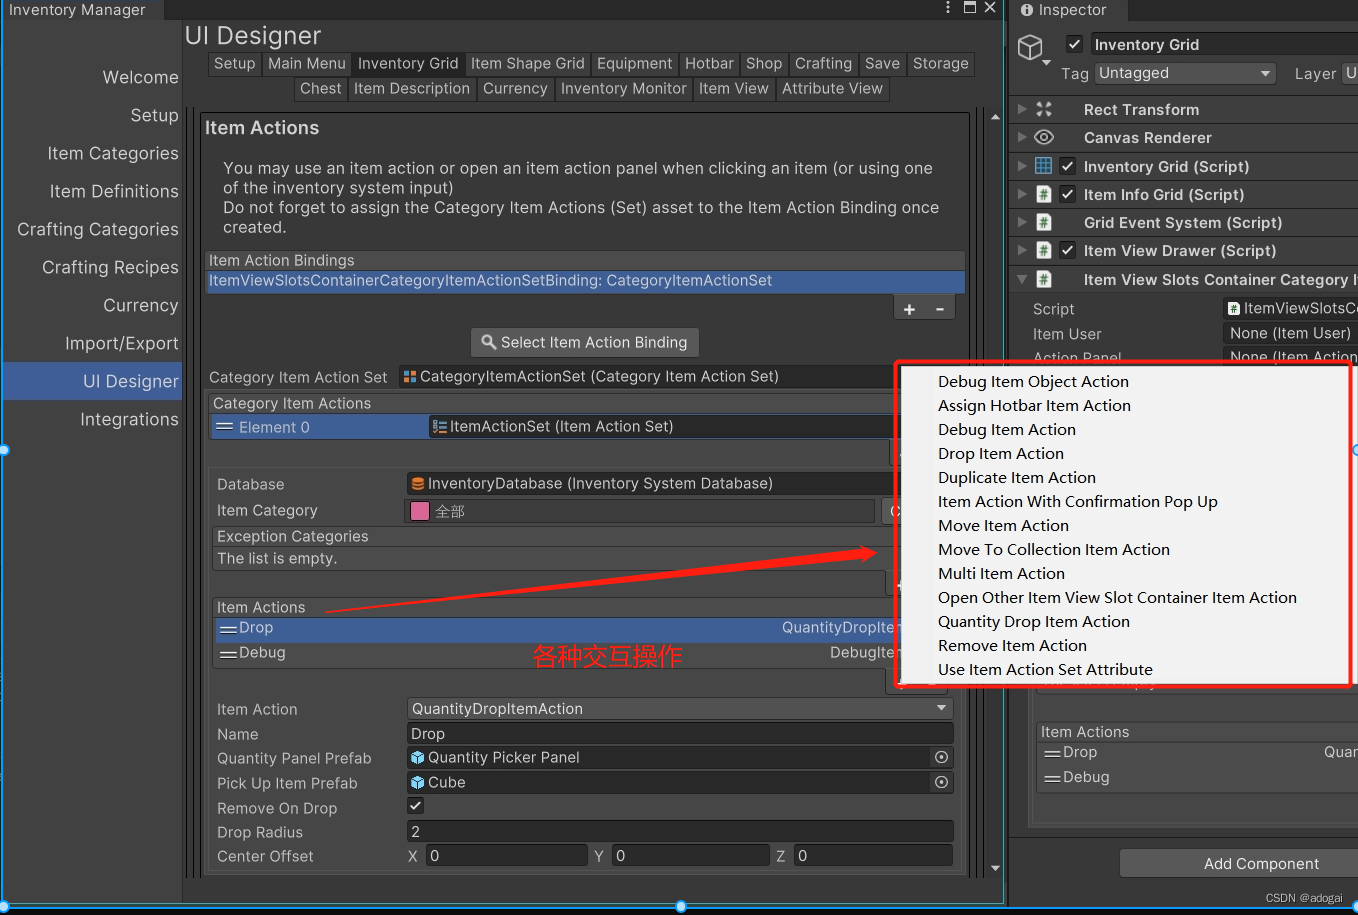
The figure below shows the addition of the two actions of drop and Debug. At this time, run the game and click on the object to make the items in the backpack drop.
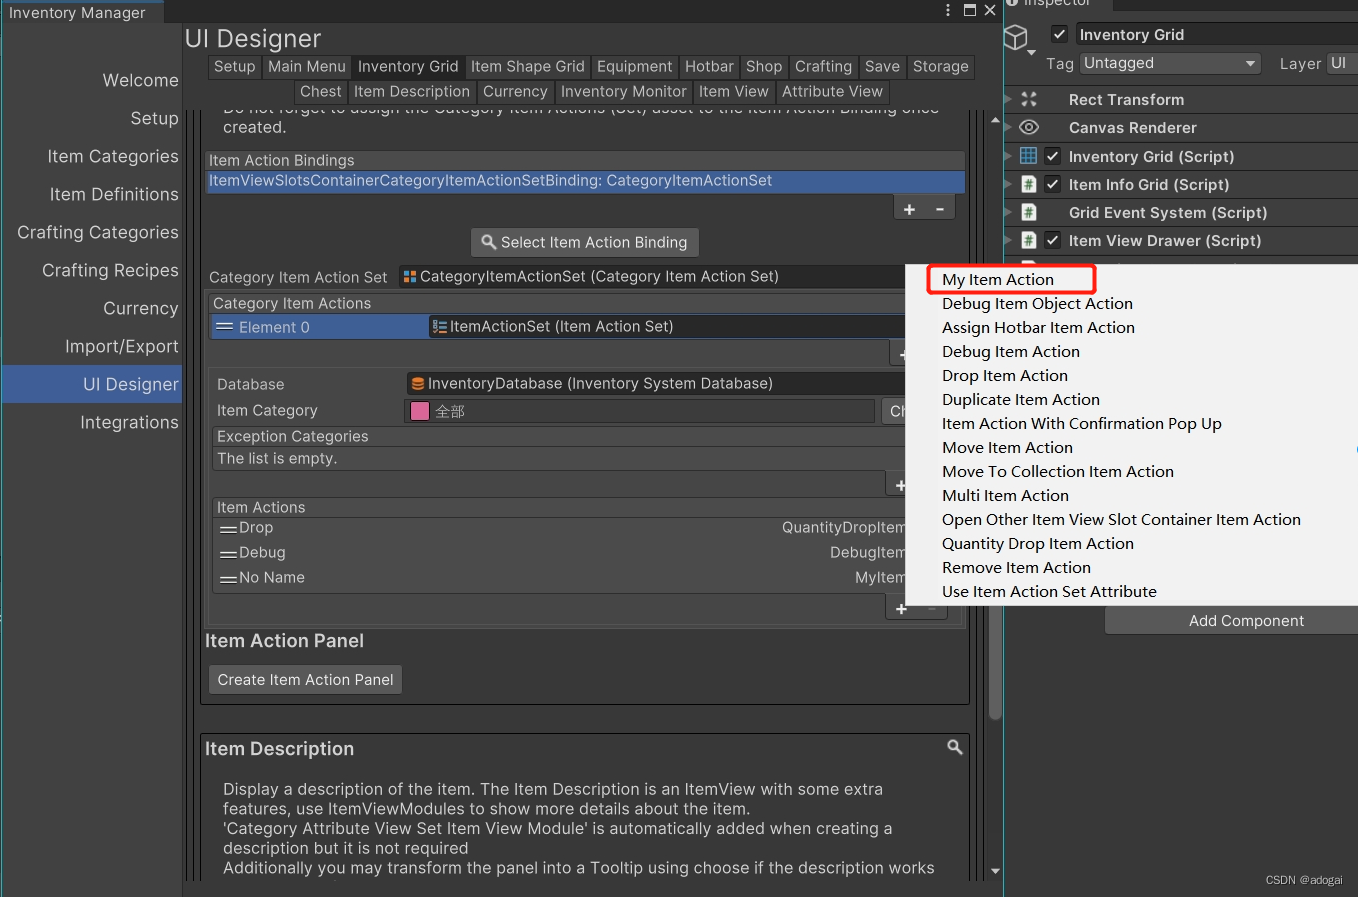
Custom Actions:
Creating your own Item Action is very easy, just create a new class that inherits Item Action and overrides the CanInvokeInternal and InvokeActionInternal functions.
using Opsive.UltimateInventorySystem.Core.DataStructures;
using Opsive.UltimateInventorySystem.ItemActions;
using System.Collections;
using System.Collections.Generic;
using UnityEngine;

[System.Serializable]
public class MyItemAction : ItemAction
{


    /// <summary>
    /// 能否调用该操作
    /// </summary>
    /// <param name="itemInfo">The item info.</param>
    /// <param name="itemUser">The item user (can be null).</param>
    /// <returns>True if it can be invoked.</returns>
    protected override bool CanInvokeInternal(ItemInfo itemInfo, ItemUser itemUser)
    {


        Debug.Log("可以进行我的操作");
        return true;
    }

    /// <summary>
    /// 调用
    /// </summary>
    /// <param name="itemInfo">The item info.</param>
    /// <param name="itemUser">The item user (can be null).</param>
    protected override void InvokeActionInternal(ItemInfo itemInfo, ItemUser itemUser)
    {


        Debug.Log("这就是我的操作");
    }
}
Add this method, click to execute two debugs
Although the default provided is sufficient, the plugin provides some special interfaces and abstract item actions, which are especially useful when creating custom item actions: IActionWithPanel: Allows you to
set the panel that invokes item actions. Example: Move Item ActionItemActionWithQuantityPickerPanel: Spawns a QuantityPicker from a prefab.
Panel, and use async/await to get the quantity before calling the "real" item operation. Example: Quantity delete item operation.ItemViewSlotsContainerItemAction: Refers to the item action for the item view slots container. Example: open other item view slot container item action.
ItemActionWithAsyncFuncActionPanel<T>: Generates an asynchronous function action panel that can be used to display a list of options. Example: Assigning Hotkey Item Actions
ItemObjectAction: Used to reference an item object, which may be useful when the item user cannot identify the related item object from the item information.
Code call-execute action
Create a new script ManuallyCallAction, then add the script to the character to run, press L to generate the set object. Don't forget to drag m_Inventory, PickUpItemPrefab.
using System.Collections;
using System.Collections.Generic;
using UnityEngine;
using Opsive.UltimateInventorySystem.Core;
using Opsive.UltimateInventorySystem.Core.DataStructures;
using Opsive.UltimateInventorySystem.Core.InventoryCollections;
using Opsive.UltimateInventorySystem.ItemActions;

public class ManuallyCallAction : MonoBehaviour
{


    //角色库存
    public Inventory m_Inventory;
    //掉落预制体
    public GameObject PickUpItemPrefab;
    void Update()
    {


        if (Input.GetKeyDown(KeyCode.L))
        {


            ManuallyCallDropItemAction();
        }
    }
    public void ManuallyCallDropItemAction()
    {


        //要在代码中直接调用项目操作,您需要三样东西
        //1) 项目信息 The ItemInfo
        //2) 项目动作 The ItemAction
        //3) 项目用户 The ItemUser

        //首先拿到你想要的物品。
        var result = m_Inventory.GetItemInfo(InventorySystemManager.GetItemDefinition("聚灵散"));

        //如果结果没有价值,我们的库存中就没有聚灵散
        if (result.HasValue == false) {

     return; }
        //得到苹果的ItemInfo
        var appleItemInfo = result.Value;

        //拿到两个聚灵散
        appleItemInfo = new ItemInfo(Mathf.Max(1, appleItemInfo.Amount), appleItemInfo);

        //让我们获取 ItemUser。这通常放置在与 Inventory 相同的游戏对象中,但并非总是如此
        var itemUser = m_Inventory.GetComponent<ItemUser>();

        //现在让我们创建 drop item 操作,您可以缓存此对象并在需要时重用它以获得更高的性能
        var dropItemAction = new DropItemAction();

        //您必须在使用前初始化项目操作。 这仅能一次。
        dropItemAction.Initialize(false);

        //设置掉落预制体
        dropItemAction.PickUpItemPrefab = PickUpItemPrefab;

        //可选:检查您是否被允许调用该操作(无论如何它都会在内部执行此操作)
        var canInvoke = dropItemAction.CanInvoke(appleItemInfo, itemUser);

        //调用动作
        dropItemAction.InvokeAction(appleItemInfo, itemUser);

        //对于某些操作,您甚至可以使用额外的数据
        //例如 drop action 跟踪最后一个掉落的拾取对象
        var droppedPickup = dropItemAction.PickUpGameObject;
    }
}
Don't be intimidated by these codes. Generally, games don't use custom functions. If they are used, it means that someone must know how to program. Just leave it to the brick industry.
3. Item function panel
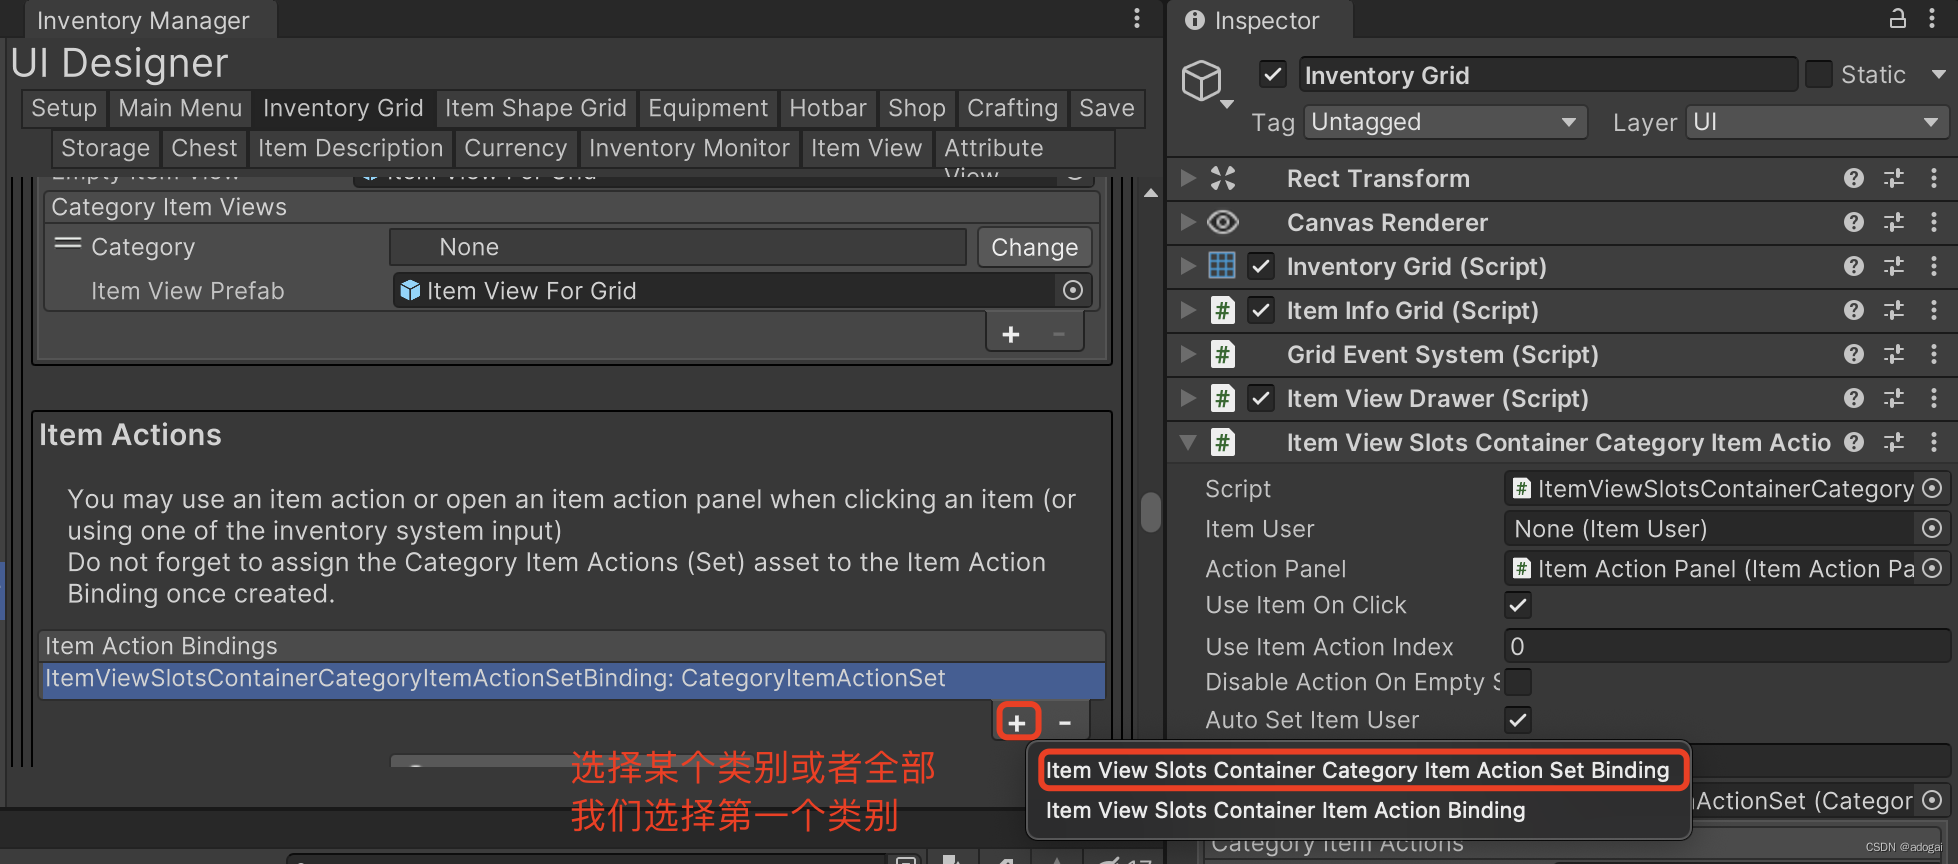
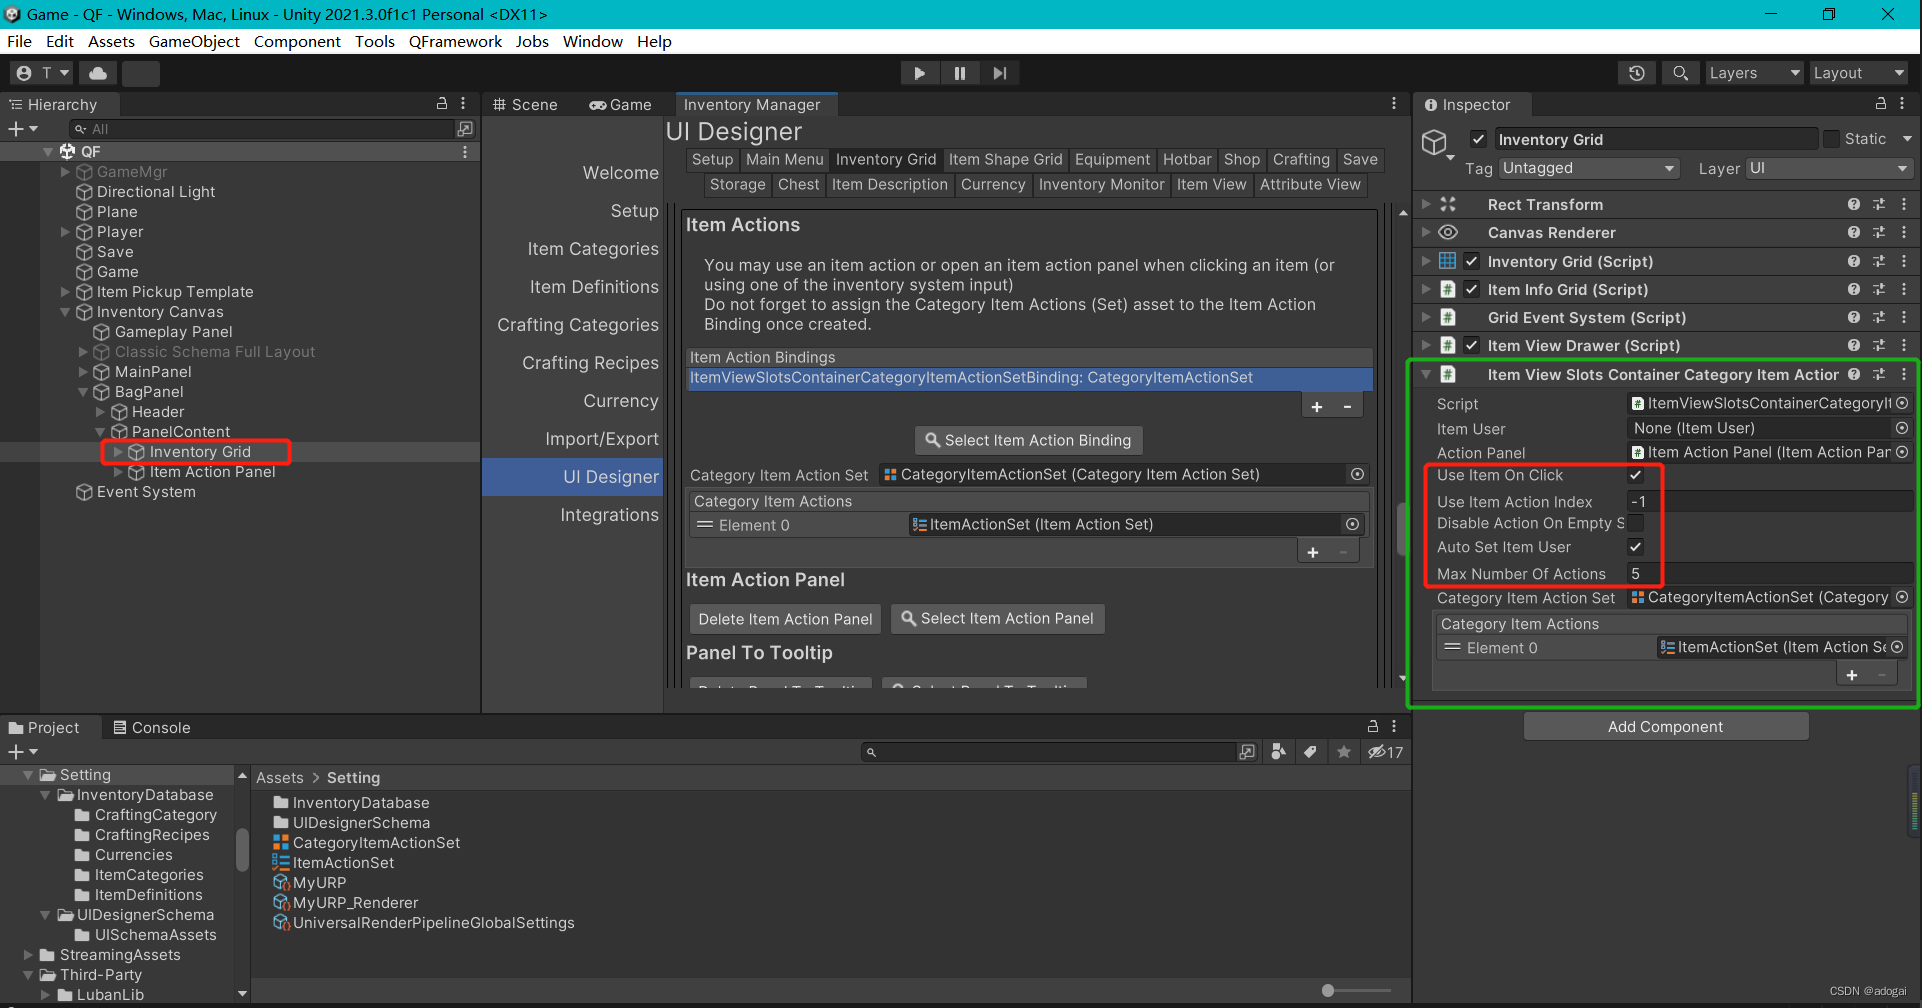
In other words, if you click the left button to trigger the discard, it is too low. Let's explore in depth - click on the item to pop up the function panel (as shown in the figure).
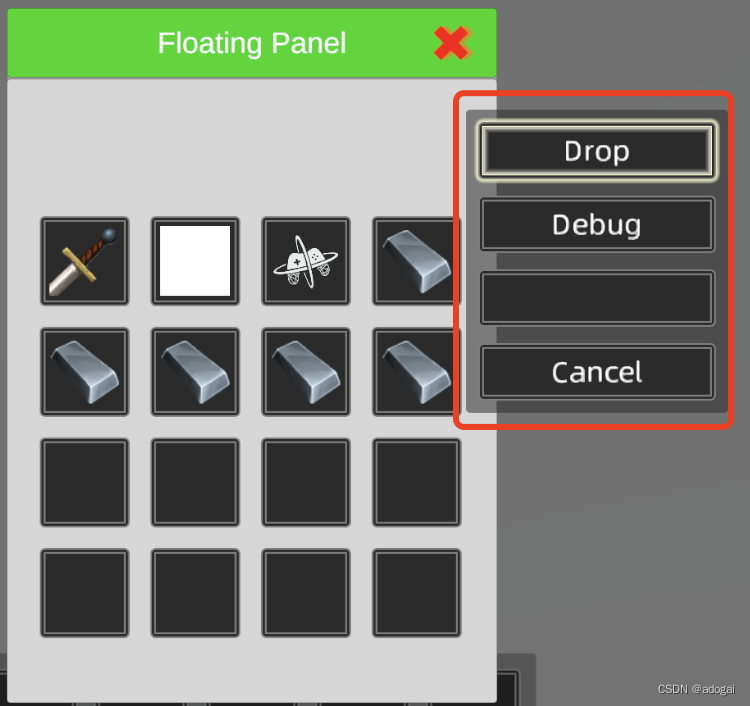

We found the script, focused on the 4 attributes in the red box, modified the User Item Aciont Index to 1, and then entered the game, and found that a panel popped up after clicking, and it was very comfortable to select individually.
Use Itme On Click: Whether to click to trigger
User Item Aciont Index: Action index -1 is all triggers, >=0 is a pop-up function window
Auto Set Item User: Automatically select users
Max Number Of Actions: The maximum number of actions
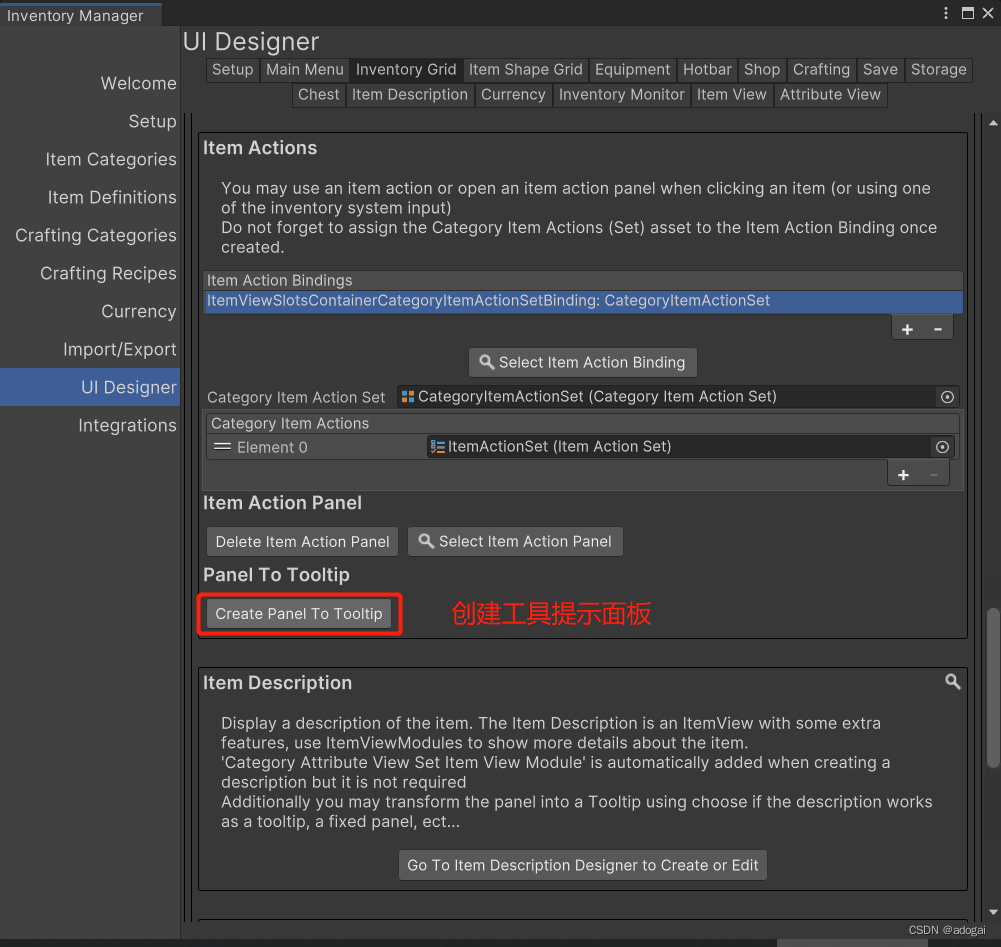
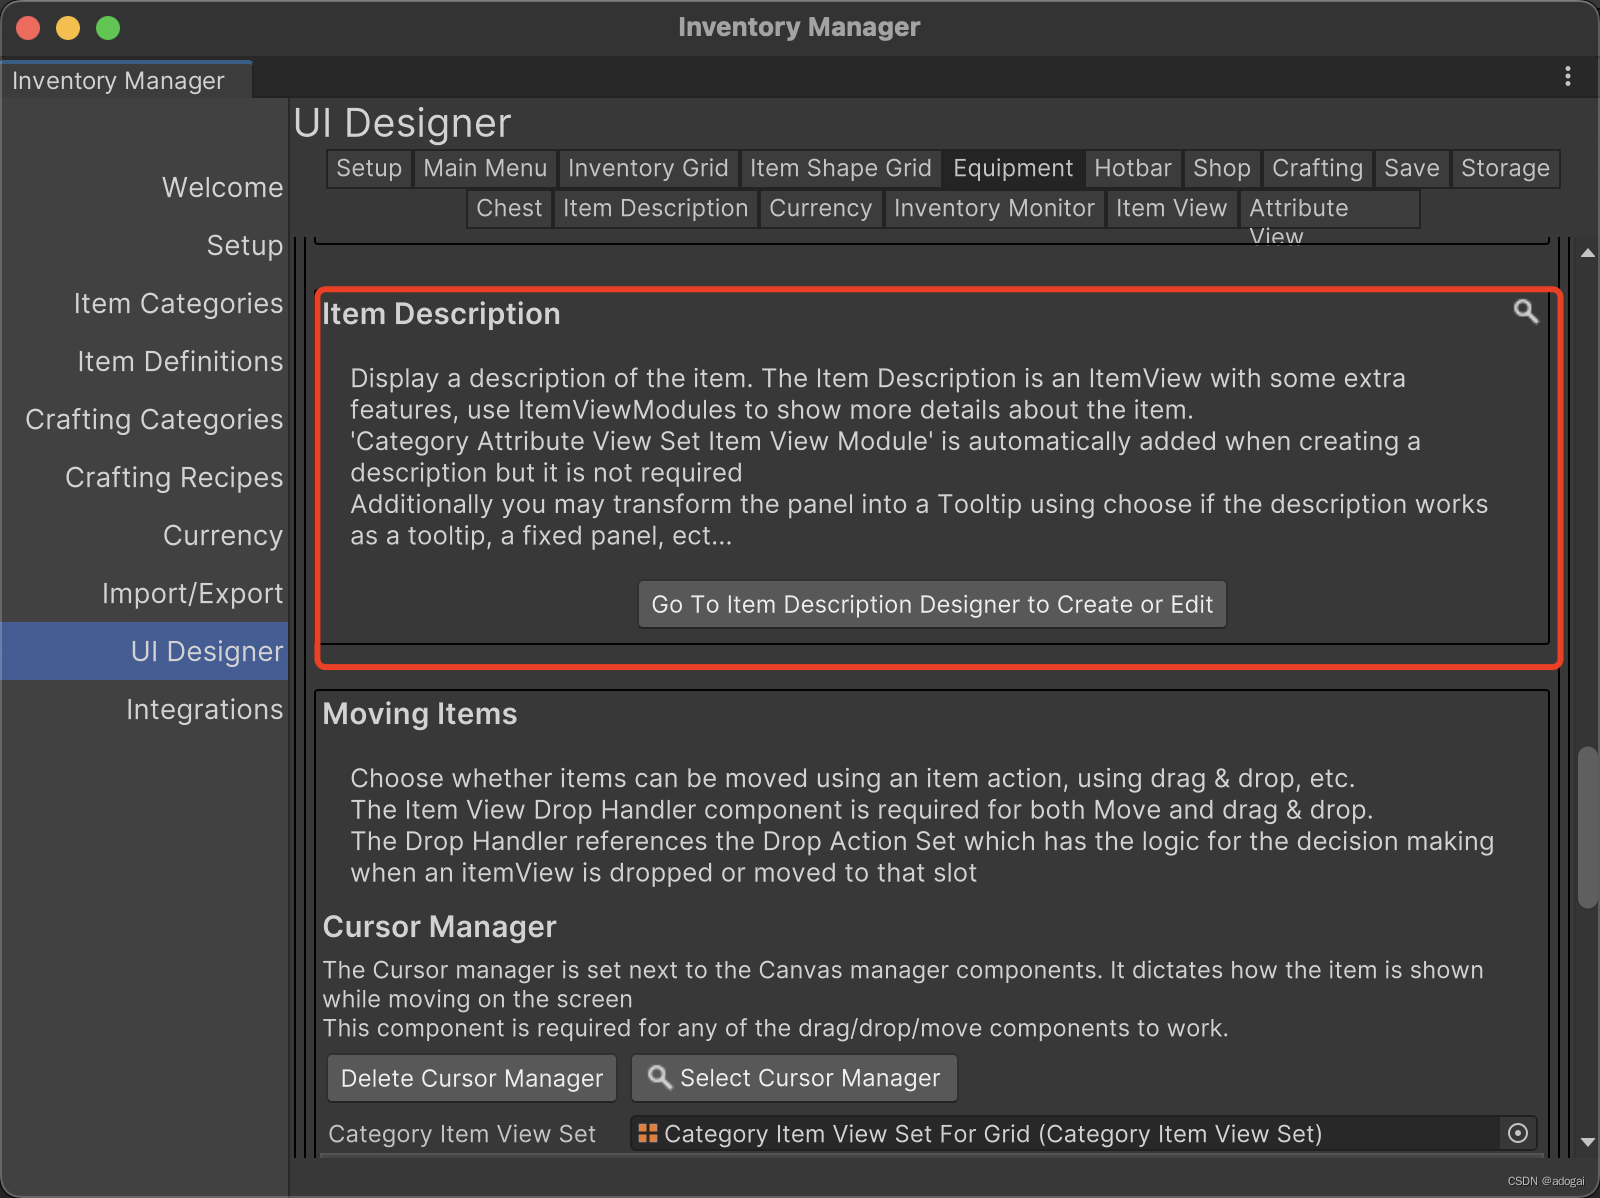
4. Floating Information Panel
Find Item Description and click Go Tp to jump to the item description section
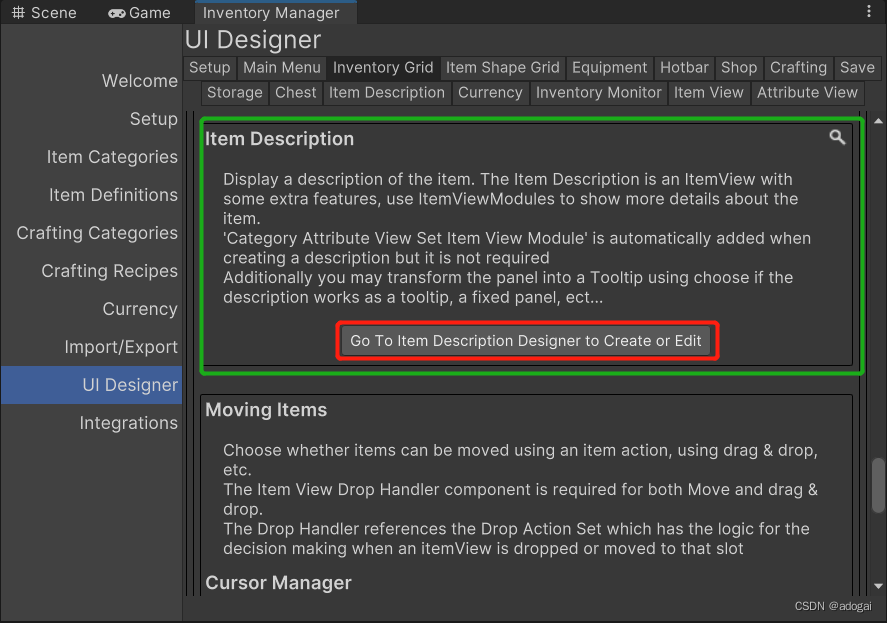
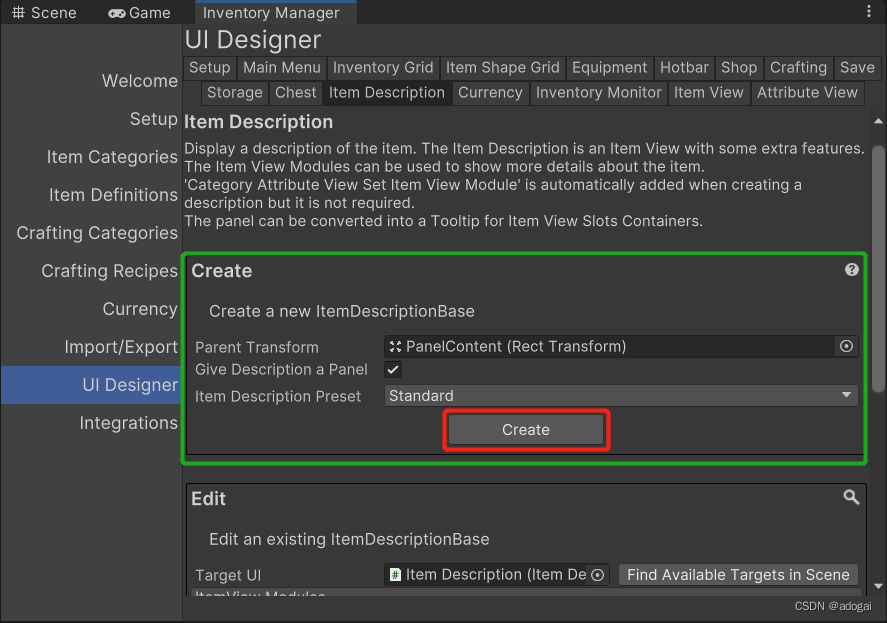
Create a default panel,
The parameter Give Description a panel represents whether to create a panel (whether the created UI has a Display Panel script), and
the parameter Item Description Preset represents the size of the panel described by the item.
Drag the child object under Panelcontent into the inventory grid to bind the panel. Convert To Tooltip is to set the prompt (floating) panel. If you need to fix it, just don’t click this.
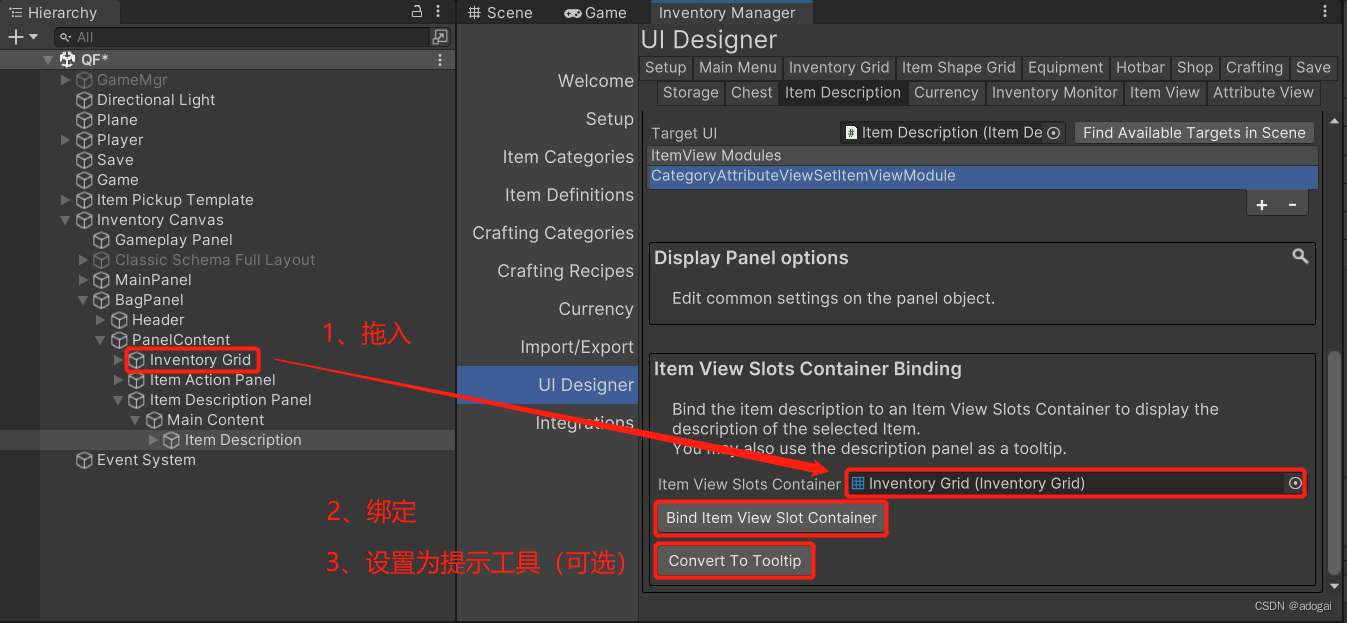
Panel binding is successful!
The background of my panel has some objects, so I found the UI to adapt it and changed it to the following picture (see the project requirements for details), and it is centered by default.
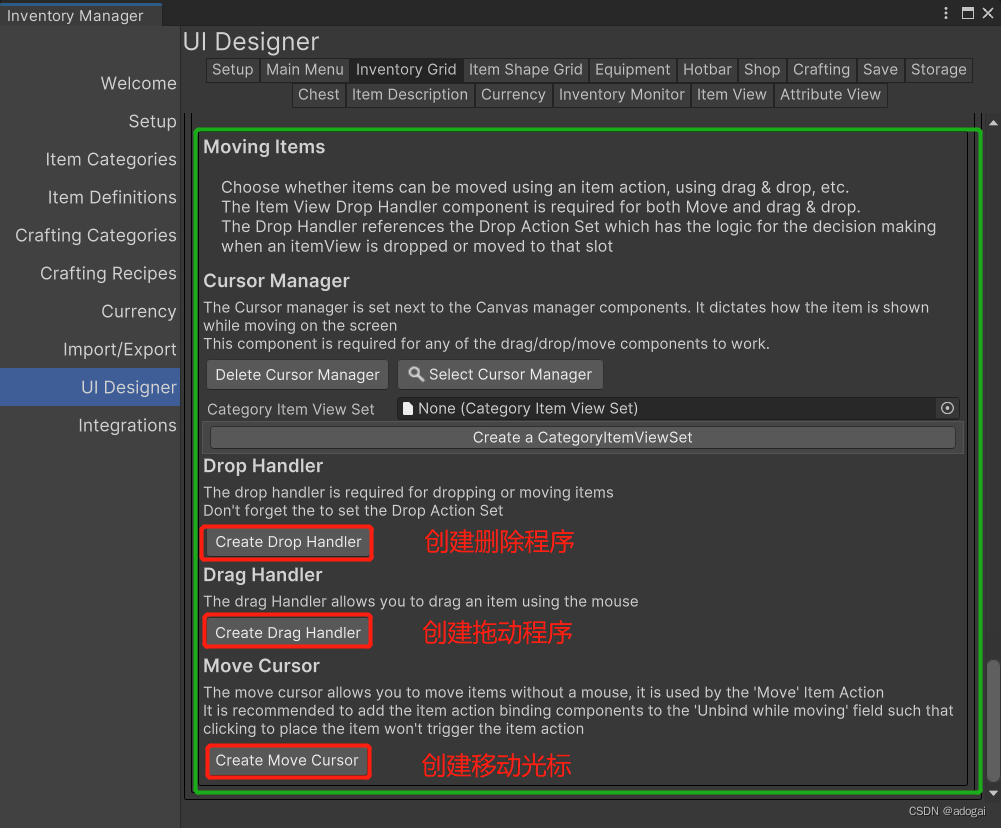
5. Drag and drop
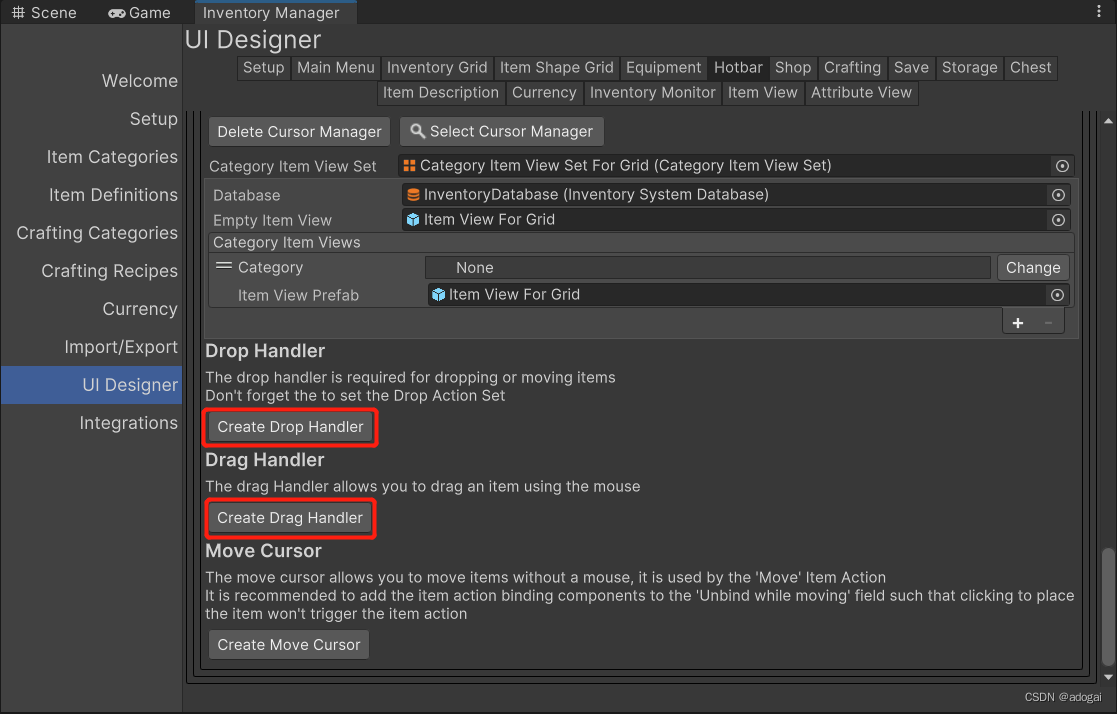
To create the first two programs as shown in the figure, it is necessary to drag the first two, because the drag and drop exchange position is actually composed of two functions:
Drag program: Responsible for dragging items
OnItemViewSlotBeginDragE: Triggered when the item view slot starts to drag.
OnItemViewSlotEndDragE: Triggered when the item view slot finishes dragging.
OnItemViewSlotDragE: Updates every frame that the item view slot is being dragged.
By listening to these events, the drag handler can set the item view slot cursor manager with the source item view slot information and tell the manager where the mouse is when the drag occurs.
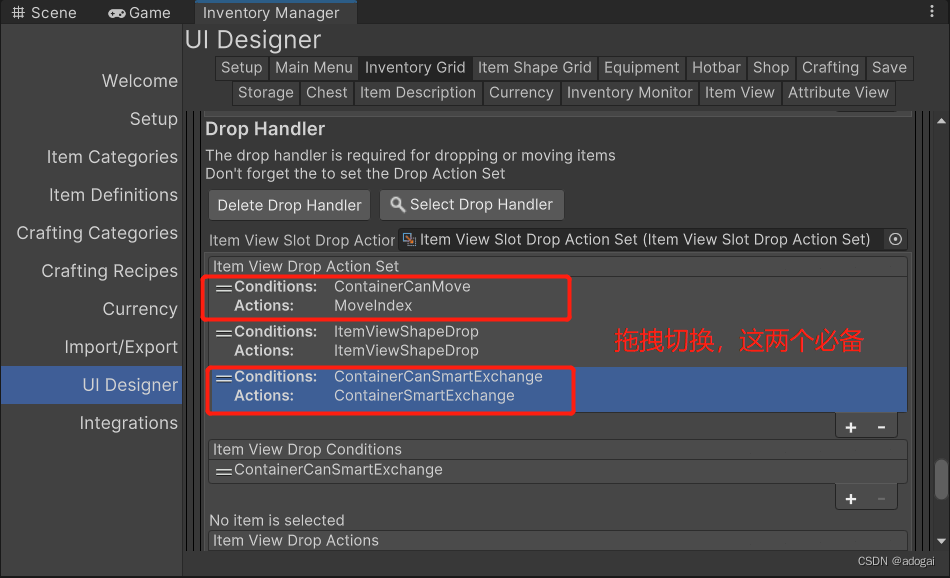
Delete program: responsible for handling dropping and deleting items (drop can be triggered by Li Jiecheng when we drop the item)
through the Action action in the Item View Slot Drop Action Set on the second picture below to customize the
drop condition
Item View Drop Container Can Add: Checks if the source and/or destination can accept the exchange.
Item View Drop Container Can Give: Checks if a container can give an item to another container Item View Drop Container Can
Move: Checks if an item can be moved from one index to another within the same container. Item View Drop Container Has
Name: Checks the names of the source and/or target container to see if they match the one specified.
Item View Drop From Item Collection: Checks that the source item collection matches the specified item collection.
Item View Drop Item Amount Condition: Compares the source item amount with a minimum or maximum value.
Item View Drop Null Item: Checks if the source and/or target item is Null.
Item View Drop Same Container: Check if the Item View Slots are from the same Item View Slots Container.
Item View Drop Container Can Smart Exchange: Smart Exchange considers many scenarios.
Item View Shape Drop: Check for appropriate when using ItemShapeGrid
Delete condition
Item View Drop Action To Item: Call Item Action from Drop Action.
Item View Drop Container Exchange: Swap items between containers by removing them from one container and adding them to another.
Item View Drop Container Give: Send items from source to destination. Choose whether to remove and/or add items.
Item View Drop Container Smart Exchange: Smart exchange conditions consider many scenarios.
Item View Drop Inventory Exchange: Similar to above, but instead of adding/removing items via the Item View Slots Container, you do this directly on the Inventory.
Item View Drop Inventory Give: Similar to above, but instead of adding/removing items through the Item View Slots Container, you do this directly on the Inventory. Item View Drop Move Index Moves the index of Item Stack in the same Item View Container.
Item View Drop Spawn Item Object: Spawns an item object with dropped items.
Item View Shape Drop: Items are dropped using the ItemShapeGrid function, which takes the Item Shape into account.

The default settings can basically meet our project. Of course, you can also create your own conditions, just inherit the "Item View Drop Condition" and "Item View Drop Action" abstract classes: [Serializable] public class ItemViewDropSameContainerCondition : ItemViewDropCondition{ public override
bool
CanDrop ( ItemViewDropHandler itemViewDropHandler) { return itemViewDropHandler. SourceContainer == itemViewDropHandler. DestinationContainer; } }
[Serializable] public class ItemViewDropMoveIndexAction :
ItemViewDropAction {
public override void Drop(ItemViewDropHandler itemViewDropHandler)
{
itemViewDropHandler.SourceContainer.MoveItem(itemViewDropHandler.StreamData.SourceIndex,
itemViewDropHandler.StreamData.DestinationIndex);
} }
6. Cursor configuration
To give a practical example, the cursor changes to another shape when dragging an object
The item view slot move cursor listens to the following events on the container:
OnItemViewSlotSelected: An item view slot is selected.
OnItemViewSlotClicked: The item view slot is clicked.
7. Item configuration (icon, description)
Looking at the icon above is empty, the mouse is sliding over and flickering back and forth-have we forgotten some settings, yes, where is my icon? !
I don't know! (The official did not explain.)
In fact, it is because we changed the name of the icon without authorization. The default is "Icon" and we changed it into Chinese "icon". It would be strange if it was right.
1. Repair icon
The repair method is very simple, open the DropHoverIconPreviewItemView and IconItemView scripts, and change "Icon" to "icon".

The icon of "iron" is successfully displayed (the elixir is none, and the icon is not selected).
2. Repair the description.
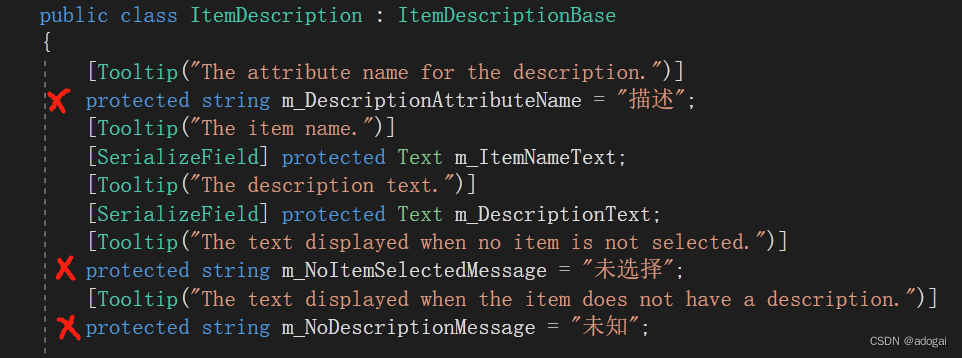
Find the ItemDescription script in the same way, and change "Description" to "Description". In addition, the error description in the figure below also needs to be modified
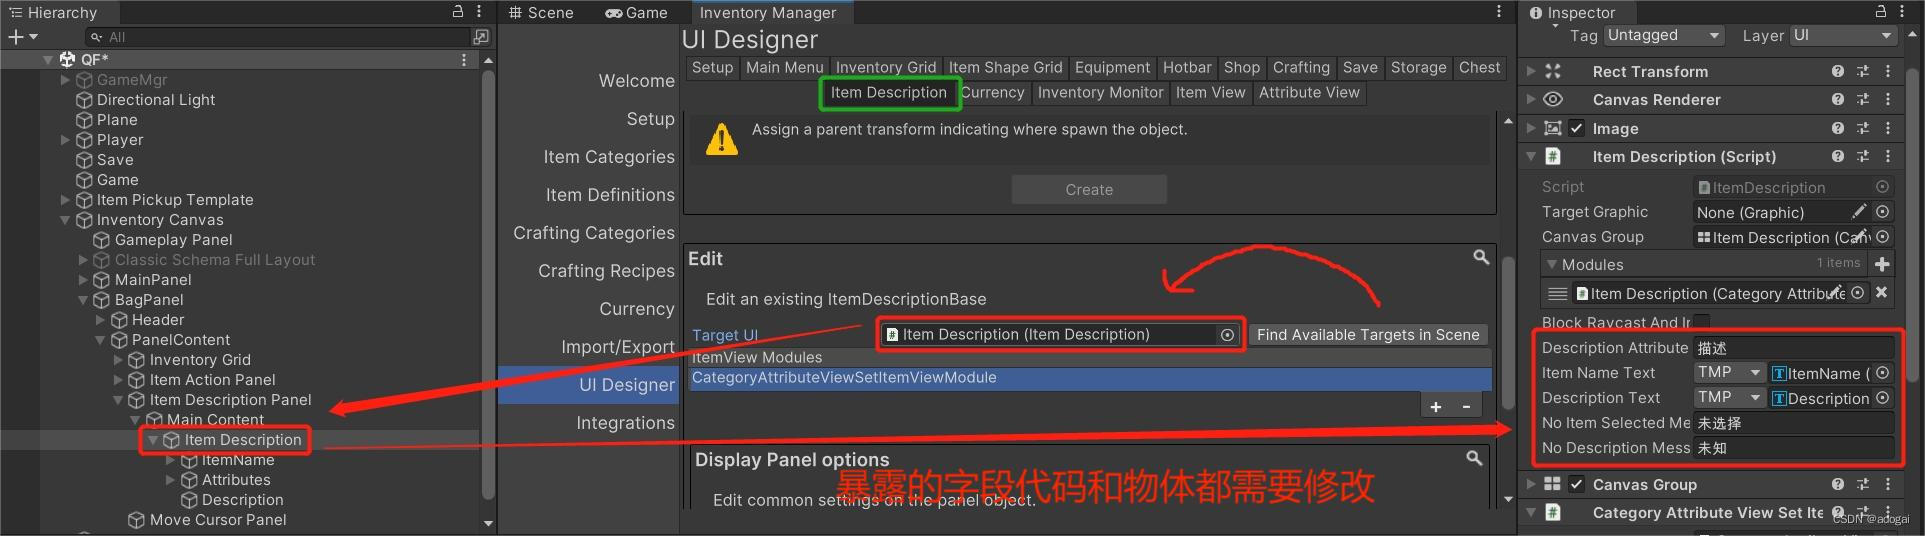
. Item Description, is it very troublesome. There is a simple way, just remove the serialization, haha, it seems that I have done useless work before.
Of course, it is also possible to inherit ItemDescriptionBase and write it yourself. The method of customizing the item panel is also very simple, that is, declare the xx field on this script or a script written by yourself, assign a value in the OnSetValue method, and release it with OnClear.
After removing:
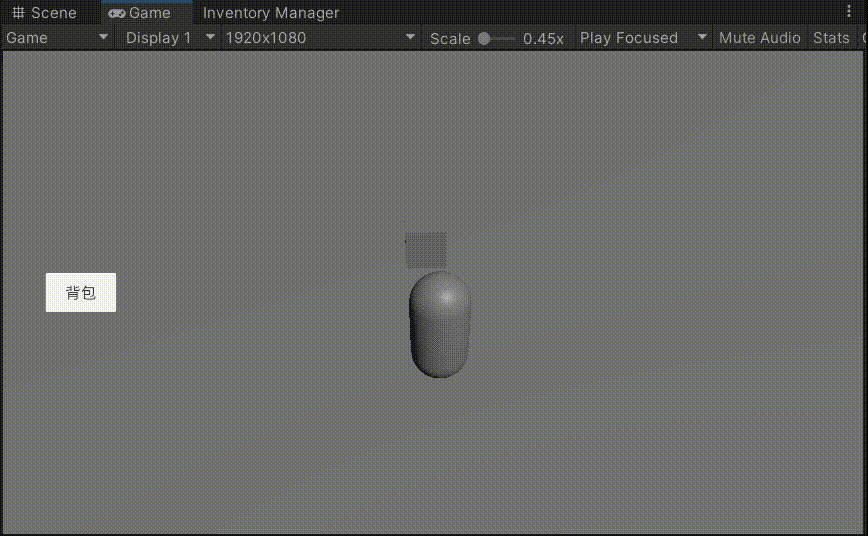
Original: 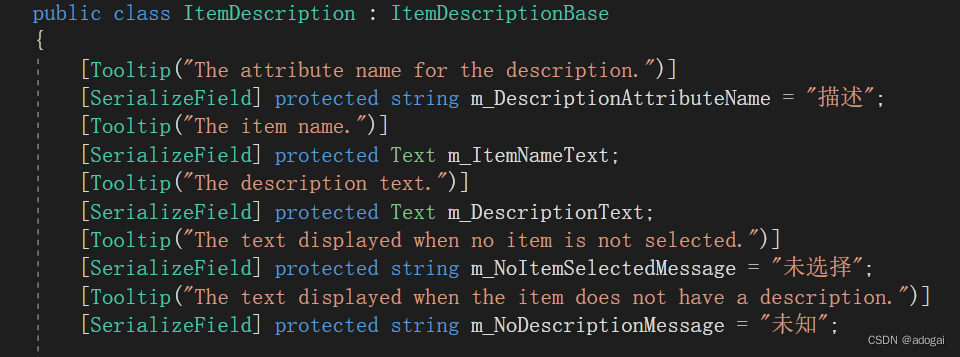
Finished effect:
8. Role bar
Create an item slot and save it. The default name is ItemSlotSet
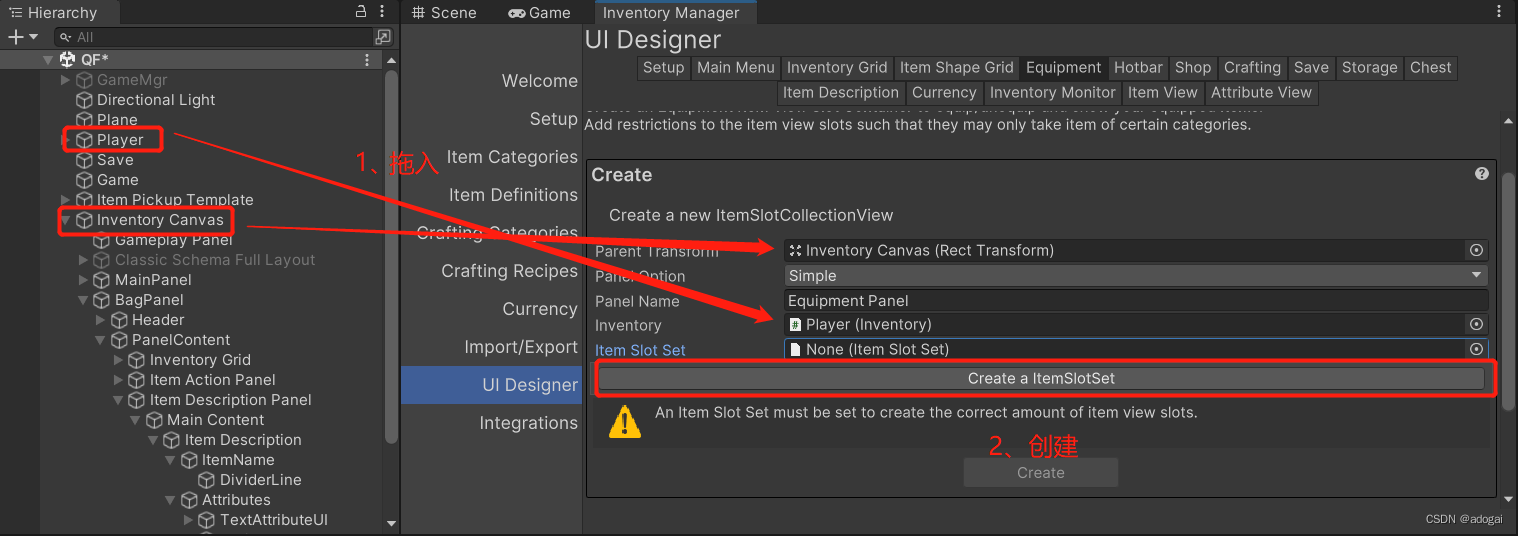
to create the desired slot, but don’t create the UI first.
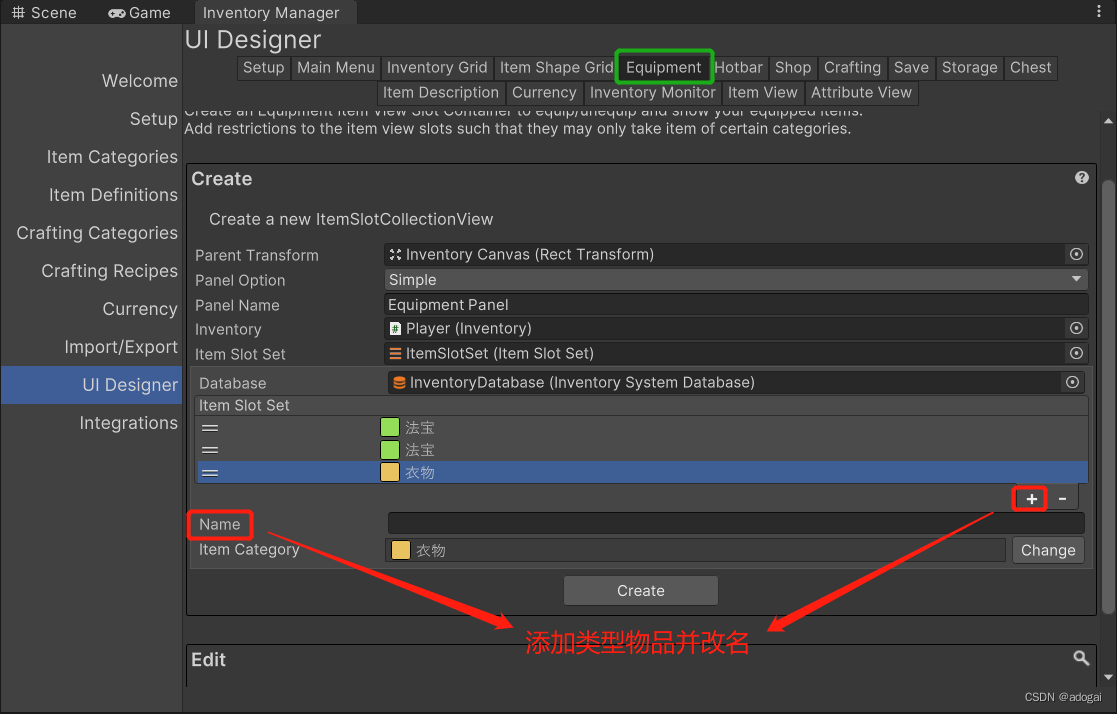
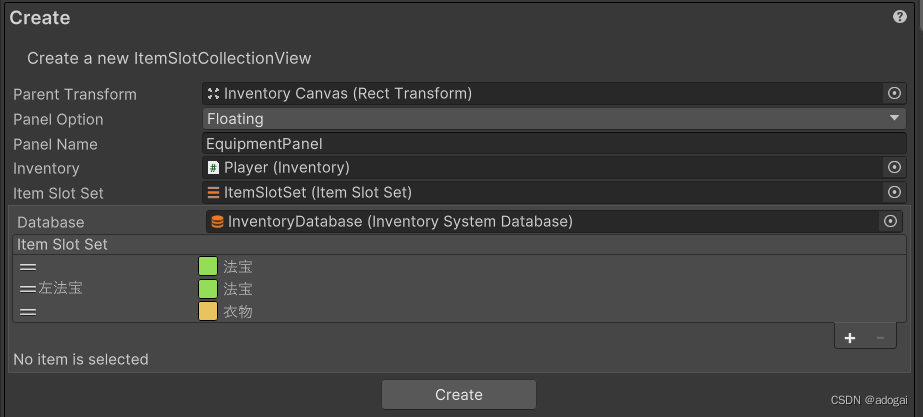
Let’s add an equipment slot type to the character’s item collection, and then click Create in the above picture. Figure 2: Remember to change the name and floating panel.
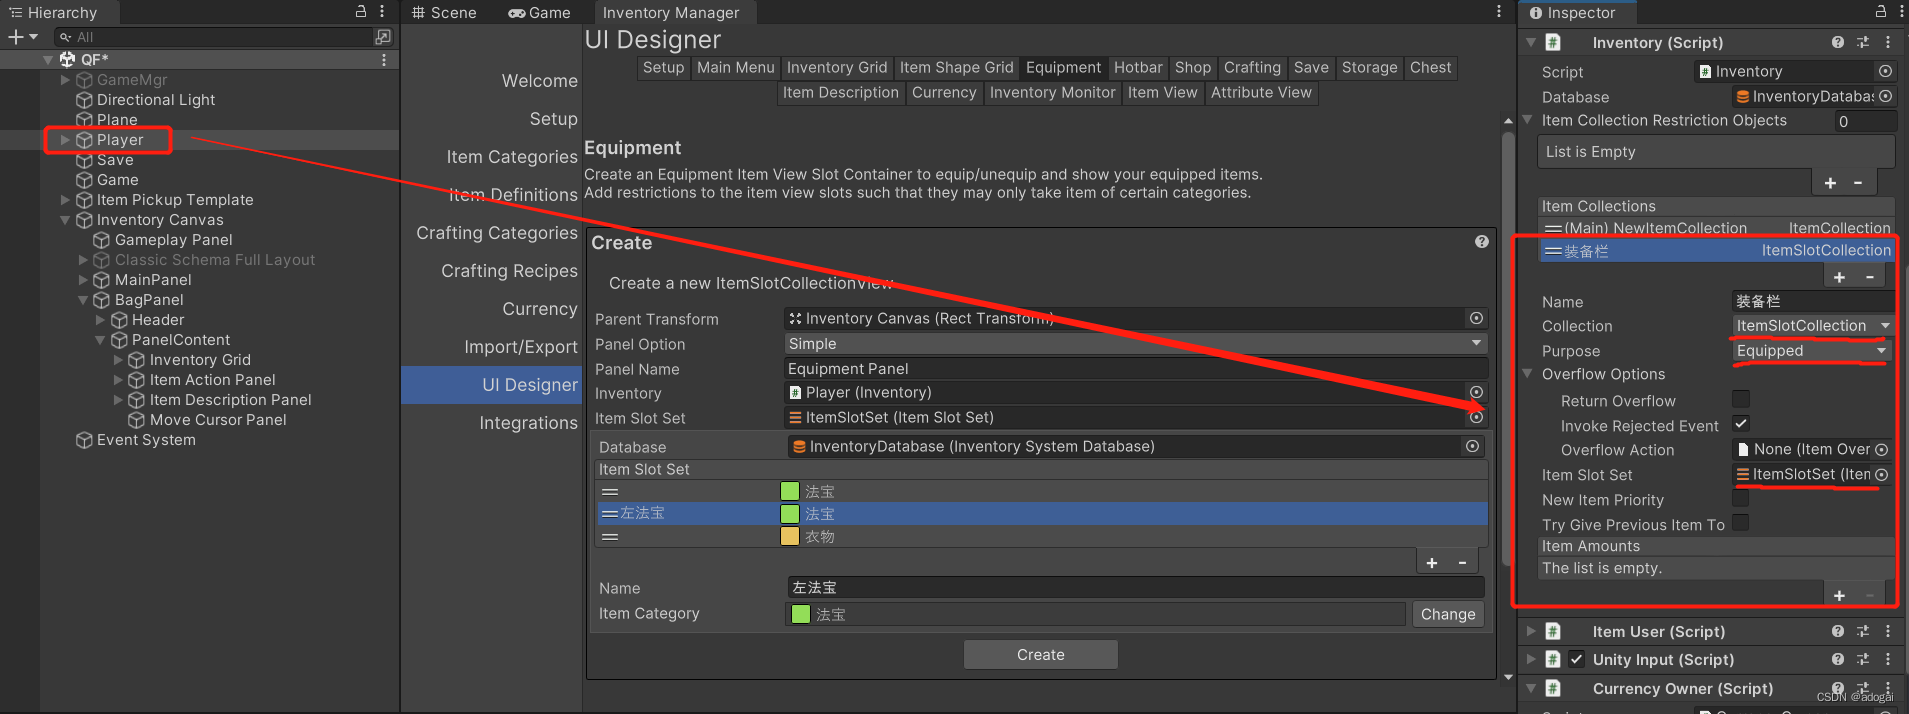
Add click action as shown in the figure, and then create Create Action Panelhe and Tooltip (refer to the third part of this chapter). If the function of the pop-up box after clicking the equipment bar is different, create a new one. If you don’t need this function, you don’t need to create it, and customize it according to your needs.
Add a prompt panel, refer to the fourth part for details
After it is created, create the equipment bar UI in the scene, then add and drag in the buttons and panels in the MainPanel script, and the method of opening and closing the equipment bar.
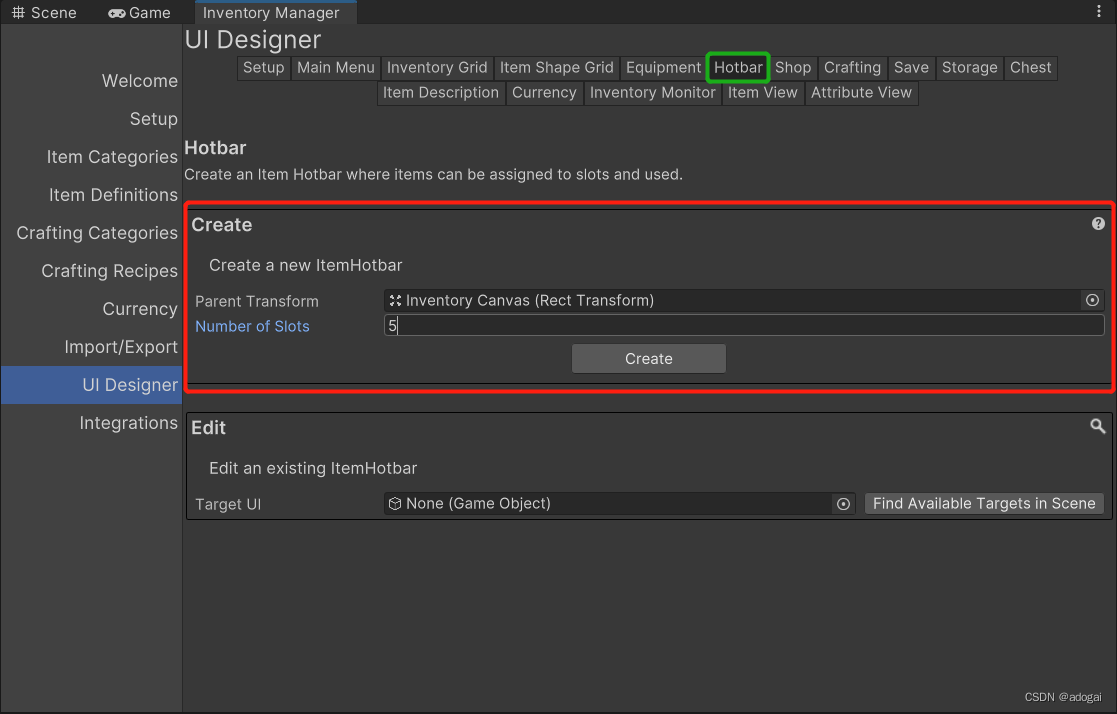
Nine, shortcut bar
Find the Hotbar as shown in the picture, and then enter the desired number of items to create.
Add interactive operation, create two programs, the action inside is the Item View Slot Drop Action Set selected by the previous backpack.
Below is the effect, it looks pretty good.
10. Item restrictions (total upper limit, stacking)
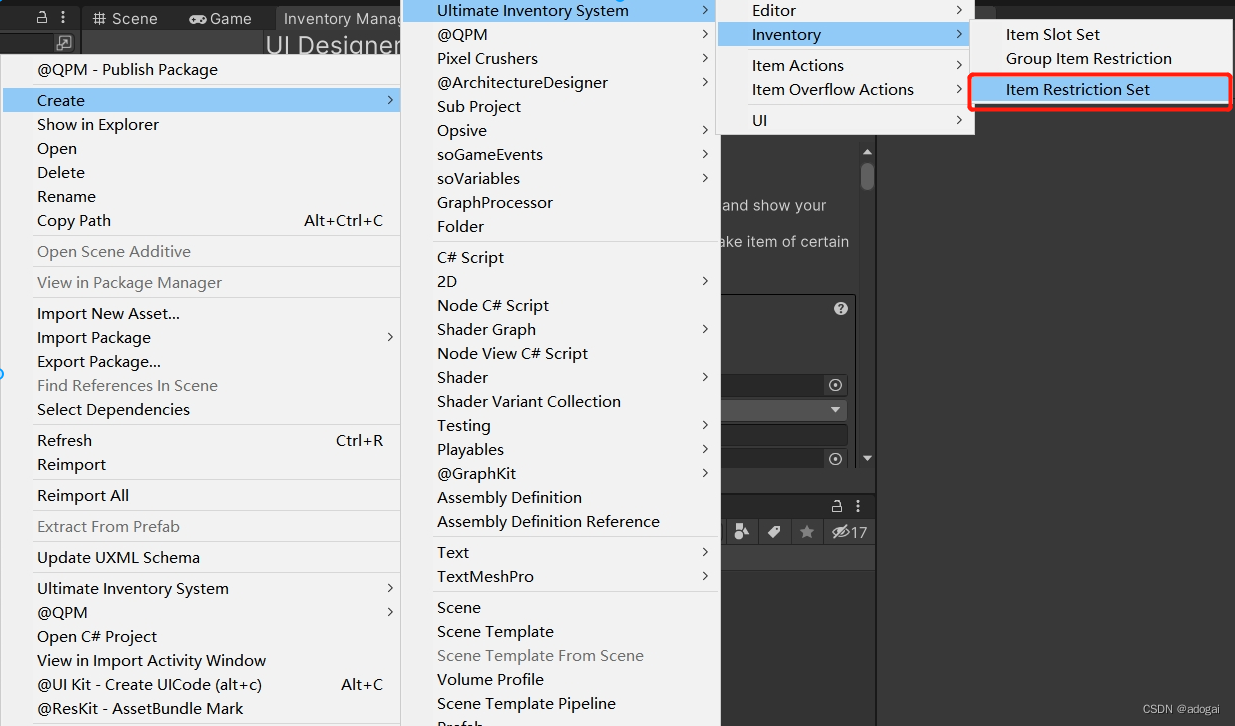
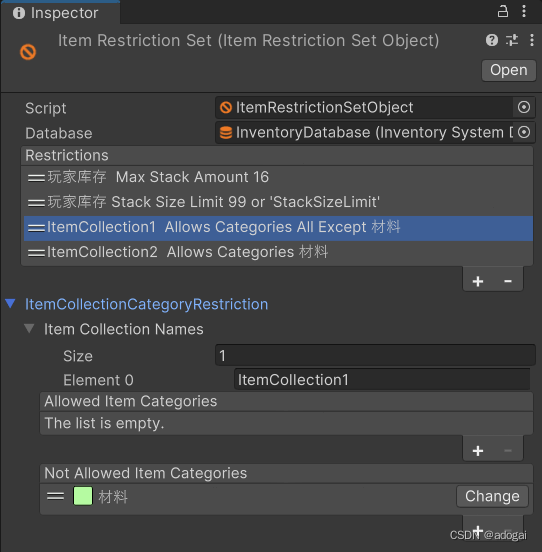
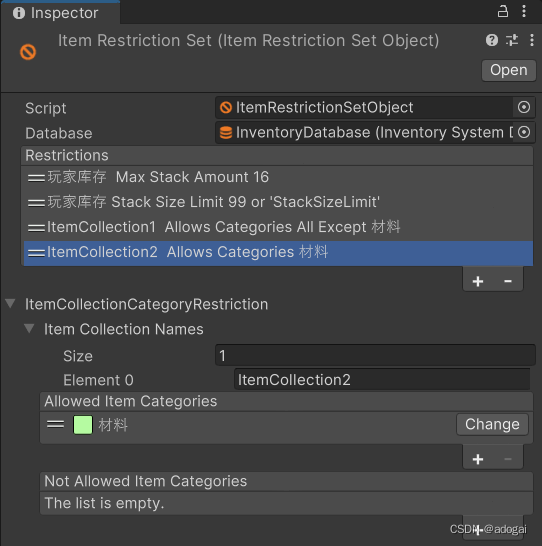
Item Restrictions are a scriptable object created by right-clicking Create -> Ultimate Inventory System -> Inventory -> Item Restriction Set.
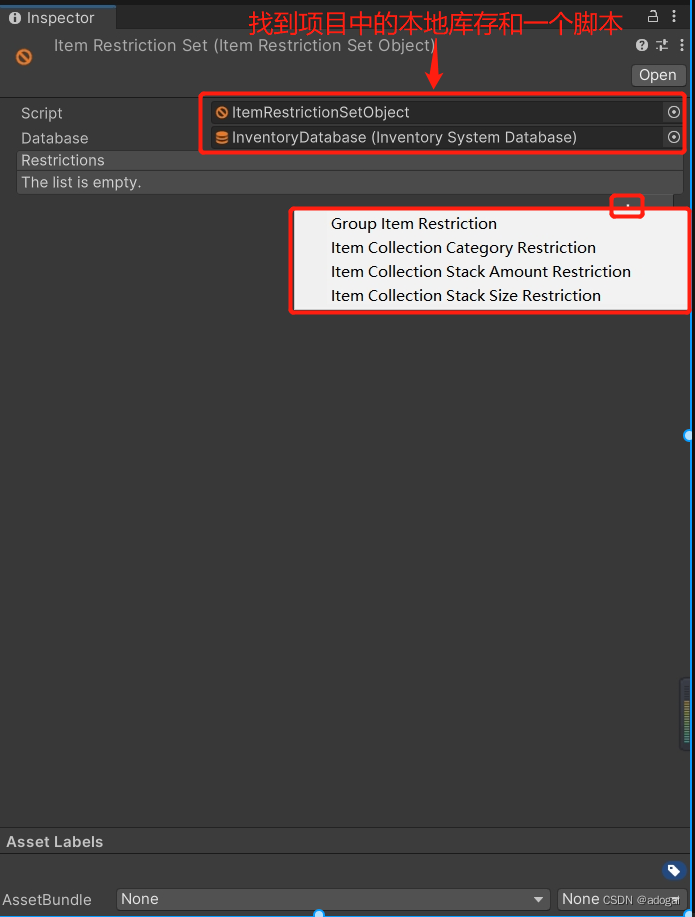
Several restrictions explain
Group Item Restriction: Programmable objects, which will not be explained in this article. Details
Item Collection Category Restriction: Restrict certain items to only allow items of a specific category to be added to them. (For details, see " 3. Manage Item Collection ")
Item Collection Stack Amount Restriction: Only allow a certain number of items in the inventory, and limit the number of items that can be accommodated. Set two, ten grids can only hold items in two grids; on the contrary, if it is not set, even if the grid cannot be displayed, it will be stored infinitely in the inventory.
Item Collection Stack Size Restriction: Set the upper limit of the warehouse stack, for example, the warehouse can have up to 99 objects with the same attributes.
For example, only 16 grids can be used, and the upper limit of material items is 99:
(1) Modify the inventory name to "Player Inventory"
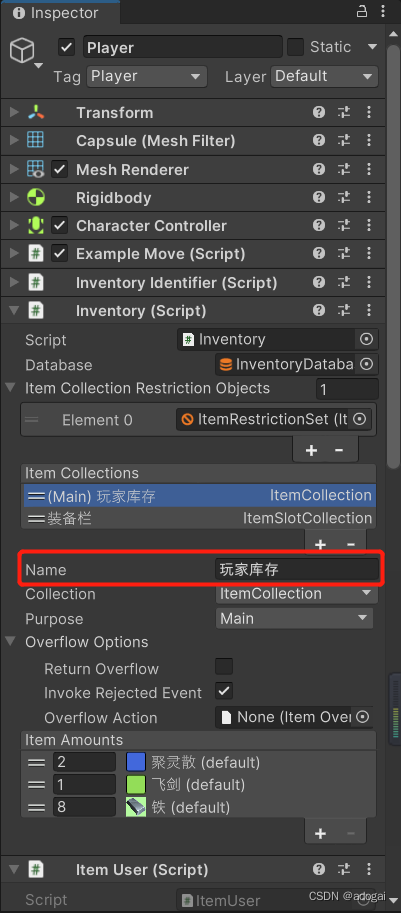
(2) Add Item Collection Stack Amount Restriction and Item Collection Stack Size Restriction in the restriction settings, fill in the newly changed Good "player inventory", set the corresponding properties.
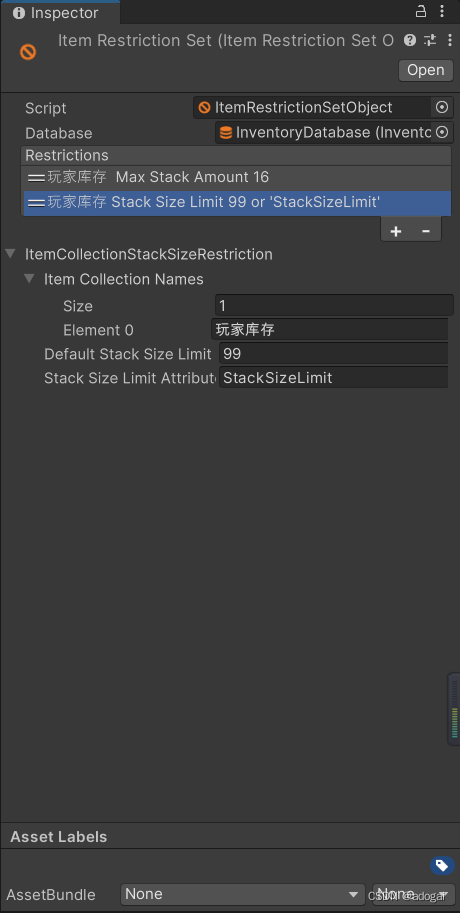
Let's take another example. It is set that the player's inventory can store up to 99; we limit the requirement of 9 of the same material as a group.
First change the type of "Player Inventory" to MultiStackItemCollection,
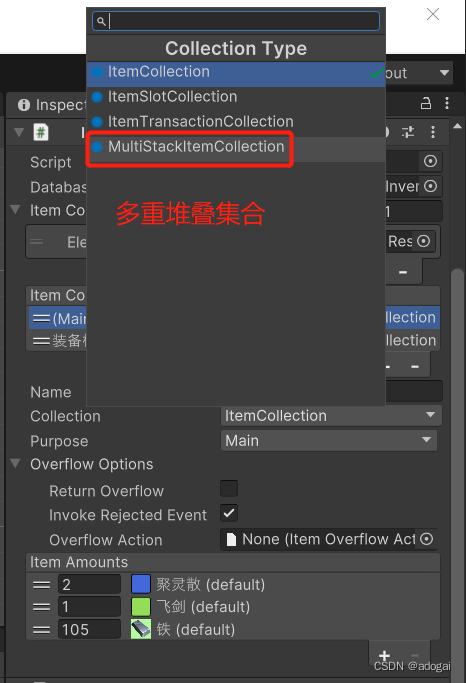
and then set the default stack size to 9 for
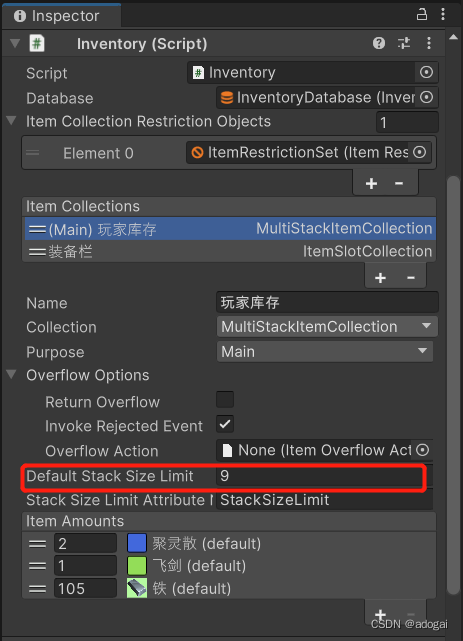
the final effect
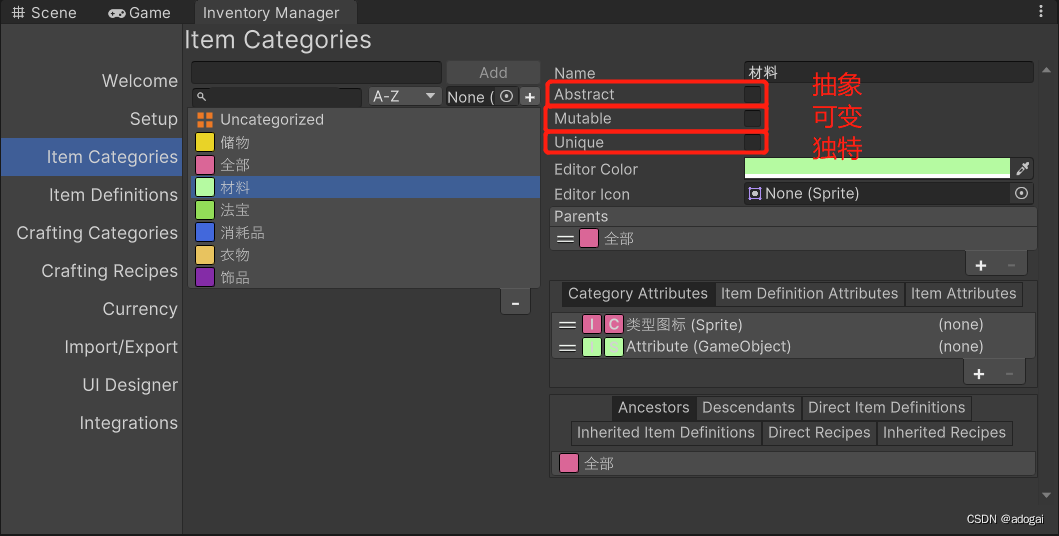
Note: If the material is not stacked, it may be that the parent attribute of your iron has a variable and unique value; uncheck the check in the figure below.
3. Manage item collection (Item Collection Category Restriction)
modify the player inventory to ItemTransactionCollection, add an independent item collection and a stack collection (the default upper limit of the stack collection is 99, you need to modify it yourself)

set the following two conditions, filter the total inventory and send it to the newly created Two inventories are convenient for future management and code calling.
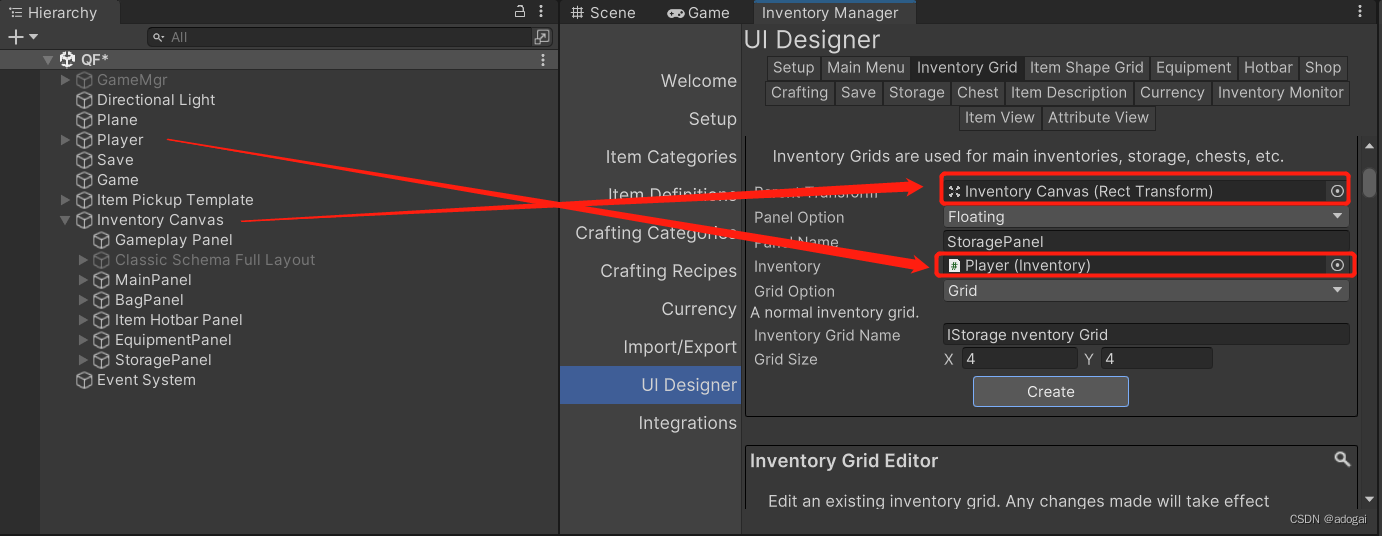
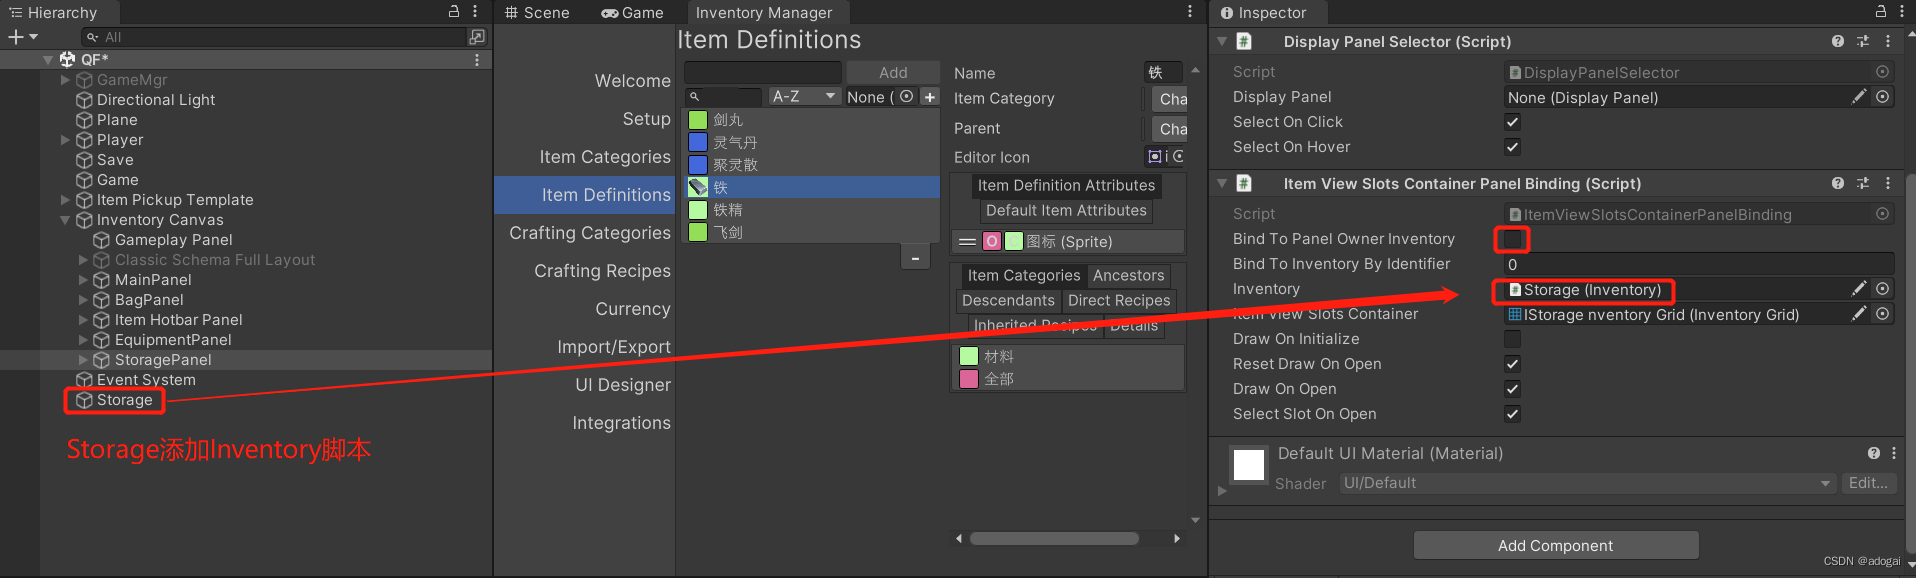
11. Warehouse
Warehouse (storage) can be said to be another backpack, in which the transfer operation is realized by using the Action action (similar to delegation) we talked about before; the warehouse usually has to go to a certain place or a type of one-time consumables to open, make good use of If so, the gameplay will be greatly improved.
(1) Create warehouse
(2) Add warehouse button and open interface event (omitted)
(3) Set floating UI, click panel, filter, search navigation, etc. (omitted)
(4) Create drag-and-drop program to add Action, you can also Before public use, the premise is that the function of the backpack is the same as that of the warehouse. This part can be dragged and dropped. (some omitted)
(4) Create an empty object to add the Inventory inventory script, and drag it into the warehouse as the inventory of the warehouse.
Effect (I only added the drag and drop program, the others were not added):
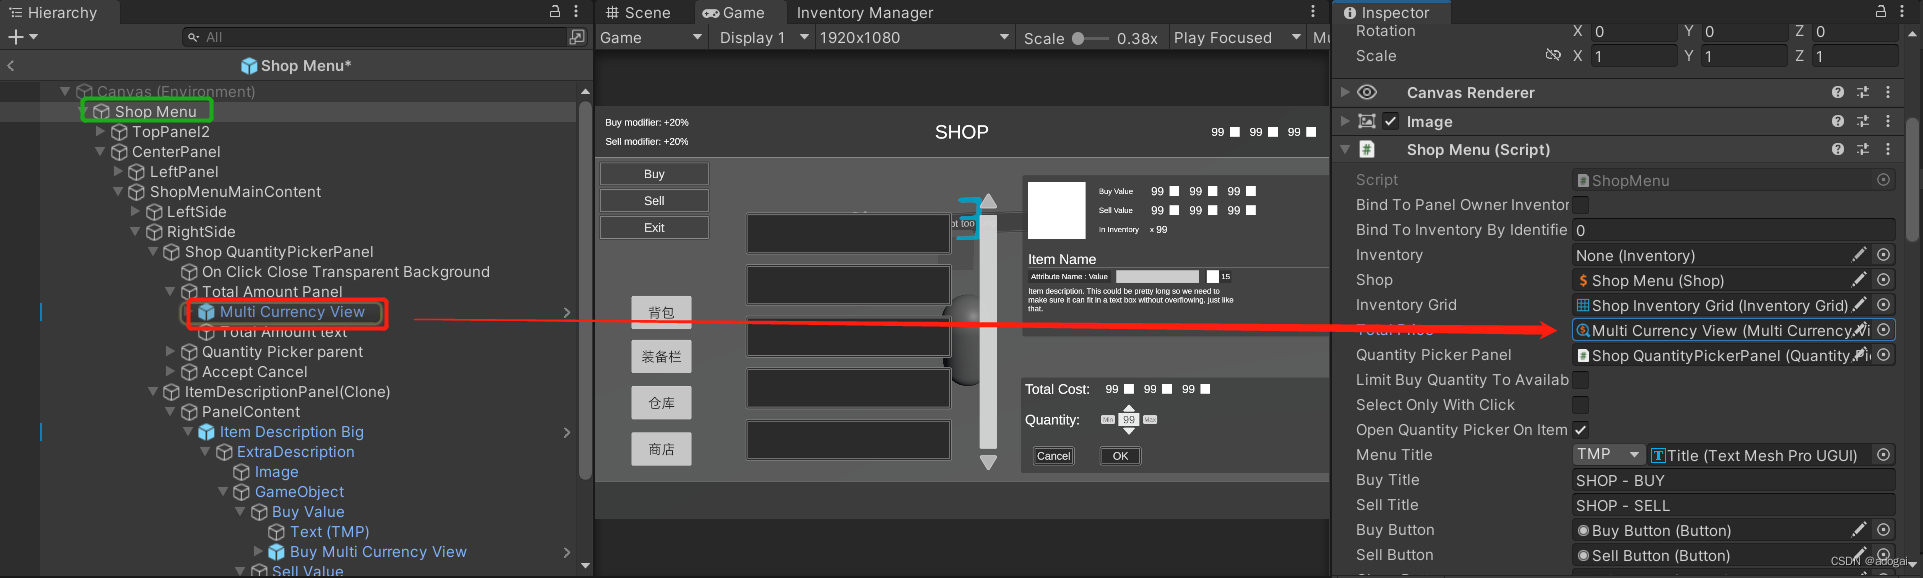
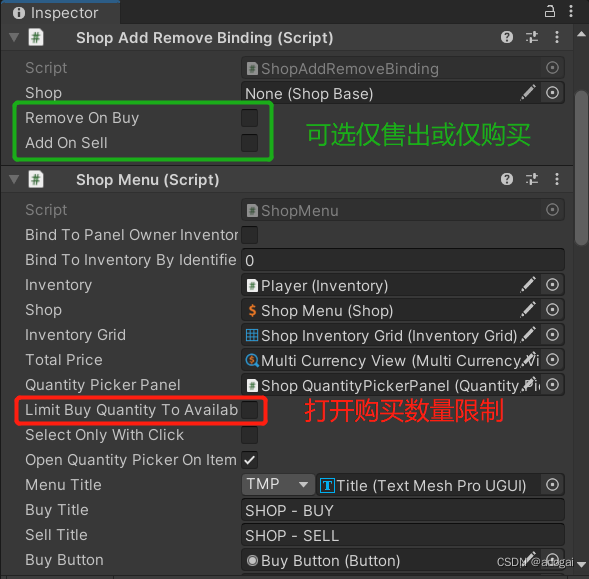
12. Shops
Front 1. Find the Shop Menu and search for Multi Currency to find several prefabs, replace them with the prefabs you created and modify the currency properties.
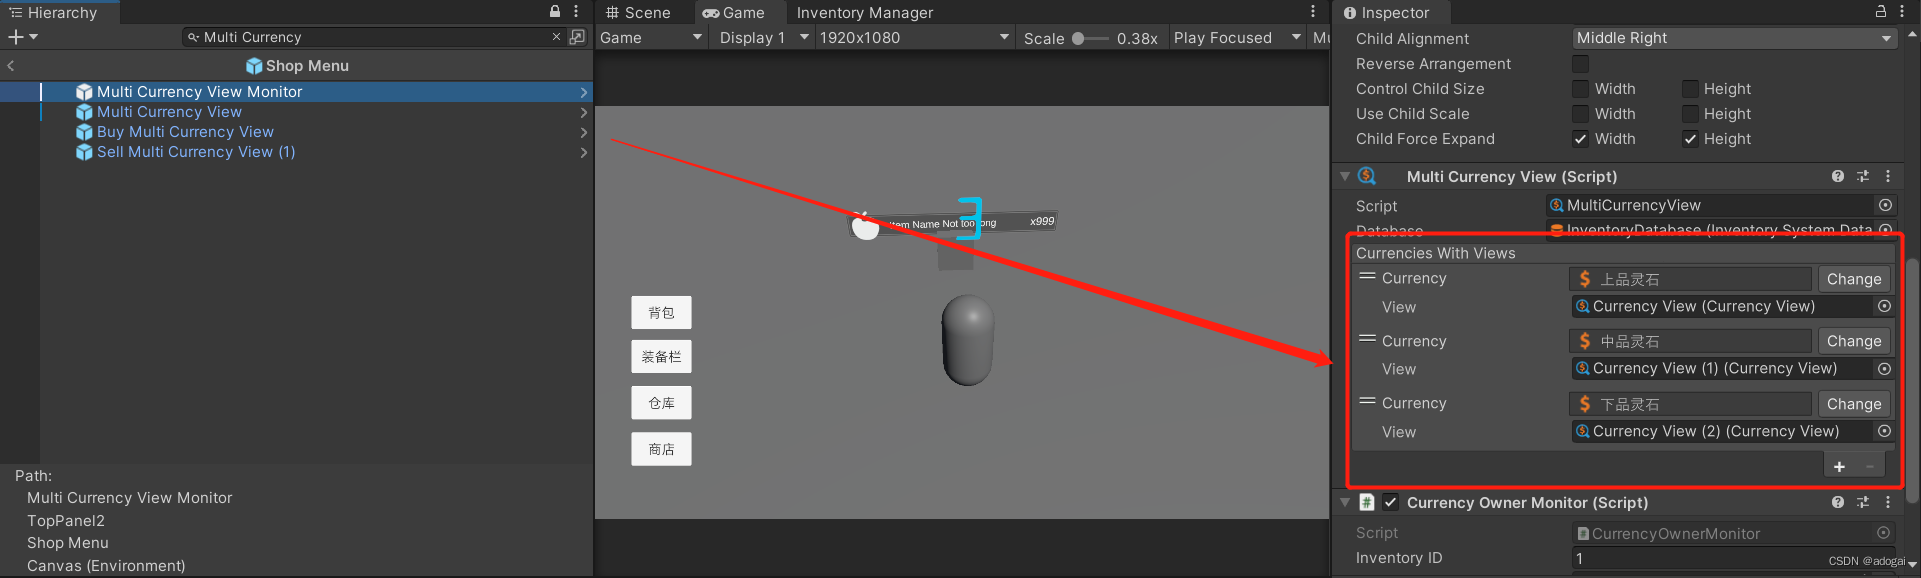
After changing the prefab, reset the reference
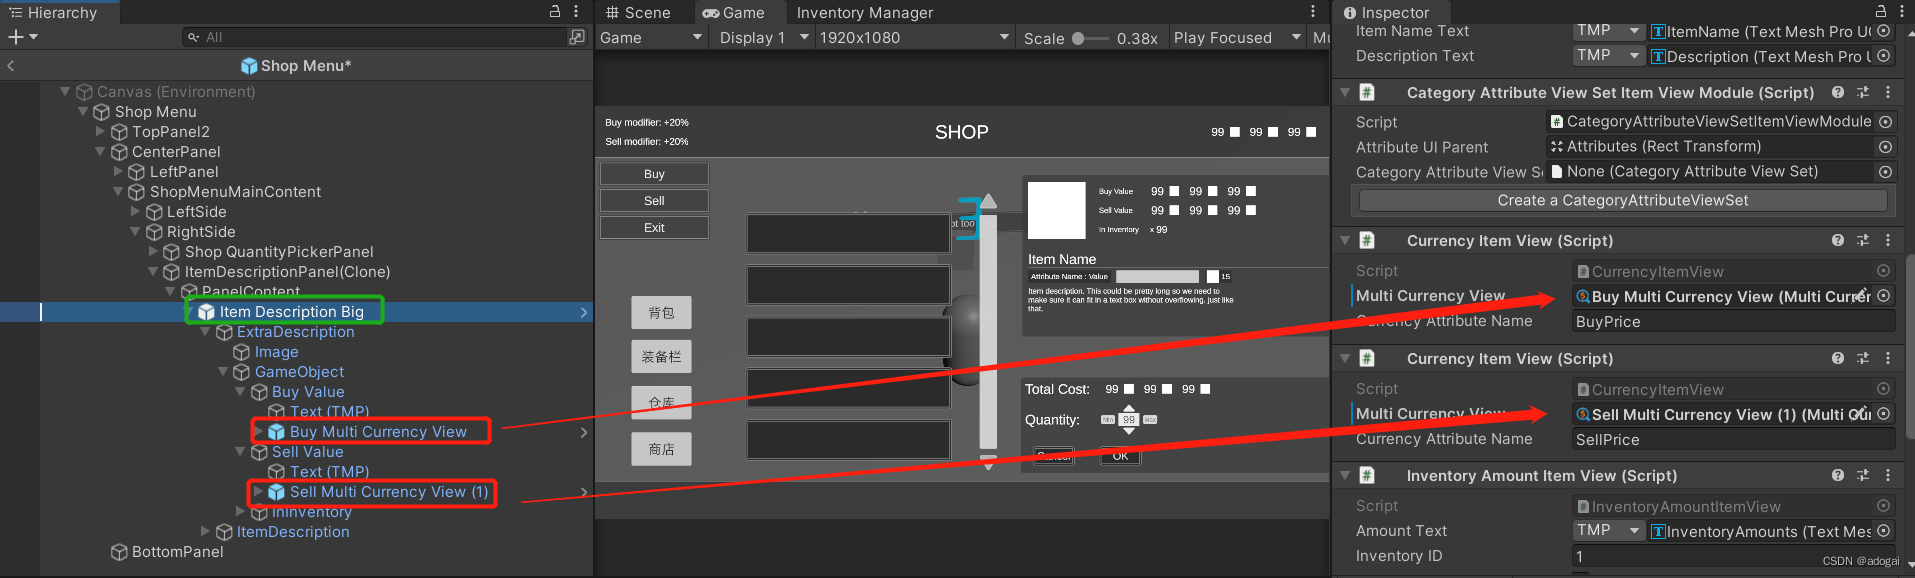
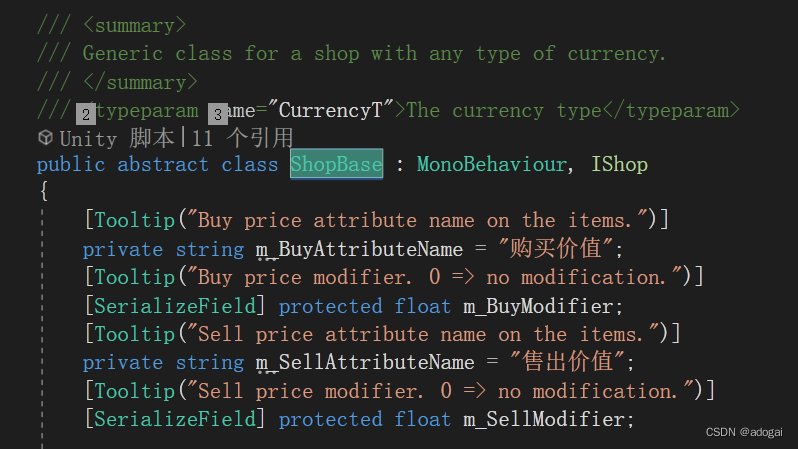
Front 2. Find ShopBase, modify the price attribute, and remove the serialization. Of course, it is also possible to modify the fields exposed by the shop externally as in the previous chapter.
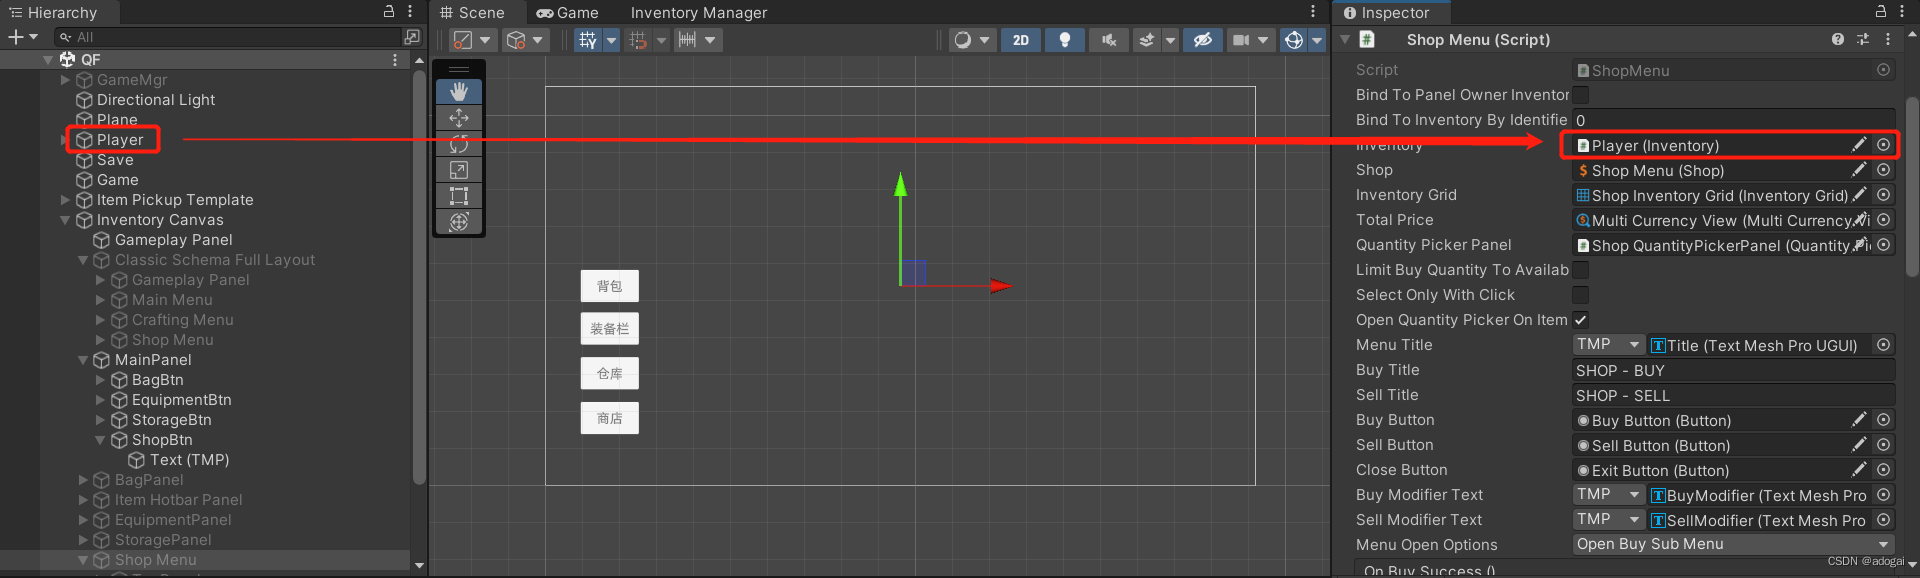
1. Create a store
2. Add selling items to the store inventory (omitted)
3. Add interactive inventory to the store, that is, the protagonist
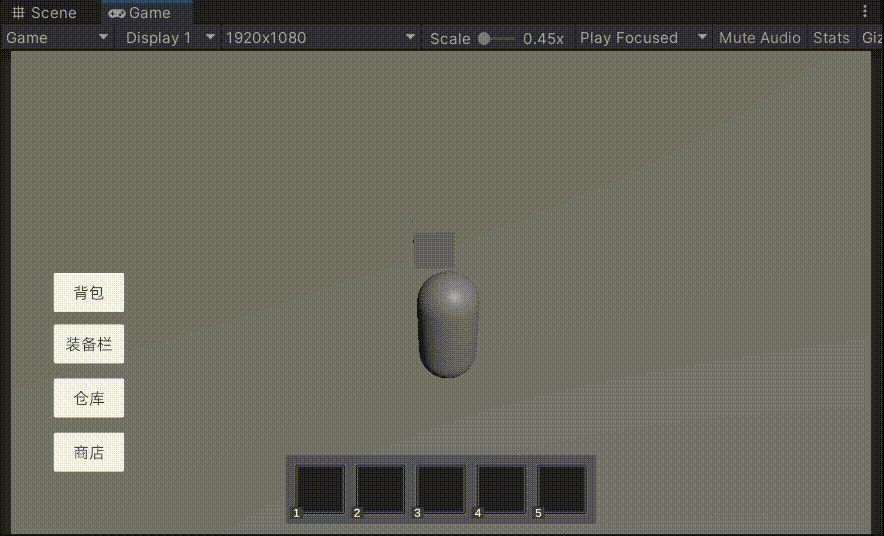
4. Effect
5. Ask the store to delete purchased items and add items sold by players.
Create a function

Check the function switch, I choose to tick all, just to show the real (buy and sell each other, hurt each other)
the final effect:
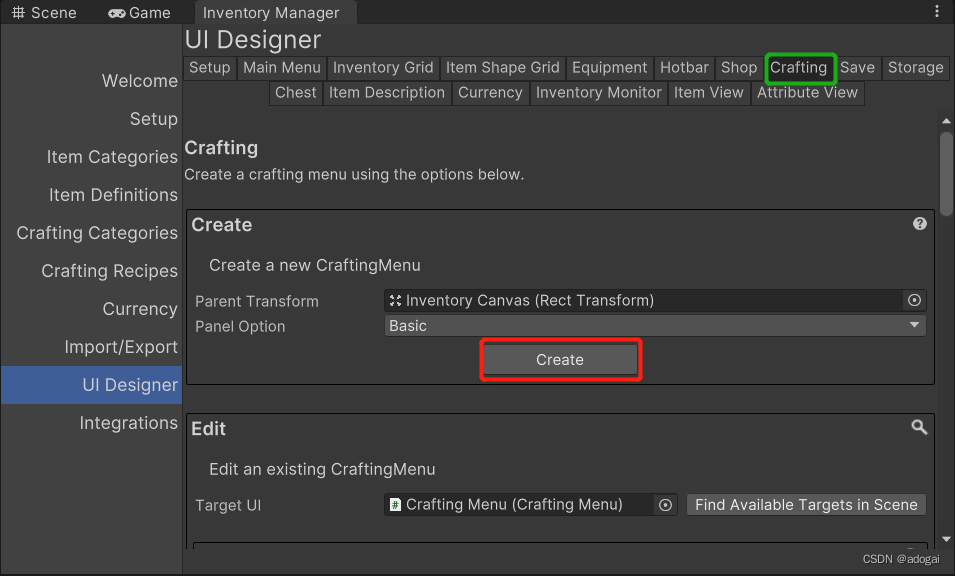
Thirteen, the production interface
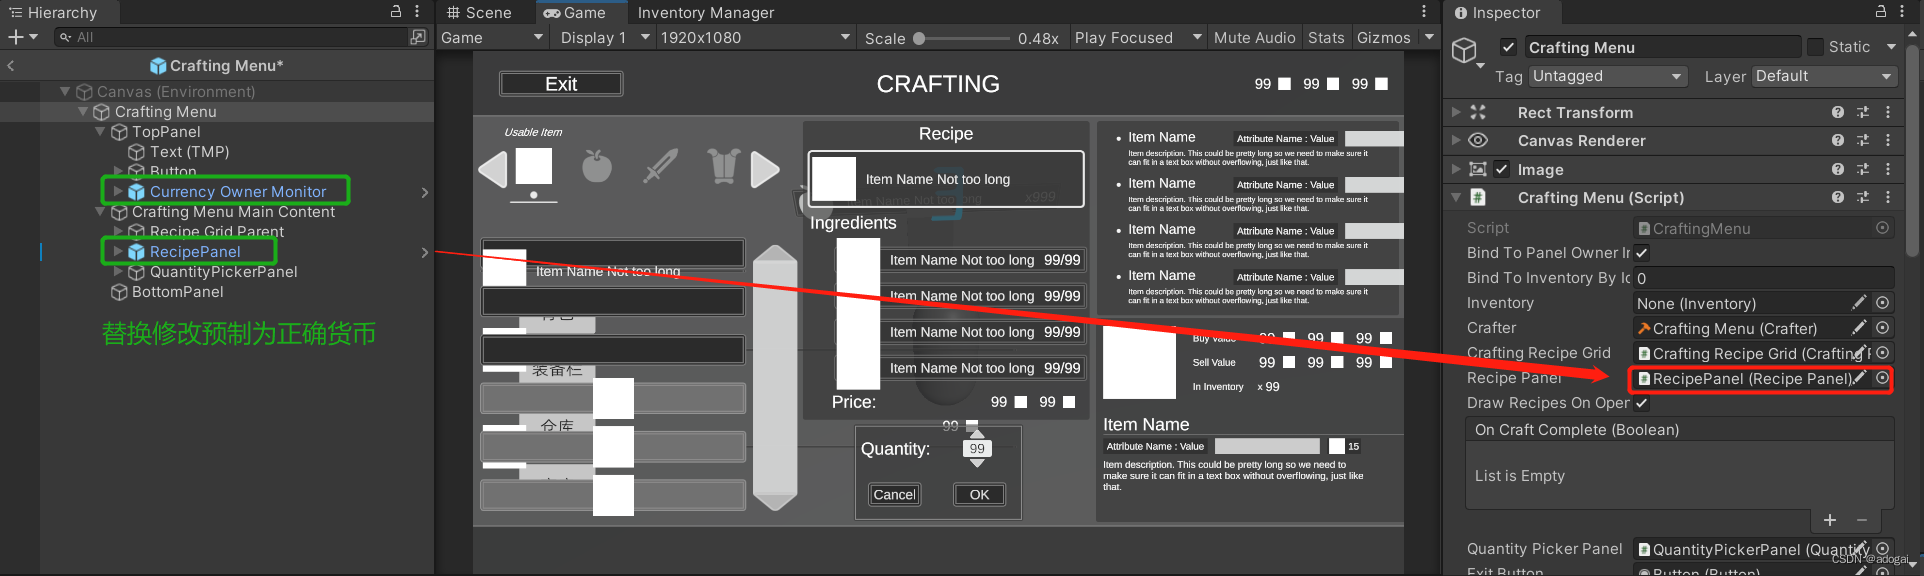
Search Currency modification corresponding to the prefabricated currency
Pre-modification

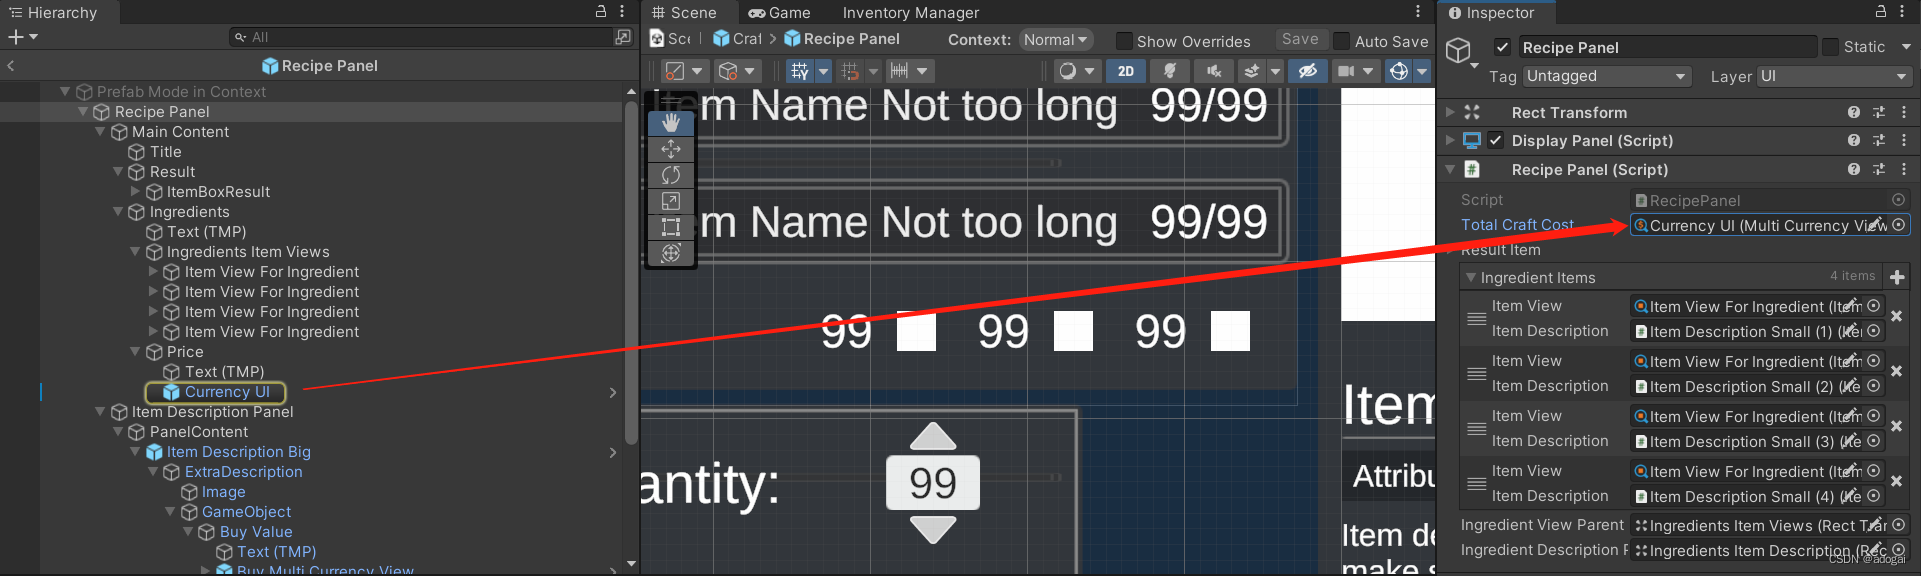
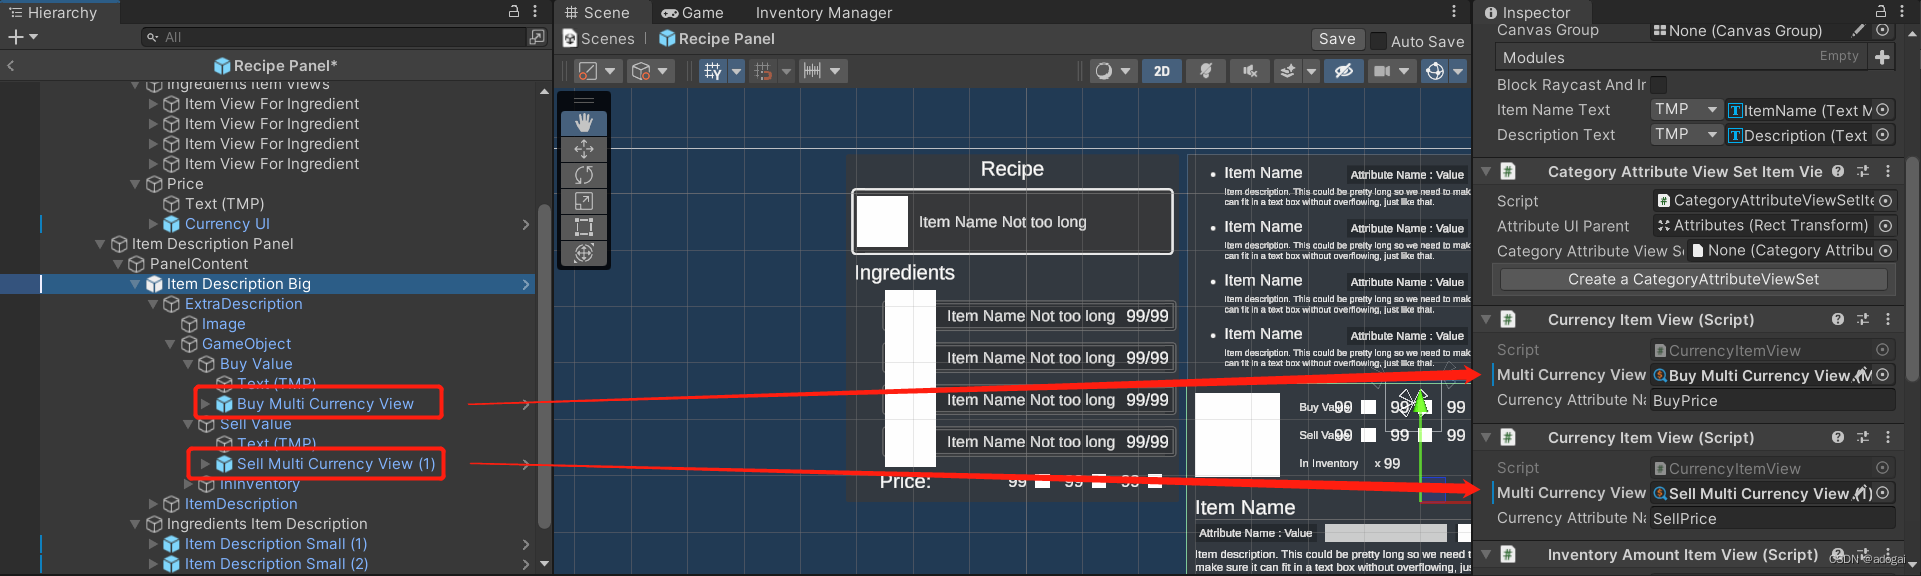
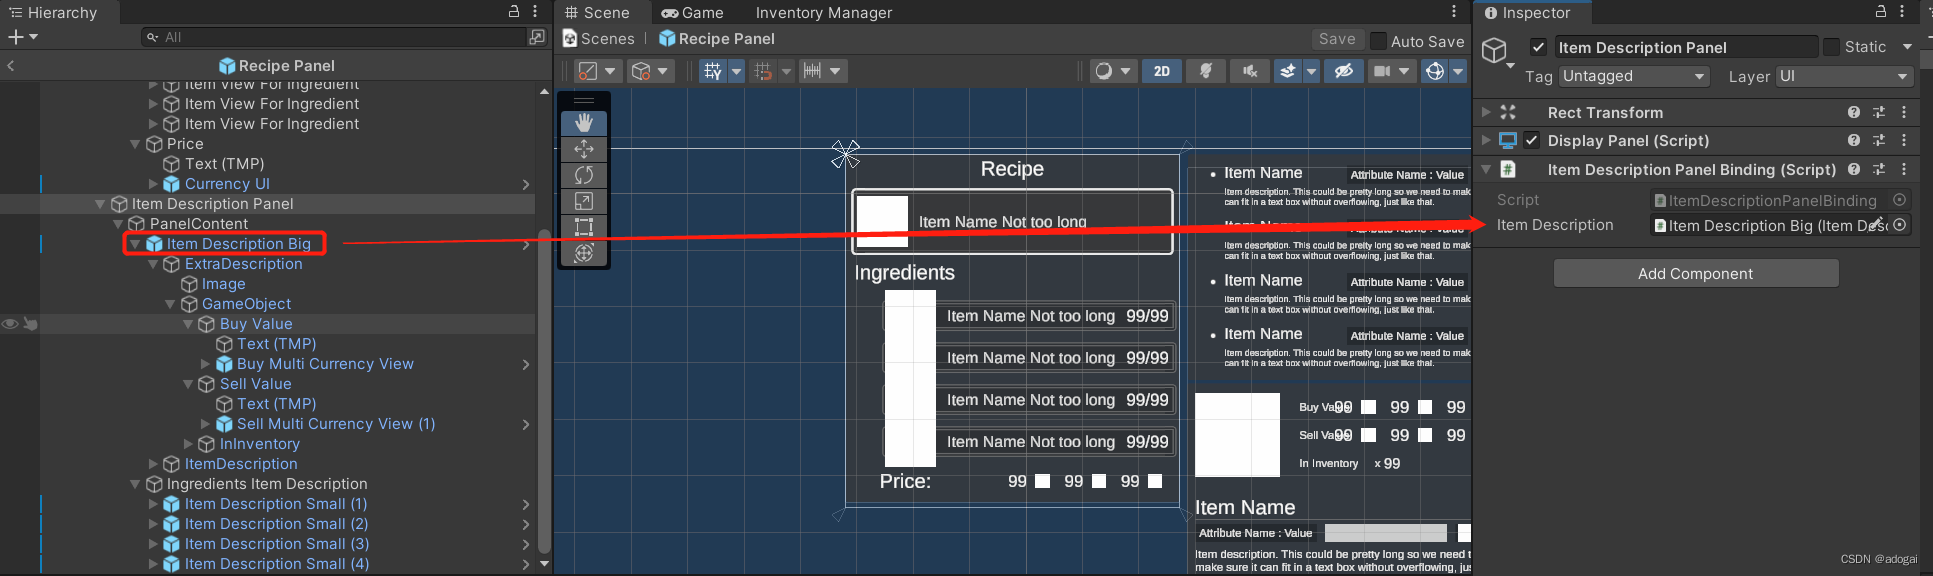
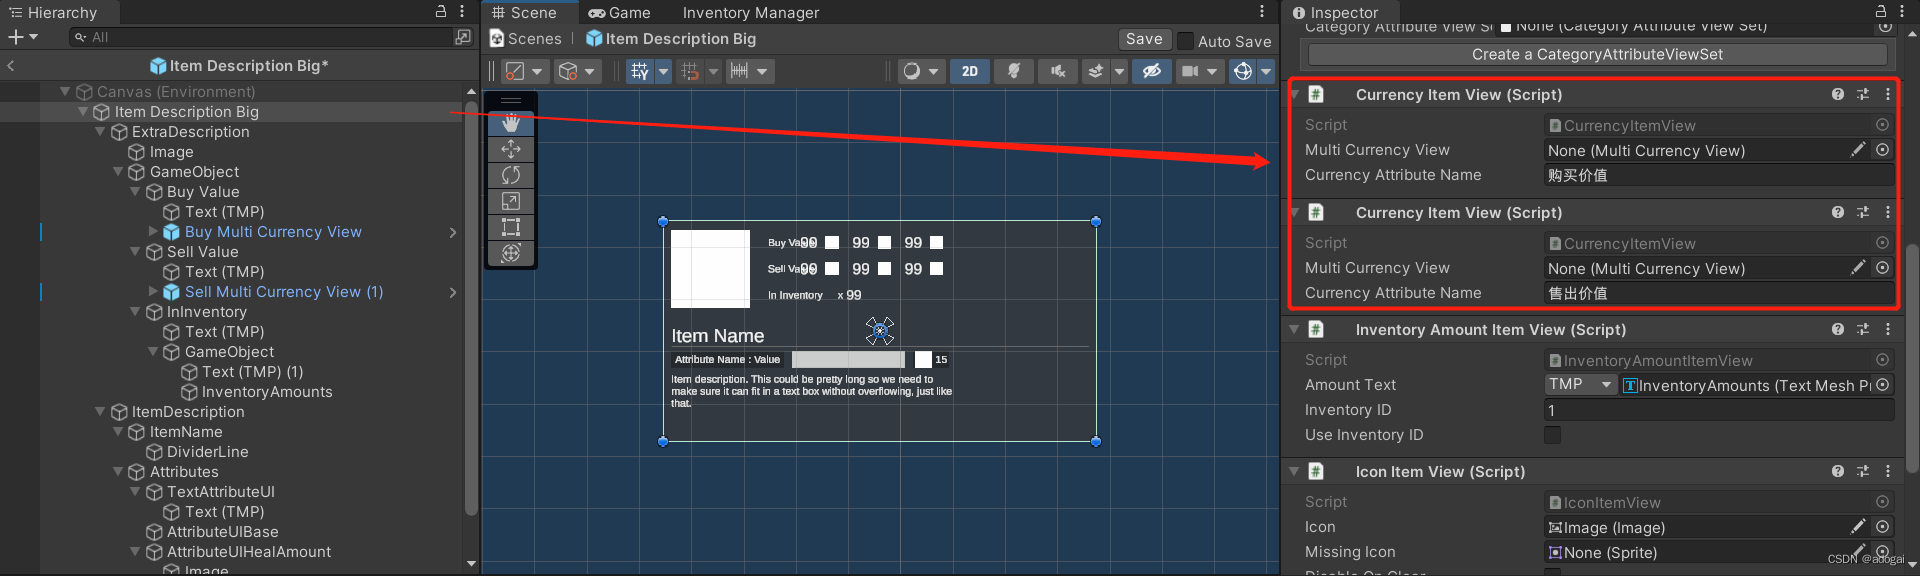
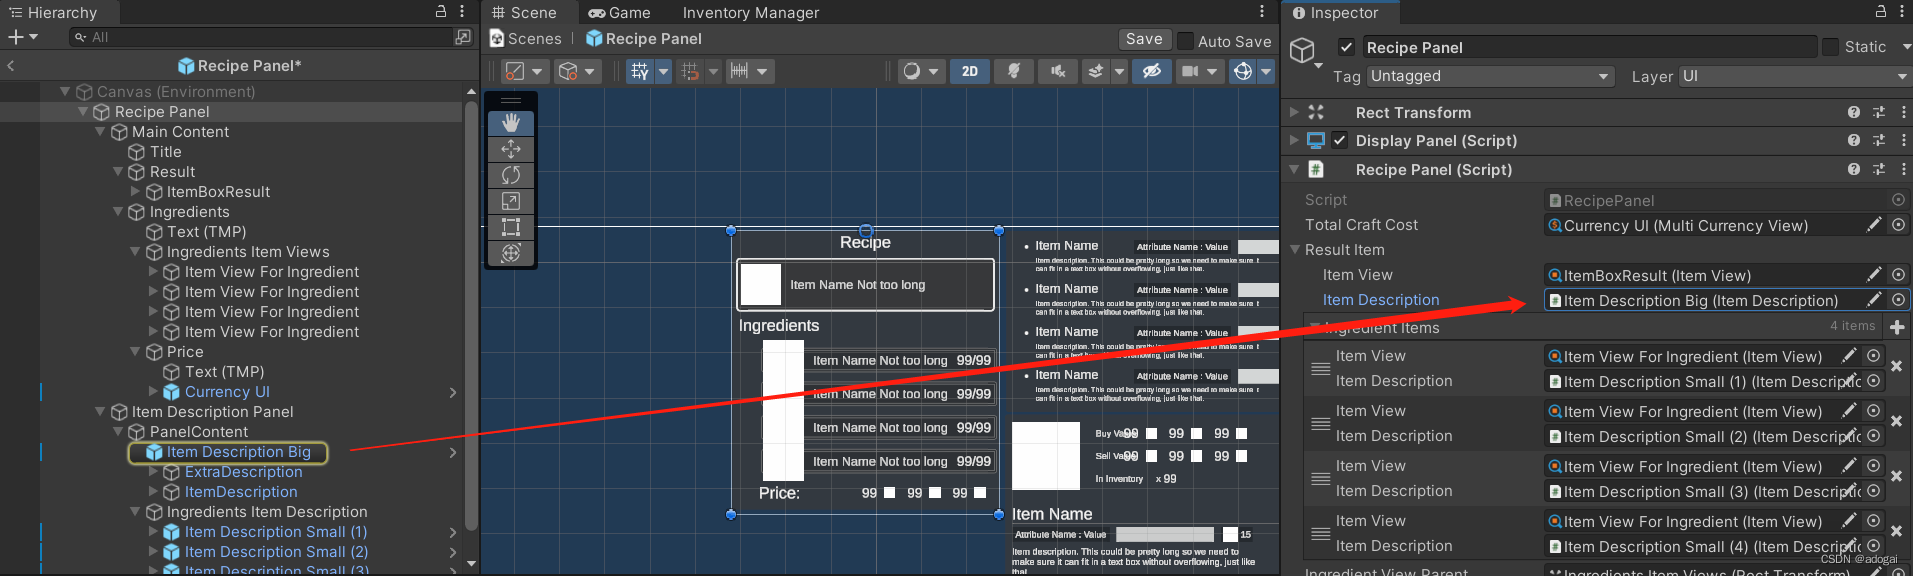
1. Create a production interface
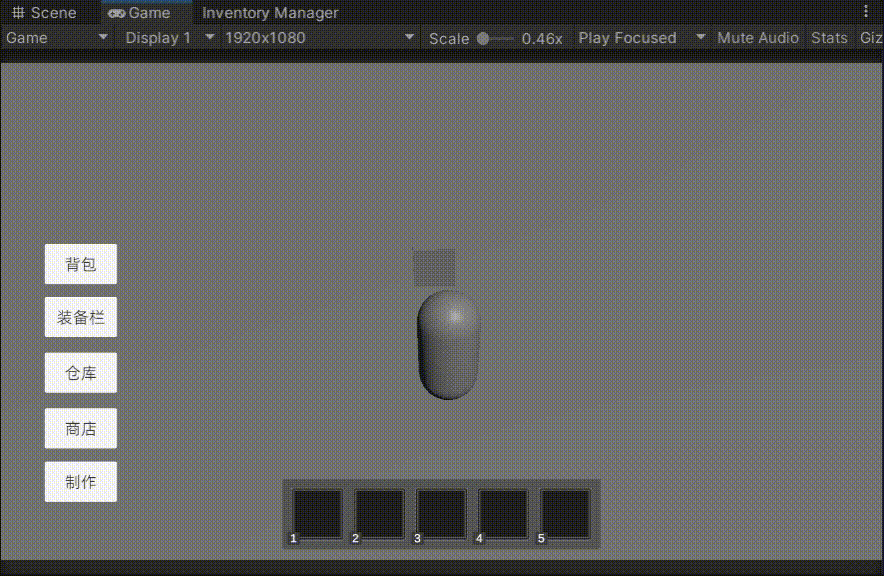
Effect
Summarize
There are so many written in this article, which has more words than my paper and the plagiarism rate is not high. I can only say that I have tried my best. There are many knowledge points and they are very useful. In addition, a lot of things have to be reserved for the fourth chapter of code, such as the interface of adding and deleting items, data linkage (drinking blood medicine), item linkage (linkage with model-wearing), optimization of picking things, killing monsters and exploding Equipment interface, loading and saving interface, treasure chest random function.
The plug-in and article will be optimized later, unnecessary things will be removed, and the demo will be released at the beginning of the article. It will be very cool to do so. The disadvantage will be worse if the plug-in is updated. After all, I wrote some things and moved a lot of components.
To be optimized:
1. When opening the interface, a pop-up window will automatically appear. In fact, the first item is automatically locked, which is convenient for keyboard operation; it is for keyboard and controller players. This is not critical, the key is that the position of the panel is incorrect and needs to be optimized.
2. The sound effect part is not added.
3. The online function (this is to be determined, there is no plan to do online so there is no need for this)
4. Some shortcut functions, such as clicking the backpack when the warehouse is open can quickly move items; such as the multi-select function;
5. Semi-finished Demo, currently there are other plug-ins and frameworks in the project, the test is compatible, and it will take some time to separate.
At present, there are many prefabricated and modified parts of the project, which can be removed after the demo is sorted out to make the article clearer. The
finishing part: Item View For Ingredient lacks X Item View For List (after demo is deleted)