Table of contents
2. Introductory simple example
2. Introduction to frequent examination modules
3. Component parameter passing method
2. Passing parameters from father to son
2. Layout switching of the 13th Lanqiao Zhenti (7)
3. The 13th Lanqiao Zhenti (8) shopping cart
1. vue
1. Inspection
Lead-in and scaffolding
<script src="https://cdn.jsdelivr.net/npm/[email protected]/dist/vue.js"></script>2. Introductory simple example
<!DOCTYPE html>
<html lang="en">
<head>
    <meta charset="UTF-8">
    <meta http-equiv="X-UA-Compatible" content="IE=edge">
    <meta name="viewport" content="width=device-width, initial-scale=1.0">
    <title>Document</title>
    <script src="https://cdn.jsdelivr.net/npm/[email protected]/dist/vue.js"></script>
</head>
<body>
    <div id="app">
        <span @click="btnClick">{

   {index}}</span>
    </div>

</body>
<script>
    new Vue({
        el:'#app',
        data(){
            return {
                index:1
            }
        },
        methods: {
            btnClick(){
                console.log(this.index);
            }
        }
    })
</script>
</html>
3. Learn more
Friends who want to know more can read the editor's vue column, there are a lot of learning about vue
2. Life cycle
1. Document icon

2. Introduction to frequent examination modules
created、mounted、beforeDestroy
(1) The difference between created and mounted
①Life cycle execution order
<!DOCTYPE html>
<html lang="en">
<head>
    <meta charset="UTF-8">
    <meta http-equiv="X-UA-Compatible" content="IE=edge">
    <meta name="viewport" content="width=device-width, initial-scale=1.0">
    <title>Document</title>
    <script src="https://cdn.jsdelivr.net/npm/[email protected]/dist/vue.js"></script>
</head>
<body>
    <div id="app">
        <span>{

   {index}}</span>
    </div>

</body>
<script>
    new Vue({
        el:'#app',
        data(){
            return {
                index:1
            }
        },
        created () {
            console.log('created');
            this.btnClick()
        },
        mounted () {
            console.log('mounted');
        },
        methods: {
            btnClick(){
                console.log(this.index);
            }
        }
    })
</script>
</html>
② DOM operation page
created: the first data that can obtain data and methods in the entire life cycle , often used for request interface and data initialization
mounted: the first time the DOM can be obtained, the mount operation is performed
[Like hanging a picture, created picks up the picture, and mounted is the operation of hanging a picture]
<!DOCTYPE html>
<html lang="en">
<head>
    <meta charset="UTF-8">
    <meta http-equiv="X-UA-Compatible" content="IE=edge">
    <meta name="viewport" content="width=device-width, initial-scale=1.0">
    <title>Document</title>
    <script src="https://cdn.jsdelivr.net/npm/[email protected]/dist/vue.js"></script>
</head>
<body>
    <div id="app">
        <span class="demo" @click="btnClick()">{

   {index}}</span>
    </div>

</body>
<script>
    new Vue({
        el:'#app',
        data(){
            return {
                index:1
            }
        },
        created () {
            console.log('created');
            this.btnClick()
        },
        mounted () {
            console.log('mounted');
            console.log(document.querySelector('.demo'));
        },
        methods: {
            btnClick(){
                console.log(this.index);
            }
        }
    })
</script>
</html>
(2) beforeDestroy before destruction: the last one can get data and methods, which is often used to process data and methods before the page is destroyed destroy
Common scenarios: turn off the timer, record the user's operation time, stay time, video viewing time, and effective video playback times
3. Component parameter passing method
1. Create and use components
<!DOCTYPE html>
<html lang="en">
<head>
    <meta charset="UTF-8">
    <meta http-equiv="X-UA-Compatible" content="IE=edge">
    <meta name="viewport" content="width=device-width, initial-scale=1.0">
    <title>Document</title>
    <script src="https://cdn.jsdelivr.net/npm/[email protected]/dist/vue.js"></script>
</head>
<body>
    <div id="app">
        <span class="demo" @click="btnClick()">{

   {index}}</span>
        <user></user>
    </div>

    <!-- 组件user -->
    <template id="user">
        <div>
            <h1>123</h1>
            <h4>{

   {userIndex}}</h4>
        </div>
    </template>

</body>
<script>
    // 组件user
    const user = Vue.extend({
        template:"#user",
        data(){
            return{
                userIndex:10,
            }
        },
        methods:{
            btnChildClick(){

            }
        }
    });

    //父组件
    new Vue({
        el:'#app',
        data(){
            return {
                index:1
            }
        },
        components: {
            user
        },
        created () {
            console.log('created');
            this.btnClick()
        },
        mounted () {
            console.log('mounted');
            console.log(document.querySelector('.demo'));
        },
        methods: {
            btnClick(){
                console.log(this.index);
            }
        }
    })
</script>
</html>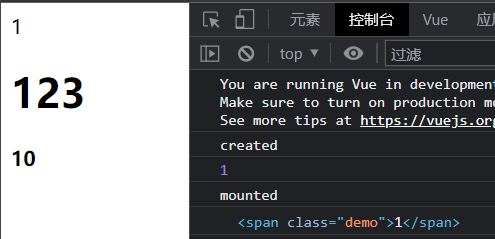
2. Passing parameters from father to son
(1) Father-to-child props
Example: pass a string directly
<!DOCTYPE html>
<html lang="en">
<head>
    <meta charset="UTF-8">
    <meta http-equiv="X-UA-Compatible" content="IE=edge">
    <meta name="viewport" content="width=device-width, initial-scale=1.0">
    <title>Document</title>
    <script src="https://cdn.jsdelivr.net/npm/[email protected]/dist/vue.js"></script>
</head>
<body>
    <div id="app">
        <span class="demo" @click="btnClick()">{

   {index}}</span>
        <!-- 注意如果直接写"lalala",会被认为是一个lalala方法,而报错 -->
        <user :userinfo="'lalala'"></user>
    </div>

    <!-- 组件user -->
    <template id="user">
        <div>
            <h1>123</h1>
            <h4>{

   {userIndex}}</h4>
            <h4>{

   {userinfo}}</h4>
        </div>
    </template>

</body>
<script>
    // 组件user
    const user = Vue.extend({
        template:"#user",
        data(){
            return{
                userIndex:10,
            }
        },
        props:['userinfo'],
        methods:{
            btnChildClick(){

            }
        }
    });

    //父组件
    new Vue({
        el:'#app',
        data(){
            return {
                index:1
            }
        },
        components: {
            user
        },
        created () {
            console.log('created');
            this.btnClick()
        },
        mounted () {
            console.log('mounted');
            console.log(document.querySelector('.demo'));
        },
        methods: {
            btnClick(){
                console.log(this.index);
            }
        }
    })
</script>
</html>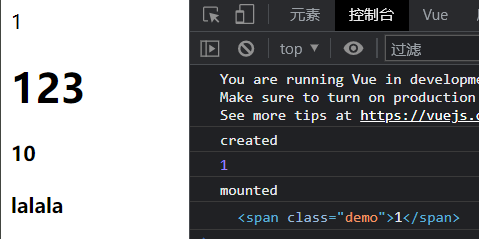
(2) Son-to-father $emit()
<!DOCTYPE html>
<html lang="en">
<head>
    <meta charset="UTF-8">
    <meta http-equiv="X-UA-Compatible" content="IE=edge">
    <meta name="viewport" content="width=device-width, initial-scale=1.0">
    <title>Document</title>
    <script src="https://cdn.jsdelivr.net/npm/[email protected]/dist/vue.js"></script>
</head>
<body>
    <div id="app">
        <span class="demo" @click="btnClick()">{

   {index}}</span>
        <!-- 注意绑定属性要用驼峰btn-child不能用btnChild -->
        <user :userinfo="'lalala'" @btn-child="btnFather"></user>
    </div>

    <!-- 组件user -->
    <template id="user">
        <div>
            <h1>123</h1>
            <h4>{

   {userIndex}}</h4>
            <h4 @click="btnChildClick">{

   {userinfo}}</h4>
        </div>
    </template>

</body>
<script>
    // 组件user
    const user = Vue.extend({
        template:"#user",
        data(){
            return{
                userIndex:10,
            }
        },
        props:['userinfo'],
        methods:{
            btnChildClick(){
                // 注意用驼峰btn-child,不用btnChild
                this.$emit('btn-child',this.userIndex)
            }
        }
    });

    //父组件
    new Vue({
        el:'#app',
        data(){
            return {
                index:1
            }
        },
        components: {
            user
        },
        created () {
            console.log('created');
            this.btnClick()
        },
        mounted () {
            console.log('mounted');
            console.log(document.querySelector('.demo'));
        },
        methods: {
            btnClick(){
                console.log(this.index);
            },
            btnFather(e){
                console.log('btnFather:'+e);
            }
        }
    })
</script>
</html>
4. axios
1 Introduction
Axios is a promise-based network request library that can be used in browsers and node.js
2. Layout switching of the 13th Lanqiao Zhenti (7)
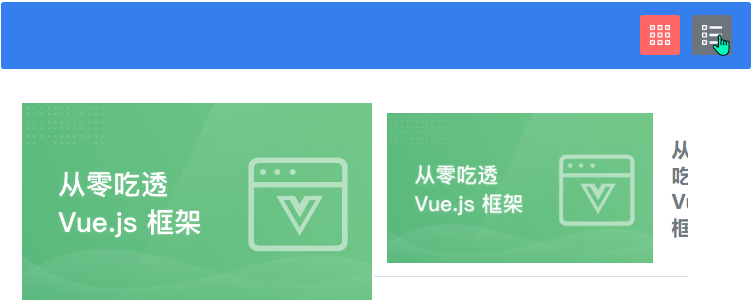
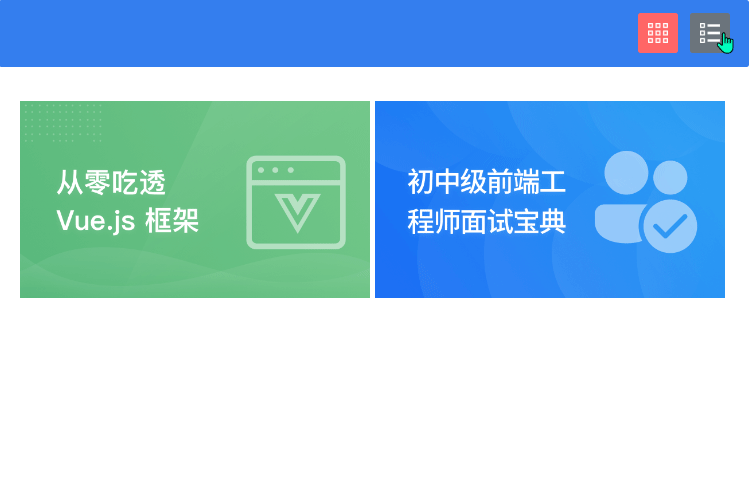
(1) Realize the click switching effect of the tab bar picture
①Requirement: Click the icon of "List Effect", the background color of the icon will change to red (that is class=active), the background color of the icon of "Big Picture Effect" will change to gray (that is, class=active it will removed)
②Analysis: To achieve the effect of clicking to switch styles, you can write the dynamic binding class attribute; set the click event, and modify the dynamic binding value isActive
<!-- TODO:请在下面实现需求 -->
<div class="bar">
  <a class="grid-icon" :class="{active:isActive}" @click="grid()"></a>
  <a class="list-icon" :class="{active:!isActive}" @click="list()"></a>
</div>
<script type="text/javascript">
var vm = new Vue({
el: "#app",
data: {
goodsList: [],
isActive:true,
},
mounted() {
// TODO:补全代码实现需求
},
methods:{
grid(){
this.isActive = true
},
list(){
this.isActive = false
}
}
});
</script>③Result display
(2) Get json data through axios
<script type="text/javascript">
  var vm = new Vue({
    el: "#app",
    data: {
      goodsList: [],
      isActive:true,
    },
    mounted() {
      // TODO:补全代码实现需求
      this.getData()
    },
    methods:{
      grid(){
        this.isActive = true
      },
      list(){
        this.isActive = false
      },
      getData(){
        axios.get('./goodsList.json').then(res=>{
          console.log(res.data);
          this.goodsList = res.data
        })
      }
    }
  });
</script>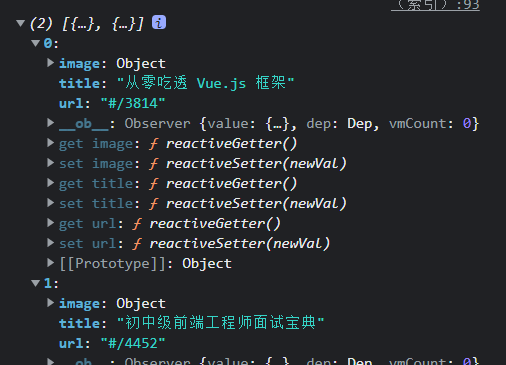
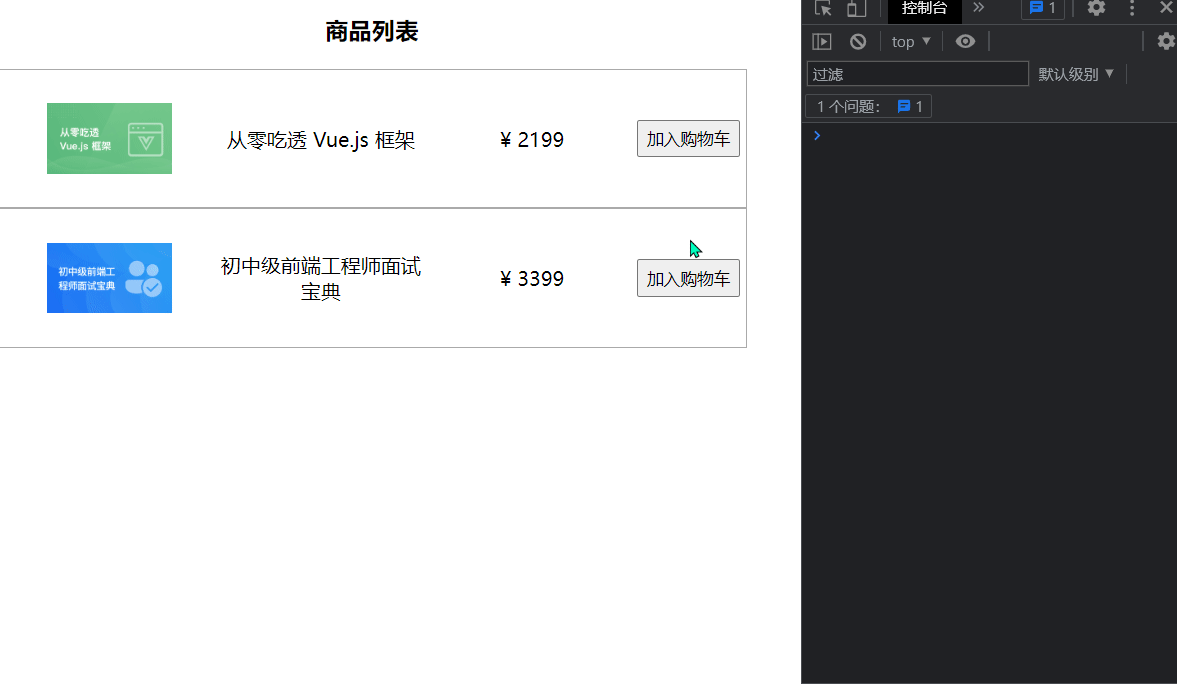
(3) Realize content rendering
①By observing the grid sample code, you can use the v-for loop ul tag to render the content
② Combining the isActive attribute value defined above, dynamically bind the class style of the ul tag, the href attribute value of the a tag, and the src attribute value of the img tag
<ul v-for="item in goodsList" :key="item.url" :class="isActive?'grid':'list'">
  <li>
    <a :href="item.url" target="_blank"> <img :src="item.image.large" /></a>
  </li>
</ul>
The effect achieved here is shown in the figure
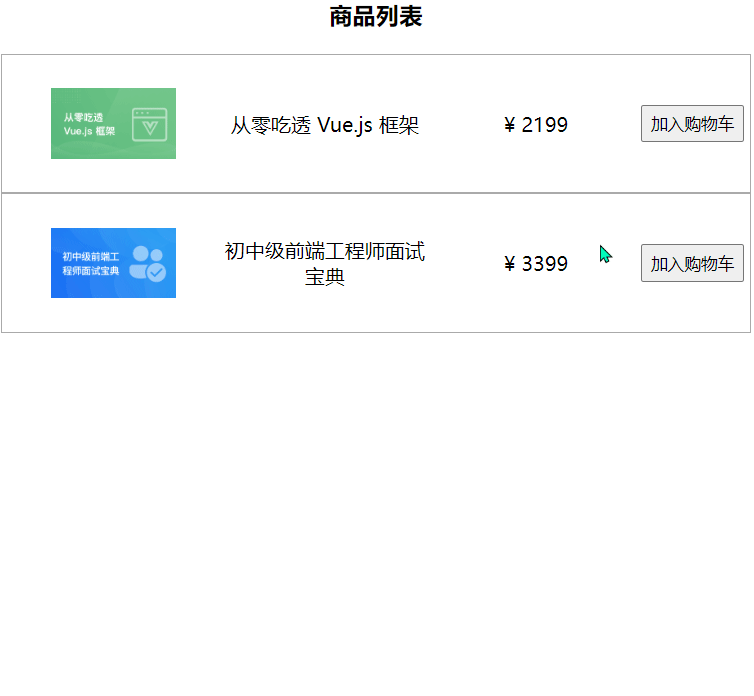
③It is found that when the content is displayed as a picture, there is no text content; when it is displayed as a list, there is a text content with the p tag, and it is necessary to use v-show to dynamically bind the text display or not
<ul v-for="item in goodsList" :key="item.url" :class="isActive?'grid':'list'">
  <li>
    <a :href="item.url" target="_blank"> <img :src="item.image.large" /></a>
    <p v-show="!isActive">{

   {item.title}}</p>
  </li>
</ul>
(4) Complete code
<!DOCTYPE html>
<html lang="en">
  <head>
    <meta charset="UTF-8" />
    <title>布局切换</title>
    <script type="text/javascript" src="./js/vue.js"></script>
    <link rel="stylesheet" type="text/css" href="./css/index.css" />
    <script
      src="./js/axios.min.js"
      type="text/javascript"
      charset="utf-8"
    ></script>
  </head>
  <body>
    <div id="app" v-cloak>
      <!-- TODO:请在下面实现需求 -->
      <div class="bar">
        <a class="grid-icon" :class="{active:isActive}" @click="grid()"></a>
        <a class="list-icon" :class="{active:!isActive}" @click="list()"></a>
      </div>
      <!--grid 示例代码,动态渲染时可删除-->
      <ul v-for="item in goodsList" :key="item.url" :class="isActive?'grid':'list'">
        <li>
          <a :href="item.url" target="_blank"> <img :src="item.image.large" /></a>
          <p v-show="!isActive">{

   {item.title}}</p>
        </li>
      </ul>
      <!-- <ul class="grid">
        <li>
          <a href="#/3814" target="_blank"> <img src="./images/1.png" /></a>
        </li>
      </ul>
      <ul class="list">
        <li>
          <a href="#/3814" target="_blank"> <img src="./images/1.png" /></a>
          <p>从零吃透 Vue.js 框架</p>
        </li>
      </ul> -->
    </div>
  </body>
</html>
<script type="text/javascript">
  var vm = new Vue({
    el: "#app",
    data: {
      goodsList: [],
      isActive:true,
    },
    mounted() {
      // TODO:补全代码实现需求
      this.getData()
    },
    methods:{
      grid(){
        this.isActive = true
      },
      list(){
        this.isActive = false
      },
      getData(){
        axios.get('./goodsList.json').then(res=>{
          console.log(res.data);
          this.goodsList = res.data
        })
      }
    }
  });
</script>
3. The 13th Lanqiao Zhenti (8) shopping cart
Requirement: Modify addToCart the method to realize the function of adding products to the shopping cart. That is: after clicking the "Add to Cart" button, if the item does not exist in the shopping cart, add the item to the end of the shopping cart and initialize the quantity to 1; if the item already exists in the shopping cart, only the original quantity Just +1
Idea: If you judge that the shopping cart has not been clicked on the data of the product, you will push it, and if there is data, you will modify the num. You can use the for loop to judge, here I use the high-order function findIndex
(1) Determine whether the shopping cart has the data of the clicked product
addToCart(goods){
    // TODO:修改当前函数,实现购物车加入商品需求
    console.log(goods);
    const index = this.cartList.findIndex(e=>{
      return e.id === goods.id
    })

    goods.num = 1;
    this.cartList.push(goods);
    this.cartList = JSON.parse(JSON.stringify(this.cartList));
},
It can be seen from the effect diagram that when the shopping cart is not clicked on the data of the product, the flag outputs -1, and the found is to return the subscript of the first found data
(2) Addition of goods or increase of num value
addToCart(goods){
    // TODO:修改当前函数,实现购物车加入商品需求
    console.log(goods);
    const index = this.cartList.findIndex(e=>{
      return e.id === goods.id
    })
    if(index == -1){
      goods.num = 1;
      this.cartList.push(goods);
    }else{
      this.cartList[index].num++
    }

    this.cartList = JSON.parse(JSON.stringify(this.cartList));
},
(3) removeGoods method
Requirement: Improve removeGoods the method to realize the function of removing items from the shopping cart. Click the minus sign ("-") button corresponding to the item in the shopping cart to reduce its quantity by -1 from the original quantity; if the reduced quantity is 0, remove the item from the shopping cart.
Idea: Click '-', and the quantity num will be reduced by 1. Note that when num is reduced to 1, and then click '-', it is necessary to delete the product from the shopping cart list
removeGoods(goods){
    // TODO:补全代码实现需求
    const index = this.cartList.findIndex(e=>{
      return e.id === goods.id
    })
    if(this.cartList[index].num > 1){
      this.cartList[index].num--
    }else{
      // index裁切的起始点,1裁切长度
      this.cartList.splice(index,1)
    }
}
(4) Extended learning
Simplify the above code
addToCart(goods){
    // TODO:修改当前函数,实现购物车加入商品需求
    console.log(goods);
    const index = this.cartList.findIndex(e => e.id === goods.id)
    // 利用展开符,先结构goods,然后再添加num
    index == -1 ? this.cartList.push({...goods,num:1}) : this.cartList[index].num++

    this.cartList = JSON.parse(JSON.stringify(this.cartList));
},
removeGoods(goods){
    // TODO:补全代码实现需求
    const index = this.cartList.findIndex(e => e.id === goods.id)
    this.cartList[index].num > 1 ? this.cartList[index].num-- : this.cartList.splice(index,1)
}