Series Article Directory
TinyOS series of articles [1]: TinyOS configuration tutorial
TinyOS series of articles [2]: Tossim tutorial
Article directory
foreword
This article is mainly used to record the TinyOSsimulation
1. Installation
1.1. Experimental environment
This experiment takes the following version as an example, other system versions may have unknown problems
- ubuntu-14.04.6
- VMware Fusion
For the installation of the virtual machine, you can refer to my other blog: Blitz configuration tutorial
1.2. Basic work of TinyOS
- Add source to ubuntu's package list file
sudo gedit /etc/apt/sources.list
This command uses geditan editor , of course you can also use vim, etc.
It should be noted that you need to use su rootto enter , and then use sudoto run the above command, otherwise the following error will be reported:
(gedit:2640): dconf-WARNING **: failed to commit changes to dconf: 连接已关闭

** (gedit:2640): CRITICAL **: log.vala:104: Unable to connect to Zeitgeist: 连接已关闭

(gedit:2640): dconf-WARNING **: failed to commit changes to dconf: 连接已关闭

(gedit:2640): dconf-WARNING **: failed to commit changes to dconf: 连接已关闭
Error creating proxy: 连接已关闭 (g-io-error-quark, 18)
Error creating proxy: 连接已关闭 (g-io-error-quark, 18)
Error creating proxy: 连接已关闭 (g-io-error-quark, 18)
Error creating proxy: 连接已关闭 (g-io-error-quark, 18)

(gedit:2640): GLib-GIO-CRITICAL **: g_dbus_connection_register_object: assertion 'G_IS_DBUS_CONNECTION (connection)' failed

(gedit:2640): GLib-GIO-CRITICAL **: g_dbus_connection_register_object: assertion 'G_IS_DBUS_CONNECTION (connection)' failed

(gedit:2640): GLib-GIO-CRITICAL **: g_dbus_connection_get_unique_name: assertion 'G_IS_DBUS_CONNECTION (connection)' failed

(gedit:2640): dconf-WARNING **: failed to commit changes to dconf: 连接已关闭

(gedit:2640): dconf-WARNING **: failed to commit changes to dconf: 连接已关闭

(gedit:2640): dconf-WARNING **: failed to commit changes to dconf: 连接已关闭

** (gedit:2640): CRITICAL **: Unable to connect to Zeitgeist's DataSourceRegistry: 连接已关闭
- Add the following code to sources.list, save and exit
# TinyOS Repository
deb http://tinyos.stanford.edu/tinyos/dists/ubuntu lucid main
When adding the above code, the terminal will have the following error message (but it does not seem to affect subsequent downloads, skip it for now):
(gedit:3437): Gtk-WARNING **: Calling Inhibit failed: GDBus.Error:org.freedesktop.DBus.Error.ServiceUnknown: The name org.gnome.SessionManager was not provided by any .service files
- Then execute the following command to update resources
sudo apt-get update
The partial terminal output looks like this:
命中 http://security.ubuntu.com trusty-security/main Translation-en
命中 http://security.ubuntu.com trusty-security/multiverse Translation-en
获取:3 http://tinyos.stanford.edu lucid/main i386 Packages [5,310 B]
命中 http://security.ubuntu.com trusty-security/restricted Translation-en
命中 http://security.ubuntu.com trusty-security/universe Translation-en
忽略 http://tinyos.stanford.edu lucid/main Translation-zh_CN
忽略 http://tinyos.stanford.edu lucid/main Translation-zh
忽略 http://tinyos.stanford.edu lucid/main Translation-en
忽略 http://extras.ubuntu.com trusty/main Translation-zh_CN
忽略 http://extras.ubuntu.com trusty/main Translation-zh
忽略 http://extras.ubuntu.com trusty/main Translation-en
下载 12.3 kB,耗时 11秒 (1,034 B/s)
正在读取软件包列表... 完成
updateAfter success, execute the installationTinyOScommand :
sudo apt-get install tinyos-2.1.2
The download process may be slow, please be patient. After the installation is successful, the partial output of the terminal is as follows:
update-alternatives: using /usr/lib/jvm/java-6-openjdk-amd64/bin/schemagen to provide /usr/bin/schemagen (schemagen) in 自动模式
update-alternatives: using /usr/lib/jvm/java-6-openjdk-amd64/bin/serialver to provide /usr/bin/serialver (serialver) in 自动模式
update-alternatives: using /usr/lib/jvm/java-6-openjdk-amd64/bin/wsgen to provide /usr/bin/wsgen (wsgen) in 自动模式
update-alternatives: using /usr/lib/jvm/java-6-openjdk-amd64/bin/wsimport to provide /usr/bin/wsimport (wsimport) in 自动模式
update-alternatives: using /usr/lib/jvm/java-6-openjdk-amd64/bin/xjc to provide /usr/bin/xjc (xjc) in 自动模式
正在设置 openjdk-6-jre-lib (6b41-1.13.13-0ubuntu0.14.04.1) ...
正在设置 libatk-wrapper-java-jni:amd64 (0.30.4-4) ...
正在处理用于 libc-bin (2.19-0ubuntu6.14) 的触发器 ...
正在处理用于 ca-certificates (20170717~14.04.2) 的触发器 ...
Updating certificates in /etc/ssl/certs... 0 added, 0 removed; done.
Running hooks in /etc/ca-certificates/update.d....
done.
done.
After the installation is successful TinyOS, the basic work has been done, and the next step is to complete the configuration and install the corresponding compiler.
1.3. TinyOS configuration
- Change the ownership of the tinyos folder to complete the subsequent configuration, enter the following commands respectively:
sudo chown your_user_name:your_user_name -R /opt/tinyos-2.1.2/
sudo chown your_user_name -R /opt/tinyos-2.1.2
- Enter
tinyos-2.1.2the directory to check whether there istinyos.sha file, if there is no such file, use the commandvim tinyos.shto create a new file and add the following code:
#! /usr/bin/env bash
# www.ElectronicsPub.com
# TinyOS 2.1.2 Configuration Guide
# Here we setup the environment
# variables needed by the tinyos
# make system
echo "Setting up for TinyOS 2.1.2"
export TOSROOT=
export TOSDIR=
export MAKERULES=
TOSROOT="/opt/tinyos-2.1.2"
TOSDIR="$TOSROOT/tos"
CLASSPATH=$CLASSPATH:$TOSROOT/support/sdk/java
MAKERULES="$TOSROOT/support/make/Makerules"
export TOSROOT
export TOSDIR
export CLASSPATH
export MAKERULES
- Next, configure environment variables and open bash.bashrc with the following command
sudo gedit ~/.bashrc
Add the following code at the bottom:
# Start TinyOS environment pathing
export TOSROOT=/opt/tinyos-2.1.2
export TOSDIR=$TOSROOT/tos
export CLASSPATH=$TOSROOT/support/sdk/java/tinyos.jar:.$CLASSPATH
export MAKERULES=$TOSROOT/support/make/Makerules
export PATH=/opt/msp430/bin:$PATH
source /opt/tinyos-2.1.2/tinyos.sh
# End TinyOS pathing
- Execute the changes with the following command:
source ~/.bashrc
The following prompt appears on the terminal, indicating success:
Setting up for TinyOS 2.1.2
1.4. Install java
- Enter the following commands in sequence in the terminal:
cd $TOSROOT/support/sdk/java
sudo tos-install-jni
make
make install
- If it is the first time to install tinyos, some tools of MSP430 will be installed automatically through the installation of tinyos, you can check it by the following command:
msp430-gcc --version
The following prompt appears on the terminal, indicating that the installation is successful:
msp430-gcc (GCC) 4.5.3
Copyright (C) 2010 Free Software Foundation, Inc.
This is free software; see the source for copying conditions.  There is NO
warranty; not even for MERCHANTABILITY or FITNESS FOR A PARTICULAR PURPOSE.
have to be aware of is:
- If prompted:
command not found or msp430 compiler is not installed, please refer to step 1.5 - Or it prompts that the compiler has been installed but the version is below 4.6.3 (for bloggers), you must also follow step 5 to install
- If it prompts that the compiler version is already 4.6.3, you can try to use the demo provided by tinyos for experimentation
1.5. Installing the compiler
Enter the following commands in sequence:
sudo apt-get install gcc g++
sudo apt-get install python2.7 python2.7-dev
Now the environment is set up, and the simulation program can be tested.
2. Test the emulator
Enter the directory where the program is located:
cd /opt/tinyos-2.1.2/apps/Blink
Execute the following command to compile:
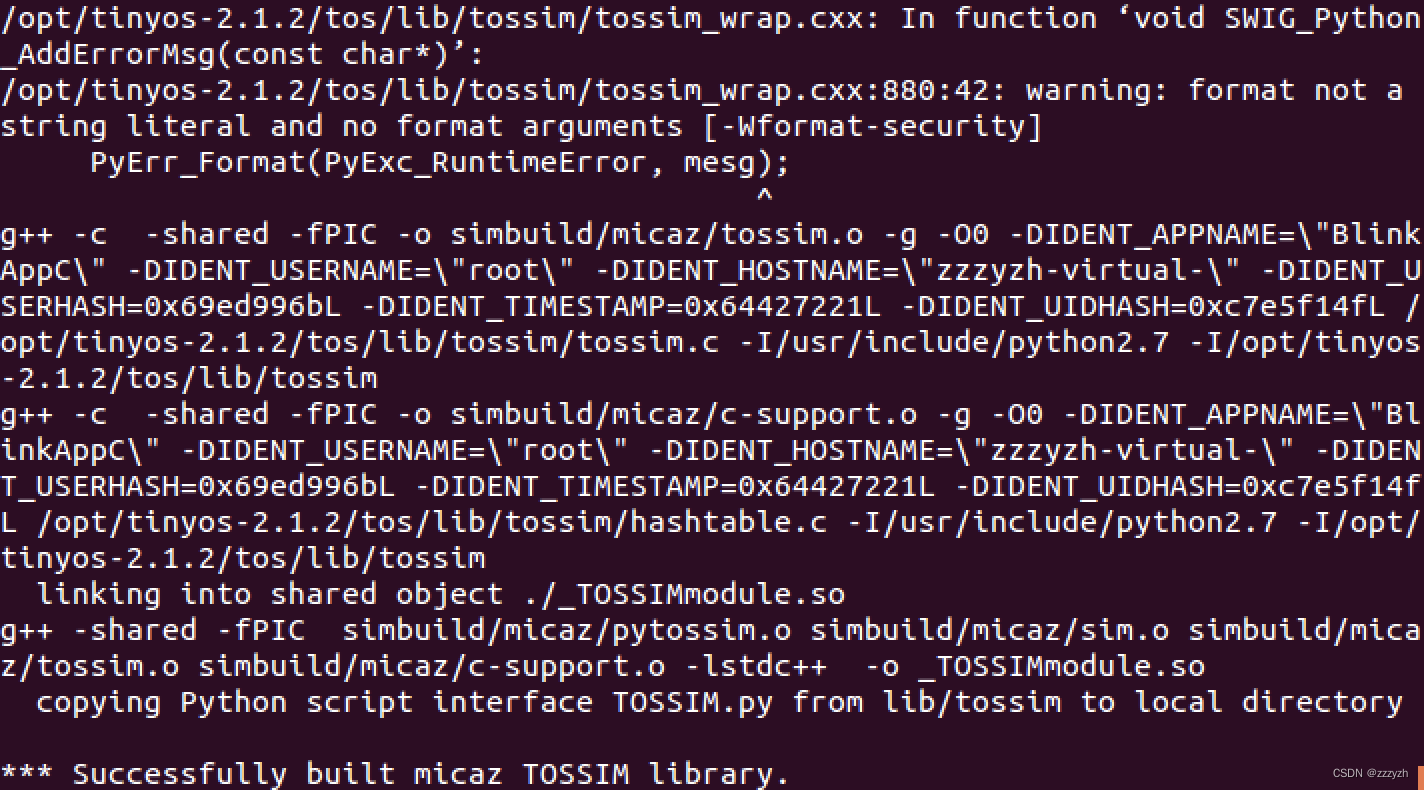
make micaz sim
When the following output appears on the terminal, the configuration is successful:
Summarize
A simple configuration guide