Author platform:
| CSDN:blog.csdn.net/qq\_4115394…
| Nuggets: juejin.cn/user/651387…
| Zhihu: www.zhihu.com/people/1024…
| GitHub: github.com/JiangXia-10…
| WeChat public account: 1024 note
This article is about 3865 words, and the estimated reading time is 10 minutes
foreword
Sending emails is one of the necessary business scenarios for many companies. Common ones include early warning emails, onboarding emails, report emails, and so on. There are many scenarios in our company that need to use the email function. Today, let’s learn how to use springboot to realize the email business scenario and master the core logic of the email business class.
The basic process of sending an email is as follows:
-
The sender of the email logs in to his email server through the user name and password, here he logs in directly by calling the interface;
-
The sender prepares the mail to be sent, and sends the mail from the mail server of the mail sender to the mail server of the receiver
-
After the receiver logs in to his mailbox, he pulls the email from the email server for viewing, so the user name, password and email server address of the email sender need to be configured later
combat
Like other scenarios, emails also need to introduce a starter first, and the relevant starter dependencies here are as follows:
<dependency>
    <groupId>org.springframework.boot</groupId>
    <artifactId>spring-boot-starter-mail</artifactId>
</dependency>
复制代码
After introducing the above dependencies, you can actually use email. However, as mentioned above, you need to configure the username, password, and email server address of the email sender. Here, the configuration email attributes of the email server are as follows:
spring:
    mail:
#    邮箱账号
        username: [email protected]
#    邮箱客户端授权码
        password: sqbnsqstthyshghi
#    邮箱服务器地址
        host: smtp.qq.com
        properties:
            mail:
                smtp:
                    ssl:
                        enable: true
复制代码
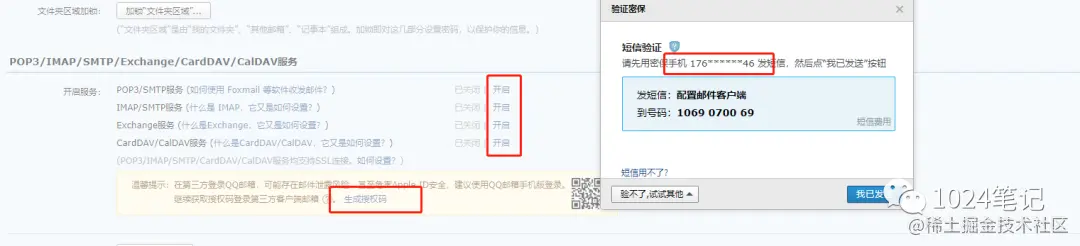
The password here is not the password used to log in on the webpage, but the authorization code obtained when the service is activated in the mailbox settings-account, which needs to be obtained through the following methods: For example, if you have a QQ mailbox, go to Settings-Account-POP3/ IMAP/SMTP/Exchange/CardDAV/CalDAV service, enable POP3/SMTP service, and then send the mobile phone number for verification to obtain the authorization code:

The value of the host address is also seen by clicking on it after enabling the mailbox service in the settings: the same mailbox is usually the same, indicating the address of the mailbox server, but when using QQ mailbox to send mail, if only the account number, password, host, it will prompt that a secure connection is required, so the following configuration is also required:
spring
    properties:
        mail:
            smtp:
                ssl:
                    enable: true
复制代码
Next, you can formally test the email. The method in the test class is as follows:
@Autowired
JavaMailSenderImpl javaMailSender;
@Test
public void sendmailtest(){
SimpleMailMessage mailMessage = new SimpleMailMessage();
mailMessage.setSubject("测试springboot发送邮件");//主题
mailMessage.setText("这是springboot发送邮件的内容,你看看怎么样呢?是不是成功了?");//内容        mailMessage.setTo("[email protected]");
mailMessage.setFrom("[email protected]");
javaMailSender.send(mailMessage);
}
复制代码
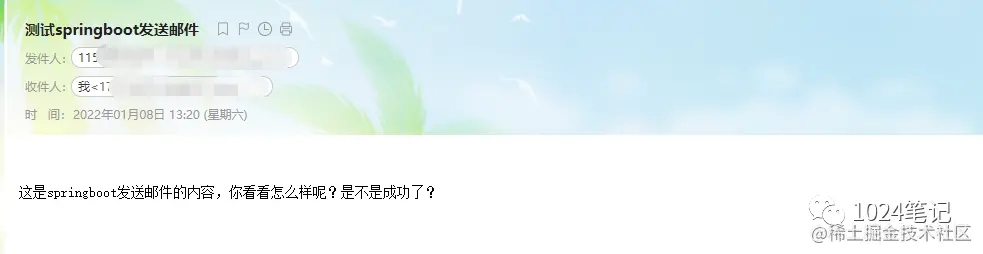
Execute the test method, after running successfully, open the mail collection box of the recipient, here is 163 mailbox, you can see that the mail just sent has been successfully received:

 Through the above code, we can see that the core is JavaMailSenderImpl. Check the source code and find that it implements the JavaMailSender interface. What are JavaMailSender and JavaMailSenderImpl? JavaMailSender and JavaMailSenderImpl are the interface and implementation class of the integrated mail service officially provided by Spring, and are currently the mainstream tools for sending mail and integrating mail services in the Java backend. Their principle is actually very simple. If the test code above is used, you only need to inject JavaMailSenderImpl directly into the business class and call the send method to send the mail. Among them, simple mails can be sent through SimpleMailMessage, and complex mails can be sent through MimeMessageHelper to build MimeMessage. For example, you can configure an email-related template. Each time you send different emails to different people, you can directly call the template, and you can also upload attachments and send them. For example, in the scenario of an onboarding email: The html file of the email template is as follows:
<html lang="en" xmlns:th="http://www.thymeleaf.org">
    <head>
        <meta charset="UTF-8">
        <title>
            这是欢迎一个邮件
        </title>
    </head>
    <body>
        欢迎 加入我们公司
        <table border="1">
            <tr>
                <td>
                    姓名
                </td>
                <td th:text="${name}"></td>
            </tr>
            <tr>
                <td>
                    职位
                </td>
                <td th:text="${posName}"></td>
            </tr>
            <tr>
                <td>
                    职称
                </td>
                <td th:text="${joblevelName}"></td>
            </tr>
            <tr>
                <td>
                    部门
                </td>
                <td th:text="${departmentName}"></td>
            </tr>
        </table>
        <p>
            希望在未来的日子里,携手共进!
        </p>
    </body>
</html>
复制代码
The test method is as follows:
@Autowired
JavaMailSenderImpl javaMailSender;
@Autowired
TemplateEngine templateEngine;
@Autowired
MailProperties mailProperties;
@Test
public void sendmailtemp() throws MessagingException {
//复杂邮件
MimeMessage msg = javaMailSender.createMimeMessage();
MimeMessageHelper helper = new MimeMessageHelper(msg,true);
try {
helper.setTo("[email protected]");
helper.setFrom("[email protected]");
helper.setSubject("入职欢迎");
helper.setSentDate(new Date());
//附件
helper.addAttachment("配置说明.docx", new File("C:/Users/Administrator/Desktop/配置说明.docx")); Context context = new Context();
context.setVariable("name", "江夏");
context.setVariable("posName", "java开发工程师");
context.setVariable("joblevelName", "高级工程师");            context.setVariable("departmentName", "研发部");
String mail = templateEngine.process("mailtemp", context);
helper.setText(mail, true);
javaMailSender.send(msg);
System.out.println(System.currentTimeMillis() + ":邮件发送成功");        }
catch (MessagingException e) {
e.printStackTrace();
System.out.println(System.currentTimeMillis() + ":邮件发送失败"+ e.getMessage());
}
}
复制代码
Execute the test method:

 javaMailSenderImpl provides the method createMimeMessage to create complex mail. MimeMessageHelper provides methods for creating email content, such as sender, receiver, attachment, email content, and so on. The actual sending of the mail is still the send method of JavaMailSenderImpl.
Summarize
The above is the general content and basic logic of springboot building an email service. In actual applications, more complex logic can be implemented according to specific business scenarios, such as message queues, automatic triggers, and so on.
If you have any questions or mistakes, welcome to communicate, discuss and learn together!
The source code of this project is at:
Welcome to download, Star!