1. Scene
After the front-end is built and launched, the user is still stuck on the old page. The user does not know that the web page has been redeployed. When jumping to the page, sometimes the js connection hash changes, causing an error and unable to jump, and the user cannot experience the new features.
2. Solution
- Each package is written to a json file, or the generated
script的src引入的hash地址或者etagdifferences are compared, and the call is polled to determine whether it is updated. - The front-end uses websocket long connection, specifically every time it is built, the back-end is notified after packaging, and the front-end is notified through websocket after updating.
The polling call can be changed to be called in the front routing guard. There is no need to control the time. The user will only call the judgment when there is an operation.
3. Specific implementation
3.1 Polling method
Refer to Xiaoman’s implementation and modify it slightly:
class Monitor {
  private oldScript: string[] = []

  private newScript: string[] = []

  private oldEtag: string | null = null

  private newEtag: string | null = null

  dispatch: Record<string, (() => void)[]> = {}

  private stop = false

  constructor() {
    this.init()
  }

  async init() {
    console.log('初始化')
    const html: string = await this.getHtml()
    this.oldScript = this.parserScript(html)
    this.oldEtag = await this.getEtag()
  }
 // 获取html
  async getHtml() {
    const html = await fetch('/').then((res) => res.text())
    return html
  }
  // 获取etag是否变化
  async getEtag() {
    const res = await fetch('/')
    return res.headers.get('etag')
  }
  // 解析script标签
  parserScript(html: string) {
    const reg = /<script(?:\s+[^>]*)?>(.*?)<\/script\s*>/gi
    return html.match(reg) as string[]
  }
  // 订阅
  on(key: 'update', fn: () => void) {
    ;(this.dispatch[key] || (this.dispatch[key] = [])).push(fn)
    return this
  }
  // 停止
  pause() {
    this.stop = !this.stop
  }

  get value() {
    return {
      oldEtag: this.oldEtag,
      newEtag: this.newEtag,
      oldScript: this.oldScript,
      newScript: this.newScript,
    }
  }
  // 两层对比有任一个变化即可
  compare() {
    if (this.stop) return
    const oldLen = this.oldScript.length
    const newLen = Array.from(
      new Set(this.oldScript.concat(this.newScript))
    ).length
    if (this.oldEtag !== this.newEtag || newLen !== oldLen) {
      this.dispatch.update.forEach((fn) => {
        fn()
      })
    }
  }
 // 检查更新
  async check() {
    const newHtml = await this.getHtml()
    this.newScript = this.parserScript(newHtml)
    this.newEtag = await this.getEtag()
    this.compare()
  }
}

export const monitor = new Monitor()

// 路由前置守卫中调用
import { monitor } from './monitor'

monitor.on('update', () => {
  console.log('更新数据', monitor.value)
  Modal.confirm({
    title: '更新提示',
    icon: createVNode(ExclamationCircleOutlined),
    content: '版本有更新,是否刷新页面!',
    okText: '刷新',
    cancelText: '不刷新',
    onOk() {
      // 更新操作
      location.reload()
    },
    onCancel() {
      monitor.pause()
    },
  })
})

router.beforeEach((to, from, next) => {
    monitor.check()
})
3.2 websocket method
Since the back-end is not easy to communicate with, then implement a complete version yourself.
The specific process is as follows:
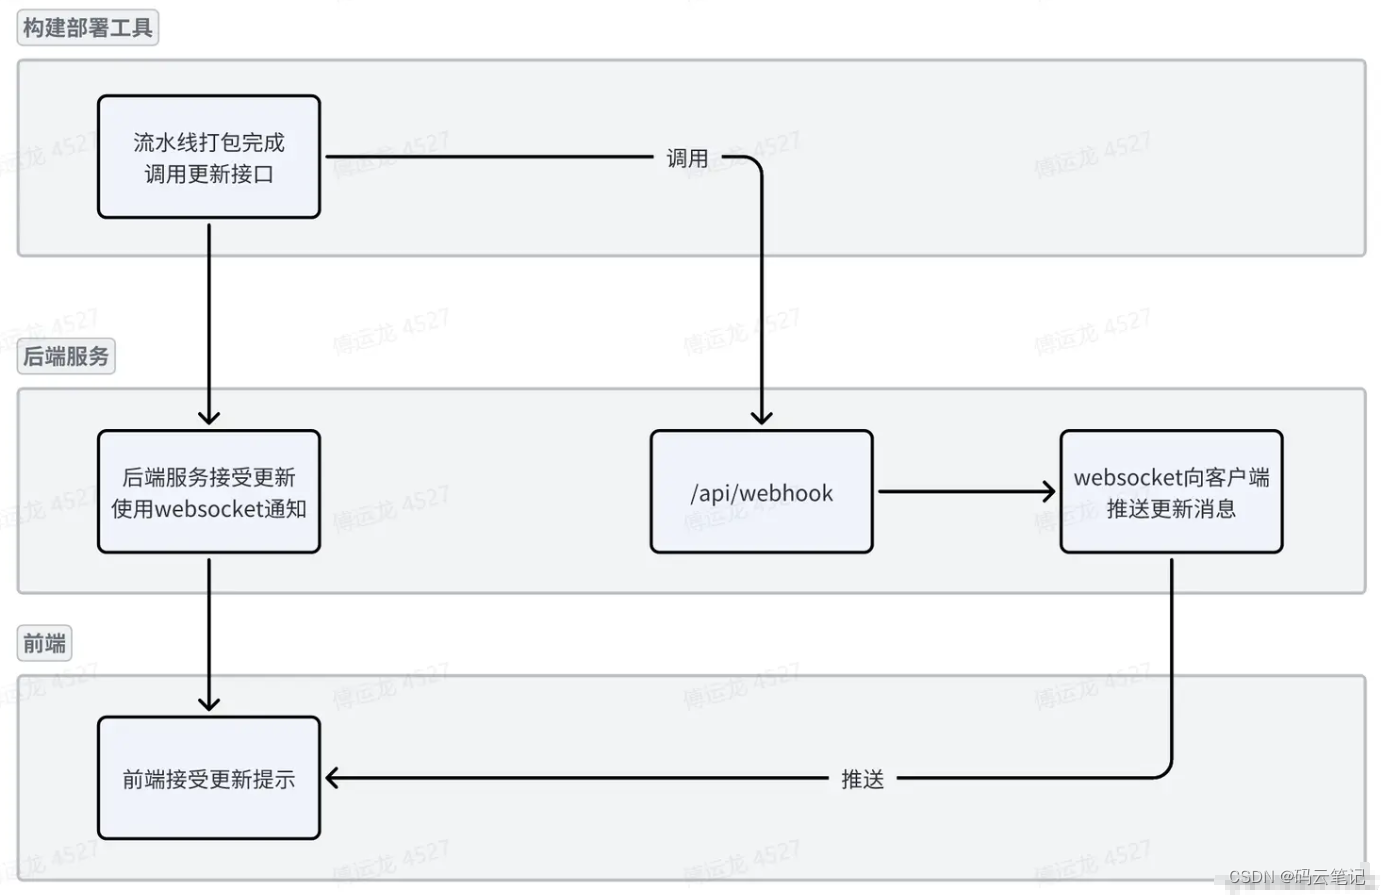
3.2.1 Code implementation
The server uses koa to implement:
// 引入依赖 koa koa-router koa-websocket short-uuid koa2-cors
const Koa = require('koa')
const Router = require('koa-router')
const websockify = require('koa-websocket')
const short = require('short-uuid')
const cors = require('koa2-cors')

const app = new Koa()
// 使用koa2-cors中间件解决跨域
app.use(cors())

const router = new Router()

//  使用 koa-websocket 将应用程序升级为 WebSocket 应用程序
const appWebSocket = websockify(app)

// 存储所有连接的客户端进行去重处理
const clients = new Set()

// 处理 WebSocket 连接
appWebSocket.ws.use((ctx, next) => {
  // 存储新连接的客户端
  clients.add(ctx.websocket)
  // 处理连接关闭事件
  ctx.websocket.on('close', () => {
    clients.delete(ctx.websocket)
  })
  ctx.websocket.on('message', (data) => {
    ctx.websocket(666)//JSON.stringify(data)
  })
  ctx.websocket.on('error', (err) => {
     clients.delete(ctx.websocket)
  })

  return next(ctx)
})

// 处理外部通知页面更新的接口
router.get('/api/webhook1', (ctx) => {
  // 向所有连接的客户端发送消息,使用uuid确保不重复
  clients.forEach((client) => {
    client.send(short.generate())
  })
  ctx.body = 'Message pushed successfully!'
})

// 将路由注册到应用程序
appWebSocket.use(router.routes()).use(router.allowedMethods())

// 启动服务器
appWebSocket.listen(3000, () => {
  console.log('Server started on port 3000')
})
Front-end page code:
Websocket is encapsulated using vueuse and maintains a heartbeat.
import { useWebSocket } from '@vueuse/core'
const { open, data } = useWebSocket('ws://hzsunrise.top/ws', {
heartbeat: {
message: 'ping',
interval: 5000,
pongTimeout: 10000,
},
immediate: true, // 自动连接
autoReconnect: {
retries: 6,
delay: 3000,
},
})
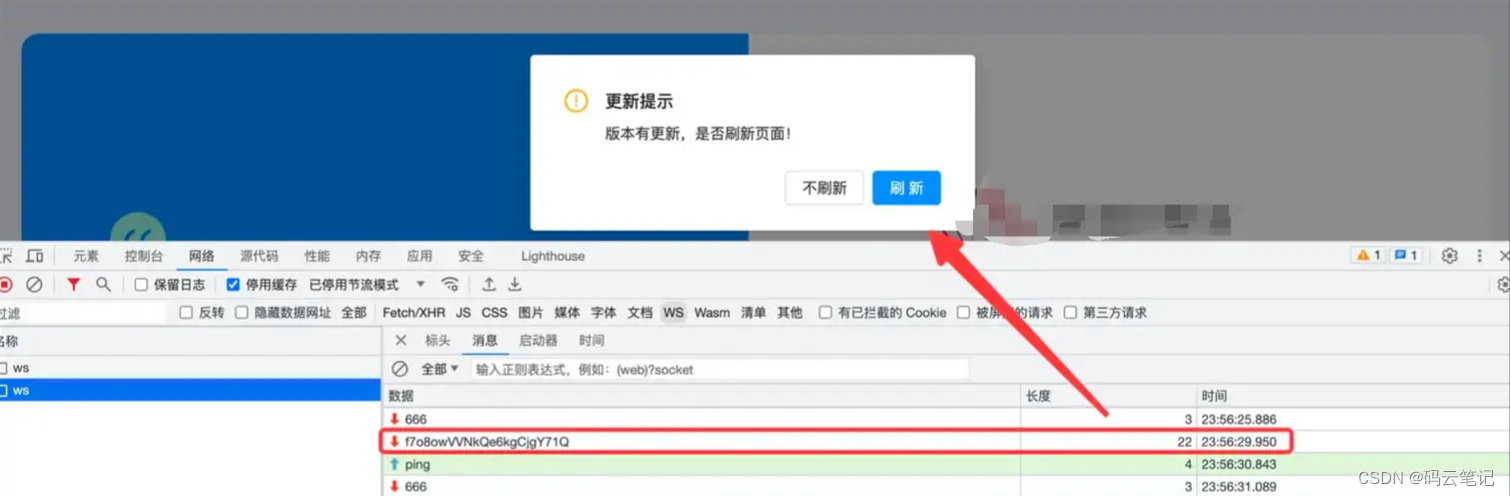
watch(data, (val) => {
if (val.length !== '3HkcPQUEdTpV6z735wxTum'.length) return
Modal.confirm({
title: '更新提示',
icon: createVNode(ExclamationCircleOutlined),
content: '版本有更新,是否刷新页面!',
okText: '刷新',
cancelText: '不刷新',
onOk() {
// 更新操作
location.reload()
},
onCancel() {},
})
})
// 建立连接
onMounted(() => {
open()
})
// 断开链接
onUnmounted(() => {
close()
})
3.2.2 Release and deployment
Backend deployment:
Consider that the node environment is not installed on the server, use docker to deploy directly, and use pm2 to run the node program.
- Write a DockerFile and publish the image
Pack the image locally and send it to docker hub, use docker build -t f5l5y5/websocket-server-image:v0.0.1 .the command to generate the image file, and use docker push f5l5y5/websocket-server-image:v0.0.1to push it to your remote warehouse
- The server pulls the image and runs
Pull the image:docker pull f5l5y5/websocket-server-image:v0.0.1
Run the image:docker run -d -p 3000:3000 --name websocket-server f5l5y5/websocket-server-image:v0.0.1
You can enter the container to view:docker exec -it <container_id> sh # 使用 sh 进入容器
Then check the running status of the container
At this time, access /api/webhook1will find the corresponding route of the project, and you need to configure nginx proxy forwarding.
- Configure nginx interface forwarding
map $http_upgrade $connection_upgrade {
    default upgrade;
    ''      close;
  }
server {
        listen     80;
        server_name  hzsunrise.top;
        client_max_body_size 50M;

        location / {
            root /usr/local/openresty/nginx/html/xxx-admin;
            try_files $uri $uri/ /index.html;
        }
        // 将触发的更新代理到容器的3000
        location /api/webhook1 {
         proxy_pass http://localhost:3000/api/webhook1;
         proxy_set_header Host $host;
         proxy_set_header X-Real-IP $remote_addr;
        }
        // websocket 配置
        location /ws {
          # 反向代理到容器中的WebSocket接口
          proxy_pass http://localhost:3000;
          # 支持WebSocket协议
          proxy_http_version 1.1;
          proxy_set_header Upgrade $http_upgrade;
          proxy_set_header Connection "Upgrade";
        }
}
3.2.3 Testing
Just request api/webhook with url
4. Summary
There are two main options in practice:
-
Polling calling scheme : polling to obtain the hash value or etag of the script file introduced by the web page. The advantage of this solution is that it is simple to implement, but it has the problems of high performance consumption and delay.
-
WebSocket version solution : Establish a WebSocket connection while deploying the front-end, and send notification of completion of the back-end construction and deployment to the front-end. When the backend completes deployment, a message is sent to the frontend via WebSocket, prompting the user to refresh the page to load the latest version. The advantages of this solution are good real-time performance and better user experience, but it requires corresponding configuration and code development on both the front end and the back end.
Choosing the appropriate solution depends on the specific needs and actual situation, it is for reference onlyO^O!