Alibaba Cloud OSS official website: OSS Management Console (aliyun.com)
What is Object Storage OSS
Alibaba Cloud Object Storage OSS (Object Storage Service) is a massive, secure, low-cost, and highly reliable cloud storage service that can provide 99.9999999999% (12 nines) data durability and 99.995% data availability. A variety of storage types are available to fully optimize storage costs.
OSS has a platform-independent RESTful API interface. You can store and access any type of data in any application, at any time and at any place.
You can use the API, SDK interface or OSS migration tool provided by Alibaba Cloud to easily move massive data into or out of Alibaba Cloud OSS. After data is stored in Alibaba Cloud OSS, you can choose Standard storage (Standard) as the main storage method for mobile applications, large websites, picture sharing, or hot audio and video, or you can choose low-frequency access storage with lower cost and longer storage period ( Infrequent Access), archive storage (Archive), and cold archive storage (Cold Archive) are used as storage methods for infrequently accessed data.
1. Open an account and create a space
- Create an Alibaba Cloud account
- Activate object storage OSS service
- Enter the OSS console and create a new OSS management console (aliyun.com) Bucket

The Bucket name can be filled in at will, and the region can be selected closest to our current region. Because it is a test, our storage type selects low-frequency access, and for the read and write permissions, we select Announcement Read.
4. After the creation is completed, click on the upper right corner to enter AccessKey and select to start using the sub-account Key.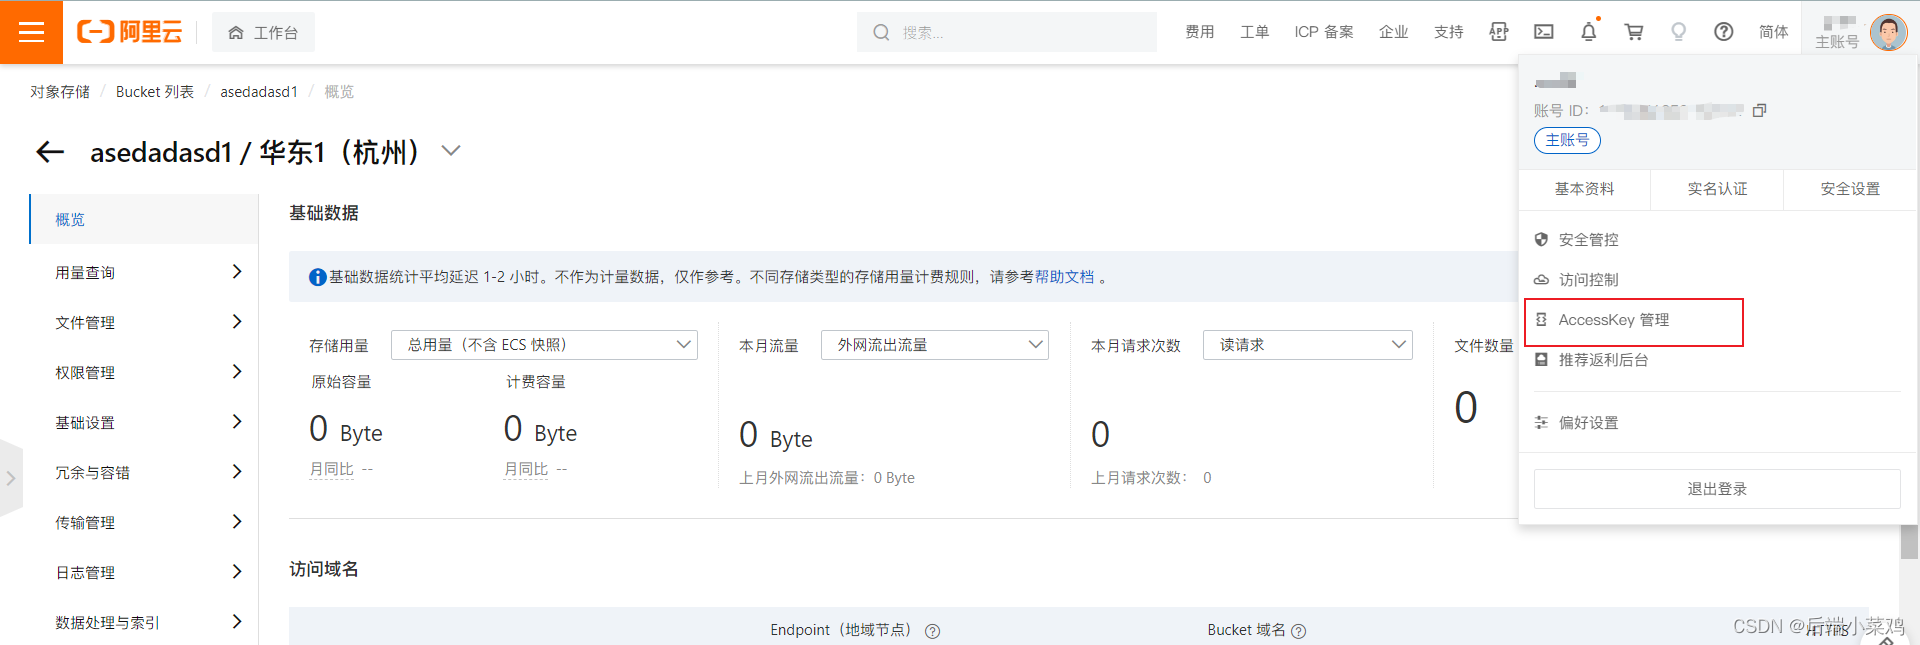

5. After creating the sub-account, keep the generated account and key. We will use this sub-account for operations in the future.
6. Our endpoint and other information can be viewed in the overview in the console
2. Simply use the OSS client in java to upload files to the server
- Import dependency spring-cloud-starter-alicloud-oss
      <dependency>
            <groupId>com.alibaba.cloud</groupId>
            <artifactId>spring-cloud-starter-alicloud-oss</artifactId>
            <version>2.2.0.RELEASE</version>
        </dependency>
2. Add configuration (access-key, secret-key, endoint)
spring:
  cloud:
    alicloud:
      access-key: 你的 access-key
      secret-key: 你的 secret-key
      oss:
        endpoint: oss-cn-shenzhen.aliyuncs.com
Note: endpoint is under the oss package
3. Write a test class to test uploading images to the OSS server
    @Resource
    OSS ossClient;

    @Test
    public void uploadDemo() throws FileNotFoundException {
        // 填写Bucket名称,例如examplebucket。
        String bucketName = "hola76";
        // 填写Object完整路径,完整路径中不能包含Bucket名称,例如exampledir/exampleobject.txt。
        String objectName = "1111727083.jpg";
        // 填写本地文件的完整路径,例如D:\\localpath\\examplefile.txt。
        // 如果未指定本地路径,则默认从示例程序所属项目对应本地路径中上传文件流。
        String filePath= "C:\\Users\\Administrator\\Pictures\\111727083.jpg";

        // 创建OSSClient实例。
        //OSS ossClient = new OSSClientBuilder().build(endpoint, accessKeyId, accessKeySecret);
        InputStream inputStream = new FileInputStream(filePath);
        // 创建PutObject请求。
        ossClient.putObject(bucketName, objectName, inputStream);
        System.out.println("上传成功!");
        ossClient.shutdown();

    }
4. Go to the console to view
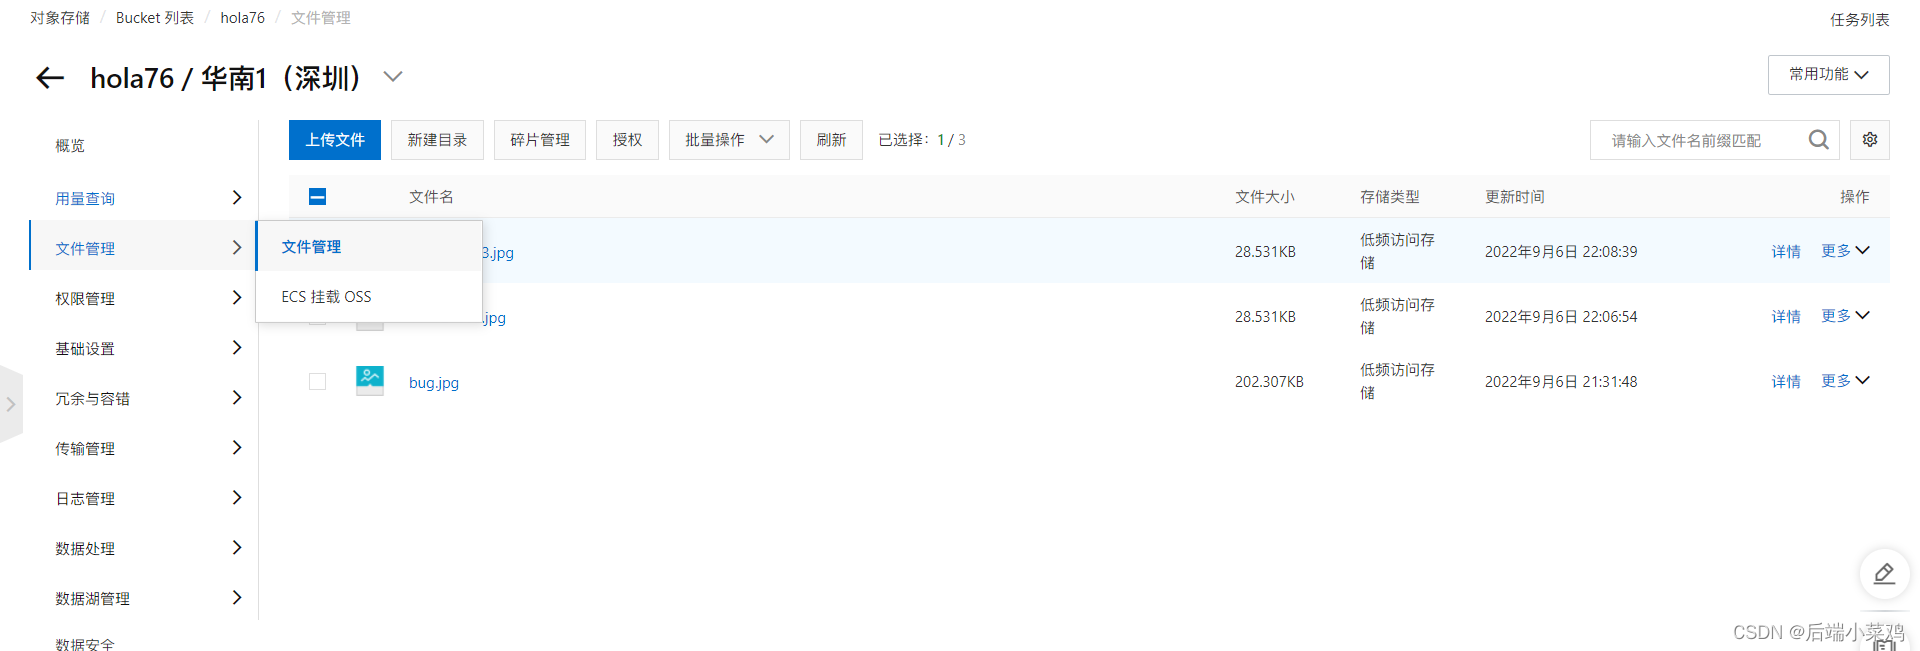
5. Picture uploaded successfully
3. Server-side signature direct transmission and set upload callback
Official document: Server-side signature and direct transmission (aliyun.com)
1.Process introduction
The process is shown in the figure below:
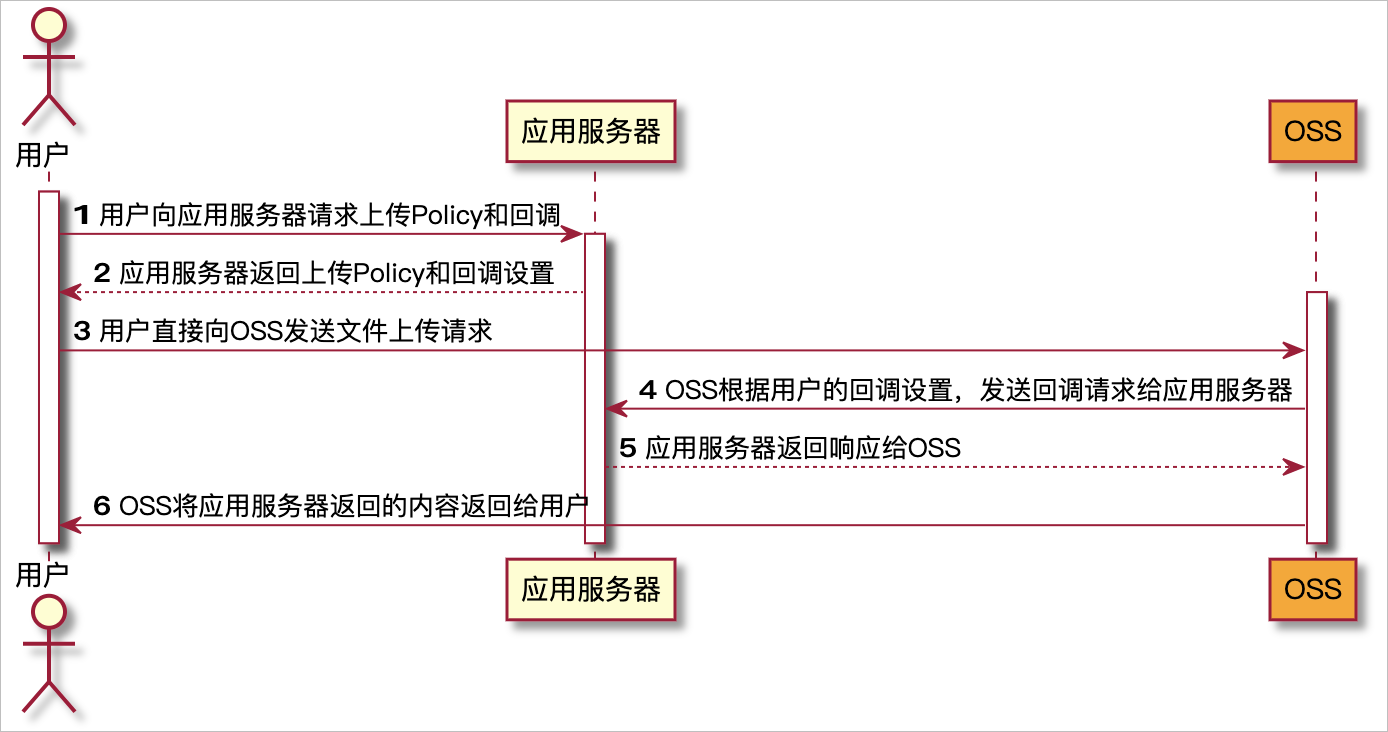
When a user wants to upload a file to OSS and wants to return the upload result to the application server, he needs to set a callback function to notify the application server of the request. After the user uploads the file, he will not get the return result directly. Instead, he will notify the application server first and then convey the result to the user.
2.JAVA implementation
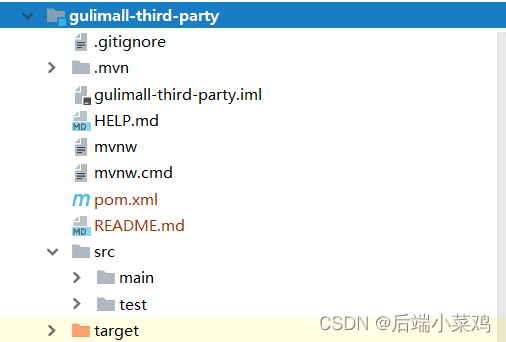
1. We will create a new project specifically to provide us with third-party services. The project structure is as follows
2. Introduce Alibaba Cloud OSS dependencies and openFeign dependencies (service registration and discovery are included in common)
<?xml version="1.0" encoding="UTF-8"?>
<project xmlns="http://maven.apache.org/POM/4.0.0" xmlns:xsi="http://www.w3.org/2001/XMLSchema-instance"
         xsi:schemaLocation="http://maven.apache.org/POM/4.0.0 https://maven.apache.org/xsd/maven-4.0.0.xsd">
    <modelVersion>4.0.0</modelVersion>
    <groupId>com.liucan.gulimall</groupId>
    <artifactId>gulimall-third-party</artifactId>
    <version>0.0.1-SNAPSHOT</version>
    <name>gulimall-third-party</name>
    <description>第三方服务</description>

    <properties>
        <java.version>1.8</java.version>
        <project.build.sourceEncoding>UTF-8</project.build.sourceEncoding>
        <project.reporting.outputEncoding>UTF-8</project.reporting.outputEncoding>
        <spring-boot.version>2.3.7.RELEASE</spring-boot.version>
        <spring-cloud.version>Hoxton.SR9</spring-cloud.version>
    </properties>

    <dependencies>
        <dependency>
            <groupId>com.liucan.gulimall</groupId>
            <artifactId>gulimall-common</artifactId>
            <version>0.0.1-SNAPSHOT</version>
            <exclusions>
                <exclusion>
                    <groupId>com.baomidou</groupId>
                    <artifactId>mybatis-plus-boot-starter</artifactId>
                </exclusion>
                <exclusion>
                    <groupId>mysql</groupId>
                    <artifactId>mysql-connector-java</artifactId>
                </exclusion>
            </exclusions>
        </dependency>
        <dependency>
            <groupId>org.springframework.boot</groupId>
            <artifactId>spring-boot-starter-web</artifactId>
        </dependency>
        <dependency>
            <groupId>com.alibaba.cloud</groupId>
            <artifactId>spring-cloud-starter-alicloud-oss</artifactId>
            <version>2.2.0.RELEASE</version>
        </dependency>
        <dependency>
            <groupId>org.springframework.cloud</groupId>
            <artifactId>spring-cloud-starter-bootstrap</artifactId>
            <version>3.1.1</version>
        </dependency>
        <dependency>
            <groupId>org.springframework.cloud</groupId>
            <artifactId>spring-cloud-starter-openfeign</artifactId>
        </dependency>
        <dependency>
            <groupId>org.springframework.boot</groupId>
            <artifactId>spring-boot-starter-test</artifactId>
            <scope>test</scope>
            <exclusions>
                <exclusion>
                    <groupId>org.junit.vintage</groupId>
                    <artifactId>junit-vintage-engine</artifactId>
                </exclusion>
                <exclusion>
                    <groupId>com.vaadin.external.google</groupId>
                    <artifactId>android-json</artifactId>
                </exclusion>
            </exclusions>
        </dependency>
        <dependency>
            <groupId>junit</groupId>
            <artifactId>junit</artifactId>
            <scope>test</scope>
        </dependency>
    </dependencies>

    <dependencyManagement>
        <dependencies>
            <dependency>
                <groupId>org.springframework.cloud</groupId>
                <artifactId>spring-cloud-dependencies</artifactId>
                <version>${spring-cloud.version}</version>
                <type>pom</type>
                <scope>import</scope>
            </dependency>
            <dependency>
                <groupId>com.alibaba.cloud</groupId>
                <artifactId>spring-cloud-alibaba-dependencies</artifactId>
                <version>2.2.8.RELEASE</version>
                <type>pom</type>
                <scope>import</scope>
            </dependency>

            <dependency>
                <groupId>org.springframework.boot</groupId>
                <artifactId>spring-boot-dependencies</artifactId>
                <version>${spring-boot.version}</version>
                <type>pom</type>
                <scope>import</scope>
            </dependency>
        </dependencies>
    </dependencyManagement>

    <build>
        <plugins>
            <plugin>
                <groupId>org.apache.maven.plugins</groupId>
                <artifactId>maven-compiler-plugin</artifactId>
                <version>3.8.1</version>
                <configuration>
                    <source>1.8</source>
                    <target>1.8</target>
                    <encoding>UTF-8</encoding>
                </configuration>
            </plugin>
            <plugin>
                <groupId>org.springframework.boot</groupId>
                <artifactId>spring-boot-maven-plugin</artifactId>
                <version>2.3.7.RELEASE</version>
                <configuration>
                    <mainClass>com.liucan.gulimall.thirdparty.GulimallThirdPartyApplication</mainClass>
                </configuration>
                <executions>
                    <execution>
                        <id>repackage</id>
                        <goals>
                            <goal>repackage</goal>
                        </goals>
                    </execution>
                </executions>
            </plugin>
        </plugins>
    </build>

</project>
3. Add @EnableDiscoveryClient to the startup class to enable service registration and discovery, and configure the registration center address in application.yml
spring:
  application:
    name: gulimall-third-party
  cloud:
    nacos:
      discovery:
        server-addr: 127.0.0.1:8848
server:
  port: 30000
import org.springframework.boot.SpringApplication;
import org.springframework.boot.autoconfigure.SpringBootApplication;
import org.springframework.cloud.client.discovery.EnableDiscoveryClient;
@EnableDiscoveryClient
@SpringBootApplication
public class GulimallThirdPartyApplication {
public static void main(String[] args) {
SpringApplication.run(GulimallThirdPartyApplication.class, args);
}
}4. Enter nacos and create a new namespace for the current service with dataId of third-party.

5. In nacos [Configuration Management]--[Configuration List], switch to the third-party namespace we just created and create a new configuration.

The configuration is as follows:

6. Create a new bootstrap.properties under the project resource to specify the address of our configuration center and the namespace to be read.
spring.cloud.nacos.config.server-addr=127.0.0.1:8848
spring.cloud.nacos.config.namespace=be8c72c0-916d-4bd8-8f80-14916ade1faf

spring.cloud.nacos.config.extension-configs[0].data-id=oss.yml
spring.cloud.nacos.config.extension-configs[0].group=DEFAULT_GROUP
spring.cloud.nacos.config.extension-configs[0].refresh=true
7. Create a new OSSContrller test to obtain the Policy signature
package com.liucan.gulimall.thirdparty.controller;

import com.aliyun.oss.OSS;
import com.aliyun.oss.OSSClientBuilder;
import com.aliyun.oss.common.utils.BinaryUtil;
import com.aliyun.oss.model.MatchMode;
import com.aliyun.oss.model.PolicyConditions;
import org.codehaus.jettison.json.JSONObject;
import org.springframework.beans.factory.annotation.Autowired;
import org.springframework.beans.factory.annotation.Value;
import org.springframework.web.bind.annotation.RequestMapping;
import org.springframework.web.bind.annotation.RestController;

import javax.annotation.Resource;
import java.text.SimpleDateFormat;
import java.util.Date;
import java.util.LinkedHashMap;
import java.util.Map;

@RestController
public class OSSCntroller {

    @Autowired
    OSS ossClient;

    @Value("${spring.cloud.alicloud.oss.endpoint}")
    private String endpoint;
    @Value("${spring.cloud.alicloud.access-key}")
    private String accessId;
    @Value("${spring.cloud.alicloud.secret-key}")
    private String accessKey;
    @Value("${spring.cloud.alicloud.oss.bucket}")
    private String bucket;

    @RequestMapping("/oss/policy")
    public Map<String, String> policy(){
        // 填写Host地址,格式为https://bucketname.endpoint。
        String host = "https://"+bucket+"."+endpoint;
        // 设置上传回调URL,即回调服务器地址,用于处理应用服务器与OSS之间的通信。OSS会在文件上传完成后,把文件上传信息通过此回调URL发送给应用服务器。
        String callbackUrl = "https://192.168.0.0:8888";
        // 设置上传到OSS文件的前缀,可置空此项。置空后,文件将上传至Bucket的根目录下。

        String dateDir = new SimpleDateFormat("yyyy-MM-dd").format(new Date());
        String dir = dateDir+"/";

        // 创建ossClient实例。
        OSS ossClient = new OSSClientBuilder().build(endpoint, accessId, accessKey);

        Map<String, String> respMap = null;
        try {
            long expireTime = 30;
            long expireEndTime = System.currentTimeMillis() + expireTime * 1000;
            Date expiration = new Date(expireEndTime);
            PolicyConditions policyConds = new PolicyConditions();
            policyConds.addConditionItem(PolicyConditions.COND_CONTENT_LENGTH_RANGE, 0, 1048576000);
            policyConds.addConditionItem(MatchMode.StartWith, PolicyConditions.COND_KEY, dir);

            String postPolicy = ossClient.generatePostPolicy(expiration, policyConds);
            byte[] binaryData = postPolicy.getBytes("utf-8");
            String encodedPolicy = BinaryUtil.toBase64String(binaryData);
            String postSignature = ossClient.calculatePostSignature(postPolicy);

            respMap = new LinkedHashMap<String, String>();
            respMap.put("accessId", accessId);
            respMap.put("policy", encodedPolicy);
            respMap.put("signature", postSignature);
            respMap.put("dir", dir);
            respMap.put("host", host);
            respMap.put("expire", String.valueOf(expireEndTime / 1000));
            // respMap.put("expire", formatISO8601Date(expiration));

            JSONObject jasonCallback = new JSONObject();
            jasonCallback.put("callbackUrl", callbackUrl);
            jasonCallback.put("callbackBody",
                    "filename=${object}&size=${size}&mimeType=${mimeType}&height=${imageInfo.height}&width=${imageInfo.width}");
            jasonCallback.put("callbackBodyType", "application/x-www-form-urlencoded");
            String base64CallbackBody = BinaryUtil.toBase64String(jasonCallback.toString().getBytes());
            respMap.put("callback", base64CallbackBody);
        } catch (Exception e) {
            // Assert.fail(e.getMessage());
            System.out.println(e.getMessage());
        }
        return respMap;
    }
}
8. Request localhost:30000/oss/policy
 After successfully obtaining the signature, the user first requests this interface before uploading the image, and then directly requests Alibaba Cloud with the signature returned by this interface. Then it can be directly uploaded to Alibaba Cloud OSS. The file stream does not need to be saved to our server and then forwarded. This is server-side signature direct transmission.
9. Hand over the service to Gateway for unified routing management
1. Add routing configuration in Gateway module
Our unified entrance to access OSS services is api/thirdparty/
spring:
  cloud:
    gateway:
      routes:
       - id: product_route
         uri: lb://gulimall-product #lb開啓負載均衡 路由到服務名為gulimall_product的服务
         predicates:
          - Path=/api/product/**
         filters:
          - RewritePath=/api/product/(?<segment>/?.*),/product/$\{segment}

       - id: third_party_route
         uri: lb://gulimall-third-party #lb開啓負載均衡 路由到服務名為gulimall-third-party的服务
         predicates:
          - Path=/api/thirdparty/**
         filters:
          - RewritePath=/api/thirdparty/(?<segment>/?.*),/$\{segment}

       - id: admin_route
         uri: lb://renren-fast #lb開啓負載均衡 路由到服務名為renren-fast的服务
         predicates:
         - Path=/api/**
         filters:
         - RewritePath=/api/(?<segment>/?.*),/renren-fast/$\{segment}
2. Restart Gateway and visit
![]()

4. OOS front-end and back-end joint debugging test upload
1. Create a new folder upload in src/components to store uploaded components:
policy.js:
import http from '@/utils/httpRequest.js'
export function policy() {
   return  new Promise((resolve,reject)=>{
        http({
            url: http.adornUrl("/thirdparty/oss/policy"),
            method: "get",
            params: http.adornParams({})
        }).then(({ data }) => {
            resolve(data);
        })
    });
}
singleUpload.vue: (change the upload path to our Bucket public domain name, which can be viewed on the OSS console)
<template>
  <div>
    <el-upload action="http://hola76.oss-cn-shenzhen.aliyuncs.com" :data="dataObj" list-type="picture" :multiple="false" :show-file-list="showFileList" :file-list="fileList" :before-upload="beforeUpload" :on-remove="handleRemove" :on-success="handleUploadSuccess" :on-preview="handlePreview">
      <el-button size="small" type="primary">点击上传</el-button>
      <div slot="tip" class="el-upload__tip">只能上传jpg/png文件,且不超过10MB</div>
    </el-upload>
    <el-dialog :visible.sync="dialogVisible">
      <img width="100%" :src="fileList[0].url" alt="">
    </el-dialog>
  </div>
</template>
<script>
import { policy } from './policy'
import { getUUID } from '@/utils'

export default {
  name: 'singleUpload',
  props: {
    value: String
  },
  computed: {
    imageUrl() {
      return this.value
    },
    imageName() {
      if (this.value != null && this.value !== '') {
        return this.value.substr(this.value.lastIndexOf('/') + 1)
      } else {
        return null
      }
    },
    fileList() {
      return [
        {
          name: this.imageName,
          url: this.imageUrl
        }
      ]
    },
    showFileList: {
      get: function () {
        return this.value !== null && this.value !== '' && this.value !== undefined
      },
      set: function (newValue) {}
    }
  },
  data() {
    return {
      dataObj: {
        policy: '',
        signature: '',
        key: '',
        ossaccessKeyId: '',
        dir: '',
        host: ''
        // callback:'',
      },
      dialogVisible: false
    }
  },
  methods: {
    emitInput(val) {
      this.$emit('input', val)
    },
    handleRemove(file, fileList) {
      this.emitInput('')
    },
    handlePreview(file) {
      this.dialogVisible = true
    },
    beforeUpload(file) {
      let _self = this
      return new Promise((resolve, reject) => {
        policy()
          .then(response => {
            _self.dataObj.policy = response.data.policy
            _self.dataObj.signature = response.data.signature
            _self.dataObj.ossaccessKeyId = response.data.accessid
            _self.dataObj.key = response.data.dir + '/' + getUUID() + '_${filename}'
            _self.dataObj.dir = response.data.dir
            _self.dataObj.host = response.data.host
            resolve(true)
          })
          .catch(err => {
            reject(false)
          })
      })
    },
    handleUploadSuccess(res, file) {
      console.log('上传成功...')
      this.showFileList = true
      this.fileList.pop()
      this.fileList.push({ name: file.name, url: this.dataObj.host + '/' + this.dataObj.key.replace('${filename}', file.name) })
      this.emitInput(this.fileList[0].url)
    }
  }
}
</script>
<style>
</style>
multiUpload.vue: (change the upload path to our Bucket public domain name, which can be viewed on the OSS console)
<template>
  <div>
    <el-upload action="http://hola76.oss-cn-shenzhen.aliyuncs.com" :data="dataObj" list-type="picture-card" :file-list="fileList" :before-upload="beforeUpload" :on-remove="handleRemove" :on-success="handleUploadSuccess" :on-preview="handlePreview" :limit="maxCount" :on-exceed="handleExceed">
      <i class="el-icon-plus"></i>
    </el-upload>
    <el-dialog :visible.sync="dialogVisible">
      <img width="100%" :src="dialogImageUrl" alt />
    </el-dialog>
  </div>
</template>
<script>
import { policy } from './policy'
import { getUUID } from '@/utils'
export default {
  name: 'multiUpload',
  props: {
    //图片属性数组
    value: Array,
    //最大上传图片数量
    maxCount: {
      type: Number,
      default: 30
    }
  },
  data() {
    return {
      dataObj: {
        policy: '',
        signature: '',
        key: '',
        ossaccessKeyId: '',
        dir: '',
        host: '',
        uuid: ''
      },
      dialogVisible: false,
      dialogImageUrl: null
    }
  },
  computed: {
    fileList() {
      let fileList = []
      for (let i = 0; i < this.value.length; i++) {
        fileList.push({ url: this.value[i] })
      }

      return fileList
    }
  },
  mounted() {},
  methods: {
    emitInput(fileList) {
      let value = []
      for (let i = 0; i < fileList.length; i++) {
        value.push(fileList[i].url)
      }
      this.$emit('input', value)
    },
    handleRemove(file, fileList) {
      this.emitInput(fileList)
    },
    handlePreview(file) {
      this.dialogVisible = true
      this.dialogImageUrl = file.url
    },
    beforeUpload(file) {
      let _self = this
      return new Promise((resolve, reject) => {
        policy()
          .then(response => {
            console.log('这是什么${filename}')
            _self.dataObj.policy = response.data.policy
            _self.dataObj.signature = response.data.signature
            _self.dataObj.ossaccessKeyId = response.data.accessid
            _self.dataObj.key = response.data.dir + '/' + getUUID() + '_${filename}'
            _self.dataObj.dir = response.data.dir
            _self.dataObj.host = response.data.host
            resolve(true)
          })
          .catch(err => {
            console.log('出错了...', err)
            reject(false)
          })
      })
    },
    handleUploadSuccess(res, file) {
      this.fileList.push({
        name: file.name,
        // url: this.dataObj.host + "/" + this.dataObj.dir + "/" + file.name; 替换${filename}为真正的文件名
        url: this.dataObj.host + '/' + this.dataObj.key.replace('${filename}', file.name)
      })
      this.emitInput(this.fileList)
    },
    handleExceed(files, fileList) {
      this.$message({
        message: '最多只能上传' + this.maxCount + '张图片',
        type: 'warning',
        duration: 1000
      })
    }
  }
}
</script>
<style>
</style>
2.Introduce and use components in brand.vue
<single-upload></single-upload>

<script>
import singleUpload from '../../../components/upload/singleUpload.vue'
</script>
3. Effect
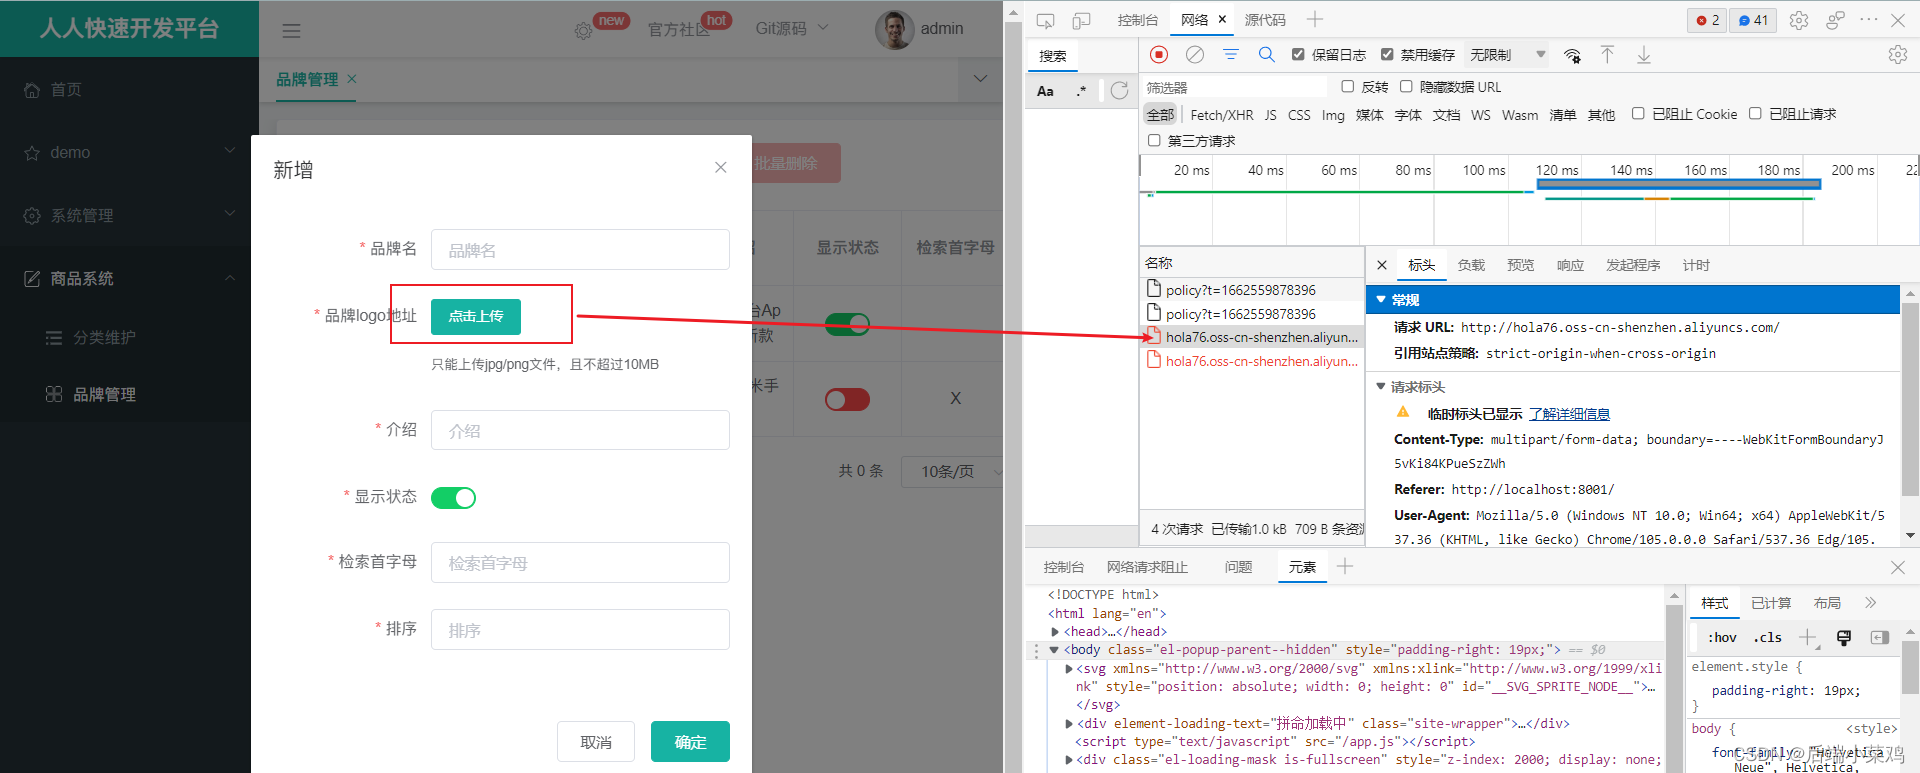
It was found that a cross-domain problem occurred when requesting to upload Alibaba Cloud OSS.
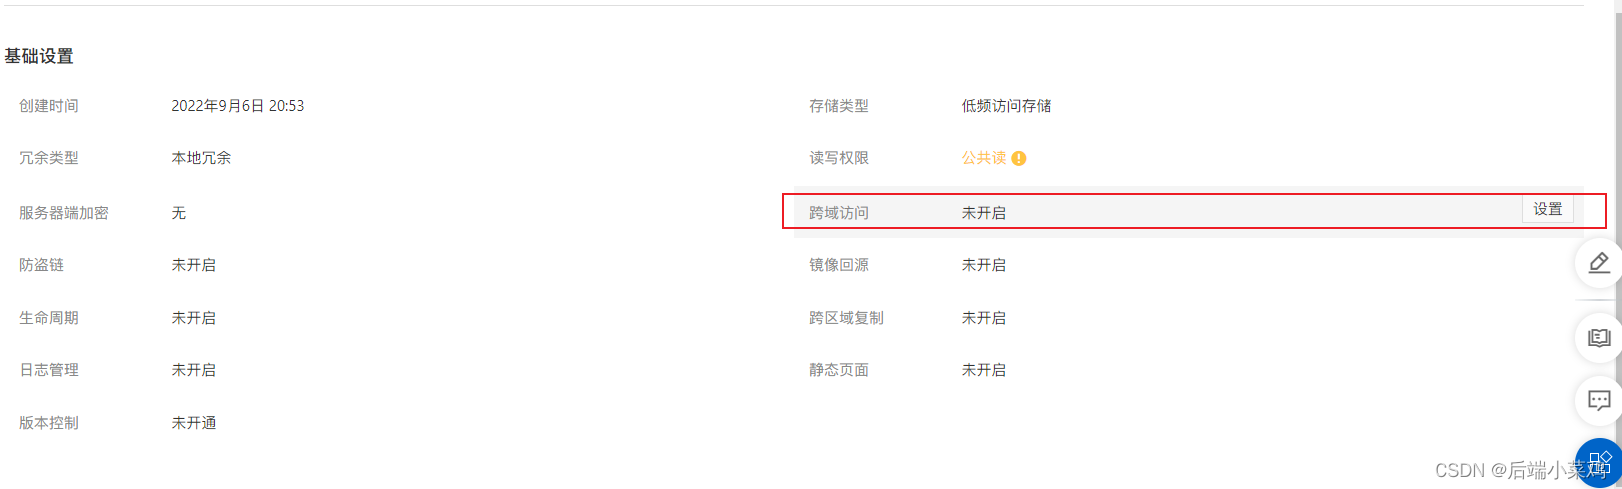
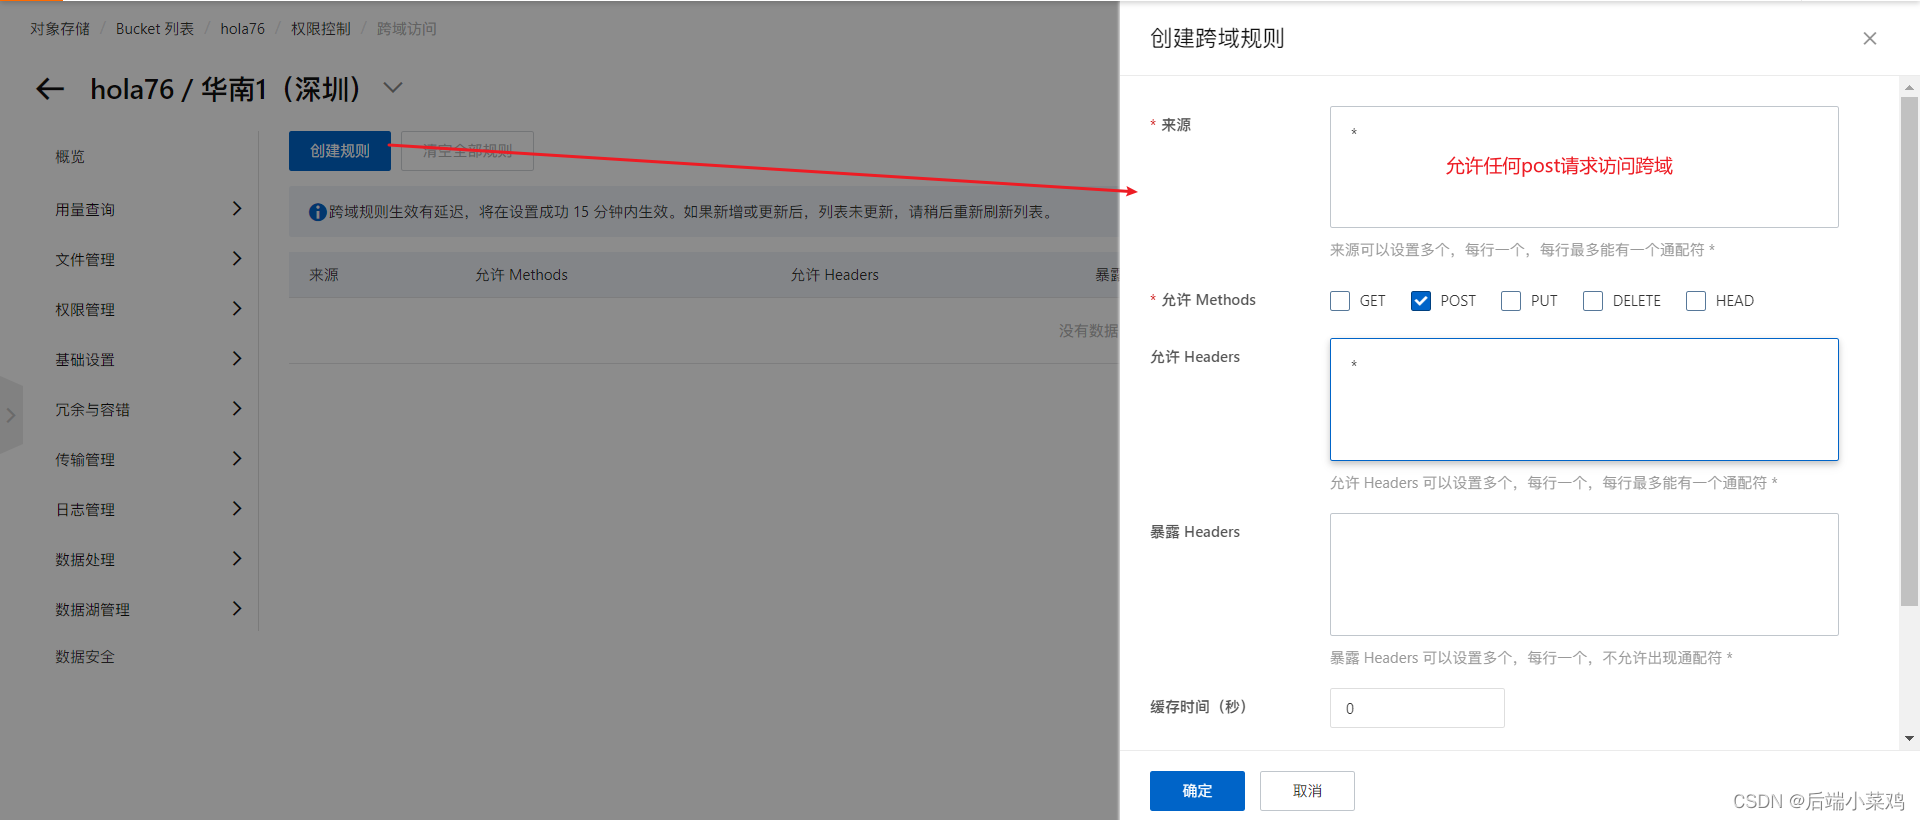
4. Enable cross-domain access in the OSS console
5. Test
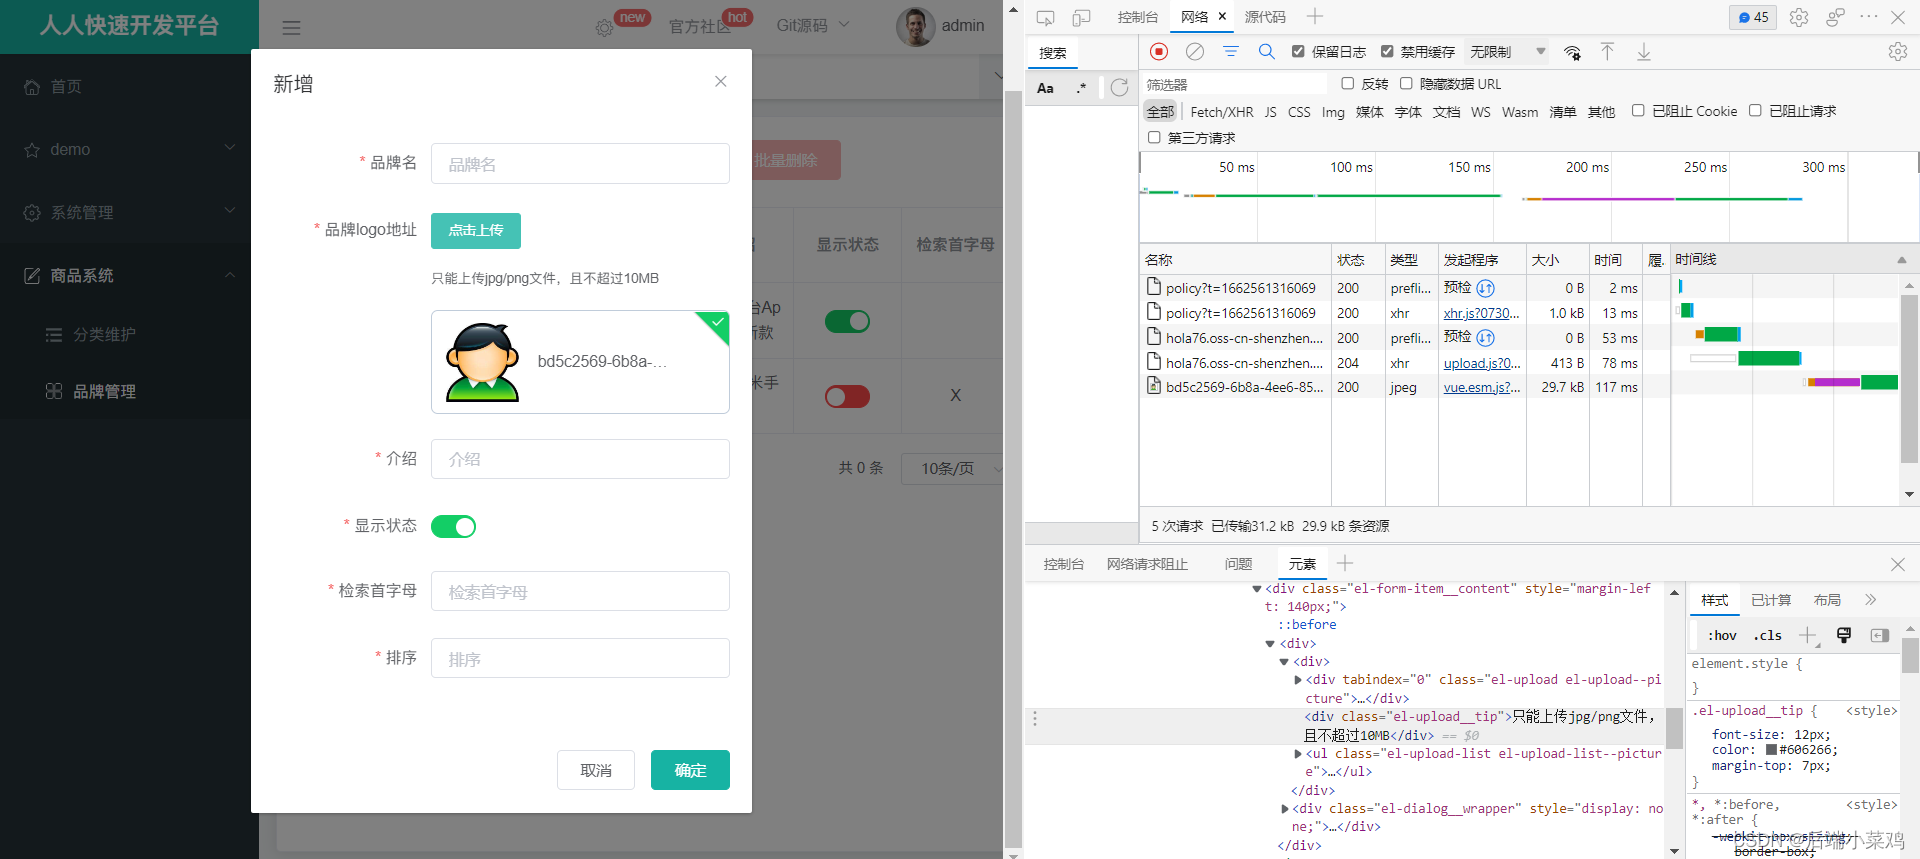

Approximate process: Click on the front end to upload the image -> request the policy to obtain the signature data -> submit the signature data and file stream to Alibaba Cloud -> Alibaba Cloud for verification and storage