Installation process reference: Ubuntu18 configures a deep learning environment compatible with ROS (Anaconda3+PyTorch1.10+python3.8+cuda10.2)_ubuntu18 uses conda in ros_ice cream blog-CSDN blog
environment:
Ubuntu 18
Gtx 1066
Possible problems and errors:
Problem 1. CUDA cannot run nvcc -V after installation
Command 'nvcc' not found, but can be installed with: sudo apt install nvidia-cuda-toolkit
Answer: There are two situations. In the first case, it is downloaded through the command line or the official website, just add the path. In the second case, it is installed through Conda, so don't worry about it. Let's use another method to verify whether CUDA is installed in place.
Reference solution for the first case: nvcc -V and nvidia -smi under Linux have been installed but command not found, but can be installed with: Problem_superheroy's blog-CSDN blog Solution for the second case (you can go directly to the end of the article See installation method)
Skip this command and type the command in the conda environment you created
conda list
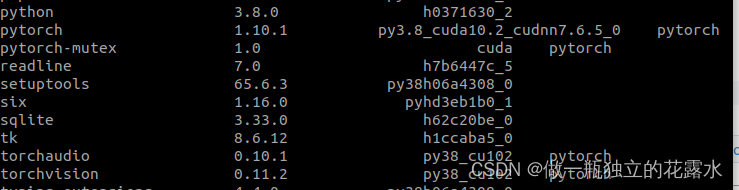 Find pytorch in the pop-up information. The following string is py3.8_cuda10.2_cudnn7.6, which means that your CUDA is installed (you have read this article, I guess you have not installed it), and the following string is py3.8_cpu or If it says "cpu", it means your installation failed.
So far, the problem of checking whether CUDA is installed is solved.
If Conda cannot find the version you specified, it will install a CPU version to fool you. Here is the core part:
The blog you found on the Internet is well installed, but why can't it work here? You must have specified the environment: Ubuntu18 Anaconda gtx1060 (or 1065, 1066), then the problem lies in timeliness. This is a Very stringent conditions, which may change within a few months
conda install pytorch torchvision cudatoolkit=10.2 -c pytorchFor example, if you execute the above command (only the CUDA version is specified) at this time, you will get a CPU version of pytorch. Try the following command:
conda install pytorch==1.9.0 torchvision==0.10.0 torchaudio==0.9.0 cudatoolkit=11.3 -c pytorch -c conda-forgeAfter I executed this command, CUDA was finally installed successfully (or in other words, the GPU version of pytorch was finally installed successfully), but there were still potential problems. I found that conda was installed 1.10.0 after executing this command. pytorch is different from what I specified. This reminds me that if the readers who read this article read it three months after I wrote this blog, wouldn't this method be invalid again? I hope this blog can be used in It has been effective for a long time, which is also the most basic goal of every blog I write.
The simplest and most effective method
Go to the official website to check the command, it's that simple. You will definitely curse, but please be patient and read it, you will gain a little bit.
PyTorch An open source machine learning framework that accelerates the path from research prototyping to production deployment. https://pytorch.org/Slide to this location
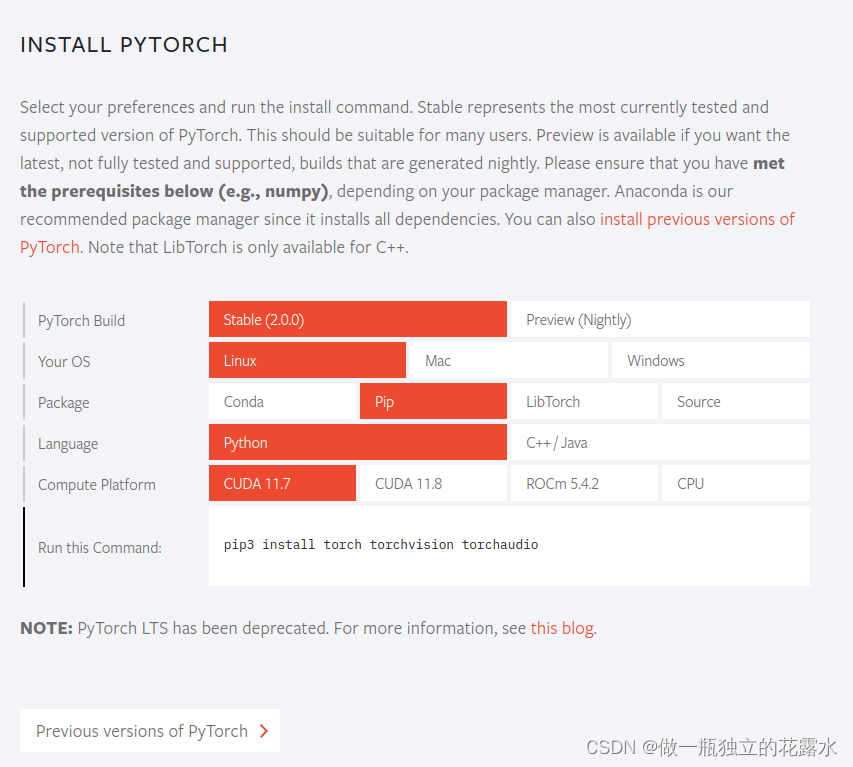
Notice that there is "Previous versions of Pytorch" at the bottom, click on it
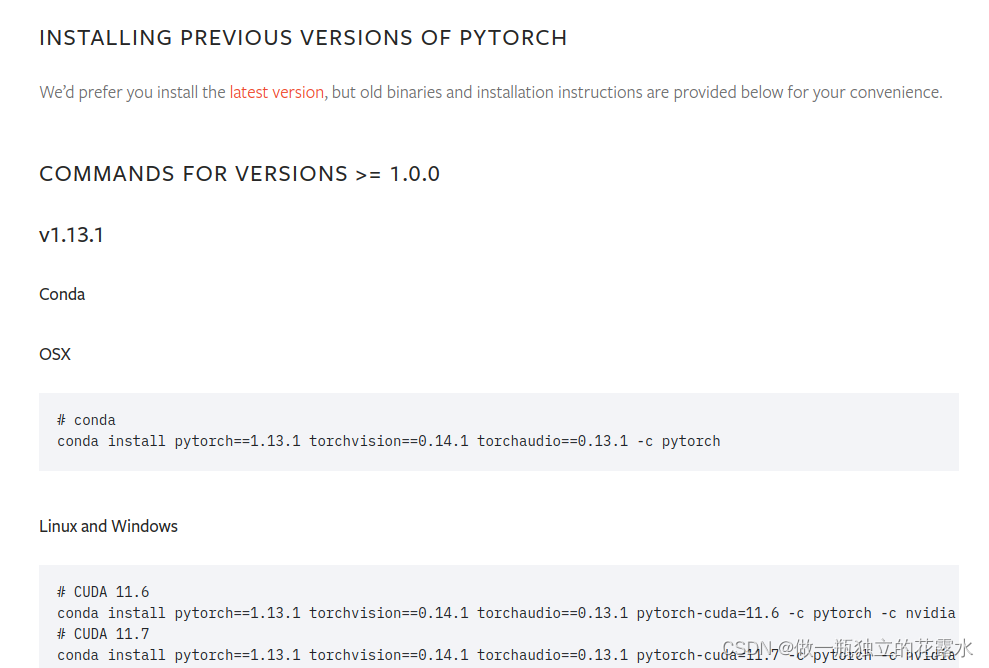
v1.13.1 is the version of pytorch.
If you have a 1060 graphics card, you can find commands before CUDA 11.4.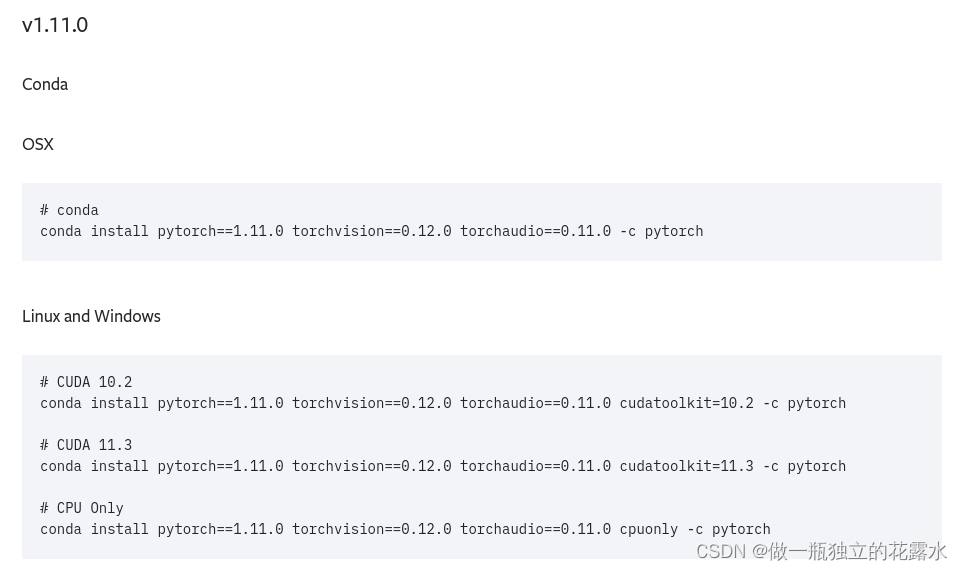
For example, 1.11.0 has commands for CUDA10.2 and CUDA11.3, both of which are acceptable.
No matter when you install it, you will definitely be able to find a version that is not invalid (not so new that it does not support your graphics card, but not so old that it cannot run the source code you find)
Welcome to leave a message
appendix
Installation process:
1. Install Anaconda3
wget https://repo.anaconda.com/archive/Anaconda3-2021.05-Linux-x86_64.sh
bash Anaconda3-2021.05-Linux-x86_64.sh -p ~/Package/anaconda3 -u
press Enter, Then enter yes, and then the installation is successful.2. In order to eliminate conflicts with ros,
sudo gedit .bashrc
comments out the originally added anaconda comment
source .bashrc.
From now on, you must enter source ~/Package/anaconda3/bin/activate every time you start it.
3. Check the installation results.
Enter conda --version
python Ctrl+z to exit.4. Create the virtual environment mytorch
conda create -n mytorch python=3.8
activate the virtual environment
conda activate mytorch5. Install the graphics card driver
. Open the terminal, enter ubuntu-drivers devices,
which is marked recommended, that is, open the software and update for the recommended driver
-> select the additional driver -> select the driver nvidia-driver-470 that you just found and recommended for installation -> click Apply changes
-> wait, then install is complete -> reboot6. Install pytorch in mytorch
conda install pytorch==1.10.0 torchvision==0.11.0 torchaudio==0.10.0 cudatoolkit=10.2 -c pytorch
Possible commands:
Activate anaconda environment
source ~/Package/anaconda3/bin/activate
conda activate mytorchLaunch the camera's ros command
roslaunch realsense2_camera rs_camera.launchAttachment: conda related commands
# Create a new environment
conda create -n mytorch python==3.8
# Activate the environment
conda activate mytorch
# Delete the environment
conda remove -n mytorch --all
# Exit the current environment
conda deactivate
# View those virtual environments
conda env list
# Check which packages a certain virtual environment has
conda list