Make macOS Mojave USB boot disk
Step1 : Preparation
First, prepare a USB flash drive with a capacity of 8GB or larger and back up all the data in it.
Step2 : Download MacOS system
Download the installer for the official version of macOS Mojave and set it aside. Do not start the installation yet.
Step3 : Format U disk
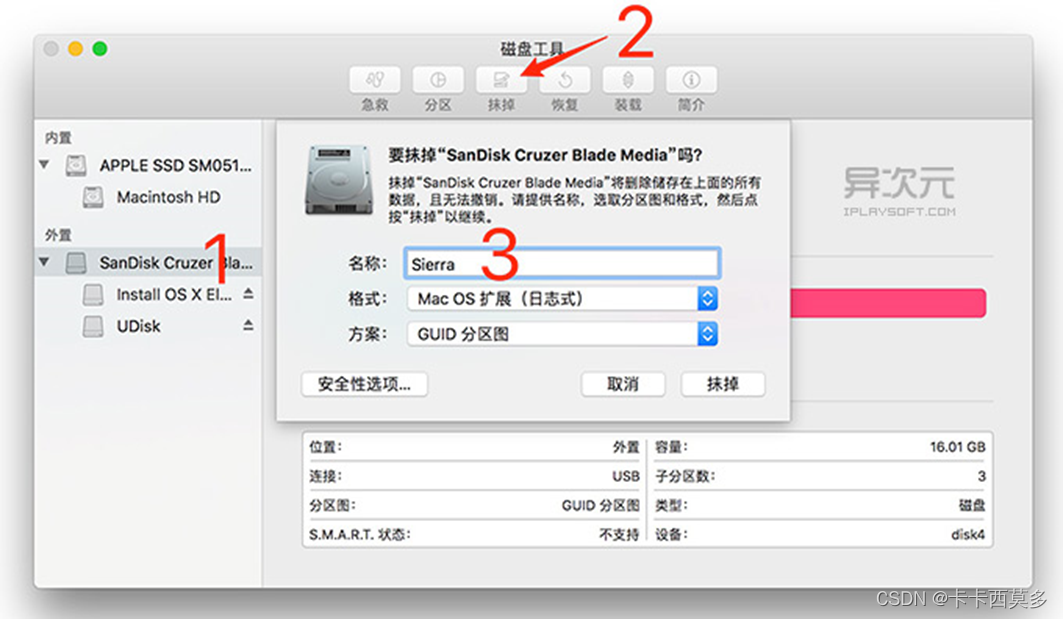
Open " Applications → Utilities → Disk Utility " , "erase" ( format ) the U disk into " Mac OS X Extended (Journaled) " format, GUID partition map, and name the U disk " Mojave " ( Number 3 in the picture below ) . Note: The drive letter name must be consistent with the name in the following command. You need to read it carefully . Many novices tend to make mistakes here .)
Step4 : Use terminal to copy
Open " Applications → Utilities → Terminal " and copy and paste the following command into it:
If you want to create a macOS Mojave boot disk , change the name of the USB disk to " Mojave " ( must correspond to the following command ) , and then copy this command:
sudo /Applications/Install\ macOS\ Mojave.app/Contents/Resources/createinstallmedia --volume /Volumes/Mojave /Applications/Install\ macOS\ Mojave.app --nointeractionIf you want to create a macOS High Sierra boot disk , the USB disk name needs to be changed to " High Sierra " ( corresponding to the following command ) , copy this command:
sudo /Applications/Install\ macOS\ High\ Sierra.app/Contents/Resources/createinstallmedia --volume /Volumes/HighSierra --applicationpath /Applications/Install\ macOS\ High\ Sierra.app --nointeractionIf you want to create an " older version of macOS Sierra ", change the name of the USB flash drive to " Sierra " and copy this command:
sudo /Applications/Install\ macOS\ Sierra.app/Contents/Resources/createinstallmedia --volume /Volumes/Sierra --applicationpath /Applications/Install\ macOS\ Sierra.app --nointeractionIf you want to create macOS 14 beta1 (recommended partition 16G), change the USB disk name to " Sonoma " and copy this command:
sudo /Applications/Install\ macOS\ 14\ beta.app/Contents/Resources/createinstallmedia --volume /Volumes/Sonoma /Applications/Install\ macOS\ 14\ beta.app --nointeractionIf you want to create macOS13.0 (recommended partition 13G), change the USB disk name to " 13 " and copy this command:
sudo "/Applications/Install macOS Ventura.app/Contents/Resources/createinstallmedia" --volume "/Volumes/13" --nointeractionIf you want to create macOS12.6 (recommended partition 13G), change the USB disk name to " 12 " and copy this command:
sudo /Applications/Install\ macOS\ Monterey.app/Contents/Resources/createinstallmedia --volume /Volumes/12
If you want to create macOS11.6.8 (recommended partition 13G), change the USB disk name to " 11 " and copy this command:
sudo /Applications/Install\ macOS\ Big\ Sur.app/Contents/Resources/createinstallmedia --volume /Volumes/11If you want to create macOS10.15.7 (recommended partition 9G), change the name of the USB disk to " 10.15 " and copy this command:
sudo /Applications/Install\ macOS\ Catalina.app/Contents/Resources/createinstallmedia --volume /Volumes/10.15 If you want to create macOS10.14.6 (recommended partition 6G), change the USB disk name to " 10.14 " and copy this command:
sudo /Applications/Install\ macOS\ Mojave.app/Contents/Resources/createinstallmedia --volume /Volumes/10.14If you want to create macOS10.13.6 (recommended partition 6G), change the USB disk name to " 10.13 " and copy this command:
sudo /Applications/Install\ macOS\ High\ Sierra.app/Contents/Resources/createinstallmedia --volume /Volumes/10.13
If you want to create macOS10.12.6 (recommended partition 6G), change the USB disk name to " 10.12 " and copy this command:
sudo /Applications/Install\ macOS\ Sierra.app/Contents/Resources/createinstallmedia --volume /Volumes/10.12 --applicationpath /Applications/Install\ macOS\ Sierra.app
Most of the commands are very similar. There are two differences. One is the macOS version code, and the other is the name of the USB flash drive.
Step5 : Under production
Press Enter and execute the command. You will be prompted to enter the administrator password and the production process will begin: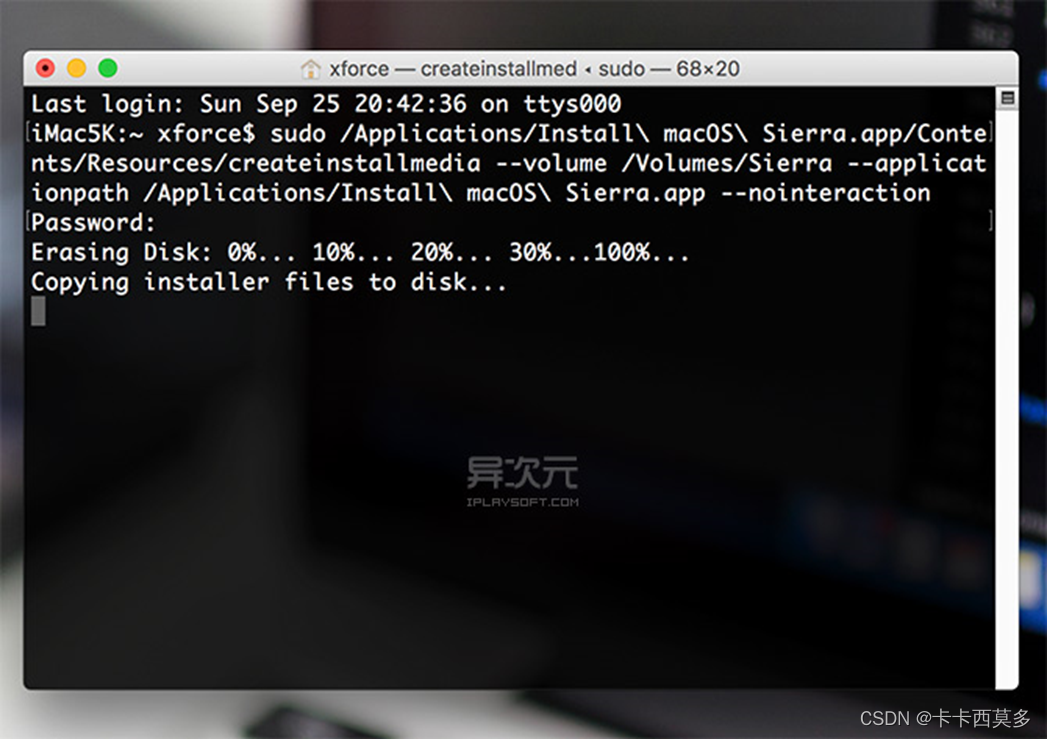
Step6 : End
As shown in the picture above, the system is already under production at this time. Please wait patiently until the word "Done." appears at the end of the screen , which means you are done!
How to install macOS Mojave via USB flash drive / format and reinstall (wipe the disk and install the system new)
After you create the macOS Mojave installation USB flash drive, you can use it to format and reinstall your Mac computer ( wipe disk installation ) . The operation method is very simple:
Step1: Back up data
However, you still need to find a way to back up all the important data in your Mac .
Step2: Insert the USB disk
Plug in the prepared installation USB disk. If the system can recognize it, then we will shut down first.
Step3: Boot into the USB flash drive
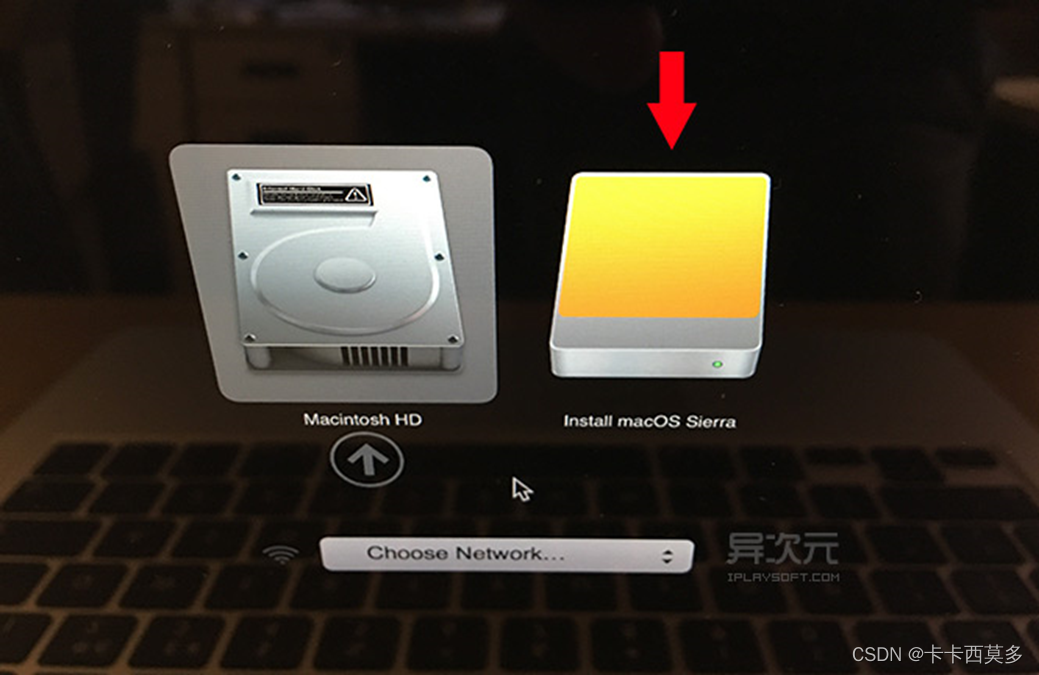
Press the power button to turn on the computer. When you hear a " dang " sound, hold down the Option key until the boot menu option appears:
Step4: Installation
At this time, select the installation USB disk ( yellow icon ) and press Enter to start the installation. During the process, you can use " Disk Utility " to format or repartition the Mac 's disk.
Step5: End
After that, it is a step-by-step installation until it is completed.