Environment: vue3 +setup syntax
First put the link to the official documentation:
Chinese version: vue.draggable.next Chinese documentation - itxst.com (folk translation)
English version: GitHub - SortableJS/vue.draggable.next: Vue 3 compatible drag-and-drop component based on Sortable.js
Because in the process of writing by myself, the official documents and online information are very unclear, and the versions used are different, so it is easy to get into trouble. After I finish writing, I will summarize it and share my encouragement with you.
(1) First, clarify the needs:
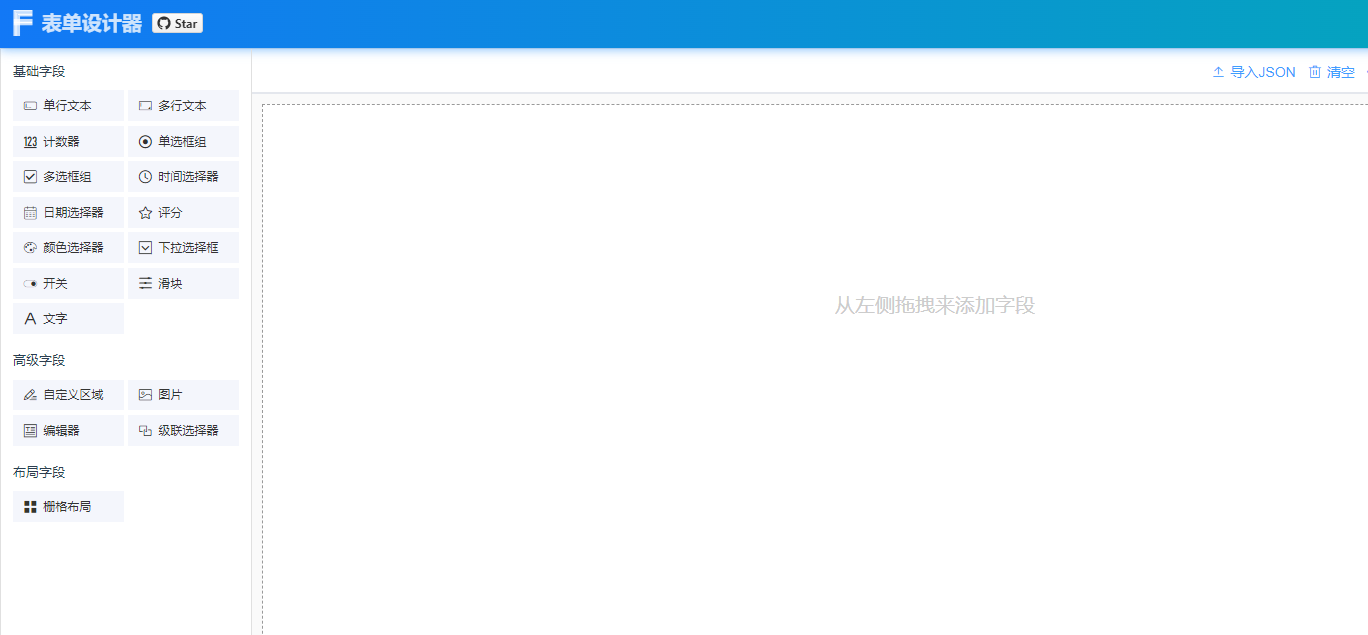
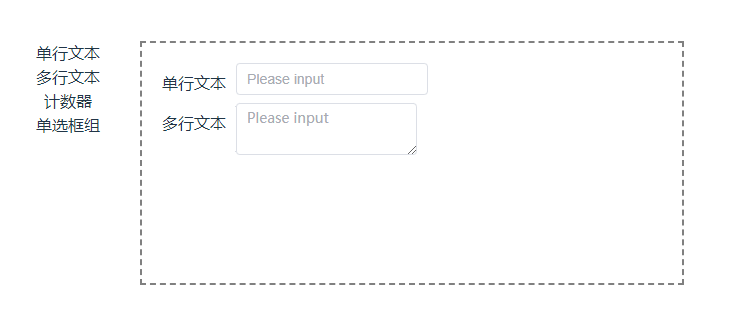
Make a table designer that can be repeatedly dragged and dropped. The rendering is as follows:
(2) Build a basic framework that can be dragged to each other
(1) Use the npm command in the terminal to download the plug-in
npm i -S vuedraggable@next

//导入
import draggable from 'vuedraggable'
(2) Drag-and-drop plug-ins can be roughly divided into two ways of use - group drag and single group drag.
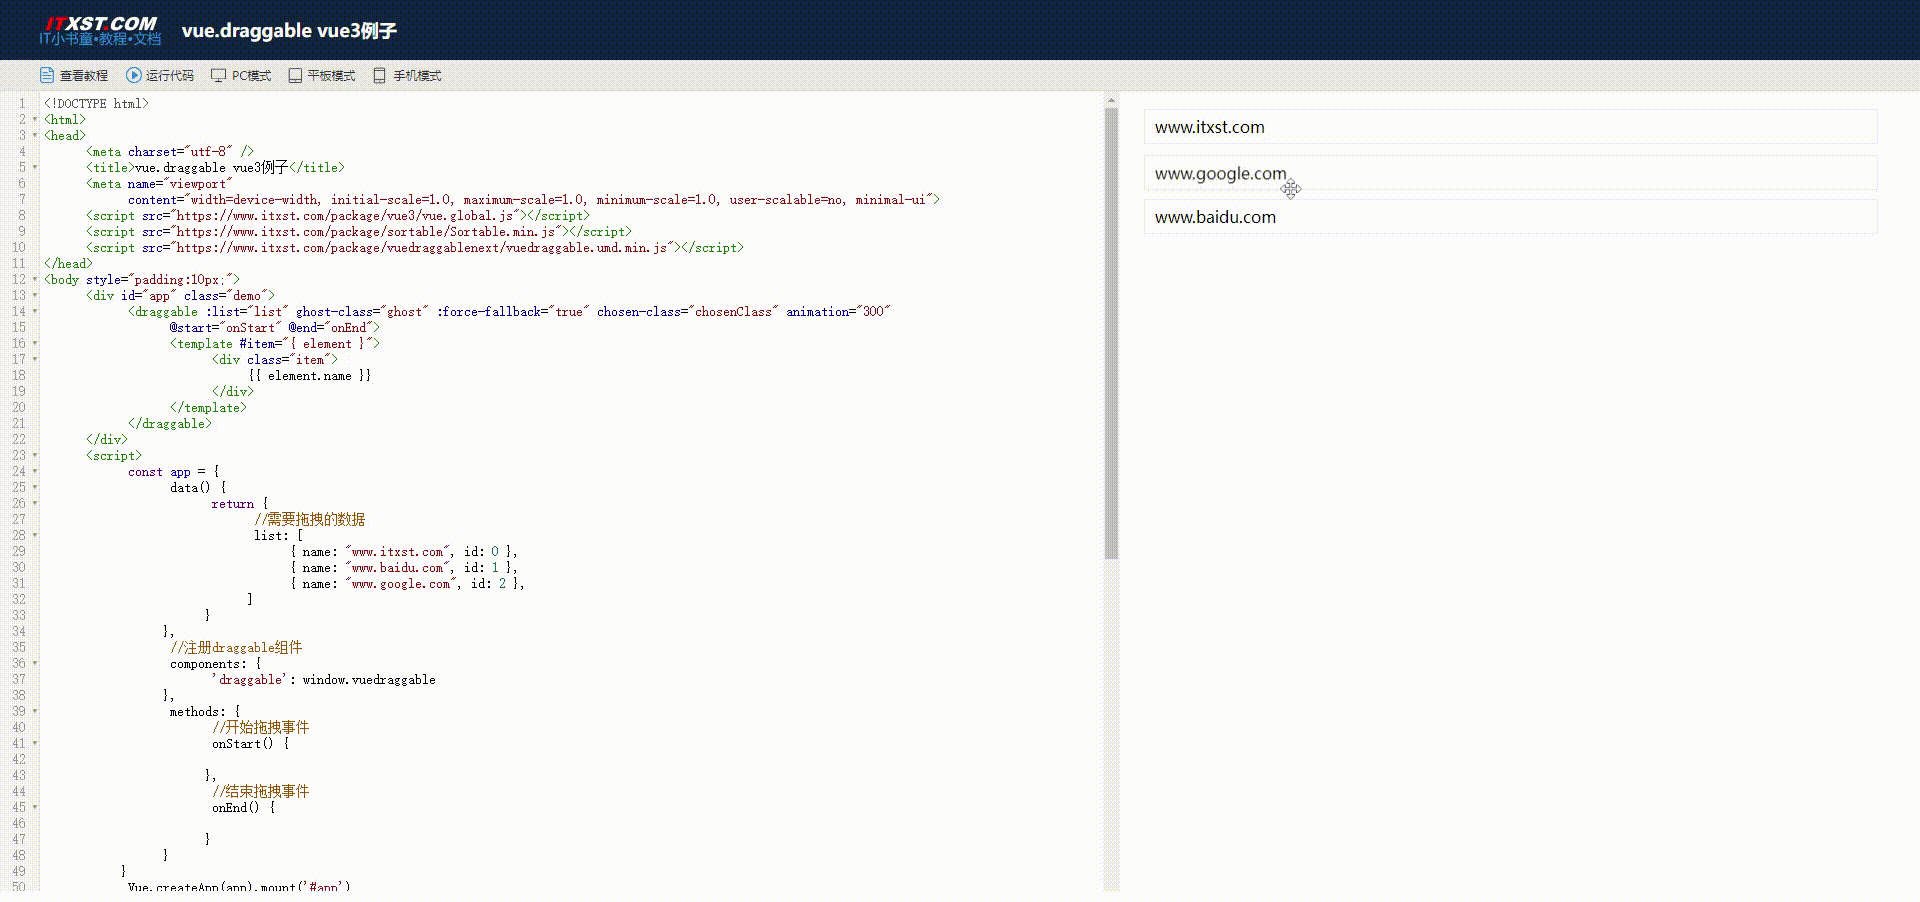
Single group drag means there is only one group of data, and drag is to exchange the position within this group of data, as shown in the following figure:
When dragging each other, there are two sets of data. The two sets of data can change the order internally and can be dragged into each other's array.
The requirements of this article only use mutual drag and drop. The code form of mutual drag and drop is as follows:
    //需要克隆的数据,A组
    <draggable :list="dragList" ghost-class="ghost" :force-fallback="true" :group="{ name: 'list', pull: 'clone' }"
      :sort="false" itemKey="id">
      <template #item="{ element }">
        <div class="item move">
          <label class="move">{

   { element.name }}</label>
        </div>
      </template>
    </draggable>

//拖拽的结果,B组
 <draggable :list="widgetList" ghost-class="ghost" itemKey="id" :force-fallback="true" group="list" :fallback-class="true"
    :fallback-on-body="true">
    <template #item="{ element }">
      <div class="item move">
        <label class="move">{

   { element.name }}</label>
      </div>
    </template>
  </draggable>

<script lang="ts" setup>
import draggable from 'vuedraggable'

interface type {
  name: string,
  id: number
}
const dragList: type[] = reactive<type[]>([
  { name: "单行文本", id: 1 },
  { name: "多行文本", id: 2 },
  { name: "计数器", id: 3 },
  { name: "单选框组", id: 4 },
])

const widgetList = reactive<type[]>([
  { name: "多行文本", id: 2 },
])
I have organized some commonly used attributes of draggable to facilitate their use according to different needs. You can check and fill in the form:
| Attributes |
illustrate |
type |
Is it required? |
| group |
If dragging in groups, classification can be achieved by setting the name of the group. The pull attribute represents dragging out, and put represents dragging in. :group="{ name :'list',pull : true, put: false }" It means that this group and other groups whose name is list can realize group drag and drop. This group is allowed to be dragged out, but not dragged in. Pull is 'clone', which means clone mode. Pull and put can be written or not. The default value is true. |
Object / string |
no (Required when group dragging) |
| list |
bound data |
Array |
yes |
| sort |
Whether to enable the sorting function, the default is true, if set to false, the group it belongs to cannot be sorted |
Boolean |
no |
| force-fallback |
The default is false, ignoring the dragging behavior of HTML5, because there is an attribute in h5 that can also be dragged. When you want to customize the ghostClass chosenClass dragClass style, it is recommended to set forceFallback to true. |
Boolean |
no (Required when setting ghost-class or drag-class) |
| ghost-class |
:ghostClass="ghostClass" Set the placeholder class name of the dragged element, and you can set the dragged element to different styles. Custom styles may need to add !important to take effect, and set the forceFallback attribute to true. |
String |
no |
| disabled |
Whether to disable, default false |
Boolean |
no |
| drag-class |
:drag-class="dragClass" drag element style, your custom style may need to add !important to take effect, and set the forceFallback attribute to true |
Boolean |
no |
| item-key |
A unique identifier for each element, it is recommended to use id itemKey='id', note that there is no need to write it in variable form here |
String |
yes (It can run without filling it in, but the console will report a warning) |
So far, this has been a drag-and-drop component.
(3) If you find that the component you wrote cannot be dragged and dropped, or the component is not displayed on the web page, or a red error message appears, check the following points:
-
Whether the names in the group are consistent. Group is a variable and requires the form: group ='{name:'' }'
-
In order for the elements of group AB to drag each other, the data structures of the elements must be completely consistent. If you are not sure, you can use interface to define a type such as interface itemType { name : string , id:number }
-
Whether the array bound to AB group is responsive. If it is not responsive , drag and drop will be successful but cannot respond in time. You can use this method to self-check --> drag and drop first, and then drag and drop casually in the html part of the code. Add something, then save it, and observe whether the content you just dragged is displayed on the web page. If it appears, it is a problem of non-responsiveness of the array.
-
In the new version of vue3, the item slot is a required part and cannot be replaced by a v-for loop.
<draggable> <template #item="{ element }"> <div class="item move"> <label class="move">{ { element.name }}</label> </div> </template> </draggable> -
Only one child element is allowed in the item slot. There is a pitfall here, that is, if there are two child elements but one is commented out, an error will be reported. Even if there is actually only one child element.
//正确的
<template #item="{ element }">
      <div class="item move">
        <label class="move">{

     { element.name }}</label>
      </div>
 </template>

//会报错的情况!
<template #item="{ element }">
      <!-- <div class="class"></div> -->
      <div class="item move">
        <label class="move">{

     { element.name }}</label>
      </div>
 </template>
So far, drag and drop has been successful. Some people may encounter this problem - if Group B is empty and dragging the first component into Group B, dragging will be difficult. You can only succeed by dragging to the top of the drag area/fundamentally Unable to drag successfully.
Reason: Because the draggable of Group B is rendered as a div with a height of auto, if the current group is empty and the height is 0, the draggable area will become very small or non-existent.
Solution: Design the height for the draggable of group B. The specific code is to add the class name and set it in css.
<draggable :list="widgetList" ghost-class="ghost" itemKey="id" :force-fallback="true" group="list" :fallback-class="true"
    :fallback-on-body="true" class="drag-content">
    <template #item="{ element }">
      <div class="item move">
        <label class="move">{

   { element.name }}</label>
      </div>
    </template>
  </draggable>

<style lang="less" scoped>
    .drag-content {
        height:500px; //建议是外层嵌套一层div,div固定高,此处再设为100%
    }
</style>
(3) Replace the dragged content with element component/other specified content
We found that the content displayed after dragging can be freely defined and set in the draggable of Group B.
At this point, we need to improve the array structure of dragList to map the different components formed after dragging.
(This can be done if there are few components)
interface itemType {
  name: string,
  id: number,
  element:string
}

const dragList: type[] = reactive<type[]>([
  { name: "单行文本", id: 1, element: 'Input' },
  { name: "多行文本", id: 2, element: 'Textarea' },
  { name: "计数器", id: 3, element: 'InputNumber' },
  { name: "单选框组", id: 4, element: 'Radio' },
])

const widgetList = reactive<type[]>([

])
// A组
<draggable :list="dragList" ghost-class="ghost" :force-fallback="true" :group="{ name: 'list', pull: 'clone' }"
:sort="false" itemKey="id">
<template #item="{ element }">
<div class="item move">
<label class="move">{
{ element.name }}</label>
</div>
</template>
</draggable>
// B组
<draggable :list="widgetList" ghost-class="ghost" itemKey="id" :force-fallback="true" group="list"
:fallback-class="true" :fallback-on-body="true" class="drag-content">
<template #item="{ element }">
<div class="item move">
<label class="move title">{
{ element.name }}</label>
<div> <el-input v-model="input" placeholder="Please input" v-if="element.element === 'input'" /></div>
<div><el-input v-model="textarea" :rows="2" type="textarea" placeholder="Please input"
v-if="element.element === 'textarea'" /> </div>
</div>
</template>
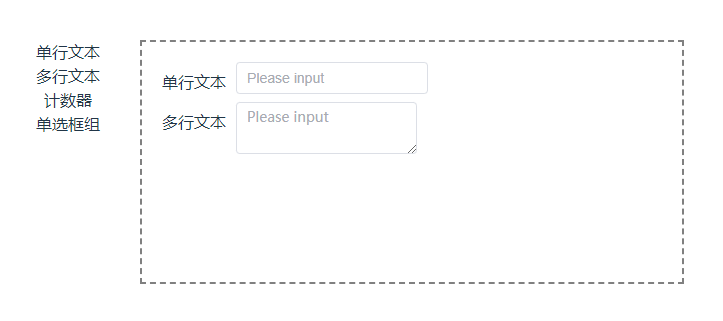
</draggable>Click on the control and drag it over, and you can achieve the following effect. If you don't want the title, you can remove the label part, and follow the same method for other controls:
This can be done when the number of components is small, but when the number is large, it is recommended to use component tags for mapping.
(1) First change the structure of the file
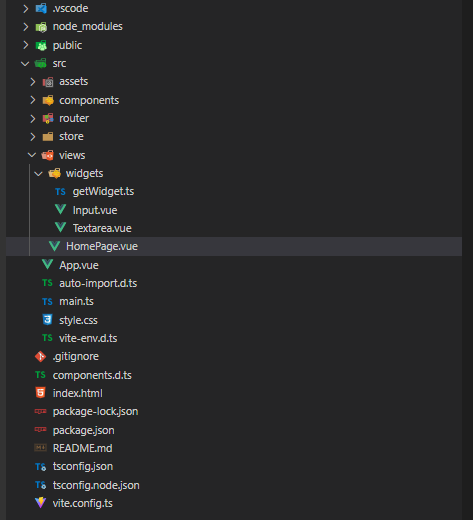
(2) Write a public function to return all files in the current widgets folder
// getWidget.ts

const gets = {} as any
const modules = import.meta.glob('./*.vue', {eager:true})
for (let each in modules) {
  const name = (modules[each] as any).default.__name
  gets[name] = (modules[each] as any).default
}

console.log(gets);

export default gets
You can also use the globEager method. The compiler will report an error: the function has been deprecated, but it does not affect its use.
(3) Write the parts of each component separately

// Input.vue
<template>
  <div>
    <el-input v-model="input" placeholder="Please input"  />
  </div>
</template>

<script lang="ts" setup>

 const input=ref('')
</script>

<style lang="less" scoped>

</style>
(4) Use component tag mapping
    <draggable :list="widgetList" ghost-class="ghost" itemKey="id" :force-fallback="true" group="list"
      :fallback-class="true" :fallback-on-body="true" class="drag-content">
      <template #item="{ element }">

        <div class="item move">
          <label class="move title">{

   { element.name }}</label>
          <div>
            <component :is="getWidget(element.element)"></component>
          </div>
        </div>
      </template>
    </draggable>


// 使用函数映射

<script lang="ts" setup>
import draggable from 'vuedraggable'
//要注意导入
import getName from './widgets/getWidget'


const getWidget = (name: string) => {
//写的时候,组件的起名一定要与dragList中的element名字一模一样,不然会映射不上
  return getName[name]
}
(5) Final effect
Successfully achieved!