Study these days samba services through ad user authentication domain. In the process of discovery to find information in the. About linux join windows domain, a lot of information on the Internet, but the most pressing online say do not succeed, and even a lot of people do not know what they estimate that the final net ads join you think has been successfully joined to the domain, but then it? As a member of the domain , ordinary machines can be provided within the user login; as samba service should be added to the shared directory, so that it acts as a domain-joined thing. The author, after repeated experiments, finally linux added to the windows domain some of the details recorded, not exclusive, special show.
I use linux as CentOS5.3 . ad domain Win2k3 SP2 . Domain : Rainbird.net
Win2k3:
Name:ad1
Ip:192.168.1.241
Dns:192.168.1.241
Centos5.3:
Name:Filesrv
Ip:192.168.1.246
Dns:192.168.1.241
Ok,let’s go!
1.samba server software requirements
krb5-Workstation-1.2.7-19 pam_krb5-1.70-1 krb5-devel-1.2.7-19 krb5-libs-1.2.7-19 Samba-3.0.5-2 [root @ FILESRV CentOS ] # rpm -qa | grep krb5
krb5-auth-dialog-0.7-1
krb5-libs-1.6.1-25.el5
krb5-devel-1.6.1-25.el5
pam_krb5-2.2.14-1
krb5-workstation-1.6.1-25.el5
[Root @ filesrv CentOS] # rpm -qa | grep samba
samba-swat-3.0.28-0.el5.8
samba-common-3.0.28-0.el5.8
samba-client-3.0.28-0.el5.8
samba 3.0.28-0.el5.8
If centos not cancel selected by default when you install the "Base", the krb5 package is the default full installation
If you do not choose to install samba can be installed so
[root@filesrv CentOS]# rpm -ivh xinetd-2.3.14-10.el5.i386.rpm
[root@filesrv CentOS]# rpm -ivh --aid samba*.rpm
2. Configure kerberos , and samba
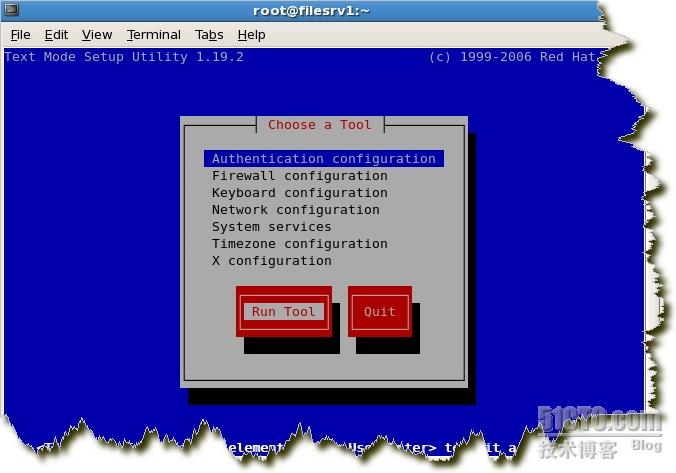
Because I used the system is centos so as to ensure a successful accuracy, here is configured using a graphical interface tool in character.
Run setup tool

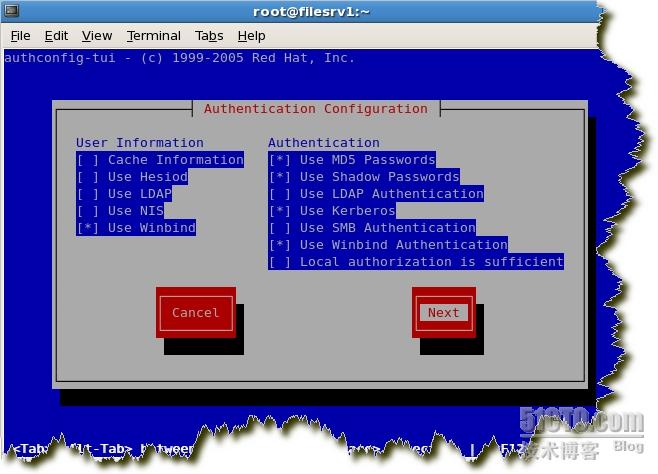
Authentication Configuration
select:
“use winbind”
“use kerberos”
“use winbind authertication”
Delete the admin server the rest into the real situation
Realm is the domain name , KDC for the domain server ip

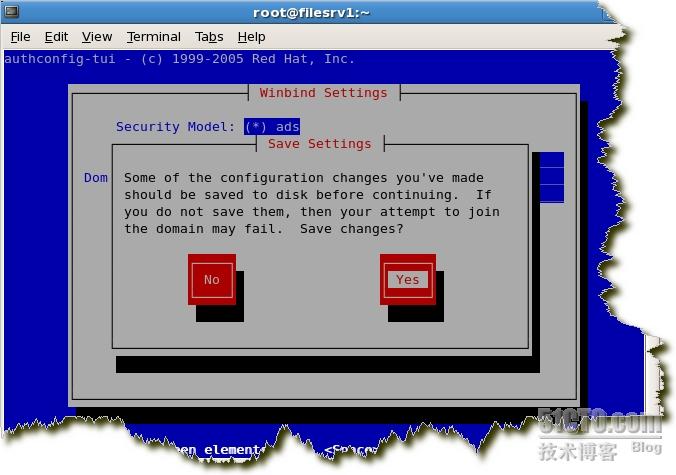
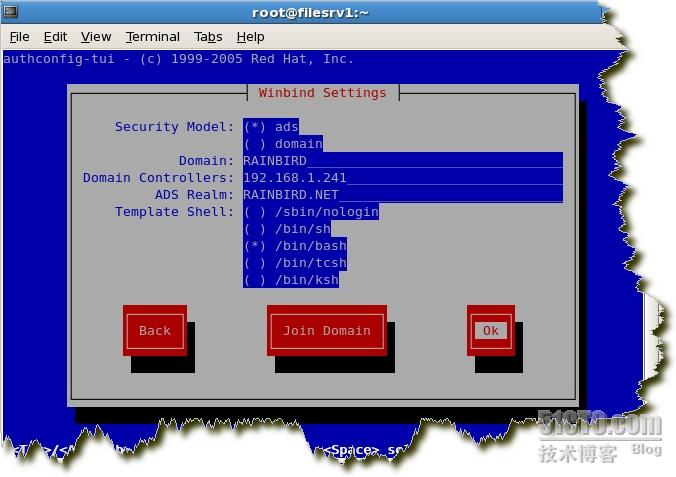
Configuration winbind
Domain for your domain, left first . "" Front stuff

Select "join domain", you are prompted to save the configuration information, certainly yes a.
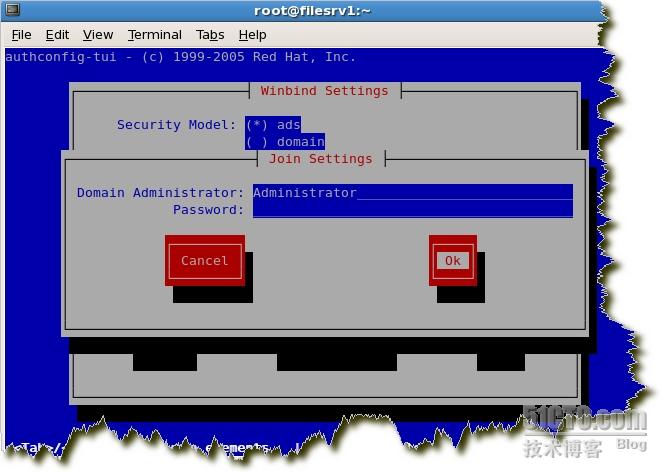
Hey, I see this screen is not thought xp machine added to the scene domain? Is that right! Enter the ad domain administrator password it J
Not surprisingly, then, you reach the final screen, certainly ok, then quit.
In general, not bad as long as five minutes to two machines up and down, and the items are configured correctly, you will see the following picture. See this caption your linux successfully added to ad domain it !
OK,用图形的好处就是方便快捷,但是这样只适合rh系统。别的linux系统咋办呢?别急。这个工具其实就是编辑以下三个配置文件:
/etc/nsswitch.conf
passwd: files winbind(就是先读files 然后再通过winbind认证)
shadow: files winbind
group: files winbind
/etc/krb5.conf
[logging]
default = FILE:/var/log/krb5libs.log
kdc = FILE:/var/log/krb5kdc.log
admin_server = FILE:/var/log/kadmind.log
[libdefaults]
default_realm = RAINBIRD.NET(默认的域名)
dns_lookup_realm = false
dns_lookup_kdc = false
ticket_lifetime = 24h
forwardable = yes
[realms]
EXAMPLE.COM = {
kdc = kerberos.example.com:88
admin_server = kerberos.example.com:749
default_domain = example.com
}
RAINBIRD.NET = {
kdc = 192.168.1.241:88(域服务器)
kdc = 192.168.1.241
}
[domain_realm]
.example.com = EXAMPLE.COM
example.com = EXAMPLE.COM
rainbird.net = RAINBIRD.NET
.rainbird.net = RAINBIRD.NET
[appdefaults]
pam = {
debug = false
ticket_lifetime = 36000
renew_lifetime = 36000
forwardable = true
krb4_convert = false
}
/etc/samba/smb.conf
workgroup = RAINBIRD//域名
password server = 192.168.1.241//域服务器
realm = RAINBIRD.NET
security = ads//必须启用
idmap uid = 16777216-33554431
idmap gid = 16777216-33554431
template shell = /bin/bash
winbind use default domain = false (改成true)
winbind offline logon = false(改成true)
template homedir = /home/%U
winbind separator = /
winbind enum users = Yes
winbind enum groups = Yes
红色部分就是工具自动修改的了,但是smb.conf修改的不彻底,还不能满足我们的要求,怎么办呢?手动把蓝色部分加上,并把那两个false改成ture,然后设置samba的开机自动启动chkconfig smb on,service smb on启动服务,然后就是手工把linux加入到windows了
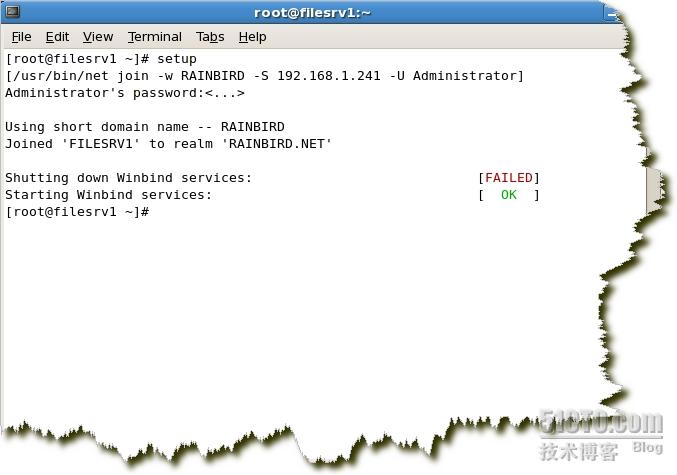
[root@filesrv ~]# net ads join -U [email protected]
[email protected]'s password:
The workgroup in /etc/samba/smb.conf does not match the short
domain name obtained from the server.
Using the name [RAINBIRD] from the server.
You should set "workgroup = RAINBIRD" in /etc/samba/smb.conf.
Using short domain name -- RAINBIRD
Joined 'FILESRV' to realm 'RAINBIRD.NET'
提示“Joined”哟,不是这个提示就是有问题,再仔细检查。
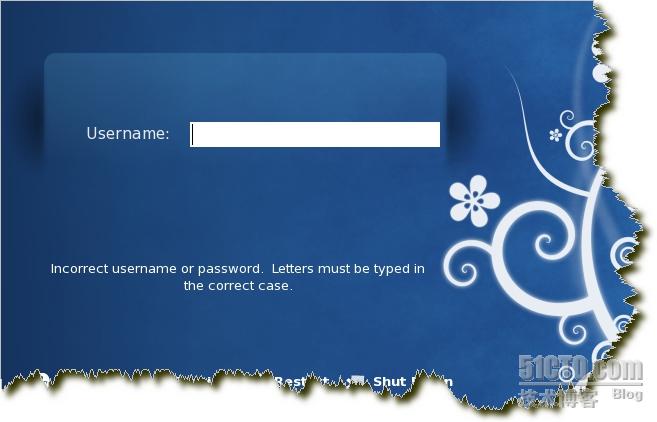
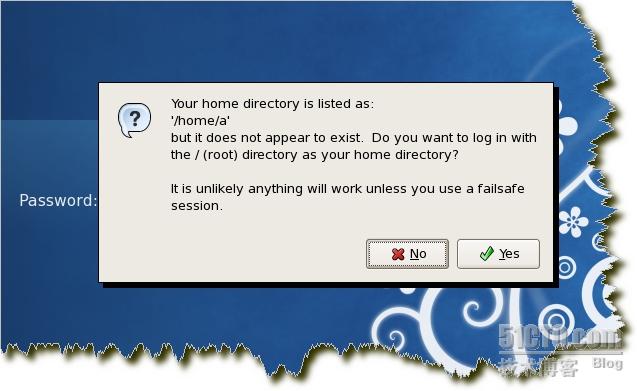
OK,重启linux,这时候用一个域用户登陆linux如果提示用户或密码验证失败,说明你重启之前的东西没配置对。仔细检查一下哪里不对呢?
如果提示如下,那么恭喜你,可以继续下一个话题了。
3.自动创建用户目录.
用到的文件pam_mkhomedir.so
在/etc/pam.d/sysconf-auth文件中的sesson部分添加一行
session required pam_mkhomedir.so silent skel=/etc/skel umask=0077
silent不打印创建目录信息
skel 告诉pam_mkhomedir.so拷贝/etc/skel里的文件到新创建的目录里.
umask 是创建的目录的权限
创建哪个目录是在smb.conf里的template homedir定义的
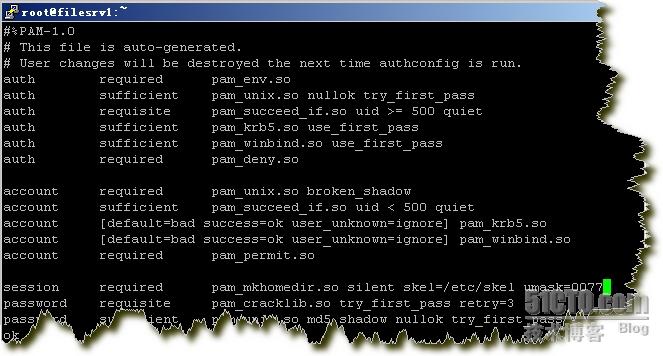
如图:
保存退出,重启一下X-window。再次用域用户登陆,是不是成功看到了久违的linux桌面呢?

Ok,到此为止,linux加入windows的故事就讲完了。而samba服务器通过ad域认证并实现每个用户500M的共享空间,且当用户登陆windows域的时候自动挂载已经成型,近期放出,敬请期待。
Rainbird2大侠出品了一篇
“Linux加入windows域之完美方案”,虽然网上流传了很多加入liunx到windows的文章,比如, “梦想开始的地方”的“使用Samba将linux主机加入AD域”,该帖子即详细介绍了加入的方法和具体步骤,见原文:
http://www.cnblogs.com/lizl/articles/852846.html#891920, 但基于CentOS的图形化界面,Raidbird2的方法相对简单,容易,但其实在安装CentOS5.3的时候,要求创建新账号的右下,已经存在一个“使用网络账号登录”的按钮,点击它即可进行纯GUI
界面的操作,比Raidbird2文中所描述的更为漂亮。但毋庸置疑,Raidbird2的该文依然可以用帮助大多数想实现这种方法的朋友。
不过,纵观所有的文章,仅仅都是提到了如何加入linux主机到windows域,却没有提及任何相关如何对域账号,或使用域账号对linux主机进行管理的文章。 在下这里抛砖引玉,简单提一下需求和解决办法。
首先,我们的构想环境是30台linux主机,均已安装要求加入到 windows域。由于地理位置的分布和权限分派的要求,所有计算机管理员均为admin,但非root,即他们均可以使用sudo为宜。30台 linux主机如果都使用本地计算机账号,那么对于密码的维护将是一个噩梦的开始,所以,在这里我们使用AD域账号来进行管理和验证。
-
问题:多台linux主机管理员账号混乱,密码重设繁琐 (当然高手可以用shell来实现,这里暂且不提)
-
要求:使用域账号,作为本地管理员可以使用sudo操作
-
方法:
-
创建一本地组(你也可以使用已存在的组)
-
group add groupname
-
修改sudo列表
-
visudo
-
在root ALL=(ALL) ALL 下添加一行
-
%groupname ALL=(ALL) ALL
-
保存退出
-
修改group文件
-
vim /etc/group
-
groupname:x:501:DOMAIN\username 或者域组名
-
这里DOMAIN必须大写
-
如果已经用该域账号登录了,注销即可。
-
该方法成功运行在CentOS5.3系统。
由于在下水平问题,估计文章有所疏漏,还请大侠们补正,谢谢。
本文出自 “狼牙” 博客,请务必保留此出处http://wolfteeth.blog.51cto.com/923253/199692
转载于:https://www.cnblogs.com/ericsun/archive/2013/05/24/3096424.html