layout: POST
title: "Installation OpenWrt RaspberryPi 3B + Tutorial"
DATE: 2019-09-28 22:00:00 +0800
the Categories: RaspberryPi
---
Recently in the study of p2p principle when, as NAT types of restrictions encountered a lot of trouble, and our dormitory router does not support NAT mode control, so I wanted to come in raspberry install OpenWrt to achieve a controllable NAT router, with the thought that since the official OpenWrt firmware, it should be relatively simple, they still face a lot of trouble, so a simple record what, for the same problem encountered friends as a reference.
hardware
- Raspberrypi 3b+
For the first time to explain the hardware needed because Raspberrypi 3b+itself with a wireless network card, network cable port, if the WAN connection is only going to use Raspberry Pi as a wireless router, it does not require any other accessories for previous models, you may need with NIC a.
- Monitor, keyboard
Note snapshot version is without lcui, and so I can not enter the management interface directly in the browser, but in theory, the boot, the computer connected through the network cable and should be able to pass 192.168.1.1to log ssh, but do not rule out because of network adjustments like lead can not be connected, preferably directly connected to the display and keyboard to facilitate debugging.
Firmware Description
Then talk about the firmware, firmware, there are two types, one is release版本, the other is snapshot版本. When I installed, release version without 无线网卡驱动, and snapshot version without lcui(that is, for that router management program in browser login).
I originally installed the release version and found that the wireless network card can not start after installed, then copy the appropriate wireless network card driver to OpenWrt system Raspbian from my system, then you can successfully connect WIFI, it can carve AP, but Because when I connect the WAN after, raspberry pie is always inexplicable restart, frequently impossible to connect to the hotspot, so I decided to try snapshot version. So following on from talk about the snapshot版本installation and configuration process it, the reader is advised to install snapshot版本, check the information I was when everyone recommended snapshot version, which we should all come to the conclusion after the test.
Download and install
download
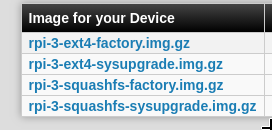
There are several mirrors, two types of file systems, two types ( factoryand sysupgrade), the file system can be, but be aware sysupgradethat the upgrade for the router management interface used in factoryis the use of SD card brush used by the system because of the relatively a better understanding of ext4, so I downloaded the ext4-factory version.
Extract and write image file
Note that represent your SD card device file sdX
gzip -d openwrt-brcm2708-bcm2710-rpi-3-ext4-factory.img.gz

sudo dd if=openwrt-brcm2708-bcm2710-rpi-3-ext4-factory.img of=/dev/sdX bs=2M conv=fsync
Power
Connect the display and keyboard, the Raspberry Pi sd card into the boot, if nothing else should be able to see the prompt and press Enter to start the console when the output, and so on screen, you can start the terminal and press Enter.
If you do not monitor, you can try the network cable to the computer directly, to see whether through [email protected]login, you can log in directly to the default, after logging can passwdset the root password.
Of course, you can put sd card is mounted to the computer, according to the following instructions to change the configuration files and then loaded into the boot test.
Enable Wireless LAN
Confirm whether the wireless LAN normal driving
Use ip addrthe command to view interface information, if present wlan0, can be determined wireless network card driver is no problem.
Enable Wireless LAN
I performed at the just-machine ip addrcommand, wlan0the state of DOWNwhich is closed, and therefore need to be enabled manually. So I try to use the wifi upcommand to enable, but did not succeed, it seems to be suggesting wlan0 in disabled state, this time to perform if you wifi statusshould see radio0the disabledproperty true.
It is necessary to modify /etc/config/wirelessthe file (with the system vicommand), the radio0configuration disabledchanged0
...
config wifi-device 'radio0'
        ...
        option disabled '0'
        ...
And then perform /etc/init.d/network restartthe restart network services, this time again using ip addrto view network, the wireless network card should have been enabled to live if not, you can try to use wifi upor ipcommand to manually enable
Network Configuration
My configuration is to use wlan0 (wireless LAN) establishing a local wireless LAN, while eno0 (Ethernet card) only for connection to WAN.
So I had the profile lanconfiguration includes bridgethe line deleted, because I do not intend to bridge, and into the use of wireless LAN wlan0(originally eno0).
Another point worth noting is that I will be lanthe ipaddrchange of 192.168.2.1which is connected to the address in order to avoid conflicts when our dormitory WAN port, then this configuration, Raspberry Pi is connected to the wireless LAN equipment ip will be 192.168.2. *, use those devices to log router settings ( not yet use only installed in order to use the lcui ) ssh or login if you want to use 192.168.2.1this address.
If you use ssh to log network cable to the computer the way, this configuration can cause you can not continue this way, but if wifi configured correctly, it should be able to continue to use the wifi connection ssh.
config interface 'lan'
    option ifname 'wlan0'
    option proto 'static'
    option ipaddr '192.168.2.1'
    option netmask '255.255.255.0'
    option ip6assign '60'
For WAN, to be configured according to the actual situation
- If it is broadband, then the general is to use
PPPOEway
config interface 'wan'
    option proto 'pppoe'
    option ifname 'eth0'
    option ipv6 'auto'
    option username '用户名'
option password '密码'- If DHCP LAN configuration simpler
config interface 'wan'
    option proto 'dhcp'
    option ifname 'eth0'
After changing for the better configuration file, /etc/init.d/network restartrestart the network services, to test whether the connection wifi, the problem, they should use more ip addrcommands to troubleshoot the error, find out why.
Under normal circumstances, you should now be connected to wifi, wifi connection this device can also be connected to [email protected]the. For the wan port can be used ip addrto see if the wan port has acquired the ip address, if not configured properly under examination.
Detecting whether everything is normal
If your WAN connection can be normal, WIFI can be used normally, then congratulations, but can not access WIFI if normal WAN connection, then the problem may be a firewall configuration below will tell you how to change the configuration. Now that may have been connected to the network, we may wish to install good lcui, then you can sign up as a router management interface.
Installation lcuiManager
See https://openwrt.org/zh-cn/doc/howto/luci.essentials
installation
Retrieves the latest list of available software packages in the library:
opkg updateHTTPS support a full installation of LuCI do not need to:
opkg install luci
HTTPS support a full installation of LuCI need:
opkg install luci-sslStart using the Web server (uHTTPd)
Web server installation package LuCI uHTTPd is a dependent software, which is installed automatically when you install LuCI.
After installation, Web Server is not running! You need to manually open it. You should also start the Web server, so that it starts automatically when you restart the router.
The following command to start the first Web server, making it the second start on reboot.
  /etc/init.d/uhttpd start
  /etc/init.d/uhttpd enable
After installing, you can log in OpenWrt should manage the interface