A. Installation
1. Install node.js, to note here is that, Vue CLI 3 need nodejs ≥ 8.9 , so we went to Chinese official Download: http://nodejs.cn/download/ , you can download the latest version;
2. Install vue-cli3.0 version:
Two situations: 1. Your previous version of vue-cli3.0 previously installed, before the need to uninstall version before installing the new version;
Uninstall the old version:
npm uninstall vue-cli -g
Install the new version:
npm install -g @vue/cli
2. Before you have not been installed the previous version of vue-cli3.0, the new version can be installed directly;
3. Install nrm, sometimes foreign resources too slow, you can use this to quickly switch between npm source:
1. Global installation nrm
npm install -g nrm
2. Check the current source use
nrm current

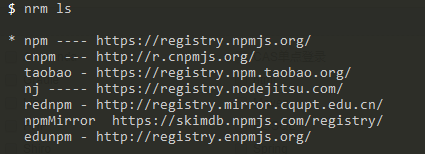
3. Review the optional source (with an asterisk is the currently used source)
NRM ls
4. The handover source
Taobao mirror as an example:
nrm use taobao

5. Test source speed (i.e., response time)
For example: test the response time Taobao official sources and sources
NRM test asl

NRM test taobao

Can be drawn, speed Taobao source is much faster than the official sources, after the installation of nrm, we create a project, we download and build speed will be much faster, to say the fast word ;
II. Create a project
1. Create a new project
vue create jjrweb // behind the file name does not support the hump (with capital letters)
Pop up the following interface:

1. The first "my-default" is my previously saved preset configuration, the following will be introduced to the next and so on;
2.default (babel, eslint): default package, providing babel and eslint support;
3.Manually select features: themselves to select the required function, to provide more features to choose from. For example, if you want to support TypeScript, you should choose this one;
If you want more support, here I choose Manually the SELECT Features : switch to this, press the enter key to select,
Pop up the following interface:
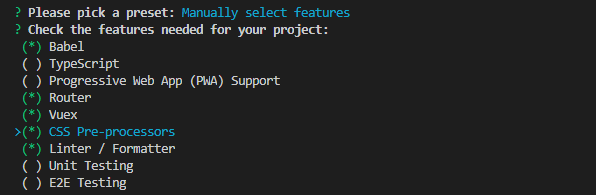
Multiple Choices: Use the arrow keys to switch between the characteristic options, using the space bar to select the current characteristics, using a key to switch to select all, an i-key rollover option.
() Babel // transcoder, code can be converted for ES6 ES5 code to the existing execution environment.
() TypeScript // TypeScript is a JavaScript (suffix .js) superset (suffix .ts) includes and extends the syntax of JavaScript, JavaScript needs to be compiled output to run in the browser, there is less people then
() Progressive Web App (PWA) Support // Progressive Web Applications
() Router // vue-router (vue routing)
() Vuex // vuex (vue of state management)
() CSS Pre-processors // CSS preprocessor (eg: less, sass)
() Linter / Formatter // check code style and format (eg: ESlint)
() Unit Testing // test unit (unit tests)
() E2E Testing // e2e (end to end) test
Here I chose to picture options, enter:
Pop up the following interface:

Whether history router: Here I select NO, later if we wanted to change history, to manually route where you can add, Enter;
Pop up the following interface:

css preprocessor, mainly to solve the css browser compatibility, simplify CSS code and other issues, you can choose what kind of habit, here I choose Less
Pop up the following interface:

ESLint: providing a plug of javascript code detection tools, ESLint + Prettier // more use, I chose ESLint + Prettier
Pop up the following interface:

When to test: Here I chose to detect when Lint on save save
Pop up the following interface:

How to store configuration: Here I chose to select the map
Pop up the following interface:

Whether to save the current configuration (y: record of this configuration, then you need from a name; n: no record of this configuration): I chose NO, the above just when it comes to this, if you choose yes, next time create project when you can choose a template before pressing
Pop up the following interface:
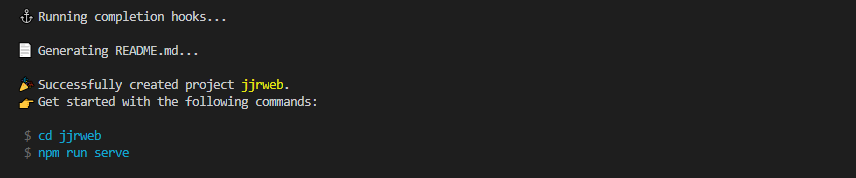
Completed structures: can enter into the project folder, and then run the project;

2. Project Structure
Streamline a lot, but still there are many differences and vue2.0, the basic usage change is not particularly large, as shown:

Difference 3.vue-cli2.0 and vue-cli3.0 of
1.vuex (state management):
In vue cli 2 : vuex is set up after the completion of their npm install, not included in the building process . We can see vue cli vuex 2 default file folder (store) but also contains the three js file: action (call external API interface to store some of asynchronous execution method, and then commit mutations mutations change data), index (data initialization mutations is the outlet store), (data processing logic mutations synchronous execution of the collection method, the only way to store data in Vuex mutations altered the commit)
in vue cli 3 : vuex comprising a predetermined selected set up for the process . vue cli 3 default only one store.js instead of the original three js file store folder. Usage action, mutations, state and getters have a lot of store
2.router (routing):
vue cli 2 : " router / index.js "
3 cli VUE: " router.js " (usage and do all the same)
3. Remove the static, new public folder
cli 2 VUE : static static resource is webpack default storage folder , a package will be copied directly to the dist folder will not compile after webpack
3 cli VUE : abandon static added public . vue cli 3 in "static resources" are two possible ways:
Webpack treated by : the resource is introduced into or referenced by "relative path" in template / CSS in JavaScript are compressed and compiled
Without webpack treatment : placed in the public directory or referenced by absolute path resources will be "directly copied" a, without any compiler compression processing
4.index.html :
vue cli 2 : " index.html "
3 cli VUE : " public / index.html " This template is html-webpack-plugin -treated
5.src/views:
3 cli VUE src files folder new views folder used to store "pages", to distinguish between components (components)
6. removing the build (defined according to the configuration rule config), config (configuration parameters in different environments) folder:
vue cli 3 , these you can configure via the command line parameters, or vue.config.js (vue.config.js create a new file in the root directory of the same name) in the devServer field development server configuration
7.babel.config.js:
配置Babel 。Vue CLI 使用了 Babel 7 中的新配置格式 babel.config.js。和 .babelrc 或 package.json 中的 babel 字段不同,这个配置文件不会使用基于文件位置的方案,而是会一致地运用到项目根目录以下的所有文件,包括 node_modules 内部的依赖。官方推荐在 Vue CLI 项目中始终使用 babel.config.js 取代其它格式。
8.根目录的一些其他文件的改变:
之前所有的配置文件都在vue create 搭建时preset预设 或者 后期可以通过 命令参数 、 vue.config.js 中配置
三.项目编写
1.在package.json文件中添加
"scripts": {
    "serve": "vue-cli-service serve", //调用开发api
    "build": "vue-cli-service build", //上线
    "test": "vue-cli-service build --mode test",//需要添加的内容,测试
},
2.在根目录下创建.env文件,并配置
NODE_ENV = 'production'
VUE_APP_FLAG = 'pro' //vue代码可以直接使用VUE_APP_名字
3.在根目录下创建.env.test文件
NODE_ENV = 'production'
VUE_APP_FLAG = 'test'
4.在根目录下创建vue.config.js
module.express = { baseUrl: process.env.NODE_ENV === 'production' ? '/static/' : './', devServer: {
port: 端口号,
proxy: {
'/api': {
target: 'https://movie.douban.com/', // target host
ws: true, // proxy websockets
changeOrigin: true, // needed for virtual hosted sites
pathRewrite: {
'^/api': '' // rewrite path
}
},
}
} baseUrl: '/', //基本路径,不要随意更改 outputDir:`dist-${process.env.NODE_ENV}`, // 打包生成目录 assetDir: 'static', lintOnSave: false, runtimeCompiler: true, // 是否使用包含运行时编译器的 Vue 构建版本 productionSourceMap: false, // 生产环境的 source map }
5.在main.js里配置api变量
/*第一层if判断生产环境和开发环境*/
if (process.env.NODE_ENV === 'production') {
    /*第二层if,根据.env文件中的VUE_APP_FLAG判断是生产环境还是测试环境*/
    if (process.env.VUE_APP_FLAG === 'pro') {
        //production 生产环境
        axios.defaults.baseURL = 'http://www.aaaa.com';//路径

    } else {
        //test 测试环境
        axios.defaults.baseURL = 'http://192.168.0.152:8102';//路径

} } else { //dev 开发环境 axios.defaults.baseURL = 'http://192.168.0.152:8102';//路径


 }
6.打包
npm run test