다음으로 말씀 드리고 싶은 것은 로그인 인터페이스에서주의해야 할 몇 가지 문제입니다. 앱의 로그인 인터페이스는 일반적으로 비밀번호 로그인, 인증 코드 로그인, 비밀번호 분실, 등록 된 계정과 같은 여러 모듈을 가지고 있습니다. 기능 구현은 비교적 간단하며, 주로 일부 세부 사항의 디자인은 전문 UI 디자이너가 아니기 때문에 저는 기능 구현 부분을 중심으로 디자인과 외모에 대해 이야기 할 수 없습니다.
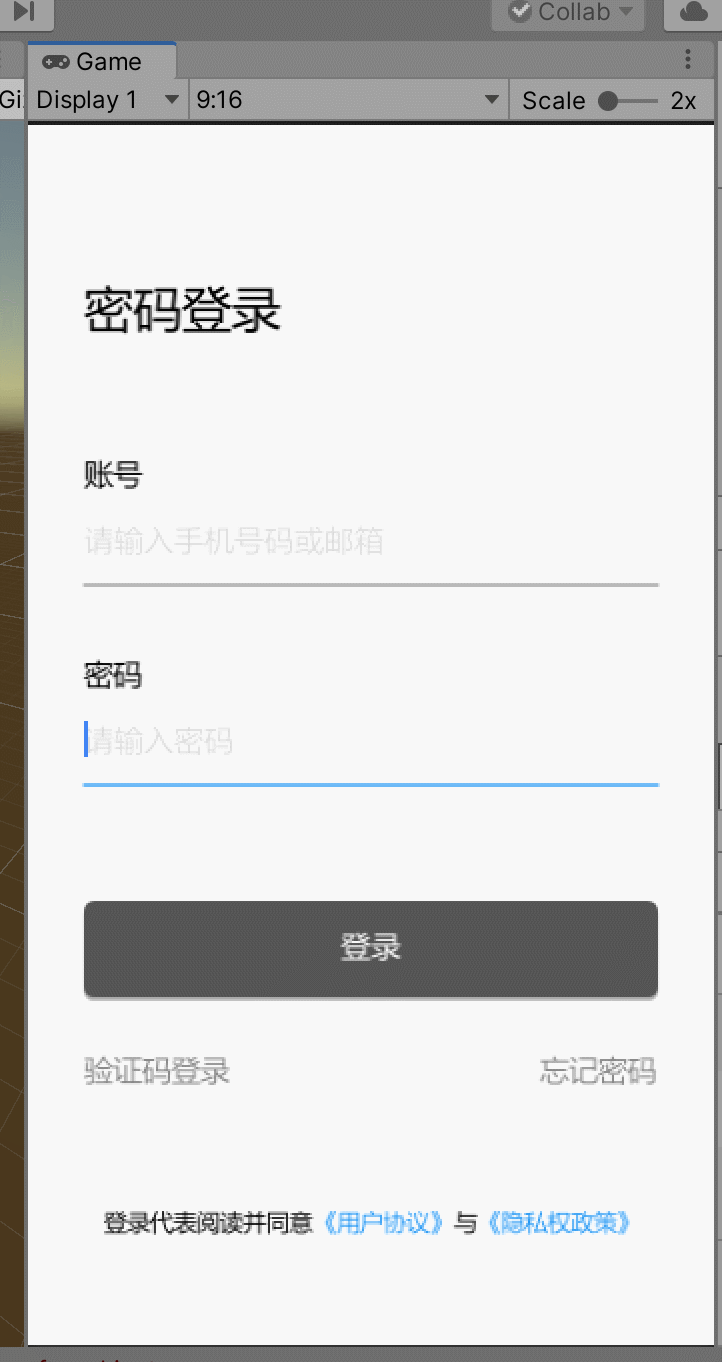
데모에서는 주로 계정 로그인, 인증 코드 로그인, 비밀번호 잊어 버림 세 가지 기능을 수행했습니다. 실제로 인증 코드 로그인, 비밀번호 분실, 계정 등록의 3 가지 기능 모듈로 구현 된 코드는 유사하며 재사용이 가능하며 아래에서 설명한다.
계정 비밀번호 로그인 인터페이스에 의해 구현되는 로직은 주로 1. 계정 비밀번호의 적법성에 대한 로컬 검증, 2. 로그인 성공 여부를 확인하기 위해 백그라운드로 제출하고, 그렇다면 메인 인터페이스로 들어갑니다. 그렇지 않으면 다시 로그인하십시오.
두 개의 텍스트 상자는 TextField에 의해 구현되며 각 텍스트 상자는 데코레이터를 사용하여 몇 가지 프롬프트 기능을 수행합니다. 위 코드는 아래 코드의 일부입니다.
 TextEditingController passwordController = new TextEditingController();

Widget PasswordField()
        {
            return new TextField(
                            textAlign: TextAlign.left,
                            style: new TextStyle(fontSize: 20),
                            controller:passwordController,
                            obscureText: isObscure,
                            //autovalidate: validataPassword,
                            //focusNode: passwordFocus,
                            onChanged: (text) => { setState(() => password = text); },
                            //validator: (value) => { return value.Trim().Length > 0 ? null : "密码不能为空"; },
                            decoration: new InputDecoration(
                                hintText: "请输入密码",
                                hintStyle: new TextStyle(color: Color.fromARGB(255, 221, 221, 221),fontSize:15),
                                suffixIcon: password == "" ? null :
                                new Container(child:new Row(
                                    mainAxisSize: MainAxisSize.min,
                                    children: PasswordIcon()))

                                )
                            );
        }
List<Widget> PasswordIcon()
{
            return new List<Widget> {
             new GestureDetector(child: new Icon(isObscure?Icons.visibility_off:Icons.visibility),
             onTap: () => { setState(()=> { isObscure=!isObscure; }); }),
             new GestureDetector(child: new Icon(Icons.clear),onTap: () => { setState(()=> { passwordController.text = ""; }); })};
}
코드는 주로 숨기기 또는 암호의 실현, 암호 지우기 및 사용자에게 이러한 기능을 입력하라는 메시지를 포함하여 암호 상자의 실현을 주로 실현합니다. UI 구성 요소를 직접 끌어서 놓는 UGUI와 달리 UIWidget의 모든 구성 요소는 스스로 작성해야합니다. 작성 과정은 번거롭지 만 자유도는 상당히 큽니다. 모든 구성 요소의 거의 모든 속성을 편집 할 수 있으며 기술 그렇다면 많은 기능적 구성 요소를 재사용 할 수 있으며 사용자 정의 구성 요소 라이브러리 세트를 생성 할 수 있습니다.
로그인 버튼은 주로 로그인 확인을 위해 사용자 입력에 따라 색상을 변경하는 RaisedButton으로 구현됩니다. ,
new Container(
     height: 48,
     constraints: new BoxConstraints(minWidth: float.PositiveInfinity, maxHeight: float.PositiveInfinity),
     child: new RaisedButton(
     shape:new RoundedRectangleBorder(borderRadius:BorderRadius.circular(5)),
     color: password != "" && accountController.text != "" ? Colors.blue : Color.fromARGB(255, 85, 85, 85),
      child: new Text("登录", style: new TextStyle(color: Color.white, fontSize: 15)),
                  onPressed: () => {

                  if (password == "" || account == "")
                  {
                  // ShowMessage("账号或密码不能为空");

                   }
                   else
                   {
                    Login(account, password);
                     }

})),
먼저 컨테이너를 RaisedButton의 부모 노드로 사용하고 자식 노드 채우기를 설정하기 위해서는 버튼 크기를 설정할 필요가 없으며 부모 노드에 따라 직접 채 웁니다. 동시에 모양을 사용하여 버튼을 둥글게 만들고, 계정 비밀번호가 비어 있는지 여부를 판단하여 버튼의 색상을 변경합니다. 버튼을 클릭하면 먼저 로컬에서 확인하고, 확인에 실패하면 상자가 팝업되고, 그렇지 않으면 배경 판단을 입력합니다.
다음으로 인증 코드 로그인에 대해 얘기하고 비밀번호를 잊어 버리자

인증 코드 로그인, 계정 등록 기능을 포함한 비밀번호 잊어 버림은 기본적으로 휴대폰이나 이메일을받은 다음 애플리케이션을 백그라운드 인터페이스로 전송 한 다음 인증 코드를 사용하여 내 작업인지 여부를 확인하는 방식으로 매우 유사합니다. , 로그인, 비밀번호 수정, 계정 등록 등 세 가지 기능이 있습니다.
인증 코드 전송을위한 인터페이스 디자인은 비밀번호 로그인과 유사하며, 대부분의 앱의 인증 코드 입력 인터페이스는 단순한 텍스트가 아니기 때문에 인증 코드를받은 후 입력되는 모듈에 주목해야합니다. 입력 할 수있는 상자가 있지만 일부 멋진 스타일을 통해 사용자 입력을 안내합니다.이 효과를 얻기 위해서는 일부 구성 요소 기능의 조합을 개발해야합니다.
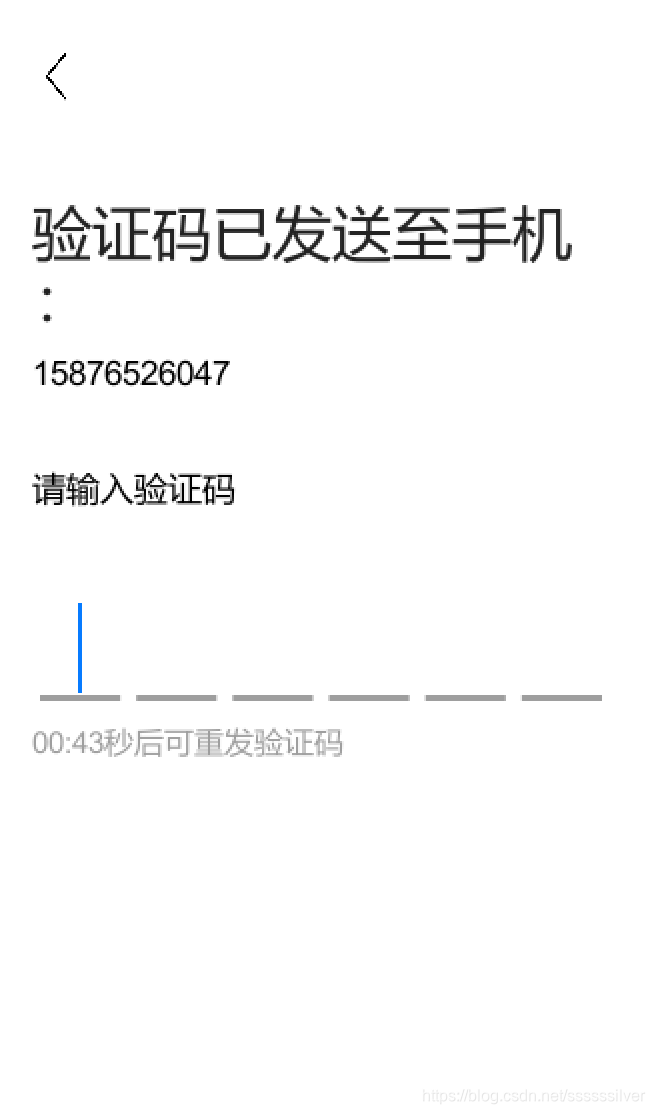
예를 들어이 텍스트 상자의 구현은 실제로 Container, Row, TextField 및 이미지를 사용하여 실현됩니다.이 효과는 실제로 블로거의 flutter 기사를 참조하여 다시 작성됩니다. 주소는 여기에 있습니다 . 일반적인 구현 원칙은 A hidden TextField를 사용하는 것입니다. , 입력하자마자 포커스를 받게됩니다.이 TextField에서 얻은 데이터를 기반으로 인증 코드 입력 박스는 실제로 하나씩 가로 채서 해당 박스에 표시됩니다. 마지막 문자를 입력하면 자동으로 제출됩니다. 상자의 깜박이는 초점 프롬프트는 실제로 깜박이는 gif로 실현되며 텍스트 옆의 텍스트 상자에서 자동으로 깜박입니다. 다음 코드 상단의 구현 코드
Widget VerificationBox()
        {
            return new Container(
                height: 60,
                child:new Stack(
                    children:new List<Widget> {
                        new Row(
                            mainAxisAlignment:MainAxisAlignment.center,
                            crossAxisAlignment:CrossAxisAlignment.center,
                            children: GetInputCell()
                            ),
                        new Container(
                            height:60,
                            width:float.PositiveInfinity,
                            child:new TextField(
                                keyboardType:TextInputType.number,
                                inputFormatters:new List<TextInputFormatter>{ new LengthLimitingTextInputFormatter(cellCount) },
                                decoration:new InputDecoration(border:InputBorder.none),
                                cursorWidth:0,
                                style:new TextStyle(color:Colors.transparent),
                                controller:controller,
                                autofocus:true,

                                onChanged:(str)=>
                                {
                                    setState(()=>
                                    {
                                        code=str;
                                        if(str.Length==cellCount)
                                        {
                                             Debug.Log("提交检测")
                                            }
                                    });
                                }
                                )
                            )
                    }
                    )
                );
        }

        string MidStrEx(string sourse, string startstr, string endstr)
        {
            string result = string.Empty;
            int startindex, endindex;
            try
            {
                startindex = sourse.IndexOf(startstr);
                if (startindex == -1)
                    return result;
                string tmpstr = sourse.Substring(startindex + startstr.Length);
                endindex = tmpstr.IndexOf(endstr);
                if (endindex == -1)
                    return result;
                result = tmpstr.Remove(endindex);
            }
            catch (Exception ex)
            {
                Debug.Log("MidStrEx Err:" + ex.Message);
            }
            return result;
        }


        List<Widget> GetInputCell()
        {
            List<Widget> list = new List<Widget>();
            for (int i = 0; i < cellCount; i++)
            {
                list.Add(new Expanded(
                    flex: 1,
                    child: new Center(child: new Container(
                        width: 50,
                        height: 50,
                        margin: EdgeInsets.only(left: 5, right: 5),
                        alignment: Alignment.center,
                        child: GetFoucus(i),
                        decoration:new BoxDecoration(border: new Border(bottom: new BorderSide(width:1,color: Colors.grey)))
                        //decoration:new BoxDecoration(border:Border.all(color:Colors.grey,width:1))
                            )
                        ))
                    );
            }


            return list;
        }

        Widget GetFoucus(int index)
        {
            if (code.Length  == index)
            {
                return new Container(width: 45, height: 45, child: Image.network(Application.streamingAssetsPath + "/Icons/flash.gif"));
            }
            else
            {
                return new Text(
                data: GetIndexChar(index),
                style: new TextStyle(fontSize: 40, color: Colors.black, fontWeight: FontWeight.w900)
                );
            }
        }


        string GetIndexChar(int index)
        {
            if (code == null || string.IsNullOrEmpty(code))
            {
                return "";
            }
            if (code.Length > index)
            {
                return code[index].ToString();
            }
            else
            {
                return "";
            }
        }

    }
비밀번호 분실은 계정 등록 및 SMS 로그인과 유사하므로 여기서 설명하지 않겠습니다.