new FormData() -- 업로드 시 콘텐츠를 파일 스트림으로 변환해야 합니다.
new FileReader()--base64 압축, 현재 알려지지 않음
1. 엑셀 파일 내보내기
세 종류의 내보내기: 하나는 순수 프론트엔드 내보내기이고, 두 가지 백엔드 내보내기: 주소 내보내기를 위한 백엔드로 나뉘며, 다른 하나는 파일 스트림 형식으로 내보내기입니다. 막히지 않고 백엔드. 매우 큰
Blod : BLOB는 큰 개체를 포함하여 이진 큰 개체를 저장하기 위한 컨테이너입니다. 굵은 개체를 만듭니다.
백엔드는 이진 데이터 스트림을 반환하여 Excel을 생성합니다.
① Template Acquisition--Export 클릭, 확인 팝업창, Confirm 클릭
② 인터페이스 호출, 결과 얻기, 인터페이스의 responseType: 'blob'
③ 윈도우의 url 메소드 호출 후 태그 생성 후 a = url 클릭 후 설정 후 다운로드 클릭
-- 파일을 pdf로 내보낼 때 다음 유형으로 수정: 'application/pdf;chartset=UTF-8'

  // 模板获取

  const getTemplate = async () => {
    const res = await getStuTemplate()
    // const blob = new Blob(['\ufeff' + res], { type: 'application/vnd.ms-excel' })

    // 调用window的url方法
    const url = window.URL.createObjectURL(res)

    // 通过创建a标签实现
    const link = document.createElement('a')
    link.href = url

    // 命名
    // link.download = res?.headers['content-disposition'].split(';')[1].split('=')[1] || '模板'
    link.download = decodeURI('考生信息')
    document.body.appendChild(link)

    // 下载文件
    link.click()

    // 释放内存
    document.body.removeChild(link)
  }
// 考生信息--导出excel模板
export async function getStuTemplate(params?: any) {
return request(`/${Proxy_Api}/entrantManage/exportExcel`, {
method: 'GET',
responseType: 'blob',
params,
})
}// 导出 -- PDF
const getTemplate = async () => {
const res = await getStuTemplate({ code })
// 创建blob对象,解析流数据
const blob = new Blob([res], { type: 'application/pdf;chartset=UTF-8'})
// 调用window的url方法,根据解析后的blob对象创建URL 对象
const url = window.URL.createObjectURL(blob)
// 通过创建a标签实现
const link = document.createElement('a')
link.href = url
// 命名
// link.download = res?.headers['content-disposition'].split(';')[1].split('=')[1] || '模板'
link.download = decodeURI('请假统计')
document.body.appendChild(link)
// 下载文件
link.click()
// 释放内存
document.body.removeChild(link)
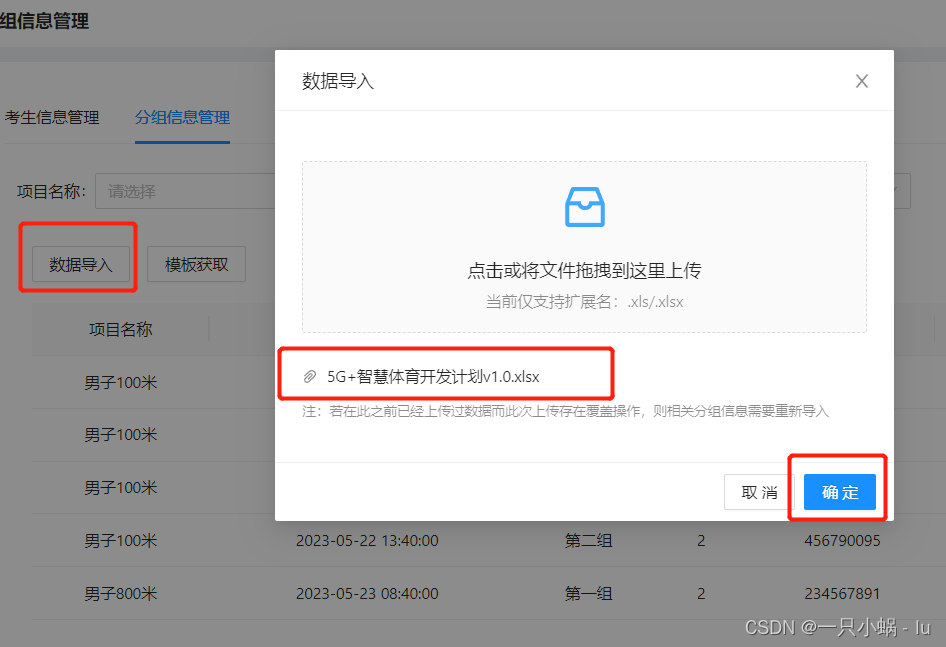
}둘, 엑셀 파일 가져오기 - 업로드
①Dragger 구성 요소를 사용하여 업로드하고 업로드를 클릭하고 파일을 선택하십시오.
② 컴포넌트의 props 설정, beforeUpload hook 함수로 파일 가로채기, action address 미설정, 자동업로드 취소
③ beforeUpload를 통해 기본 업로드를 차단하여 업로드된 파일을 처리하고 파일 형식을 판단합니다.
④ 모달 팝업창에서 확인 클릭 후 새로운 FormData()를 생성하고, append를 사용하고, fetch 요청을 보내고, 반환된 데이터를 json 형식으로 변환해야 합니다.
① 设置组件

<Modal destroyOnClose={true} title="数据导入" visible={isUploadOpen} onOk={handleOkUpload} onCancel={handleCancelUpload} width={550}>
        <Dragger {...props} style={

   { marginBottom: 20, marginTop: 20 }}>
          <p className="ant-upload-drag-icon"><InboxOutlined /></p>
          <p className="ant-upload-text">点击或将文件拖拽到这里上传</p>
          <p className="ant-upload-hint">当前仅支持扩展名:.xls/.xlsx</p>
        </Dragger>
        <p style={

   { fontSize: 12, color: '#00000073', marginTop: 10 }}>注:若在此之前已经上传过数据而此次上传存在覆盖操作,则相关分组信息需要重新导入</p>
      </Modal>

// dragger组件
② 设置组件props
// 设置文件变量
const [oneFile, setOneFile] = useState<any>();
const props: UploadProps = {
maxCount: 1, //最大数量
multiple: false, //是否支持多选
onRemove: (file) => { //删除
setOneFile(null)
},
// beforeUpload 拦截默认上传,回调参数就是file文件
// 可以对文件类型进行判断
beforeUpload: (file) => {
const fileName = file.name.substring(file.name.lastIndexOf('.') + 1, file.name.length)
const fileType = fileName == 'xls' || fileName == 'xlsx'
if (!fileType) {
message.error('上传失败,请上传xls/xlsx格式的文件')
} else {
setOneFile(file)
}
return false;
},
};③ 上传文件
/**点击上传 */
const handleOkUpload = () => {
const formData = new FormData();
formData.append('file', oneFile as RcFile);
fetch(`${Proxy_Api}/entrantManage/importExcel/${code}`, {
method: 'POST',
body: formData,
})
.then((res) => {
return res.json()
})
.then((res) => {
if (res?.success) {
message.success('导入成功');
setOneFile(null)
setIsUploadOpen(false)
} else {
message.error(res.desc)
}
})
.catch(() => {
message.error('导入失败');
})
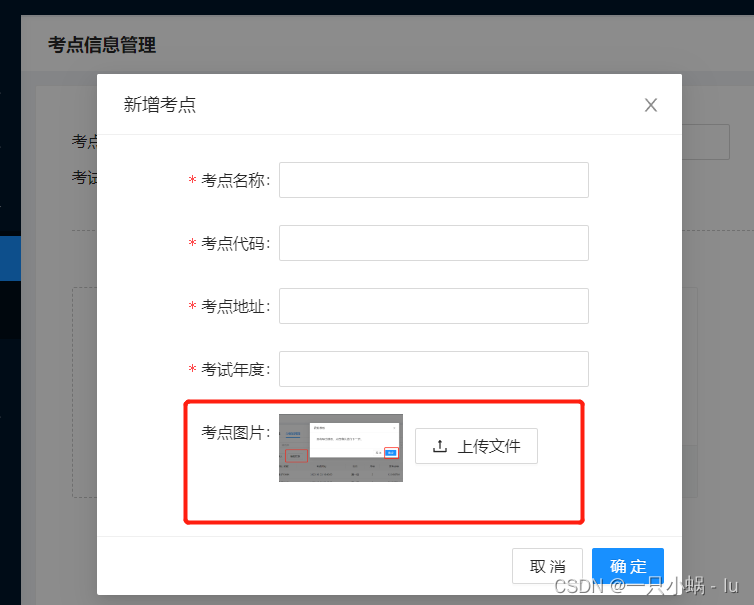
};3. 사진 업로드
① 소품 업로드, 액션 설정 안함, 비포업로드 설정, 업로드 파일 가로채기
② 업로드된 파일, 형식, 크기를 판단하여 매번 업로드 전 변수 oneFile을 수정하여 최종 제출
③ props의 onChange를 설정하고 업로드된 파일을 변경할 때 base64 메소드를 호출하고 imageUrl 변수를 수정하여 현재 업로드된 이미지를 페이지에 표시하도록 합니다.
④ 제출, 파일 스트림으로 변환할 새 FormData, 추가 사용, 가져오기 요청 보내기, 반환 데이터를 json 형식으로 변환해야 함
① 设置组件

const [imageUrl, setImageUrl] = useState<any>();

 <Form.Item label="考点图片" name="photo">

    <Upload  {...props} >

        {imageUrl ?

        // 上传图片后,图片反显,图片+上传按钮

        [<img src={imageUrl} alt="avatar" style={

   { height: '60px', marginRight: 10 }} />, <Button icon={<UploadOutlined />}>上传文件</Button>]

        : <Button icon={<UploadOutlined />}>上传文件</Button>}</Upload>

 </Form.Item>
② 设置上传props
// 上传的props
const props: UploadProps = {
maxCount: 1,
multiple: false,
name: "avatar",
action: "#",
listType: "picture",
className: "avatar-uploader",
showUploadList: false,
onRemove: (file) => {
setOneFile(null)
},
/**上传文件之前的钩子,参数为上传的文件,可设置文件格式和大小,若返回false停止上传 */
beforeUpload: beforeUpload,
onChange: handleChange,
};③ 提交上传文件
const [oneFile, setOneFile] = useState<any>(); //文件变量
/**上传文件之前的钩子,参数为上传的文件,可设置文件格式和大小,若返回false停止上传 */
const beforeUpload = (file: RcFile) => {
const isJpgOrPng = file.type === 'image/jpeg' || file.type === 'image/png';
if (!isJpgOrPng) {
message.error('请上传 JPG/PNG 格式的图片!');
}
const isLt2M = file.size / 1024 / 1024 < 2;
if (!isLt2M) {
message.error('图片需要小于 2MB!');
}
setOneFile(file)
return isJpgOrPng && isLt2M;
// 返回false ,不请求,但是获取不到显示图片,用action:"#",替换不请求
// return false;
}; ④ base64设置反显图片
// 上传判断,是否显示图片
const getBase64 = (img: RcFile, callback: (url: string) => void) => {
const reader = new FileReader();
reader.addEventListener('load', () => callback(reader.result as string));
// 方法可以将读取到的文件编码成DataURL ,可以将资料(例如图片、excel文件)内嵌在网页之中,不用放到外部文件
reader.readAsDataURL(img);
};
  ⑤ onChange--上传文件改变时的回调 */

  const handleChange: UploadProps['onChange'] = (info: UploadChangeParam<UploadFile>) => {

    if (info.file.status === 'uploading') {
      return;
    }

    if (info.file.status === 'done') {
      getBase64(info.file.originFileObj as RcFile, (url) => {
        setImageUrl(url);
      });
    }
  };
⑥ 提交
/**新增、修改--确认 */
const handleOk = () => {
addForm.validateFields().then(async (values) => {
if (imageUrl) {
const { address, examYear, code, name } = values
let newForm = new FormData()
newForm.append("address", address);
newForm.append("examYear", examYear);
newForm.append('code', code);
newForm.append('name', name);
newForm.append('photo', oneFile);
fetch(`${Proxy_Api}/examPlaceManage`, {
method: 'POST',
body: newForm,
})
.then((res) => {
return res.json()
})
.then((res) => {
if (res?.success) {
message.success('新增成功');
setOneFile(null)
setIsModalOpen(false);
} else {
const { desc } = res
message.error(desc);
}
})
.catch(() => {
message.error('新增失败');
})