前言:안녕하세요 여러분, 제 이름은 드림입니다. 오늘은 OpenCV를 사용하여 제스처를 제어 하고 작동 경험을 즉시 개선하는배워보겠습니다경계를 넘어 OpenCV 제스처 제어 드래그 기능이 등장합니다.
1. 주요 단계 및 라이브러리 기능 소개
1. 주요 단계
이 실험을 구현하기 위한 주요 단계는 다음과 같습니다.
- OpenCV 라이브러리를 가져옵니다.
- OpenCV를 통해 카메라의 비디오 스트림을 읽습니다.
- 색 공간 변환, 임계값 분할 등의 피부색 감지 알고리즘을 사용하여 손 영역을 식별합니다.
- 손의 윤곽선을 찾기 위해 손 영역에 대한 윤곽선 검출을 수행합니다.
- 손의 윤곽에 따라 손가락 키 포인트의 픽셀 좌표가 획득됩니다. 드래그 동작의 경우 검지와 중지의 위치에 집중할 수 있습니다.
- 검지 끝과 중지 끝 사이의 거리를 계산하고 드래그 동작을 트리거하는 조건이 충족되는지 확인합니다.
- 조건이 충족되면 피타고라스 정리를 사용하여 거리를 계산하고 직사각형 영역의 색상을 변경하여 드래그가 트리거되었음을 나타낼 수 있습니다.
- 직사각형이 손가락의 움직임을 따르도록 손가락의 위치에 따라 직사각형의 좌표를 업데이트합니다.
- 손가락을 놓으면 직사각형의 움직임이 중지됩니다.
2. 필요한 모듈을 가져옵니다.
# 导入OpenCV
import cv2
# 导入mediapipe
import mediapipe as mp

# 导入其他依赖包
import time
import math
3. 블록 관리 카테고리
(SquareManager)는 사각형 관련 작업을 생성, 표시, 업데이트 및 처리하는 데 사용되는 사각형 관리자입니다.
1. 블록 관리자를 초기화합니다.
블록 관리자를 초기화하고, 블록의 길이를 (rect_width)파라미터로 전달하고, 블록 목록, 거리, 활성화 상태, 활성화된 블록 ID 등 의 속성을 초기화합니다.
class SquareManager:
    def __init__(self, rect_width):
        # 方框长度
        self.rect_width = rect_width

        # 方块列表
        self.square_count = 0
        self.rect_left_x_list = []
        self.rect_left_y_list = []
        self.alpha_list = []

        # 中指与矩形左上角点的距离
        self.L1 = 0
        self.L2 = 0

        # 激活移动模式
        self.drag_active = False

        # 激活的方块ID
        self.active_index = -1
2. 블록 생성
블록을 생성하고 해당 목록에 블록의 왼쪽 상단 좌표와 투명도를 추가합니다.
# 创建一个方块,但是没有显示
    def create(self, rect_left_x, rect_left_y, alpha=0.4):
        # 将方块的左上角坐标和透明度添加到相应的列表中
        self.rect_left_x_list.append(rect_left_x)
        self.rect_left_y_list.append(rect_left_y)
        self.alpha_list.append(alpha)
        self.square_count += 1
3. 디스플레이 상자 위치 업데이트
블록의 상태에 따라 이미지 위에 블록이 그려지고 투명도를 이용해 원본 이미지에 오버레이 이미지가 겹쳐집니다.
 # 更新显示方块的位置
    def display(self, class_obj):
        # 遍历方块列表
        for i in range(0, self.square_count):
            x = self.rect_left_x_list[i]
            y = self.rect_left_y_list[i]
            alpha = self.alpha_list[i]

            overlay = class_obj.image.copy()
             # 如果方块处于激活状态,绘制紫色方块;否则绘制蓝色方块
            if (i == self.active_index):
                cv2.rectangle(overlay, (x, y), (x + self.rect_width, y + self.rect_width), (255, 0, 255), -1)
            else:
                cv2.rectangle(overlay, (x, y), (x + self.rect_width, y + self.rect_width), (255, 0, 0), -1)

            # 使用透明度将叠加图像叠加到原始图像上
            class_obj.image = cv2.addWeighted(overlay, alpha, class_obj.image, 1 - alpha, 0)
4. 블록의 착지점 결정
주어진 좌표가 블록 내에 있는지 확인하고 블록의 ID를 반환합니다.
    # 判断落在哪个方块上,返回方块的ID
    def checkOverlay(self, check_x, check_y):
        # 遍历方块列表
        for i in range(0, self.square_count):
            x = self.rect_left_x_list[i]
            y = self.rect_left_y_list[i]

            # 检查指定点是否在方块内
            if (x < check_x < (x + self.rect_width)) and (y < check_y < (y + self.rect_width)):
                # 保存被激活的方块ID
                self.active_index = i
                return i

        return -1
5. 거리 계산 및 위치 업데이트
setLen 메서드: 활성화된 블록과 손가락 끝 사이의 거리를 계산합니다.
updateSquare 메서드: 주어진 새 좌표를 기반으로 활성 사각형의 위치를 업데이트합니다.
    # 计算与指尖的距离
    def setLen(self, check_x, check_y):
        # 计算距离
        self.L1 = check_x - self.rect_left_x_list[self.active_index]
        self.L2 = check_y - self.rect_left_y_list[self.active_index]

    # 更新方块位置
    def updateSquare(self, new_x, new_y):
        self.rect_left_x_list[self.active_index] = new_x - self.L1
        self.rect_left_y_list[self.active_index] = new_y - self.L2
3. 제어 범주 식별
1. 인식 제어 클래스 초기화
class HandControlVolume:
    def __init__(self):
        # 初始化mediapipe
        self.mp_drawing = mp.solutions.drawing_utils
        self.mp_drawing_styles = mp.solutions.drawing_styles
        self.mp_hands = mp.solutions.hands

        # 中指与矩形左上角点的距离
        self.L1 = 0
        self.L2 = 0

        # image实例,以便另一个类调用
        self.image = None
HandControlVolume초기화 mediapipe및 存储中指与矩形左上角点的距离和image인스턴스화에 사용됩니다.
__init__방법: 개체를 초기화할 때 Drawing_utils, Drawing_styles 및 Hands를 포함하여 미디어 파이프를 초기화합니다. 또한 가운데 손가락과 직사각형의 왼쪽 상단 모서리 사이의 거리와 이미지 인스턴스도 초기화됩니다.
미디어파이프를 통해 손의 특징점 검출 및 자세 추정이 가능하며, 이후 제스처 인식 및 처리가 가능하다. 다른 클래스가 이미지 인스턴스를 호출할 수 있도록 클래스의 속성으로 저장하여 동작 인식 및 제어 작업을 편리하게 처리할 수 있습니다.
2. 주요 기능
코드의 이 부분은 주로 제스처 인식 및 상호 작용을 위해 비디오 스트림 처리를 초기화하고 준비하는 데 사용됩니다.
    def recognize(self):
        # 计算刷新率
        fpsTime = time.time()

        # OpenCV读取视频流
        cap = cv2.VideoCapture(0)
        # 视频分辨率
        resize_w = int(cap.get(cv2.CAP_PROP_FRAME_WIDTH))
        resize_h = int(cap.get(cv2.CAP_PROP_FRAME_HEIGHT))

        # 画面显示初始化参数
        rect_percent_text = 0

        # 初始化方块管理器
        squareManager = SquareManager(150)

        # 创建多个方块
        for i in range(0, 5):
            squareManager.create(200 * i + 20, 200, 0.6)

        with self.mp_hands.Hands(min_detection_confidence=0.7,
                                 min_tracking_confidence=0.5,
                                 max_num_hands=2) as hands:
            while cap.isOpened():

                # 初始化矩形
                success, self.image = cap.read()
                self.image = cv2.resize(self.image, (resize_w, resize_h))

                if not success:
                    print("空帧.")
                    continue
-
resize_w및resize_h: 카메라 해상도에 따라 획득되고 후속 처리를 위해 이미지 크기로 조정된 비디오 프레임의 너비와 높이입니다. -
rect_percent_text: 화면 표시 초기화 매개변수로 화면에 텍스트를 표시하는 데 사용될 수 있습니다. -
squareManager: 블록 관리자 클래스의 인스턴스를 초기화하고 블록 길이를 150으로 설정합니다.
루프를 사용하면 5개의 블록이 생성되고 create메소드를 통해 블록 관리자에 추가됩니다. 비디오 스트림에서 프레임 이미지를 읽고 지정된 크기로 크기를 조정하는 루프를 입력합니다. 프레임 이미지를 성공적으로 읽으면 추가로 처리되고, 그렇지 않으면 오류 메시지가 출력됩니다.
3. 성능 및 이미지 처리 개선
                self.image.flags.writeable = False
                # 转为RGB
                self.image = cv2.cvtColor(self.image, cv2.COLOR_BGR2RGB)
                # 镜像
                self.image = cv2.flip(self.image, 1)
                # mediapipe模型处理
                results = hands.process(self.image)

                self.image.flags.writeable = True
                self.image = cv2.cvtColor(self.image, cv2.COLOR_RGB2BGR)
-
self.image.flags.writeable = False: 성능을 향상하고 데이터 복사를 방지하려면 이미지를 쓸 수 없도록 설정합니다. -
self.image = cv2.cvtColor(self.image, cv2.COLOR_BGR2RGB): 미디어파이프 모델에서 처리되는 입력 이미지는 RGB 형식이어야 하므로 BGR 형식의 이미지를 RGB 형식으로 변환합니다. -
self.image = cv2.flip(self.image, 1): 미디어파이프 모델에서 예상되는 손 위치에 맞게 이미지를 대칭 반전합니다. -
results = hands.process(self.image): 제스처 인식 및 처리를 위해 처리된 이미지를 미디어파이프의 손 모델에 전달합니다. -
self.image = cv2.cvtColor(self.image, cv2.COLOR_RGB2BGR): 후속 표시 및 처리를 위해 이미지를 RGB 형식에서 BGR 형식으로 다시 변환합니다.
4. 손바닥 감지, 핵심 포인트 및 연결 관계 표시
                if results.multi_hand_landmarks:
                    # 遍历每个手掌
                    for hand_landmarks in results.multi_hand_landmarks:
                        # 在画面标注手指
                        self.mp_drawing.draw_landmarks(
                            self.image,
                            hand_landmarks,
                            self.mp_hands.HAND_CONNECTIONS,
                            self.mp_drawing_styles.get_default_hand_landmarks_style(),
                            self.mp_drawing_styles.get_default_hand_connections_style())
-
if results.multi_hand_landmarks:: 손바닥이 감지되는지 확인하세요. 손바닥이 감지되면 다음 단계로 진행하고, 그렇지 않으면 건너뜁니다. -
for hand_landmarks in results.multi_hand_landmarks:: 감지된 각 손바닥을 탐색합니다. -
self.mp_drawing.draw_landmarks: 미디어파이프draw_landmarks방식을 사용하여 이미지에 손가락의 주요 지점과 연결 관계를 표시합니다.
self.image: 이미지를 입력합니다. hand_landmarks: 손바닥의 포인트.
self.mp_hands.HAND_CONNECTIONS: 손가락 사이의 연결입니다.
5. 검출된 손바닥을 분석하여 손가락의 핵심 포인트를 추출합니다.
손바닥을 검출하여 손가락의 키포인트를 추출한 후 손가락의 좌표를 저장합니다.
                        landmark_list = []

                        # 用来存储手掌范围的矩形坐标
                        paw_x_list = []
                        paw_y_list = []
                        for landmark_id, finger_axis in enumerate(
                                hand_landmarks.landmark):
                            landmark_list.append([
                                landmark_id, finger_axis.x, finger_axis.y,
                                finger_axis.z
                            ])
                            paw_x_list.append(finger_axis.x)
                            paw_y_list.append(finger_axis.y)
                        if landmark_list:
                            # 比例缩放到像素
                            ratio_x_to_pixel = lambda x: math.ceil(x * resize_w)
                            ratio_y_to_pixel = lambda y: math.ceil(y * resize_h)

                            # 设计手掌左上角、右下角坐标
                            paw_left_top_x, paw_right_bottom_x = map(ratio_x_to_pixel,
                                                                     [min(paw_x_list), max(paw_x_list)])
                            paw_left_top_y, paw_right_bottom_y = map(ratio_y_to_pixel,
                                                                     [min(paw_y_list), max(paw_y_list)])

                            # 给手掌画框框
                            cv2.rectangle(self.image, (paw_left_top_x - 30, paw_left_top_y - 30),
                                          (paw_right_bottom_x + 30, paw_right_bottom_y + 30), (0, 255, 0), 2)

                            # 获取中指指尖坐标
                            middle_finger_tip = landmark_list[12]
                            middle_finger_tip_x = ratio_x_to_pixel(middle_finger_tip[1])
                            middle_finger_tip_y = ratio_y_to_pixel(middle_finger_tip[2])

                            # 获取食指指尖坐标
                            index_finger_tip = landmark_list[8]
                            index_finger_tip_x = ratio_x_to_pixel(index_finger_tip[1])
                            index_finger_tip_y = ratio_y_to_pixel(index_finger_tip[2])
                            # 中间点
                            between_finger_tip = (middle_finger_tip_x + index_finger_tip_x) // 2, (
                                        middle_finger_tip_y + index_finger_tip_y) // 2

                            thumb_finger_point = (middle_finger_tip_x, middle_finger_tip_y)
                            index_finger_point = (index_finger_tip_x, index_finger_tip_y)
-
landmark_list: 손가락 요점 정보를 저장하는데 사용되는 목록입니다. -
paw_x_list및paw_y_list: 손바닥 범위를 저장하는 데 사용되는 직사각형 상자의 가로 및 세로 좌표입니다. -
루프에서는 각 손가락의 키 포인트의 인덱스, x 좌표, y 좌표, z 좌표가 에 저장되고
landmark_list, 손바닥 범위의 가로 및 세로 좌표는paw_x_list및 에 저장됩니다paw_y_list.
비어 있지 않은 경우 landmark_list, 즉 손가락 키 포인트가 감지되고 ratio_x_to_pixel: ratio_y_to_pixel두 개의 람다 함수, 상대 스케일을 픽셀 좌표로 변환하는 데 사용되는 함수입니다. 손바닥 범위의 직사각형 좌표를 기준으로 손바닥 영역의 왼쪽 상단과 오른쪽 하단의 좌표를 계산하고 상자를 그립니다. 의 정보를 이용하여 landmark_list중지의 끝 좌표와 검지 끝의 좌표를 구하고 이를 픽셀 좌표로 변환합니다. 중지 끝 좌표와 검지 끝 좌표 사이의 중간점을 계산합니다. 가운데 손가락 끝의 좌표와 검지 끝의 좌표를 합산하여 저장 thumb_finger_point합니다 index_finger_point.
검출된 손바닥 정보를 분석하여 손가락의 핵심점 좌표를 추출하고, 손가락 좌표를 픽셀 좌표로 변환한 후, 중지손가락 끝과 검지 끝의 위치를 영상에 표시합니다.
6. 손가락 끝의 원과 연결선을 그려 거리를 계산합니다.
                            circle_func = lambda point: cv2.circle(self.image, point, 10, (255, 0, 255), -1)
                            self.image = circle_func(thumb_finger_point)
                            self.image = circle_func(index_finger_point)
                            self.image = circle_func(between_finger_tip)
                            # 画2点连线
                            self.image = cv2.line(self.image, thumb_finger_point, index_finger_point, (255, 0, 255), 5)
                            # 勾股定理计算长度
                            line_len = math.hypot((index_finger_tip_x - middle_finger_tip_x),
                                                  (index_finger_tip_y - middle_finger_tip_y))
                            # 将指尖距离映射到文字
                            rect_percent_text = math.ceil(line_len)
-
cv2.line이미지 위에 중지 끝과 검지 끝을 연결하는 선을 그리는 기능입니다. -
math.hypot함수는 직각삼각형의 빗변의 길이를 계산합니다. -
rect_percent_text후속 텍스트 표시를 위한 매개변수로 사용할 변수 에 손가락 끝 사이의 거리를 매핑합니다 .
7. 손가락 사이의 거리를 추적하세요
                            if squareManager.drag_active:
                                # 更新方块
                                squareManager.updateSquare(between_finger_tip[0], between_finger_tip[1])
                                if (line_len > 100):
                                    # 取消激活
                                    squareManager.drag_active = False
                                    squareManager.active_index = -1

                            elif (line_len < 100) and (squareManager.checkOverlay(between_finger_tip[0],
                                                                                  between_finger_tip[1]) != -1) and (
                                    squareManager.drag_active == False):
                                # 激活
                                squareManager.drag_active = True
                                # 计算距离
                                squareManager.setLen(between_finger_tip[0], between_finger_tip[1])
squareManager속성 이 True인 경우 drag_active, 즉 직사각형의 이동 모드가 활성화된 경우 squareManager.updateSquare메소드를 사용하여 직사각형의 위치를 업데이트합니다. 두 손가락 사이의 거리가 100보다 큰 경우, 즉 손가락 사이의 거리가 임계값을 초과하는 경우 직사각형의 활성화 모드가 취소되고 이는 drag_activeFalse로 설정되고 active_index-1로 설정됩니다.
그렇지 않은 경우 두 손가락 사이의 거리가 100 미만이고 손가락 사이에 겹치는 직사각형이 있으면 직사각형의 이동 모드가 활성화되지 않습니다. 직사각형의 이동 모드를 활성화하려면 drag_activeTrue로 설정하세요. 방법을 사용하여 손가락 사이의 거리를 기준으로 직사각형의 길이를 계산하고 설정합니다 squareManager.setLen.
8.디스플레이 이미지
                squareManager.display(self)

                # 显示距离
                cv2.putText(self.image, "Distance:" + str(rect_percent_text), (10, 120), cv2.FONT_HERSHEY_PLAIN, 3,
                            (255, 0, 0), 3)

                # 显示当前激活
                cv2.putText(self.image, "Active:" + (
                    "None" if squareManager.active_index == -1 else str(squareManager.active_index)), (10, 170),
                            cv2.FONT_HERSHEY_PLAIN, 3, (255, 0, 0), 3)

                # 显示刷新率FPS
                cTime = time.time()
                fps_text = 1 / (cTime - fpsTime)
                fpsTime = cTime
                cv2.putText(self.image, "FPS: " + str(int(fps_text)), (10, 70),
                            cv2.FONT_HERSHEY_PLAIN, 3, (255, 0, 0), 3)
                # 显示画面
                cv2.imshow('virtual drag and drop', self.image)

                if cv2.waitKey(5) & 0xFF == 27:
                    break
            cap.release()

control = HandControlVolume()
control.recognize()
recognize주요 기능 의 끝부분 ( )은 이미지의 상태와 새로 고침 빈도를 표시하고 직사각형을 표시하고 키 응답을 기다리는 데 사용됩니다. squareManager.display직사각형을 표시하는 방법을 사용합니다 . cv2.waitKey키 입력을 기다리는 함수이며, 누른 키가 ESC 키(해당 ASCII 코드는 27)이면 루프를 종료합니다.
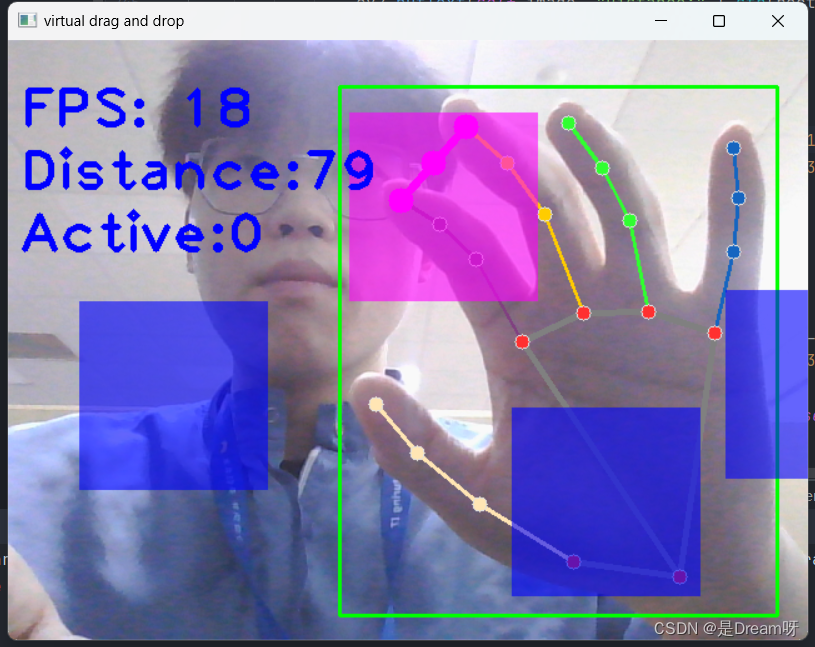
처리된 이미지, 직사각형 상태, 새로 고침 빈도를 화면에 표시하고 키 응답을 기다립니다. 이를 통해 대화형 가상 드래그 앤 드롭 기능이 가능해집니다. 다음으로 실제 작동 효과를 살펴보겠습니다.
4. 실제 시연

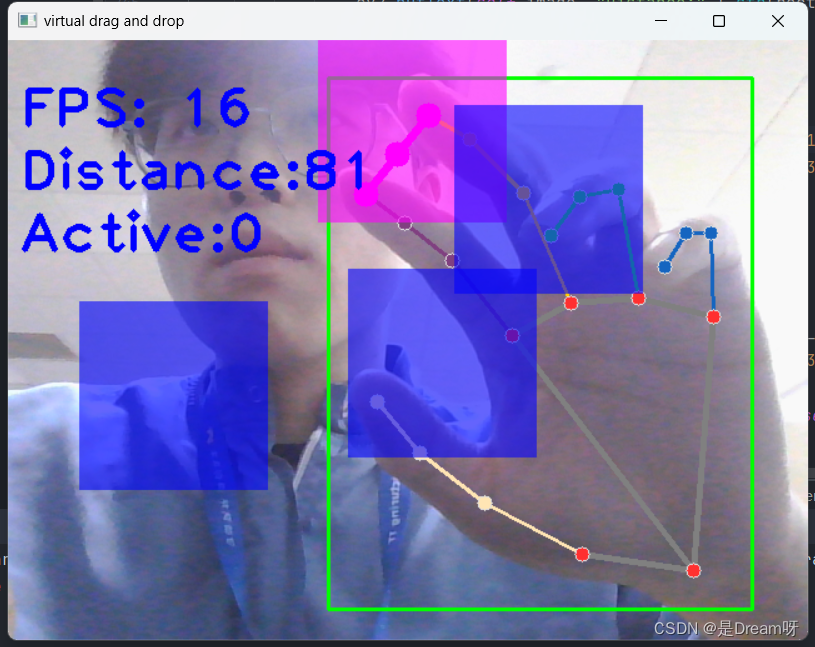
시연을 통해 손으로 블록을 드래그할 수 있고, 좋은 상태에서 효과를 얻을 수 있다.
5. 소스코드 공유
import cv2
import mediapipe as mp
import time
import math
class SquareManager:
    def __init__(self, rect_width):

        # 方框长度
        self.rect_width = rect_width

        # 方块list
        self.square_count = 0
        self.rect_left_x_list = []
        self.rect_left_y_list = []
        self.alpha_list = []

        # 中指与矩形左上角点的距离
        self.L1 = 0
        self.L2 = 0

        # 激活移动模式
        self.drag_active = False

        # 激活的方块ID
        self.active_index = -1

    # 创建一个方块,但是没有显示
    def create(self, rect_left_x, rect_left_y, alpha=0.4):
        self.rect_left_x_list.append(rect_left_x)
        self.rect_left_y_list.append(rect_left_y)
        self.alpha_list.append(alpha)
        self.square_count += 1

    # 更新位置
    def display(self, class_obj):
        for i in range(0, self.square_count):
            x = self.rect_left_x_list[i]
            y = self.rect_left_y_list[i]
            alpha = self.alpha_list[i]

            overlay = class_obj.image.copy()

            if (i == self.active_index):
                cv2.rectangle(overlay, (x, y), (x + self.rect_width, y + self.rect_width), (255, 0, 255), -1)
            else:
                cv2.rectangle(overlay, (x, y), (x + self.rect_width, y + self.rect_width), (255, 0, 0), -1)

            # Following line overlays transparent rectangle over the self.image
            class_obj.image = cv2.addWeighted(overlay, alpha, class_obj.image, 1 - alpha, 0)

    # 判断落在哪个方块上,返回方块的ID
    def checkOverlay(self, check_x, check_y):
        for i in range(0, self.square_count):
            x = self.rect_left_x_list[i]
            y = self.rect_left_y_list[i]

            if (x < check_x < (x + self.rect_width)) and (y < check_y < (y + self.rect_width)):
                # 保存被激活的方块ID
                self.active_index = i

                return i

        return -1

    # 计算与指尖的距离
    def setLen(self, check_x, check_y):
        # 计算距离
        self.L1 = check_x - self.rect_left_x_list[self.active_index]
        self.L2 = check_y - self.rect_left_y_list[self.active_index]

    # 更新方块
    def updateSquare(self, new_x, new_y):
        # print(self.rect_left_x_list[self.active_index])
        self.rect_left_x_list[self.active_index] = new_x - self.L1
        self.rect_left_y_list[self.active_index] = new_y - self.L2


# 识别控制类
class HandControlVolume:
    def __init__(self):
        # 初始化medialpipe
        self.mp_drawing = mp.solutions.drawing_utils
        self.mp_drawing_styles = mp.solutions.drawing_styles
        self.mp_hands = mp.solutions.hands

        # 中指与矩形左上角点的距离
        self.L1 = 0
        self.L2 = 0

        # image实例,以便另一个类调用
        self.image = None

    # 主函数
    def recognize(self):
        # 计算刷新率
        fpsTime = time.time()

        # OpenCV读取视频流
        cap = cv2.VideoCapture(0)
        # 视频分辨率
        resize_w = int(cap.get(cv2.CAP_PROP_FRAME_WIDTH))
        resize_h = int(cap.get(cv2.CAP_PROP_FRAME_HEIGHT))

        # 画面显示初始化参数
        rect_percent_text = 0

        # 初始化方块管理器
        squareManager = SquareManager(150)

        # 创建多个方块
        for i in range(0, 5):
            squareManager.create(200 * i + 20, 200, 0.6)

        with self.mp_hands.Hands(min_detection_confidence=0.7,
                                 min_tracking_confidence=0.5,
                                 max_num_hands=2) as hands:
            while cap.isOpened():

                # 初始化矩形
                success, self.image = cap.read()
                self.image = cv2.resize(self.image, (resize_w, resize_h))

                if not success:
                    print("空帧.")
                    continue

                # 提高性能
                self.image.flags.writeable = False
                # 转为RGB
                self.image = cv2.cvtColor(self.image, cv2.COLOR_BGR2RGB)
                # 镜像
                self.image = cv2.flip(self.image, 1)
                # mediapipe模型处理
                results = hands.process(self.image)

                self.image.flags.writeable = True
                self.image = cv2.cvtColor(self.image, cv2.COLOR_RGB2BGR)
                # 判断是否有手掌
                if results.multi_hand_landmarks:
                    # 遍历每个手掌
                    for hand_landmarks in results.multi_hand_landmarks:
                        # 在画面标注手指
                        self.mp_drawing.draw_landmarks(
                            self.image,
                            hand_landmarks,
                            self.mp_hands.HAND_CONNECTIONS,
                            self.mp_drawing_styles.get_default_hand_landmarks_style(),
                            self.mp_drawing_styles.get_default_hand_connections_style())

                        # 解析手指,存入各个手指坐标
                        landmark_list = []

                        # 用来存储手掌范围的矩形坐标
                        paw_x_list = []
                        paw_y_list = []
                        for landmark_id, finger_axis in enumerate(
                                hand_landmarks.landmark):
                            landmark_list.append([
                                landmark_id, finger_axis.x, finger_axis.y,
                                finger_axis.z
                            ])
                            paw_x_list.append(finger_axis.x)
                            paw_y_list.append(finger_axis.y)
                        if landmark_list:
                            # 比例缩放到像素
                            ratio_x_to_pixel = lambda x: math.ceil(x * resize_w)
                            ratio_y_to_pixel = lambda y: math.ceil(y * resize_h)

                            # 设计手掌左上角、右下角坐标
                            paw_left_top_x, paw_right_bottom_x = map(ratio_x_to_pixel,
                                                                     [min(paw_x_list), max(paw_x_list)])
                            paw_left_top_y, paw_right_bottom_y = map(ratio_y_to_pixel,
                                                                     [min(paw_y_list), max(paw_y_list)])

                            # 给手掌画框框
                            cv2.rectangle(self.image, (paw_left_top_x - 30, paw_left_top_y - 30),
                                          (paw_right_bottom_x + 30, paw_right_bottom_y + 30), (0, 255, 0), 2)

                            # 获取中指指尖坐标
                            middle_finger_tip = landmark_list[12]
                            middle_finger_tip_x = ratio_x_to_pixel(middle_finger_tip[1])
                            middle_finger_tip_y = ratio_y_to_pixel(middle_finger_tip[2])

                            # 获取食指指尖坐标
                            index_finger_tip = landmark_list[8]
                            index_finger_tip_x = ratio_x_to_pixel(index_finger_tip[1])
                            index_finger_tip_y = ratio_y_to_pixel(index_finger_tip[2])
                            # 中间点
                            between_finger_tip = (middle_finger_tip_x + index_finger_tip_x) // 2, (
                                        middle_finger_tip_y + index_finger_tip_y) // 2
                            # print(middle_finger_tip_x)
                            thumb_finger_point = (middle_finger_tip_x, middle_finger_tip_y)
                            index_finger_point = (index_finger_tip_x, index_finger_tip_y)
                            # 画指尖2点
                            circle_func = lambda point: cv2.circle(self.image, point, 10, (255, 0, 255), -1)
                            self.image = circle_func(thumb_finger_point)
                            self.image = circle_func(index_finger_point)
                            self.image = circle_func(between_finger_tip)
                            # 画2点连线
                            self.image = cv2.line(self.image, thumb_finger_point, index_finger_point, (255, 0, 255), 5)
                            # 勾股定理计算长度
                            line_len = math.hypot((index_finger_tip_x - middle_finger_tip_x),
                                                  (index_finger_tip_y - middle_finger_tip_y))
                            # 将指尖距离映射到文字
                            rect_percent_text = math.ceil(line_len)

                            # 激活模式,需要让矩形跟随移动
                            if squareManager.drag_active:
                                # 更新方块
                                squareManager.updateSquare(between_finger_tip[0], between_finger_tip[1])
                                if (line_len > 100):
                                    # 取消激活
                                    squareManager.drag_active = False
                                    squareManager.active_index = -1

                            elif (line_len < 100) and (squareManager.checkOverlay(between_finger_tip[0],
                                                                                  between_finger_tip[1]) != -1) and (
                                    squareManager.drag_active == False):
                                # 激活
                                squareManager.drag_active = True
                                # 计算距离
                                squareManager.setLen(between_finger_tip[0], between_finger_tip[1])

                # 显示方块,传入本实例,主要为了半透明的处理
                squareManager.display(self)

                # 显示距离
                cv2.putText(self.image, "Distance:" + str(rect_percent_text), (10, 120), cv2.FONT_HERSHEY_PLAIN, 3,
                            (255, 0, 0), 3)

                # 显示当前激活
                cv2.putText(self.image, "Active:" + (
                    "None" if squareManager.active_index == -1 else str(squareManager.active_index)), (10, 170),
                            cv2.FONT_HERSHEY_PLAIN, 3, (255, 0, 0), 3)

                # 显示刷新率FPS
                cTime = time.time()
                fps_text = 1 / (cTime - fpsTime)
                fpsTime = cTime
                cv2.putText(self.image, "FPS: " + str(int(fps_text)), (10, 70),
                            cv2.FONT_HERSHEY_PLAIN, 3, (255, 0, 0), 3)
                # 显示画面
                cv2.imshow('virtual drag and drop', self.image)

                if cv2.waitKey(5) & 0xFF == 27:
                    break
            cap.release()

control = HandControlVolume()
control.recognize()