Redis는 클라이언트-서버 모델과 요청/응답을 기반으로 하는 TCP 서비스입니다. 일괄 명령 실행이 발생하면 Redis는 일괄 처리 성능을 향상시키기 위해 파이프라이닝을 제공합니다. 이 기사에서는 Spring Boot 프레임워크에서 Redis의 Lettuce 클라이언트와 Redisson 클라이언트의 파이프라인 기능 지원 원칙을 분석하는 실습을 결합하고, 실습 중에 직면하는 문제를 분석하여 개발자가 다양한 클라이언트의 파이프라인 지원 원칙을 이해하고 방지하는 데 도움을 줄 수 있습니다. 실제 사용상의 문제.
Redis는 이미 mget 및 mset와 같은 배치 명령을 제공하지만 일부 작업은 배치 작업을 지원하지 않거나 전혀 지원하지 않으므로 Redis의 고성능에 반합니다. 이를 위해 Redis는 파이프라인 메커니즘을 기반으로 Redis Pipeline의 새로운 기능을 제공합니다. Redis Pipeline은 여러 명령을 한 번에 보내고 실행 후 결과를 한 번에 반환함으로써 왕복 지연 시간을 줄이고 운영 성능을 향상시켜 클라이언트와 Redis 간의 통신 횟수를 줄이는 기술입니다. 현재 Redis Pipeline은 다양한 버전의 Redis 클라이언트에서 지원됩니다.
2.1 Redis 단일 명령 실행을 위한 기본 단계
Redis는 클라이언트-서버 모델과 요청/응답을 기반으로 하는 TCP 서비스입니다. Redis 클라이언트에 의해 시작된 요청은 일반적으로 서버가 응답한 후 다음 단계를 거칩니다.
클라이언트는 (쿼리/삽입) 요청을 시작하고 소켓 반환을 수신합니다. 이는 일반적으로 Redis 서버의 응답을 기다리는 차단 모드 .
서버는 명령을 처리하고 처리 결과를 클라이언트에 반환합니다.
클라이언트는 서비스로부터 반환 결과를 받고, 프로그램은 차단 코드에서 반환됩니다.
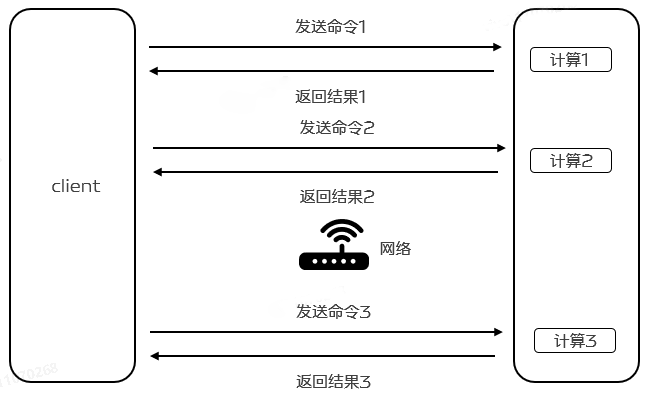
2.2 RTT 시간
Redis 클라이언트와 서버 간에 네트워크 연결을 통해 데이터가 전송됩니다. 데이터 패킷이 클라이언트에서 서버로 도착하고, 서버에서 클라이언트로 데이터가 반환되는 데 걸리는 시간을 RTT(Round Trip Time)라고 합니다. ). Redis가 지속적으로 서버를 요청할 때 RTT 시간이 250ms라면 Redis가 초당 100,000개의 요청을 처리할 수 있더라도 네트워크 전송에 많은 시간이 걸리기 때문에 초당 최대 4개의 요청만 처리한다는 것을 쉽게 알 수 있습니다. , 이로 인해 전반적인 성능이 저하됩니다.

2.3 레디스 파이프라인
효율성을 높이기 위해 이때 Pipeline이 등장합니다. 파이프라이닝은 RRT를 줄일 뿐만 아니라 실제로 한 번에 실행되는 작업 수를 크게 늘립니다. Pipelining을 사용하지 않을 경우, 서버 측에서 데이터 구조에 접근하고 응답을 생성한다는 관점에서 매번 단일 명령을 실행하는 비용이 매우 낮기 때문입니다. 그러나 네트워크 IO를 수행하는 관점에서 보면 비용이 실제로 매우 높습니다. 여기에는 read() 및 write() 시스템 호출이 포함됩니다. 즉, 사용자 모드에서 커널 모드로 전환해야 하며 이러한 컨텍스트 전환 비용이 엄청납니다.
Pipeline을 사용하면 하나의 read() 작업을 통해 여러 명령을 읽을 수 있고, 하나의 write() 작업을 사용하여 여러 명령 응답을 클라이언트가 이전 명령의 실행을 기다리지 않고 한 번에 여러 명령을 보낼 수 있습니다. 결과. RTT를 줄일 뿐만 아니라 IO 호출(IO 호출에는 사용자 모드와 커널 모드 간 전환이 포함됨) 수도 줄어들어 궁극적으로 프로그램의 실행 효율성과 성능이 향상됩니다. 아래 그림과 같이:
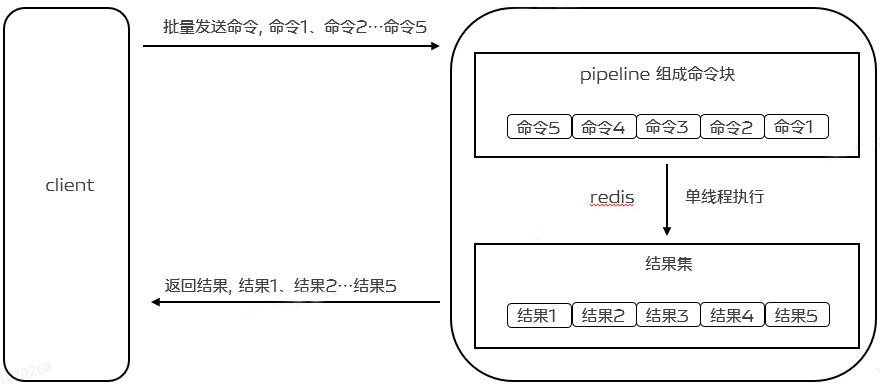
파이프라인을 지원하려면 실제로 서버 측 지원과 클라이언트 측 지원이 모두 필요합니다. 서버의 경우 동일한 TCP 연결을 통해 클라이언트가 보낸 여러 명령을 처리할 수 있어야 하는데, 여기서는 단일 명령을 처리하는 것처럼 여러 명령을 나누어 처리하는 것으로 이해할 수 있습니다. . 클라이언트는 여러 명령을 캐시하고, 버퍼가 가득 차면 명령을 보낸 다음, 버퍼에 쓰고, 마지막으로 Redis 응답을 처리해야 합니다.
3. Pipeline의 기본 사용법 및 성능 비교
jedis를 사용하여 단일 명령을 삽입하고, jedis를 사용하여 파이프라인 모드를 사용하여 삽입하고, redisson을 사용하여 파이프라인 모드를 사용하여 삽입하고 시간 소비를 테스트하는 100,000개의 집합 구조에 정수 값을 삽입하는 다음 예를 살펴보겠습니다.
@Slf4jpublic class RedisPipelineTestDemo { public static void main(String[] args) { Jedis jedis = new Jedis("10.101.17.180", 6379); String zSetKey = "Pipeline-test-set"; int size = 100000; long begin = System.currentTimeMillis(); for (int i = 0; i < size; i++) { jedis.sadd(zSetKey + i, "aaa"); } log.info("Jedis逐一给每个set新增一个value耗时:{}ms", (System.currentTimeMillis() - begin)); begin = System.currentTimeMillis(); for (int i = 0; i < size; i++) { Pipeline.sadd(zSetKey + i, "bbb"); } Pipeline.sync(); log.info("Jedis Pipeline模式耗时:{}ms", (System.currentTimeMillis() - begin)); Config config = new Config(); config.useSingleServer().setAddress("redis://10.101.17.180:6379"); RedissonClient redisson = Redisson.create(config); RBatch redisBatch = redisson.createBatch(); begin = System.currentTimeMillis(); for (int i = 0; i < size; i++) { redisBatch.getSet(zSetKey + i).addAsync("ccc"); } redisBatch.execute(); log.info("Redisson Pipeline模式耗时:{}ms", (System.currentTimeMillis() - begin)); jedis.close(); redisson.shutdown(); }}
테스트 결과는 다음과 같습니다.
Jedis가 각 세트에 하나씩 값을 추가하는 데는 162655ms가 걸립니다.
Jedis 파이프라인 모드에는 504ms가 소요됩니다.
Redisson 파이프라인 모드에는 1399ms가 소요됩니다.
우리는 파이프라인 모드를 사용할 때의 성능이 단일 명령 실행보다 훨씬 더 좋다는 것을 발견했습니다.
실제 사용에서는 많은 애플리케이션이 휴일 동안 애플리케이션 아이콘 스타일을 업데이트해야 하는 시나리오가 있습니다. 작업이 백그라운드 구성을 수행할 때 단일 사용자에게 발행해야 하는 아이콘 스타일을 미리 계산하여 저장할 수 있습니다. Redis에서는 성능 향상을 위해 Redis의 일괄 작업 문제가 포함됩니다.
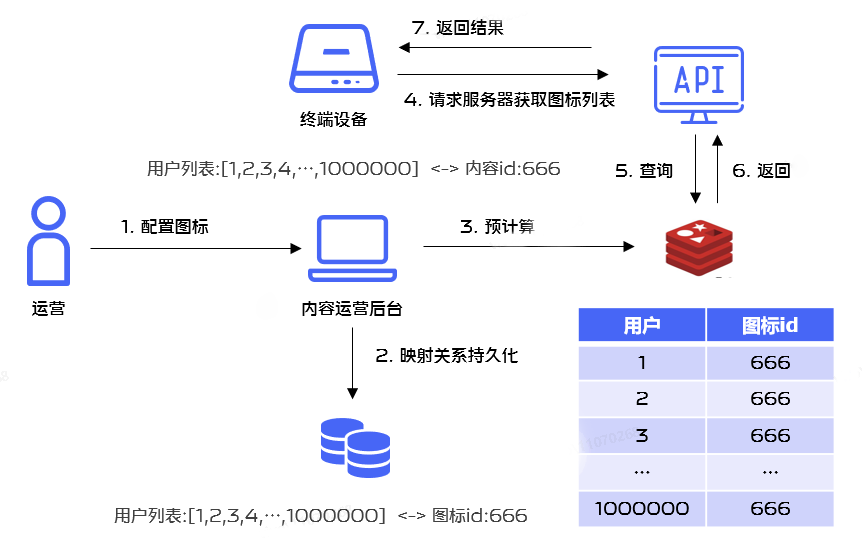
Redis 작업 성능을 향상시키기 위해 우리는 일괄 실행에 Redis Pipelining 메커니즘을 사용하기로 결정했습니다.
4.1 Redis 클라이언트 비교
Java 기술 스택의 경우 Redis에 가장 일반적으로 사용되는 클라이언트는 Jedis, Lettuce 및 Redisson입니다.
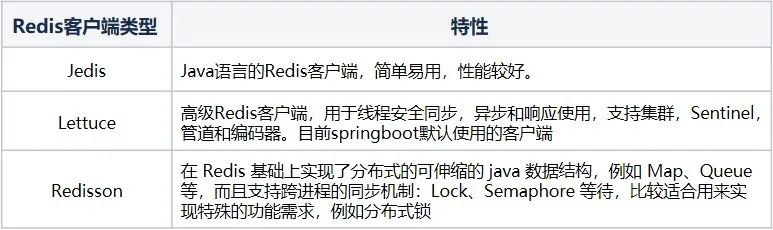
현재 프로젝트는 주로 SpringBoot를 기반으로 개발되고 있으며 Redis의 경우 기본 클라이언트가 Lettuce이므로 Lettuce 클라이언트를 기반으로 분석을 진행하고 있습니다.
4.2 Spring 환경에서 Lettuce 클라이언트를 통한 파이프라인 구현
Spring 환경에서는 Redis Pipeline을 사용하는 것도 매우 간단합니다. spring-data-redis는 다음을 제공합니다.
StringRedisTemplate은 Redis의 작업을 단순화합니다. StringRedisTemplate의 installPipelined 메서드만 호출하면 되지만 매개 변수에 SessionCallback 및 RedisCallback이라는 두 가지 콜백 메서드를 제공합니다 .
두 가지 사용 방법은 다음과 같습니다(여기에서는 집합 구조를 예로 들어 설명합니다).
public void testRedisCallback() { List<Integer> ids= Arrays.asList(1, 2, 3, 4, 5, 6, 7, 8, 9); Integer contentId = 1; redisTemplate.executePipelined(new InsertPipelineExecutionA(ids, contentId)); } @AllArgsConstructor private static class InsertPipelineExecutionA implements RedisCallback<Void> { private final List<Integer> ids; private final Integer contentId; @Override public Void doInRedis(RedisConnection connection) DataAccessException { RedisSetCommands redisSetCommands = connection.setCommands(); ids.forEach(id-> { String redisKey = "aaa:" + id; String value = String.valueOf(contentId); redisSetCommands.sAdd(redisKey.getBytes(), value.getBytes()); }); return null; } }
SessionCallback을 사용하는 방법:
public void testSessionCallback() { List<Integer> ids= Arrays.asList(1, 2, 3, 4, 5, 6, 7, 8, 9); Integer contentId = 1; redisTemplate.executePipelined(new InsertPipelineExecutionB(ids, contentId)); } @AllArgsConstructor private static class InsertPipelineExecutionB implements SessionCallback<Void> { private final List<Integer> ids; private final Integer contentId; @Override public <K, V> Void execute(RedisOperations<K, V> operations) throws DataAccessException { SetOperations<String, String> setOperations = (SetOperations<String, String>) operations.opsForSet(); ids.forEach(id-> { String redisKey = "aaa:" + id; String value = String.valueOf(contentId); setOperations.add(redisKey, value); }); return null; } }
4.3 RedisCallBack과 SessionCallback의 비교
1. RedisCallBack과 SessionCallback 모두 동일한 연결에서 여러 redis 명령을 동시에 실행할 수 있는 콜백을 구현할 수 있습니다.
2. RedisCallback은 기본을 사용합니다.
RedisConnection은 사용하기가 더 까다롭습니다. 예를 들어 위에서 설정한 추가 작업을 수행할 때 키와 값을 변환해야 하는데 이를 읽을 수 없습니다. 그러나 네이티브 API는 비교적 완전한 기능을 제공합니다.
3. SessionCalback은 우수한 캡슐화를 제공하며 이 콜백 메서드를 먼저 사용하도록 선택할 수 있습니다.
최종 코드 구현은 다음과 같습니다.
public void executeB(List<Integer> userIds, Integer iconId) { redisTemplate.executePipelined(new InsertPipelineExecution(userIds, iconId));} @AllArgsConstructorprivate static class InsertPipelineExecution implements SessionCallback<Void> { private final List<Integer> userIds; private final Integer iconId; @Override public <K, V> Void execute(RedisOperations<K, V> operations) throws DataAccessException { SetOperations<String, String> setOperations = (SetOperations<String, String>) operations.opsForSet(); userIds.forEach(userId -> { String redisKey = "aaa:" + userId; String value = String.valueOf(iconId); setOperations.add(redisKey, value); }); return null; }}
4.4 소스코드 분석
그렇다면 파이프라인 방법을 사용하면 성능이 크게 향상되는 이유는 무엇입니까? 소스 코드부터 분석해 보겠습니다.
4.4.1 파이프라인 모드에서 연결을 얻는 관련 원리 분석:
@Override public List<Object> executePipelined(SessionCallback<?> session, @Nullable RedisSerializer<?> resultSerializer) { Assert.isTrue(initialized, "template not initialized; call afterPropertiesSet() before using it"); Assert.notNull(session, "Callback object must not be null"); RedisConnectionFactory factory = getRequiredConnectionFactory(); RedisConnectionUtils.bindConnection(factory, enableTransactionSupport); try { return execute((RedisCallback<List<Object>>) connection -> { connection.openPipeline(); boolean PipelinedClosed = false; try { Object result = executeSession(session); if (result != null) { throw new InvalidDataAccessApiUsageException( "Callback cannot return a non-null value as it gets overwritten by the Pipeline"); } List<Object> closePipeline = connection.closePipeline(); PipelinedClosed = true; return deserializeMixedResults(closePipeline, resultSerializer, hashKeySerializer, hashValueSerializer); } finally { if (!PipelinedClosed) { connection.closePipeline(); } } }); } finally { RedisConnectionUtils.unbindConnection(factory); } }
① 여기서 Pipeline 기능을 사용하려면 해당 Redis 연결 팩토리를 얻어야 합니다.
LettuceConnectionFactory 메소드, 여기서 얻은 연결 팩토리는 LettuceConnectionFactory입니다.
② 바인딩 연결 프로세스는 구체적으로 현재 연결을 현재 스레드에 바인딩하는 것을 의미합니다. 핵심 메서드는 doGetConnection입니다.
public static RedisConnection doGetConnection(RedisConnectionFactory factory, boolean allowCreate, boolean bind, boolean enableTransactionSupport) { Assert.notNull(factory, "No RedisConnectionFactory specified"); RedisConnectionHolder connHolder = (RedisConnectionHolder) TransactionSynchronizationManager.getResource(factory); if (connHolder != null) { if (enableTransactionSupport) { potentiallyRegisterTransactionSynchronisation(connHolder, factory); } return connHolder.getConnection(); } ...... RedisConnection conn = factory.getConnection(); if (bind) { RedisConnection connectionToBind = conn; ...... connHolder = new RedisConnectionHolder(connectionToBind); TransactionSynchronizationManager.bindResource(factory, connHolder); ...... return connHolder.getConnection(); } return conn; }
핵심 클래스 RedisConnectionHolder가 있습니다. 살펴보겠습니다.
RedisConnectionHolder connHolder =
(RedisConnectionHolder)
TransactionSynchronizationManager.getResource(factory);
@Nullable public static Object getResource(Object key) { Object actualKey = TransactionSynchronizationUtils.unwrapResourceIfNecessary(key); Object value = doGetResource(actualKey); if (value != null && logger.isTraceEnabled()) { logger.trace("Retrieved value [" + value + "] for key [" + actualKey + "] bound to thread [" + Thread.currentThread().getName() + "]"); } return value; }
里面有一个核心方法doGetResource
(actualKey),大家很容易猜测这里涉及到一个map结构,如果我们看源码,也确实是这样一个结构。
@Nullable private static Object doGetResource(Object actualKey) { Map<Object, Object> map = resources.get(); if (map == null) { return null; } Object value = map.get(actualKey); if (value instanceof ResourceHolder && ((ResourceHolder) value).isVoid()) { map.remove(actualKey); if (map.isEmpty()) { resources.remove(); } value = null; } return value; }
resources是一个ThreadLocal类型,这里会涉及到根据RedisConnectionFactory获取到连接connection的逻辑,如果下一次是同一个actualKey,那么就直接使用已经存在的连接,而不需要新建一个连接。第一次这里map为null,就直接返回了,然后回到doGetConnection方法,由于这里bind为true,我们会执行TransactionSynchronizationManager.bindResource(factory, connHolder);,也就是将连接和当前线程绑定了起来。
public static void bindResource(Object key, Object value) throws IllegalStateException { Object actualKey = TransactionSynchronizationUtils.unwrapResourceIfNecessary(key); Assert.notNull(value, "Value must not be null"); Map<Object, Object> map = resources.get(); if (map == null) { map = new HashMap<>(); resources.set(map); } Object oldValue = map.put(actualKey, value); ...... }
③ 我们回到executePipelined,在获取到连接工厂,将连接和当前线程绑定起来以后,就开始需要正式去执行命令了, 这里会调用execute方法
@Override@Nullablepublic <T> T execute(RedisCallback<T> action) { return execute(action, isExposeConnection());}
这里我们注意到execute方法的入参为RedisCallback<T>action,RedisCallback对应的doInRedis操作如下,这里在后面的调用过程中会涉及到回调。
connection.openPipeline();boolean PipelinedClosed = false;try { Object result = executeSession(session); if (result != null) { throw new InvalidDataAccessApiUsageException( "Callback cannot return a non-null value as it gets overwritten by the Pipeline"); } List<Object> closePipeline = connection.closePipeline(); PipelinedClosed = true; return deserializeMixedResults(closePipeline, resultSerializer, hashKeySerializer, hashValueSerializer);} finally { if (!PipelinedClosed) { connection.closePipeline(); }}
我们再来看execute(action,
isExposeConnection())方法,这里最终会调用
<T>execute(RedisCallback<T>action, boolean exposeConnection, boolean Pipeline)方法。
@Nullablepublic <T> T execute(RedisCallback<T> action, boolean exposeConnection, boolean Pipeline) { Assert.isTrue(initialized, "template not initialized; call afterPropertiesSet() before using it"); Assert.notNull(action, "Callback object must not be null"); RedisConnectionFactory factory = getRequiredConnectionFactory(); RedisConnection conn = null; try { if (enableTransactionSupport) { conn = RedisConnectionUtils.bindConnection(factory, enableTransactionSupport); } else { conn = RedisConnectionUtils.getConnection(factory); } boolean existingConnection = TransactionSynchronizationManager.hasResource(factory); RedisConnection connToUse = preProcessConnection(conn, existingConnection); boolean PipelineStatus = connToUse.isPipelined(); if (Pipeline && !PipelineStatus) { connToUse.openPipeline(); } RedisConnection connToExpose = (exposeConnection ? connToUse : createRedisConnectionProxy(connToUse)); T result = action.doInRedis(connToExpose); if (Pipeline && !PipelineStatus) { connToUse.closePipeline(); } return postProcessResult(result, connToUse, existingConnection); } finally { RedisConnectionUtils.releaseConnection(conn, factory, enableTransactionSupport); }}
我们看到这里最开始也是获取对应的连接工厂,然后获取对应的连接
(enableTransactionSupport=false),具体调用是
RedisConnectionUtils.getConnection(factory)方法,最终会调用
RedisConnection doGetConnection(RedisConnectionFactory factory, boolean allowCreate, boolean bind, boolean enableTransactionSupport),此时bind为false
public static RedisConnection doGetConnection(RedisConnectionFactory factory, boolean allowCreate, boolean bind, boolean enableTransactionSupport) { Assert.notNull(factory, "No RedisConnectionFactory specified"); RedisConnectionHolder connHolder = (RedisConnectionHolder) TransactionSynchronizationManager.getResource(factory); if (connHolder != null) { if (enableTransactionSupport) { potentiallyRegisterTransactionSynchronisation(connHolder, factory); } return connHolder.getConnection(); } ...... return conn;}
前面我们分析过一次,这里调用
RedisConnectionHolder connHolder =
(RedisConnectionHolder) TransactionSynchronizationManager.getResource(factory);会获取到之前和当前线程绑定的Redis,而不会新创建一个连接。
然后会去执行T result = action.
doInRedis(connToExpose),这里的action为RedisCallback,执行doInRedis为:
connection.openPipeline();boolean PipelinedClosed = false;try { Object result = executeSession(session); if (result != null) { throw new InvalidDataAccessApiUsageException( "Callback cannot return a non-null value as it gets overwritten by the Pipeline"); } List<Object> closePipeline = connection.closePipeline(); PipelinedClosed = true; return deserializeMixedResults(closePipeline, resultSerializer, hashKeySerializer, hashValueSerializer);} finally { if (!PipelinedClosed) { connection.closePipeline(); }}
这里最开始会开启Pipeline功能,然后执行
Object result = executeSession(session);
private Object executeSession(SessionCallback<?> session) { return session.execute(this);}
这里会调用我们自定义的execute方法
@AllArgsConstructorprivate static class InsertPipelineExecution implements SessionCallback<Void> { private final List<Integer> userIds; private final Integer iconId; @Override public <K, V> Void execute(RedisOperations<K, V> operations) throws DataAccessException { SetOperations<String, String> setOperations = (SetOperations<String, String>) operations.opsForSet(); userIds.forEach(userId -> { String redisKey = "aaa:" + userId; String value = String.valueOf(iconId); setOperations.add(redisKey, value); }); return null; }}
进入到foreach循环,执行DefaultSetOperations的add方法。
@Overridepublic Long add(K key, V... values) { byte[] rawKey = rawKey(key); byte[][] rawValues = rawValues((Object[]) values); return execute(connection -> connection.sAdd(rawKey, rawValues), true);}
这里会继续执行redisTemplate的execute方法,里面最终会调用我们之前分析过的<T>T execute(RedisCallback<T>action, boolean exposeConnection, boolean Pipeline)方法。
@Nullablepublic <T> T execute(RedisCallback<T> action, boolean exposeConnection, boolean Pipeline) { Assert.isTrue(initialized, "template not initialized; call afterPropertiesSet() before using it"); Assert.notNull(action, "Callback object must not be null"); RedisConnectionFactory factory = getRequiredConnectionFactory(); RedisConnection conn = null; try { ...... T result = action.doInRedis(connToExpose); ...... return postProcessResult(result, connToUse, existingConnection); } finally { RedisConnectionUtils.releaseConnection(conn, factory, enableTransactionSupport); }}
这里会继续执行T result =
action.doInRedis(connToExpose);,这里其实执行的doInRedis方法为:
connection -> connection.sAdd(rawKey, rawValues)
4.4.2 Pipeline方式下执行命令的流程分析:
① 接着上面的流程分析,这里的sAdd方法实际调用的是DefaultStringRedisConnection的sAdd方法
@Overridepublic Long sAdd(byte[] key, byte[]... values) { return convertAndReturn(delegate.sAdd(key, values), identityConverter);}
② 这里会进一步调用
DefaultedRedisConnection的sAdd方法
@Override@Deprecateddefault Long sAdd(byte[] key, byte[]... values) { return setCommands().sAdd(key, values);}
③ 接着调用LettuceSetCommands的sAdd方法
@Overridepublic Long sAdd(byte[] key, byte[]... values) { Assert.notNull(key, "Key must not be null!"); Assert.notNull(values, "Values must not be null!"); Assert.noNullElements(values, "Values must not contain null elements!"); try { if (isPipelined()) { Pipeline(connection.newLettuceResult(getAsyncConnection().sadd(key, values))); return null; }
if (isQueueing()) { transaction(connection.newLettuceResult(getAsyncConnection().sadd(key, values))); return null; } return getConnection().sadd(key, values); } catch (Exception ex) { throw convertLettuceAccessException(ex); }}
这里我们开启了Pipeline, 实际会调用
Pipeline(connection.newLettuceResult(getAsyncConnection().sadd(key, values))); 也就是获取异步连接getAsyncConnection,然后进行异步操作sadd,而常规模式下,使用的是同步操作,所以在Pipeline模式下,执行效率更高。
从上面的获取连接和具体命令执行相关源码分析可以得出使用Lettuce客户端Pipeline模式高效的根本原因:
普通模式下,每执行一个命令都需要先打开一个连接,命令执行完毕以后又需要关闭这个连接,执行下一个命令时,又需要经过连接打开和关闭的流程;而Pipeline的所有命令的执行只需要经过一次连接打开和关闭。
普通模式下命令的执行是同步阻塞模式,而Pipeline模式下命令的执行是异步非阻塞模式。
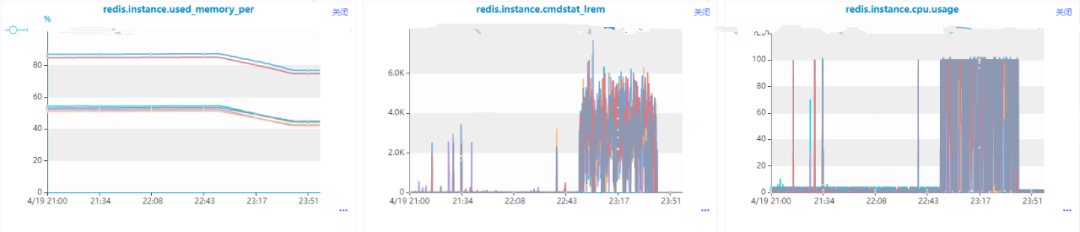
前面介绍了涉及到批量操作,可以使用Redis Pipelining机制,那是不是任何批量操作相关的场景都可以使用呢,比如list类型数据的批量移除操作,我们的代码最开始是这么写的:
public void deleteSet(String updateKey, Set<Integer> userIds) { if (CollectionUtils.isEmpty(userIds)) { return; } redisTemplate.executePipelined(new DeleteListCallBack(userIds, updateKey)); } @AllArgsConstructorprivate static class DeleteListCallBack implements SessionCallback<Object> { private Set<Integer> userIds; private String updateKey; @Override public <K, V> Object execute(RedisOperations<K, V> operations) throws DataAccessException { ListOperations<String, String> listOperations = (ListOperations<String, String>) operations.opsForList(); userIds.forEach(userId -> listOperations.remove(updateKey, 1, userId.toString())); return null; }}
在数据量比较小的时候没有出现问题,直到有一条收到了Redis的内存和cpu利用率的告警消息,我们发现这么使用是有问题的,核心原因在于list的lrem操作的时间复杂度是O(N+M),其中N是list的长度, M是要移除的元素的个数,而我们这里还是一个一个移除的,当然会导致Redis数据积压和cpu每秒ops升高导致cpu利用率飚高。也就是说,即使使用Pipeline进行批量操作,但是由于单次操作很耗时,是会导致整个Redis出现问题的。
后面我们进行了优化,选用了list的ltrim命令,一次命令执行批量remove操作:
public void deleteSet(String updateKey, Set<Integer> deviceIds) { if (CollectionUtils.isEmpty(deviceIds)) { return; } int maxSize = 10000; redisTemplate.opsForList().trim(updateKey, maxSize + 1, -1); }
由于ltrim本身的时间复杂度为O(M), 其中M要移除的元素的个数,相比于原始方案的lrem,效率提升很多,可以不需要使用Redis Pipeline,优化结果使得Redis内存利用率和cpu利用率都极大程度得到缓解。
六、Redisson 对 Redis Pipeline 特性支持
在redisson官方文档中额外特性介绍中有说到批量命令执行这个特性, 也就是多个命令在一次网络调用中集中发送,该特性是RBatch这个类支持的,从这个类的描述来看,主要是为Redis Pipeline这个特性服务的,并且主要是通过队列和异步实现的。
public interface RBatch { <K, V> RStreamAsync<K, V> getStream(String name); <K, V> RStreamAsync<K, V> getStream(String name, Codec codec); ...... <V> RListAsync<V> getList(String name); <V> RListAsync<V> getList(String name, Codec codec); ...... BatchResult<?> execute() throws RedisException; RFuture<BatchResult<?>> executeAsync(); void discard(); RFuture<Void> discardAsync(); }
简单的测试代码如下:
@Slf4jpublic class RedisPipelineTest { public static void main(String[] args) { Config config = new Config(); config.useSingleServer().setAddress("redis://xx.xx.xx.xx:6379"); RedissonClient redisson = Redisson.create(config); RBatch redisBatch = redisson.createBatch(); int size = 100000; String zSetKey = "Pipeline-test-set"; long begin = System.currentTimeMillis(); for (int i = 0; i < size; i++) { redisBatch.getSet(zSetKey + i).addAsync("ccc"); } redisBatch.execute(); log.info("Redisson Pipeline模式耗时:{}ms", (System.currentTimeMillis() - begin)); redisson.shutdown(); }}
核心方法分析:
1.建Redisson客户端RedissonClient redisson = redisson.create(config), 该方法最终会调用Reddison的构造方法Redisson(Config config)。
protected Redisson(Config config) { this.config = config; Config configCopy = new Config(config); connectionManager = ConfigSupport.createConnectionManager(configCopy); RedissonObjectBuilder objectBuilder = null; if (config.isReferenceEnabled()) { objectBuilder = new RedissonObjectBuilder(this); } commandExecutor = new CommandSyncService(connectionManager, objectBuilder); evictionScheduler = new EvictionScheduler(commandExecutor); writeBehindService = new WriteBehindService(commandExecutor);}
该构造方法中会新建异步命名执行器CommandAsyncExecutor commandExecutor和用户删除超时任务的EvictionScheduler evictionScheduler。
2.创建RBatch实例RBatch redisBatch = redisson.createBatch(), 该方法会使用到步骤1中的commandExecutor和evictionScheduler实例对象。
@Overridepublic RBatch createBatch(BatchOptions options) { return new RedissonBatch(evictionScheduler, commandExecutor, options);} public RedissonBatch(EvictionScheduler evictionScheduler, CommandAsyncExecutor executor, BatchOptions options) { this.executorService = new CommandBatchService(executor, options); this.evictionScheduler = evictionScheduler;}
其中的options对象会影响后面批量执行命令的流程。
3. 异步给set集合添加元素的操作addAsync,这里会具体调用RedissonSet的addAsync方法
@Overridepublic RFuture<Boolean> addAsync(V e) { String name = getRawName(e); return commandExecutor.writeAsync(name, codec, RedisCommands.SADD_SINGLE, name, encode(e));}
(1)接着调用CommandAsyncExecutor的异步写入方法writeAsync。
@Overridepublic <T, R> RFuture<R> writeAsync(String key, Codec codec, RedisCommand<T> command, Object... params) { RPromise<R> mainPromise = createPromise(); NodeSource source = getNodeSource(key); async(false, source, codec, command, params, mainPromise, false); return mainPromise;}
(2) 接着调用批量命令执行器
CommandBatchService的异步发送命令。
@Overridepublic <V, R> void async(boolean readOnlyMode, NodeSource nodeSource, Codec codec, RedisCommand<V> command, Object[] params, RPromise<R> mainPromise, boolean ignoreRedirect) { if (isRedisBasedQueue()) { boolean isReadOnly = options.getExecutionMode() == ExecutionMode.REDIS_READ_ATOMIC; RedisExecutor<V, R> executor = new RedisQueuedBatchExecutor<>(isReadOnly, nodeSource, codec, command, params, mainPromise, false, connectionManager, objectBuilder, commands, connections, options, index, executed, latch, referenceType); executor.execute(); } else { RedisExecutor<V, R> executor = new RedisBatchExecutor<>(readOnlyMode, nodeSource, codec, command, params, mainPromise, false, connectionManager, objectBuilder, commands, options, index, executed, referenceType); executor.execute(); } }
(3) 接着调用了RedisBatchExecutor.
execute方法和BaseRedisBatchExecutor.
addBatchCommandData方法。
@Overridepublic void execute() { addBatchCommandData(params);} protected final void addBatchCommandData(Object[] batchParams) { MasterSlaveEntry msEntry = getEntry(source); Entry entry = commands.get(msEntry); if (entry == null) { entry = new Entry(); Entry oldEntry = commands.putIfAbsent(msEntry, entry); if (oldEntry != null) { entry = oldEntry; } } if (!readOnlyMode) { entry.setReadOnlyMode(false); } Codec codecToUse = getCodec(codec); BatchCommandData<V, R> commandData = new BatchCommandData<V, R>(mainPromise, codecToUse, command, batchParams, index.incrementAndGet()); entry.getCommands().add(commandData);}
这里的commands以主节点为KEY,以待发送命令队列列表为VALUE(Entry),保存一个MAP.然后会把命令都添加到entry的commands命令队列中, Entry结构如下面代码所示。
public static class Entry { Deque<BatchCommandData<?, ?>> commands = new LinkedBlockingDeque<>(); volatile boolean readOnlyMode = true; public Deque<BatchCommandData<?, ?>> getCommands() { return commands; } public void setReadOnlyMode(boolean readOnlyMode) { this.readOnlyMode = readOnlyMode; } public boolean isReadOnlyMode() { return readOnlyMode; } public void clearErrors() { for (BatchCommandData<?, ?> commandEntry : commands) { commandEntry.clearError(); } } }
4. 批量执行命令redisBatch.execute(),这里会最终调用CommandBatchService的executeAsync方法,该方法完整代码如下,我们下面来逐一进行拆解。
public RFuture<BatchResult<?>> executeAsync() { ...... RPromise<BatchResult<?>> promise = new RedissonPromise<>(); RPromise<Void> voidPromise = new RedissonPromise<Void>(); if (this.options.isSkipResult() && this.options.getSyncSlaves() == 0) { ...... } else { voidPromise.onComplete((res, ex) -> { ...... }); } AtomicInteger slots = new AtomicInteger(commands.size()); ...... for (Map.Entry<MasterSlaveEntry, Entry> e : commands.entrySet()) { RedisCommonBatchExecutor executor = new RedisCommonBatchExecutor(new NodeSource(e.getKey()), voidPromise, connectionManager, this.options, e.getValue(), slots, referenceType); executor.execute(); } return promise; }
里面会用到我们在3.3步骤所生成的commands实例。
(1)接着调用了基类RedisExecutor的execute方法
public void execute() { ...... connectionFuture.onComplete((connection, e) -> { if (connectionFuture.isCancelled()) { connectionManager.getShutdownLatch().release(); return; } if (!connectionFuture.isSuccess()) { connectionManager.getShutdownLatch().release(); exception = convertException(connectionFuture); return; } sendCommand(attemptPromise, connection); writeFuture.addListener(new ChannelFutureListener() { @Override public void operationComplete(ChannelFuture future) throws Exception { checkWriteFuture(writeFuture, attemptPromise, connection); } }); }); ...... }
(2)接着调用
RedisCommonBatchExecutor的sendCommand方法,里面会将多个命令放到一个List<commanddata> list列表里面。
@Override protected void sendCommand(RPromise<Void> attemptPromise, RedisConnection connection) { boolean isAtomic = options.getExecutionMode() != ExecutionMode.IN_MEMORY; boolean isQueued = options.getExecutionMode() == ExecutionMode.REDIS_READ_ATOMIC || options.getExecutionMode() == ExecutionMode.REDIS_WRITE_ATOMIC; List<CommandData<?, ?>> list = new ArrayList<>(entry.getCommands().size()); if (source.getRedirect() == Redirect.ASK) { RPromise<Void> promise = new RedissonPromise<Void>(); list.add(new CommandData<Void, Void>(promise, StringCodec.INSTANCE, RedisCommands.ASKING, new Object[] {})); } for (CommandData<?, ?> c : entry.getCommands()) { if ((c.getPromise().isCancelled() || c.getPromise().isSuccess()) && !isWaitCommand(c) && !isAtomic) { continue; } list.add(c); } ...... writeFuture = connection.send(new CommandsData(attemptPromise, list, options.isSkipResult(), isAtomic, isQueued, options.getSyncSlaves() > 0)); }
(3)接着调用RedisConnection的send方法,通过Netty通信发送命令到Redis服务器端执行,这里也验证了Redisson客户端底层是采用Netty进行通信的。
public ChannelFuture send(CommandsData data) { return channel.writeAndFlush(data);}
5. 接收返回结果,这里主要是监听事件是否完成,然后组装返回结果, 核心方法是步骤4提到的CommandBatchService的executeAsync方法,里面会对返回结果进行监听和处理, 核心代码如下:
public RFuture<BatchResult<?>> executeAsync() { ...... RPromise<BatchResult<?>> promise = new RedissonPromise<>(); RPromise<Void> voidPromise = new RedissonPromise<Void>(); if (this.options.isSkipResult() && this.options.getSyncSlaves() == 0) { ...... } else { voidPromise.onComplete((res, ex) -> { executed.set(true); ...... List<Object> responses = new ArrayList<Object>(entries.size()); int syncedSlaves = 0; for (BatchCommandData<?, ?> commandEntry : entries) { if (isWaitCommand(commandEntry)) { syncedSlaves = (Integer) commandEntry.getPromise().getNow(); } else if (!commandEntry.getCommand().getName().equals(RedisCommands.MULTI.getName()) && !commandEntry.getCommand().getName().equals(RedisCommands.EXEC.getName()) && !this.options.isSkipResult()) { ...... Object entryResult = commandEntry.getPromise().getNow(); ...... responses.add(entryResult); } } BatchResult<Object> result = new BatchResult<Object>(responses, syncedSlaves); promise.trySuccess(result); ...... }); } ...... return promise;}
这里会把单个命令的执行结果放到responses里面,最终返回RPromise<batchresult>promise。
从上面的分析来看,Redisson客户端对Redis Pipeline的支持也是从多个命令在一次网络通信中执行和异步处理来实现的。
Redis提供了Pipelining进行批量操作的高级特性,极大地提高了部分数据类型没有批量执行命令导致的执行耗时而引起的性能问题,但是我们在使用的过程中需要考虑Pipeline操作中单个命令执行的耗时问题,否则带来的效果可能适得其反。最后扩展分析了Redisson客户端对Redis Pipeline特性的支持原理,可以与Lettuce客户端对Redis Pipeline支持原理进行比较,加深Pipeline在不同Redis客户端实现方式的理解。
