我们创建了支付宝开放平台的网页&移动应用,审核通过后,我们需要拿到appid,支付宝公钥,私钥进项开发
-
一、添加应用信息至项目环境中
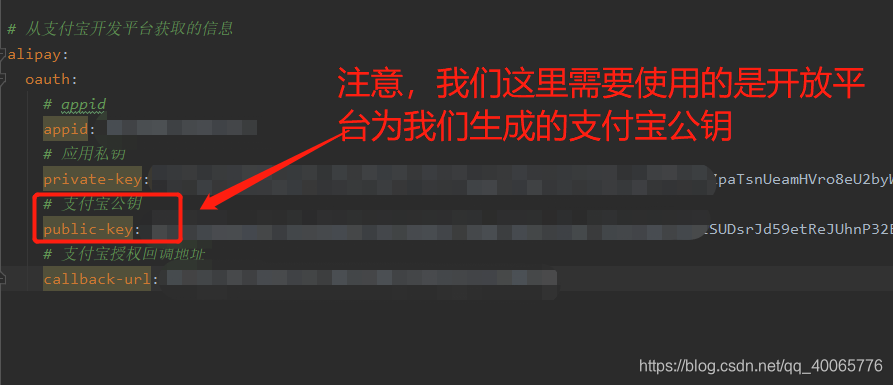
我们保存了 appid、应用私钥、支付宝公钥、支付宝回调地址等信息,这里的公钥为支付宝开放平台为我们生成的“支付宝公钥” -
二、引入 Maven 依赖
<!-- 支付宝SDK -->
<dependency>
	<groupId>com.alipay.sdk</groupId>
	<artifactId>alipay-sdk-java</artifactId>
	<version>4.9.28.ALL</version>
</dependency>
<!-- alibaba的fastjson -->
<dependency>
	<groupId>com.alibaba</groupId>
	<artifactId>fastjson</artifactId>
	<version>1.2.51</version>
</dependency>
其余依赖请自行添加
- 三、在页面放置 “支付宝” 授权登录的 DOM 元素
<a th:href="@{alipay/auth}" class="link" title="支付宝登录"><i class="iconfont icon-zhifubao"></i></a>
这里使用的是阿里的 iconfont 图标
- 四、创建 “支付宝” 授权登录的 Controller,AlipayController.java
1、从配置文件中获取 “支付宝” 配置信息
/**
 * 微博授权中提供的 appid 和 appkey
 */
@Value("${alipay.oauth.appid}")
public String APPID;
@Value("${alipay.oauth.callback-url}")
public String CALL_BACK_URL;
@Value("${alipay.oauth.private-key}")
public String PRIVATE_KEY;
@Value("${alipay.oauth.public-key}")
public String PUBLIC_KEY;
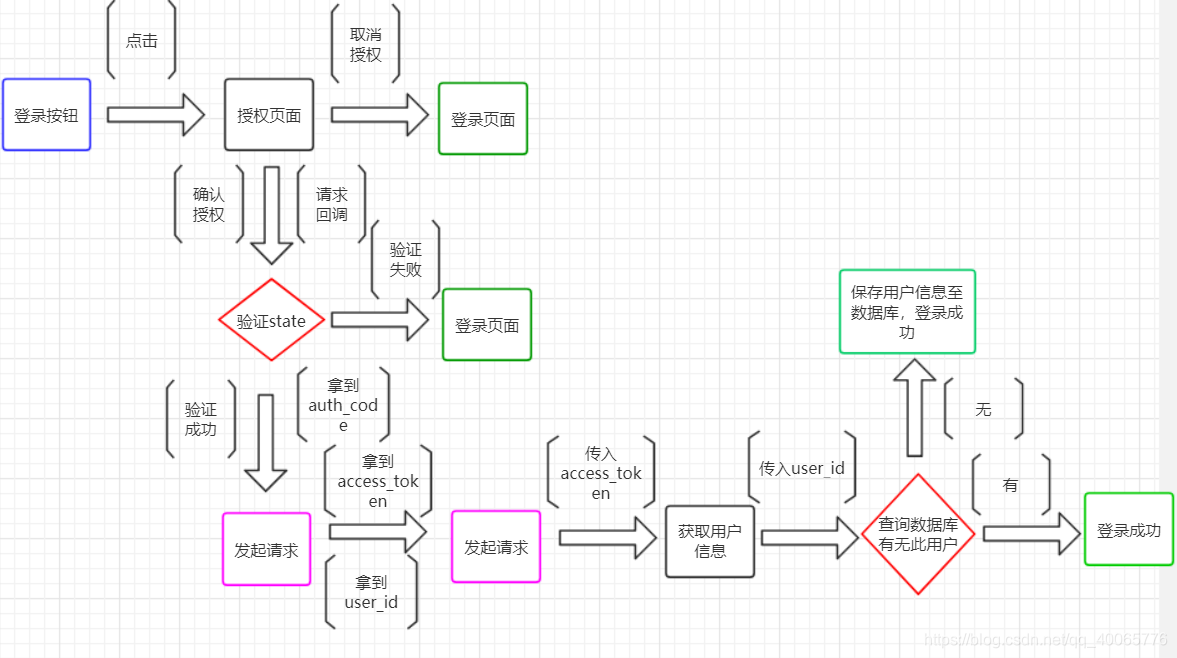
2、登录按钮点击后的接口
/**
 * 请求授权页面
 */
@GetMapping(value = "/auth")
public String qqAuth(HttpSession session) {
    // 用于第三方应用防止CSRF攻击
    String uuid = UUID.randomUUID().toString().replaceAll("-", "");
    session.setAttribute("state", uuid);

    // Step1:获取Authorization Code
    String url = "https://openauth.alipay.com/oauth2/publicAppAuthorize.htm?scope=auth_user" +
            "&app_id=" + APPID +
            "&redirect_uri=" + URLEncoder.encode(CALL_BACK_URL) +
            "&state=" + uuid;

    return PasswordUtils.redirectTo(url);
}
接口文档中建议我们在授权登录时传入一个加密的数据防止被攻击,我们传入了UUID,最后重定向到授权页面
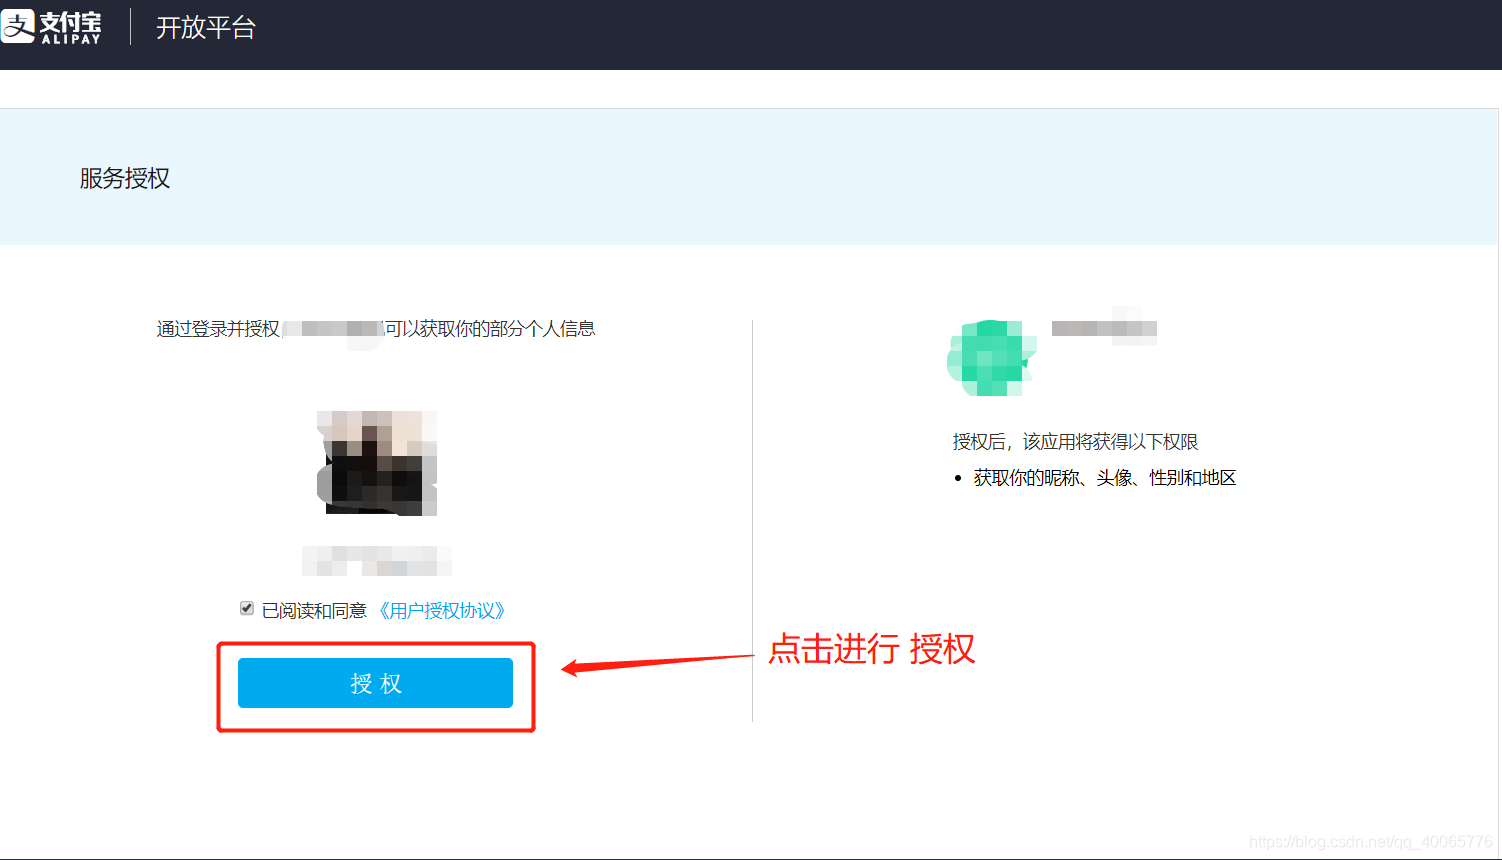
3、当该用户点击“授权”按钮,同意授权后,就会回调到我们在应用中填写的回调地址里去
/**
 * 授权回调
 */
@GetMapping(value = "/callback")
public String qqCallback(HttpServletRequest request) throws Exception {
    // 获取session
    HttpSession session = request.getSession();
    // 得到auth_code
    String authCode = request.getParameter("auth_code");
    // 我们放在地址中的状态码
    String state = request.getParameter("state");
    String uuid = (String) session.getAttribute("state");
    // 验证信息我们发送的状态码
    if (null != uuid) {
        // 状态码不正确,直接返回登录页面
        if (!uuid.equals(state)) {
            return PasswordUtils.redirectTo("/login");
        }
    }

    // Step2:通过auth_code获取Access Token 以及 user_id
    JSONObject tokenJson = AlipayHttpClient.getAccessToken(APPID, PRIVATE_KEY, PUBLIC_KEY, authCode);
    // Step3:通过auth_code获取用户信息
    JSONObject userJson = AlipayHttpClient.getUserInfo(APPID, PRIVATE_KEY, PUBLIC_KEY, tokenJson.getString("accessToken"));
    // 如果请求用户信息失败,则返回到登录界面
    if ("0".equals(userJson.getString("code"))) {
        return PasswordUtils.redirectTo("/login");
    }
    // 根据user_id在数据库中查找是否存在此用户
    UserInfo userInfo = userInfoService.getUserInfo(tokenJson.getString("userId"), Const.UserCategory.USER_CATEGORY_ALIPAY);
    // 如果存在此用户,则检查该用户是否合法,返回首页
    if (null != userInfo) {
        // 该用户被冻结
        if (2 == userInfo.getStatus()) {
            return PasswordUtils.redirectTo("/login");
        }
        // 登录成功
        else {
            session.setAttribute(Const.SYSTEM_USER_SESSION, userInfo);
            // 新增一条登录日志
            loginLogService.saveLoginLog(userInfo.getId(), ServletUtils.getServletPojo(request));
        }
    }
    // 系统中不存在该用户,则需要新建一个用户保存到数据库中,并登录
    else {
        // 拿到我们获取到的用户信息
        AlipayUserInfoShareResponse alipayUser = (AlipayUserInfoShareResponse) userJson.get("user");
        // 随机生成账户
        String loginAccount = Const.Number.NUMBER_ONE + RandomUtils.getCurrentTimeMillis(Const.Number.NUMBER_EIGHT);
        // 随机生成盐值
        String salt = PasswordUtils.getSalt();
        // 加密后的密码,默认密码123456
        String password = PasswordUtils.getMd5("123456", loginAccount, salt);
        // 性别
        String sexStr = alipayUser.getGender();
        int sex = Const.Sex.SEX_SECRECY;
        // 男
        if ("M".equalsIgnoreCase(sexStr)) {
            sex = Const.Sex.SEX_MAN;
        }
        // 女
        else if ("F".equalsIgnoreCase(sexStr)) {
            sex = Const.Sex.SEX_WOMAN;
        }
        // 保存新用户
        userInfoService.saveUserInfo(loginAccount, alipayUser.getNickName(), alipayUser.getUserName(), "", password, salt, alipayUser.getAvatar(), sex, tokenJson.getString("userId"), Const.UserCategory.USER_CATEGORY_ALIPAY, StringUtils.isEmpty(alipayUser.getMobile()) ? alipayUser.getMobile() : alipayUser.getPhone());
        // 根据openid在数据库中查找是否存在此用户
        userInfo = userInfoService.getUserInfo(tokenJson.getString("userId"), Const.UserCategory.USER_CATEGORY_ALIPAY);
        // 将当前用户保存到session中去
        session.setAttribute(Const.SYSTEM_USER_SESSION, userInfo);
        // 默认加主号为好友
        friendInfoDao.saveFridendInfo(Const.Number.NUMBER_ONE, userInfo.getId());
        // 新增一条登录日志
        loginLogService.saveLoginLog(userInfo.getId(), ServletUtils.getServletPojo(request));
    }
    return PasswordUtils.redirectTo("/success");
}
以上代码,从我自己的项目中拷贝而来,如果你直接使用,你需要对其业务代码进行修改
4、第2步代码中所用到的网络接口方法,我放在了 AlipayHttpClient.java 文件中,主要有两个方法
/**
 * auth_code换取access_token与user_id
 *
 * @param appid
 * @param privateKey 私钥
 * @param publicKey  公钥
 * @param authCode   授权码
 * @return
 * @throws AlipayApiException
 */
public static JSONObject getAccessToken(String appid, String privateKey, String publicKey, String authCode) throws AlipayApiException {
    // 返回对象
    JSONObject res = new JSONObject();
    /**
     * 支付宝网关(固定)
     * APPID 即创建应用后生成
     * 开发者私钥,由开发者自己生成
     * 参数返回格式,只支持json
     * 编码集,支持GBK/UTF-8
     * 支付宝公钥,由支付宝生成
     * 商户生成签名字符串所使用的签名算法类型,目前支持RSA2和RSA,推荐使用RSA2
     */
    AlipayClient alipayClient = new DefaultAlipayClient("https://openapi.alipay.com/gateway.do", appid, privateKey, "json", "UTF-8", publicKey, "RSA2");
    // 请求对象
    AlipaySystemOauthTokenRequest request = new AlipaySystemOauthTokenRequest();
    // 第一步获取到的:auth_code
    request.setCode(authCode);
    // 授权类型
    request.setGrantType("authorization_code");
    // 发起请求
    AlipaySystemOauthTokenResponse oauthTokenResponse = alipayClient.execute(request);
    // 拿到 access_token
    res.put("accessToken", oauthTokenResponse.getAccessToken());
    // 拿到 user_id
    res.put("userId", oauthTokenResponse.getUserId());
    return res;
}

/**
 * 使用 access_token 获取用户信息
 *
 * @param appid
 * @param privateKey  私钥
 * @param publicKey   公钥
 * @param accessToken 令牌
 * @throws AlipayApiException
 */
public static JSONObject getUserInfo(String appid, String privateKey, String publicKey, String accessToken) throws AlipayApiException {
    // 返回对象
    JSONObject res = new JSONObject();
    /**
     * 支付宝网关(固定)
     * APPID 即创建应用后生成
     * 开发者私钥,由开发者自己生成
     * 参数返回格式,只支持json
     * 编码集,支持GBK/UTF-8
     * 支付宝公钥,由支付宝生成
     */
    AlipayClient alipayClient = new DefaultAlipayClient("https://openapi.alipay.com/gateway.do", appid, privateKey, "json", "UTF-8", publicKey, "RSA2");
    // 请求对象
    AlipayUserInfoShareRequest request = new AlipayUserInfoShareRequest();
    // 传入token,发起请求
    AlipayUserInfoShareResponse response = alipayClient.execute(request, accessToken);
    // 请求成功
    if ("10000".equals(response.getCode())) {
        res.put("code", 1);
        res.put("user", response);
    }
    // 请求失败
    else {
        res.put("code", 0);
        res.put("msg", "获取用户信息失败");
    }
    return res;
}
最终我们获取到用户的信息是一个 AlipayUserInfoShareResponse 对象,该对象包含了该用户的所有信息,建议观看源代码
扫描二维码关注公众号,回复:
10017324 查看本文章

以上,就是完成 “支付宝” 授权登录的过程,相比起腾讯QQ、新浪微博的第三方授权登录,支付宝需要用到接口加签的操作,但我们使用支付宝平台提供的工具也很容易
- 五、总结
如您在阅读中发现不足,欢迎留言!!!
