引入druid连接池
1.引入druid的相关依赖,并且引入log4j日志处理
       <dependency>
            <groupId>com.alibaba</groupId>
            <artifactId>druid</artifactId>
            <version>1.1.10</version>
        </dependency>

        <dependency>
            <groupId>log4j</groupId>
            <artifactId>log4j</artifactId>
            <version>1.2.17</version>
        </dependency>
2.在yml中配置连接池
datasource:
username: xxx
password: xxx
url: jdbc:mysql://localhost:3306/springboot?useUnicode=true&characterEncoding=UTF-8&serverTimezone=GMT%2B8
driver-class-name: com.mysql.cj.jdbc.Driver
type: com.alibaba.druid.pool.DruidDataSource
initialSize: 5
minIdle: 5
maxActive: 20
maxWait: 60000
timeBetweenEvictionRunsMillis: 60000
minEvictableIdleTimeMillis: 300000
validationQuery: SELECT 1 FROM DUAL
testWhileIdle: true
testOnBorrow: false
testOnReturn: false
poolPreparedStatements: true
# 配置监控统计拦截的filters,去掉后监控界面sql无法统计,'wall’用于防火墙
filters: stat,wall,log4j
maxPoolPreparedStatementPerConnectionSize: 20
useGlobalDataSourceStat: true
connectionProperties: druid.stat.mergeSql=true;druid.stat.slowSqlMillis=500
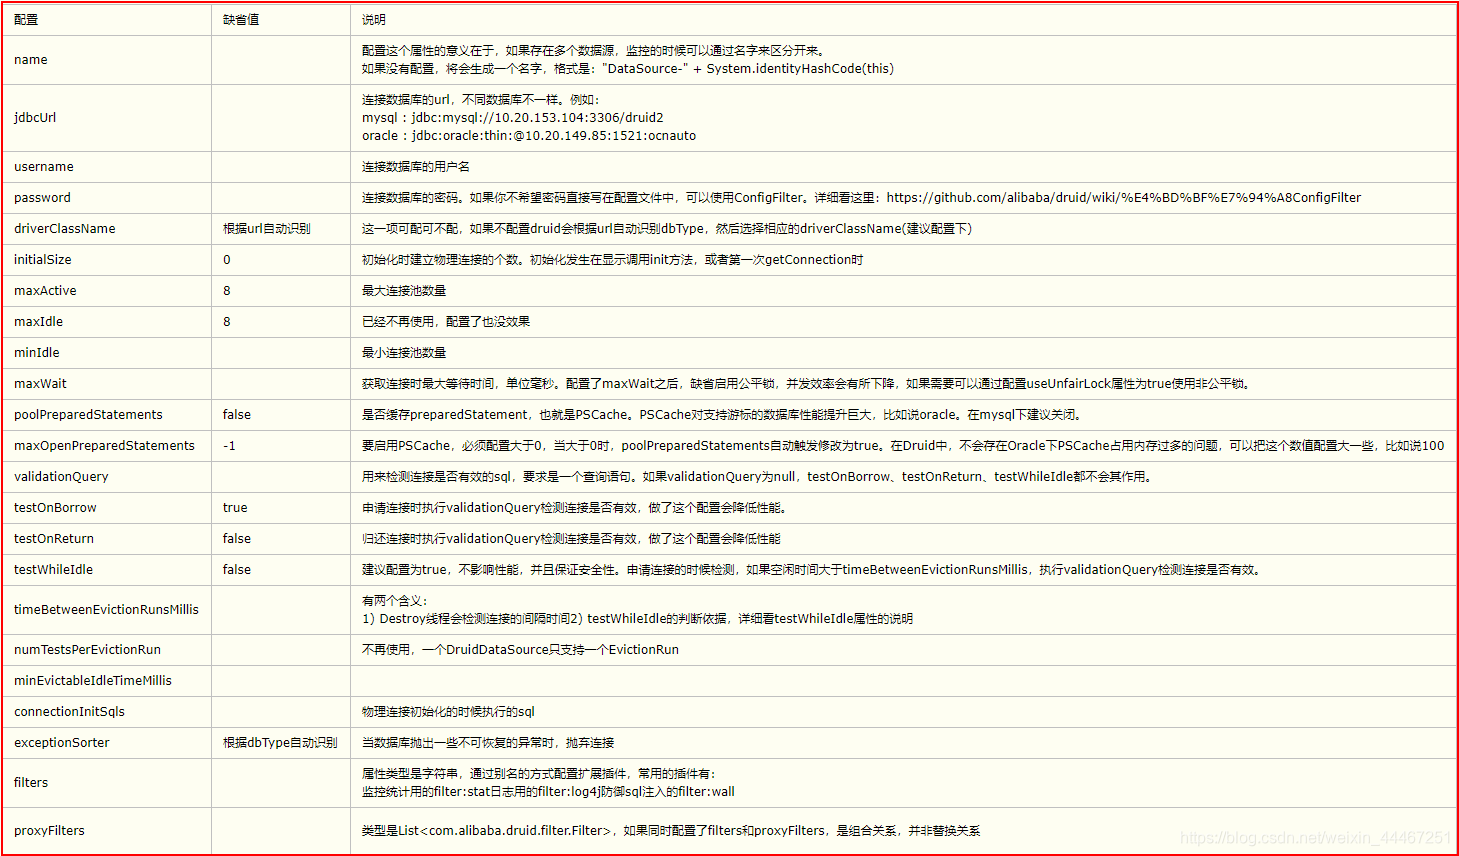
具体参数如下

3.配置log4j日志信息处理,注意,这里log4j放在resources文件夹下,文件名为log4j.properties
log4j.rootLogger=DEBUG, stdout
# Console output...
log4j.appender.stdout=org.apache.log4j.ConsoleAppender
log4j.appender.stdout.layout=org.apache.log4j.PatternLayout
log4j.appender.stdout.layout.ConversionPattern=%5p [%t] - %m%n
4.创建dataSourceConfig类作连接池的配置类,注意点:这里必须使用前缀形式,这样属性会自动注入
@Configuration
public class DruidConfig {

    @Bean
    @ConfigurationProperties(prefix = "spring.datasource")
    public DataSource druid(){
        DruidDataSource druidDataSource = new DruidDataSource();
        return druidDataSource;
    }
   }
5.配置数据监控
 //1.配置servlet
    @Bean
    public ServletRegistrationBean statViewServlet(){
        ServletRegistrationBean bean =
                new ServletRegistrationBean(new StatViewServlet(), "/druid/*");//这里是访问druid的地址
        HashMap<Object, Object> hashMap = new HashMap<>();
        //druid数据监控的用户和密码
        hashMap.put("loginUsername","admin");
        hashMap.put("loginPassword","123456");
        hashMap.put("allow","");//允许所有
        bean.setInitParameters(hashMap);
        return bean;
    }
    //配置过滤器,配置到达需要监控哪些,不需要监控哪些
    @Bean
    public FilterRegistrationBean webStatFilter(){
        FilterRegistrationBean bean = new FilterRegistrationBean(new WebStatFilter());
        HashMap<Object, Object> hashMap = new HashMap<>();
        //这里排除一些不需要监控的资源
        hashMap.put("exclusions","*.js,*.css,/druid/*");
        bean.setInitParameters(hashMap);
        bean.setUrlPatterns(Arrays.asList("/*"));
        return bean;
    }
