基础
原来的 http:localhost:8080/add?id=1&name=zhangsan
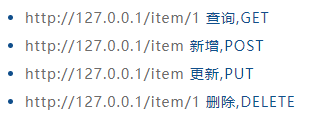
Restful http://localhost:8080/add/id/name
@Controller
@RequestMapping("/appointments")
public class AppointmentsController {
    private final AppointmentBook appointmentBook;

    @Autowired
    public AppointmentsController(AppointmentBook appointmentBook) {
        this.appointmentBook = appointmentBook;
    }

    @RequestMapping(method = RequestMethod.GET)
    public Map<String, Appointment> get() {
        return appointmentBook.getAppointmentsForToday();
    }

    @RequestMapping(path = "/{day}", method = RequestMethod.GET)
    public Map<String, Appointment> getForDay(@PathVariable @DateTimeFormat(iso = ISO.DATE) Date day, Model model) {
        return appointmentBook.getAppointmentsForDay(day);
    }

    @RequestMapping(path = "/new", method = RequestMethod.GET)
    public AppointmentForm getNewForm() {
        return new AppointmentForm();
    }

    @RequestMapping(method = RequestMethod.POST)
    public String add(@Valid AppointmentForm appointment, BindingResult result) {
        if (result.hasErrors()) {
            return "appointments/new";
        }
        appointmentBook.addAppointment(appointment);
        return "redirect:/appointments";
    }
}
SpringMVC支持Restful
观察这个案例中的内容,当使用 @RequestMapping标注在类上面声明了一个路径之后,方法的配置分为这样几种情况:
1)GET方式请求路径“/appointments”,将会进入 get() 方法
2)POST方式请求路径“/appointments”,将会进入 add() 方法
3)GET方式请求“/appointment/new”,将会进入 getNewForm() 方法
4)GET方式请求“/appointment/2016-12-06”,将会进入 getForDay() 方法【参考路径模版】
传统类型:http://localhost:8080/hello/index?name=zhangsan&id=10
REST:http://localhost:8080/hello/index/zhangsan/10
@RequestMapping("/rest/{name}/{id}")
public String rest(@PathVariable("name") String name,@PathVariable("id") int id){
    System.out.println(name);
    System.out.println(id);
    return "index";
}
SpringMVC通过映射可以直接在业务方法中获取Cookie的值。
    @RequestMapping("/cookieTest")
    public String getCookie(@CookieValue(value="JSESSIONID") String sessionId){
        System.out.println(sessionId);
        return "index";
    }
值得注意
以下两者等价
@RequestMapping("hello")
@RequestMapping(value="hello")

method:指定请求的method类型, GET、POST、PUT、DELETE等。

method:指定请求的method类型, GET、POST、PUT、DELETE等。请求必须同时包含name和id参数,并且id=10才可正常访问业务方法。

@Controller和@RestController  前者的类中可以自定义方法返回的是视图名还是json对象,
通过方法前@ResponseBody注解来区分,后者的类中所有方法就只能是json了

params:指定request中必须包含某些参数值,此处必须包含name和id两个参数,并且id的值必须为10,才能调用paramsTest方法
@RequestParam:表示将url获取到的参数name赋给指定的形参str
代码如下:
    @RequestMapping(value="paramsTest",params={"name","id=10"})
    public String paramsTest( @RequestParam("name") String str,@RequestParam("id") int age ){
    	System.out.println(str);
    	System.out.println(age); // 此处 HandlerAdapter 自动完成了 string 10 转换为 int 10
        System.out.println("paramsTest");
        return "index";
    }

参数绑定:
public String paramsBind(@RequestParam("name") String name,@RequestParam("id") int id)
将URL请求的参数name和id分别赋给形参name和id,同时进行了数据类型的转换,
URL参数都是String类型的,根据形参的数据类型,将id转换为int类型
使用 JavaBean 绑定参数
SpringMVC会根据请求参数名和pojo属性名进行自动匹配,自动为该对象填充属性值。并且支持级联属性。
1.创建实体类Address,User并进行级联设置。
public class Address {

    private int id;
    private String name;

    public int getId() {
        return id;
    }
    public void setId(int id) {
        this.id = id;
    }
    public String getName() {
        return name;
    }
    public void setName(String name) {
        this.name = name;
    }
    @Override
    public String toString() {
        return "Address [id=" + id + ", name=" + name + "]";
    }
}
public class User {

    private int id;
    private String name;
    private Address address;

    public Address getAddress() {
        return address;
    }
    public void setAddress(Address address) {
        this.address = address;
    }
    public int getId() {
        return id;
    }
    public void setId(int id) {
        this.id = id;
    }
    public String getName() {
        return name;
    }
    public void setName(String name) {
        this.name = name;
    }
    @Override
    public String toString() {
        return "User [id=" + id + ", name=" + name + ", address=" + address
                + "]";
    }

}
2.创建addUser.jsp。
<%@ page language="java" contentType="text/html; charset=UTF-8"
    pageEncoding="UTF-8"%>
<!DOCTYPE html PUBLIC "-//W3C//DTD HTML 4.01 Transitional//EN" "http://www.w3.org/TR/html4/loose.dtd">
<html>
<head>
<meta http-equiv="Content-Type" content="text/html; charset=UTF-8">
<title>Insert title here</title>
</head>
<body>
    <form action="addUser" method="post">
        编号:<input type="text" name="id"/><br/>
        姓名:<input type="text" name="name"/><br/>
        地址:<input type="text" name="address.name"/><br/>
        <input type="submit" value="提交"/>
    </form>
</body>
</html>
3.业务方法
    @RequestMapping("/addUser")
    public String getPOJO(User user){
        System.out.println(user);
        return "index";
    }
4,通过jsp页面将表单数据以post形式提交,便会打印出user信息
中文乱码在web.xml中增加固定内容
    <filter>
        <filter-name>encodingFilter</filter-name>
        <filter-class>org.springframework.web.filter.CharacterEncodingFilter</filter-class>
        <init-param>
            <param-name>encoding</param-name>
            <param-value>UTF-8</param-value>
        </init-param>
    </filter>
    <filter-mapping>
        <filter-name>encodingFilter</filter-name>
        <url-pattern>/*</url-pattern>
    </filter-mapping>
@GetMapping、@PostMapping、@PutMapping、@DeleteMapping、@PatchMapping
@RequestMapping(method = RequestMethod.GET)
@GetMapping

@RequestMapping(path = "/new", method = RequestMethod.GET)
@GetMapping("/new")

@RequestMapping(method = RequestMethod.POST)

@PostMapping
获取URL请求参数
@PathVariable
http://www.example.com/users/{userId}
// 注意这个模版,看起来与普通的URL没有什么区别,但是仔细看,其路径的最后一部分是 {userId} ,
// 这样一个使用大括号括起来的字符串,这个就是一个URI模版,与这个模版对应的实际请求如下:
http://www.example.com/users/12345
// 在SpringMVC中,对于在 @RequestMapping中配置的这种请求路径,可以使用 @PathVariable注解来获取值:
@GetMapping("/owners/{ownerId}")
public String findOwner(@PathVariable String ownerId, Model model) {

    Owner owner = ownerService.findOwner(ownerId);
    model.addAttribute("owner", owner);
    return "displayOwner";
}
// 在这个例子中的URI路径模版就是“/owners/{ownerId}”,然后在控制器方法的参数中使用 @PathVariable 注解
// 标注一个参数,Spring MVC就会在获取请求i之后自动的将{ownerId}所表示的内容设置到这个参数中了。

// 注意,这里方法的参数名称要与URI中的{var}名称一样。
// 此外,@PathVariable注解可以指定方法参数对应的URI模版中占位符的名称:
@GetMapping("/owners/{ownerId}")
public String findOwner(@PathVariable("ownerId") String theOwner, Model model) {
    // implementation omitted
}
@RequestParam
@RequestMapping(value = "/requestparam", method = RequestMethod.GET)
public String acceptingRequestInput(@RequestParam("bookname") String name, @RequestParam("count") int count) {
    System.out.println("bookname: " + name);
    System.out.println("count: " + count);
    return "requestInput";

}
/requestparam?bookname=thinkingjava&count=5
这个方法有两个参数,分别使用 @RequestParam注解进行标注了,
这种传统的URL请求,一个“?”后面跟着若干个键值对参数,可以使用 @RequestParam的方式获取参数。
@PathVariable 和 @RequestParam 区别
	地址1:http://localhost:8989/SSSP/emps?pageNo=2
  地址2:http://localhost:8989/SSSP/emp/7

  如果想获取地址1中的 pageNo的值 ‘2’ ,则使用  @RequestParam ,
  如果想获取地址2中的 emp/7 中的 ‘7 ’   则使用 @PathVariable

	1、若获取的入参的 参数 是下面这种形式 就使用 @requestParam 去获取 参数‘2’
  /emps?pageNo=2

  2、若获取的入参的 参数 是下面这种形式 就使用 @PathVariable 去获取参数 ‘7’
  /emp/7