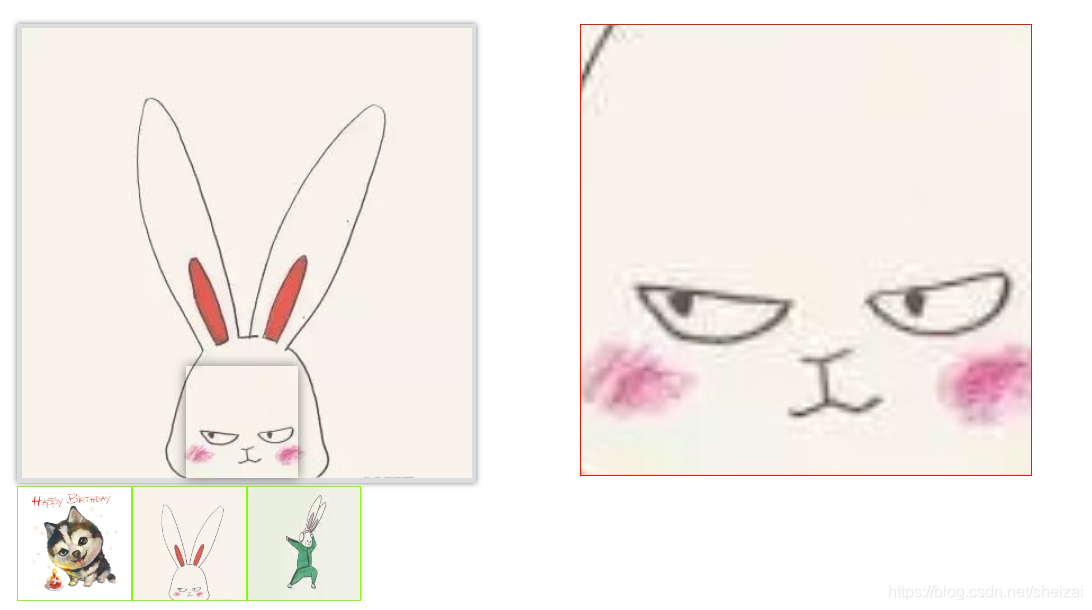
像完成放大镜效果 布局 需要两个框,其中一份表示图片区,一份表示放大区,其中图片区包含一个小框划范围
<div  class="boxx">
	<div class="small">
		<img src="images/timg.jpg" alt="">
		<span class="grayBox"></span>
	</div>
	<div class="box"data-src= "images/timg.jpg"><img src="images/timg.jpg" alt=""></div>
	<div class="box" data-src="./images/1.jpeg"><img src="images/1.jpeg" alt=""></div>
	<div class="box" data-src="./images/2.jpeg"><img src="images/2.jpeg" alt=""></div>
</div>
	<div class="big">
		<img src="images/timg.jpg" alt="">
	</div>

其中 右边的框是 跟小框是 隐藏的 需要鼠标移入事件触发才能显示
OOA
 1. 元素选择功能;
 2. 事件驱动;
 3. 元素的显示隐藏;
 4. 小图移动,大图跟随
// OOD :
    function Magnifier() {

    }
     Magnifier.prototype = {
     constructor : Magnifier ,
      // 初始化功能;
     init : function(){

      }
      $ : function(selector){
			return document.querySelector(selector);
		},
    // 事件绑定功能;
  bindEvent : function(){

   }
      // 元素显示隐藏功能;
   eleToggle : function(){

      }
   // 小图移动,大图跟随;
     eleMove : function(){
     }
   }
OOP :
首先创建一个对象
function Magnifier( options ) {
 	this.init( options );
 }
创造一个实例对象
new Magnifier({
		small_box : ".small",
		cutting_box : ".grayBox",
		big_box : ".big",
		big_img : ".big img"
	});
将原型函数指向本身
Magnifier.prototype = {
		constructor : Magnifier ,
		 }
初始化
在初始化中调用相应的 函数
init : function( options ){
			// 初始化元素;
			/*
				small_box_ele : 小盒子
				cutting_box_ele : 显示一部分的盒子;
				big_box_ele : 大盒子;
				big_img_ele : 图片盒子;
			*/
			//在这里 我们将元素与上方对应的元素名绑定
			for(var attr in options){
				this[attr+"_ele"] = this.$(options[attr]);
			}
			// 为了节省性能,所以只获取一次offsetLeft;
			this.small_box_offset = {
				left : this.small_box_ele.offsetLeft,
				top  : this.small_box_ele.offsetTop
			}
			// 因为初始的状态是display:none 所以offset的测量会得到0的结果;
			// 替换成 getComputedStyle ;
			this.cutting_box_offset = {
				width  : parseInt( getComputedStyle(this.cutting_box_ele).width ),
				height : parseInt( getComputedStyle(this.cutting_box_ele).height ),
			}
			this.small_box_width={
				width :  parseInt( getComputedStyle(this.small_box_ele).width ),
				height :  parseInt( getComputedStyle(this.small_box_ele).height ),
			}
			// big_box_ele 的宽高;
			this.big_box_offset = {
				width : parseInt( getComputedStyle(this.big_box_ele).width ),
				height : parseInt( getComputedStyle(this.big_box_ele).height ),
			}
			// console.log(this);
			this.bindEvent();
			this.scaleBigImg()
		},
元素选择功能:执行dom操作 绑定对应的元素
$ : function(selector){
			return document.querySelector(selector);
		},
事件绑定功能;
bindEvent : function(){
			this.small_box_ele.addEventListener( "mouseover" , function(){
				// 元素显示;
				this.eleToggle("show");
			}.bind(this));
			this.small_box_ele.addEventListener( "mouseout" , function(){
				// 元素隐藏;
				this.eleToggle("hide");
			}.bind(this));
			// 元素运动;
			this.small_box_ele.addEventListener("mousemove" , function( evt ){
				var e = evt || event;
				var x = e.clientX ;
				var y = e.clientY ;
				var res = this.factoryPosition( x , y )
				this.eleMove( res );
				//console.log(res)

			}.bind(this))
		},
元素显示隐藏功能;
上面事件绑定传入一个参数,对应参数进行想应的判定
如果type 不为show 则是元素display:none
		eleToggle : function( type ){
			this.cutting_box_ele.style.display = type === "show" ? "block" : "none";
			this.big_box_ele.style.display = type === "show" ? "block" : "none";
		},
小图移动,大图跟随;
			eleMove : function(res){
			this.cutting_box_ele.style.left =res.x + "px";
			this.cutting_box_ele.style.top  = res.y + "px";

			this.cutting_box_ele.style.backgroundPosition= - res.x + "px" +" " + -res.y + "px";
			this.big_img_ele.style.left = -res.xp * this.big_img_boundary.left_max + "px";
			this.big_img_ele.style.top  = -res.yp * this.big_img_boundary.top_max + "px";

		},
处理x和y;
边界检测 ,防止小框移动出容器,
其中边界的最大值等于盒子的宽减去小框的coffset.width ;
factoryPosition : function( x , y ){

			var _left =  x - this.small_box_offset.left - this.cutting_box_offset.width / 2;
			var _top  = y - this.small_box_offset.top - this.cutting_box_offset.height / 2

			var max_l = this.small_box_width.width -this.cutting_box_offset.width ;
			var max_h = this.small_box_width.height -this.cutting_box_offset.height ;
			// console.log(this.cutting_box_offset.width);
			// 做边界监测 :
			// 最小值边界监测;
			_left = _left <= 0 ? 0  : _left;
			_top  = _top  <= 0 ? 0  : _top
			_left = _left >= max_l ? max_l : _left;
			_top  = _top  >= max_h ? max_h :_top;
			// 高频率调用函数;
			return {
				x : _left,
				y : _top,
				xp : _left /max_l,
				yp : _top  / max_h
			}
		},
处理右面的数据 其中
scaleBigImg : function(){
			var width_p  = this.big_box_offset.width / this.cutting_box_offset.width;
			var height_p = this.big_box_offset.height / this.cutting_box_offset.height;

			this.big_img_offset = {
				width  : width_p * this.small_box_width.width,
				height : height_p * this.small_box_width.height,
			}

			this.big_img_boundary = {
				left_max : this.big_img_offset.width  - this.big_box_offset.width,
				top_max  : this.big_img_offset.height - this.big_box_offset.height
			}
			this.big_img_ele.style.width  = this.big_img_offset.width + "px";
			this.big_img_ele.style.height = this.big_img_offset.height + "px";
		}

	}
切换图片
给 box添加一个自定义属性, 遍历全部的以box为属性的div ,当鼠标移入与其对应的盒子是,即更换 图片的src值
var box = document.querySelectorAll(".box")
	var imgs = document.querySelectorAll(".big img,.small img");
	var small = document.querySelector(".grayBox")

	for(var i =0 ;i< box.length; i++){

		box[i].addEventListener("mouseover",function(){
		var src = this.getAttribute("data-src");
			console.log(src ,this)
			for(var k = 0 ; k < imgs.length ; k ++){
				imgs[k].src = src;
				//console.log(src)
				//small.style.background= url ( src)
            }
		})
	}
最后的效果为
