1. 《微信开发入门》文档中
            list = [token, timestamp, nonce]
            list.sort()
            sha1 = hashlib.sha1()
            map(sha1.update, list)//此处错误
            hashcode = sha1.hexdigest()
应修改为
list = [token, timestamp, nonce]
list.sort()
sha1 = hashlib.sha1()
sha1.update(list[0].encode("utf-8"))
sha1.update(list[1].encode("utf-8"))
sha1.update(list[2].encode("utf-8"))
hashcode = sha1.hexdigest()
参考文章
微信公众号token无法通过的bug解决
2.XmlForm.format(**self.__dict)
这属于python的字符串格式化
它通过{}和:来代替传统%方式
要点:关键字参数值要对得上,可用字典当关键字参数传入值,字典前加 ** 即可
例如:
hash = {‘name’:‘hoho’,‘age’:18}
‘my name is {name},age is {age}’.format(**hash)
‘my name is hoho,age is 18’
    def __init__(self, toUserName, fromUserName, content):
        self.__dict = dict()
        self.__dict['ToUserName'] = toUserName
        self.__dict['FromUserName'] = fromUserName
        self.__dict['CreateTime'] = int(time.time())
        self.__dict['Content'] = content

    def send(self):
        XmlForm = """
        <xml>
        <ToUserName><![CDATA[{ToUserName}]]></ToUserName>
        <FromUserName><![CDATA[{FromUserName}]]></FromUserName>
        <CreateTime>{CreateTime}</CreateTime>
        <MsgType><![CDATA[text]]></MsgType>
        <Content><![CDATA[{Content}]]></Content>
        </xml>
        """
        return XmlForm.format(**self.__dict)
这里就是把dict相应字段的值填入到xml字符串里。
3. web.py 本地运行
python 3 环境下安装web.py
pip install web.py==0.40-dev1
编写脚本hello.py并运行。
#hello.py
import web

urls = ('/wx', 'hello',)

class hello():
    def GET(self):
        return 'hello world'

if __name__ == "__main__":
    app = web.application(urls, globals())
    app.run()
出现如下错误信息:
The above exception was the direct cause of the following exception:

Traceback (most recent call last):
  File "F:\xw\project\python_from_beginning\wx\hello.py", line 10, in <module>
    app = web.application(urls, globals())
  File "D:\Users\admin\AppData\Local\Programs\Python\Python37\lib\site-packages\web\application.py", line 62, in __init__
    self.init_mapping(mapping)
  File "D:\Users\admin\AppData\Local\Programs\Python\Python37\lib\site-packages\web\application.py", line 130, in init_mapping
    self.mapping = list(utils.group(mapping, 2))
  File "D:\Users\admin\AppData\Local\Programs\Python\Python37\lib\site-packages\web\utils.py", line 531, in group
    x = list(take(seq, size))
RuntimeError: generator raised StopIteration
参考解决方案:
https://stackoverflow.com/questions/51700960/runtimeerror-generator-raised-stopiteration-every-time-i-try-to-run-app
把util.py中
line 526, in take
yield next(seq)
StopIteration
修改为
try:
    yield next(seq)
except StopIteration:
    return
浏览器中输入
http://127.0.0.1:8080/wx
可以看见 hello world!
打开任务管理器,我们可以看到python的 hello.py 进程。当我们访问这台服务器的8080端口,并且url为/wx时,就进入了这个程序。
    urls = ('/wx', 'hello',)

    class hello():
        def GET(self):
            return 'hello world'
4.使用flask创建微信后端
# -*- coding:utf-8 -*-

from flask import Flask
from flask import request
import hashlib

app = Flask(__name__)
app.debug = True

@app.route('/wx_flask',methods=['GET','POST'])
def wechat():
    if request.method == 'GET':
        #这里改写你在微信公众平台里输入的token
        token = 'xiaoqingxin'
        #获取输入参数
        data = request.args
        signature = data.get('signature','')
        timestamp = data.get('timestamp','')
        nonce = data.get('nonce','')
        echostr = data.get('echostr','')
        #字典排序
        list = [token, timestamp, nonce]
        list.sort()
        s = list[0] + list[1] + list[2]
        #sha1加密算法
        hascode = hashlib.sha1(s.encode('utf-8')).hexdigest()
        #如果是来自微信的请求,则回复echostr
        if hascode == signature:
            return echostr
        else:
            return ""

if __name__ == '__main__':
   	app.run()
其中

@app.route('/wx_flask',methods=['GET','POST'])
def wechat():
是python decorator,表示当网页访问“/wx_flask”目录时,会调用到wechat()函数。
具体语法解释见下文。
https://www.cnblogs.com/zh605929205/p/7704902.html
5.python 字符串格式%s的用法
比如下面的例子:
print("I'm %s. I'm %d year old" % ('Vamei', 99))
输出 I'm Vamei. I'm 99 year old"
6.部署到aws上
1.首先在本地使用github创建wx_flask
1)github 页面点击"create repository".
2)在本地文件夹下 用命令行"git add repository_address"
3)使用 GitHub desktop程序 “add local repository”进行管理。
4)安装Python3及使用venv,编写工程代码。
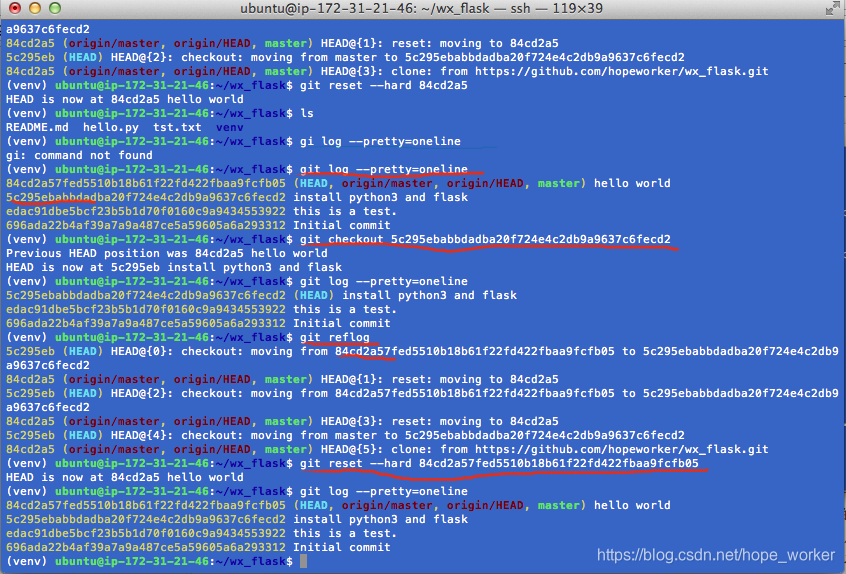
2.创建aws服务器及使用git 管理代码
1)git clone “repository url”。
2) 学习使用 git的 checkout, log, reflog, reset等命令管理版本。
sudo apt-get update
sudo apt install python3-pip
#pip3 install virtualenv
sudo apt-get install python3-venv
python3 -m venv venv_aws_ubuntu18
source venv_aws_ubuntu18/bin/activate
/更新单个文件/
git checkout origin/master -- hello.py
从aws下载文件到本地(aws 无法 git push的替代办法)
scp -i myawskey2019.pem [email protected]:/home/ubuntu/wx_flask/hello.py /Users/xiongwei/Downloads/my_project/github_directory
从aws下载文件夹到本地
scp -i myawskey2019.pem -r [email protected]:/home/ubuntu/wx_flask/venv_aws_ubuntu18/ /Users/xiongwei/Downloads/my_project/github_directory/wx_flask/
ps: ubuntu18 refers to AWS AMI=“ubuntu/images/hvm-ssd/ubuntu-bionic-18.04-amd64-server-20180912 (ami-0f65671a86f061fcd)”
从本地把文件上传到aws文件夹:
scp -i myawskey2019.pem /Users/xiongwei/Downloads/my_project/github_directory/wx_flask/wx_flask.py [email protected]:/home/ubuntu/wx_flask/
github 建tag
$ git tag
v1.0
$ git tag -d v1.0
Deleted tag ‘v1.0’ (was 9b81e22)
$ git tag -a v1.0 -m “hello world can be seen on broswer by http://18.224.25.101:8080”
$ git push origin --tags
在后台运行python程序的命令:
(venv) $ python hello.py &
ssh连接断开命令:
输入 logout
对接微信接口
微信http消息只能在80端口,而aws ubuntu默认用户为普通用户,无法开启 80端口。
会报如下错误:
(venv_aws_ubuntu18) ubuntu@ip-172-31-21-46:~/wx_flask$ python wx_flask.py
 * Serving Flask app "wx_flask" (lazy loading)
 * Environment: production
   WARNING: Do not use the development server in a production environment.
   Use a production WSGI server instead.
 * Debug mode: on
Traceback (most recent call last):
  File "wx_flask.py", line 28, in <module>
    app.run(debug=True, host='0.0.0.0', port=80)
  File "/home/ubuntu/wx_flask/venv_aws_ubuntu18/lib/python3.6/site-packages/flask/app.py", line 943, in run
    run_simple(host, port, self, **options)
  File "/home/ubuntu/wx_flask/venv_aws_ubuntu18/lib/python3.6/site-packages/werkzeug/serving.py", line 795, in run_simple
    s.bind(get_sockaddr(hostname, port, address_family))
PermissionError: [Errno 13] Permission denied
为了解决这个问题,就必须使用root用户来运行程序。在sudo情况下,venv环境会失效,因此要指定venv python路径。用下面命令解决这个问题。
(venv_aws_ubuntu18) ubuntu@ip-172-31-21-46:~/wx_flask$ sudo /home/ubuntu/wx_flask/venv_aws_ubuntu18/bin/python wx_flask.py &
使用PyCharm作为IDE
安装的是免费的社区版,感觉很好用。可以查看代码定义,git管理等,这对于目前的开发来说已经够用并且十分方便了。
学习bootstrap开发数据录入界面
1.先学习bootstrap
http://www.runoob.com/bootstrap/bootstrap-tutorial.html
2.flask表单处理
https://zhuanlan.zhihu.com/p/53782945
每日一句 crash
每日一句 crash消息
123.24.75.113 - - [09/Mar/2019 10:05:18] “GET / HTTP/1.0” 404 -
pycharm 远程调试?
退出ssh连接,服务就报错?
因为代码中加入了print语句,ssh连接退出后,找不到输出终端。
git 放弃本地修改并获取服务器代码
git branch -a //查看branch名称
git reset --hard origin/master
git pull
微信小程序开发
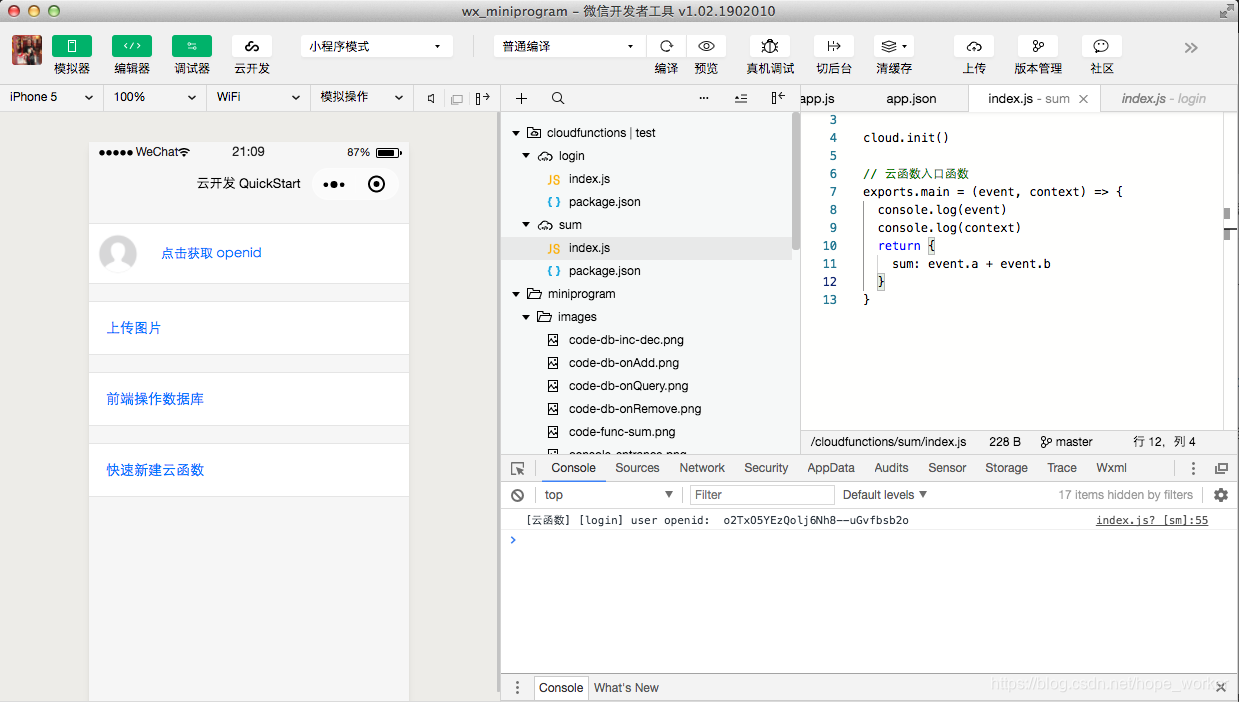
目前公众号“每日一句”功能已经上线。后面计划能够提供给用户自己输入材料的功能,这需要用到微信小程序。目前了解到小程序前端是使用JavaScript,后端可以使用云开发,也可以使用普通的后端服务器开发。云开发需要熟悉nodejs的内容,优点是不用搭建服务端,省去了备案等麻烦事,缺点是云函数个数有限制,nodejs的开发需要学习。普通后端服务器的开发可以利用之前公众号已经搭建起来的flask后台,缺点是小程序的后端服务器必须要备案。
-
官方入门指南
https://developers.weixin.qq.com/miniprogram/dev/quickstart/basic/getstart.html
按照上面的顺序,安装开发环境,开启云开发功能等。这个时候已经可以在自己的手机上运行一个开发板的样例小程序了。
-
JavaScript学习
推荐liaoxuefeng的个人博客,理解匿名函数,箭头函数,闭包,promise等基本概念
https://www.liaoxuefeng.com/wiki/001434446689867b27157e896e74d51a89c25cc8b43bdb3000
对async、await的理解
https://segmentfault.com/a/1190000007535316?utm_source=tag-newest
2.了解普通开发模式下,前端和后端的交互
https://blog.csdn.net/jsyzliuyu/article/details/81878336
- 入门慕课视频课程
https://www.imooc.com/course/list?c=fe
准备在自己mac上用virtualbox模拟aws云服务器,先本地开发。
Ubuntu镜像国内地址:
http://mirrors.163.com/ubuntu-releases/bionic/
http://mirrors.163.com/centos/
安装Ubuntu镜像
ubuntu-18.04.2-live-server-amd64.iso
1)virtualbox 共享文件失败
https://blog.csdn.net/l349074299/article/details/77869317
对于一个新的虚拟机系统,使用mount -t vboxsf AAA /mnt/BBB时出现下面问题:
“wrong fs type,bad option,bad superblock…”
这个问题是因为系统没有安装VMBOX增强插件,使用以下命令可以解决:
sudo apt install nfs-common
sudo apt install cifs-utils
sudo apt install virtualbox-guest-utils
2)主机ssh连接虚拟主机
使用桥接网络,ifconfig 获取IP地址,然后使用主机的ssh进行连接。
3)ubuntu 开机运行 rc.local
ubuntu18.04不再使用initd管理系统,改用systemd。
使用systemd设置开机启动
为了像以前一样,在/etc/rc.local中设置开机启动程序,需要以下几步:
(1)
systemd默认读取/etc/systemd/system下的配置文件,该目录下的文件会链接/lib/systemd/system/下的文件。一般系统安装完/lib/systemd/system/下会有rc-local.service文件,即我们需要的配置文件。
链接过来:
ln -fs /lib/systemd/system/rc-local.service /etc/systemd/system/rc-local.service
查看 rc-local.service 内容可以看到开机执行的文件为 rc.local.
(2)
创建/etc/rc.local文件
touch /etc/rc.local
chmod 777 /etc/rc.local
rc.local 文件内容:
#!/bin/sh
sudo mount -t vboxsf github_directory /mnt/pcshare
4)以root身份运行
虚拟机服务器:
如果是第一次获得Root权限那么首先要设置root密码
~$ sudo passwd root
获取root权限:~$ su root
输入之前你设置的密码
退出root:~$ exit
安装ssh server
sudo apt install openssh-server
编辑配置文件,让其支持root用户登录,因为默认是不支持root用户的。
sudo vi /etc/ssh/sshd_config
把其中的“PermitRootLogin prohibit-password” 修改为“PermitRootLogin yes”
重启openssh服务。
systemctl restart sshd(server服务)
本地pc机 ssh root登陆:
ssh [email protected]
5)python 中文支持
在编写Python时,当使用中文输出或注释时运行脚本,会提示错误信息:
SyntaxError: Non-ASCII character ‘\xe5’ in file
Python的默认编码文件是用的ASCII码,而你的python文件中使用了中文等非英语字符。
在Python源文件的最开始一行,加入一句:
# coding=UTF-8
2019.5.12 wx_flasky run success in virtualbox ubuntu-18.04.2-live-server-amd64.iso
2019.5.19
把“慕课”上的样例代码加入到了工程中,可以pycharm写代码,微信开发者工具看效果。通过Photoshop完成了主页面的修改,发布体验版1.0.0.
5)静态ip配置
sudo vim /etc/netplan/xxxx.ymal
然后在ethernet部分添加以下配置。
network:
    ethernets:
        ens33:
            addresses:
            - 192.168.4.254/24
            dhcp4: false
            nameservers:
                addresses:
                - 8.8.8.8
                search: []
    version: 2
sudo netplan apply
6)c语言编译工具安装
sudo apt install (make gcc g++ 等)
如果有些库找不到
试输入sudoapt-get install gcc-multilib即可
2019.8.10 利奇马台风
- use vscode as the ide for this project.
- add api_suna for suna’s mini program.
- modify the shell script, so that I can deploy it to aws server easily.

flask support multiple db:
http://www.pythondoc.com/flask-sqlalchemy/binds.html
