训练程序
参照Tensorflow中文社区教程:
http://www.tensorfly.cn/tfdoc/tutorials/mnist_pros.html
能在自己的环境中成功运行代码。
(注意一点:关于教程的print函数)
在博主用的Python3.6版本中,print已经成为了一个函数,而在Python2.7当中print不是一个函数,这里博主是需要加上括号。
所以根据自己所用的版本,更改这里,例如

print("Hello")  python3.6
print "Hello"   python2.7
按照教程将代码跑通之后,接下来就是将模型保存,只需调用一个简单的函数saver.save,以下就是博主根据教程敲得完整代码:
from tensorflow.examples.tutorials.mnist import input_data
import tensorflow as tf
#读取数据
mnist = input_data.read_data_sets('MNIST_data', one_hot=True)
sess=tf.InteractiveSession()
#构建cnn网络结构
#自定义卷积函数(后面卷积时就不用写太多)
def conv2d(x,w):
    return tf.nn.conv2d(x,w,strides=[1,1,1,1],padding='SAME')
#自定义池化函数
def max_pool_2x2(x):
    return tf.nn.max_pool(x,ksize=[1,2,2,1],strides=[1,2,2,1],padding='SAME')
#设置占位符,尺寸为样本输入和输出的尺寸
x=tf.placeholder(tf.float32,[None,784])
y_=tf.placeholder(tf.float32,[None,10])
x_img=tf.reshape(x,[-1,28,28,1])

#设置第一个卷积层和池化层
w_conv1=tf.Variable(tf.truncated_normal([3,3,1,32],stddev=0.1))
b_conv1=tf.Variable(tf.constant(0.1,shape=[32]))
h_conv1=tf.nn.relu(conv2d(x_img,w_conv1)+b_conv1)
h_pool1=max_pool_2x2(h_conv1)

#设置第二个卷积层和池化层
w_conv2=tf.Variable(tf.truncated_normal([3,3,32,50],stddev=0.1))
b_conv2=tf.Variable(tf.constant(0.1,shape=[50]))
h_conv2=tf.nn.relu(conv2d(h_pool1,w_conv2)+b_conv2)
h_pool2=max_pool_2x2(h_conv2)

#设置第一个全连接层
w_fc1=tf.Variable(tf.truncated_normal([7*7*50,1024],stddev=0.1))
b_fc1=tf.Variable(tf.constant(0.1,shape=[1024]))
h_pool2_flat=tf.reshape(h_pool2,[-1,7*7*50])
h_fc1=tf.nn.relu(tf.matmul(h_pool2_flat,w_fc1)+b_fc1)

#dropout(随机权重失活)
keep_prob=tf.placeholder(tf.float32)
h_fc1_drop=tf.nn.dropout(h_fc1,keep_prob)

#设置第二个全连接层
w_fc2=tf.Variable(tf.truncated_normal([1024,10],stddev=0.1))
b_fc2=tf.Variable(tf.constant(0.1,shape=[10]))
y_out=tf.nn.softmax(tf.matmul(h_fc1_drop,w_fc2)+b_fc2)

#建立loss function,为交叉熵
loss=tf.reduce_mean(-tf.reduce_sum(y_*tf.log(y_out),reduction_indices=[1]))
#配置Adam优化器,学习速率为1e-4
train_step=tf.train.AdamOptimizer(1e-4).minimize(loss)

#建立正确率计算表达式
correct_prediction=tf.equal(tf.argmax(y_out,1),tf.argmax(y_,1))
accuracy=tf.reduce_mean(tf.cast(correct_prediction,tf.float32))

# 定义saver
saver = tf.train.Saver()

#开始喂数据,训练
tf.global_variables_initializer().run()
for i in range(20000):
    batch=mnist.train.next_batch(50)
    if i%100==0:
        train_accuracy=accuracy.eval(feed_dict={x:batch[0],y_:batch[1],keep_prob:1})
        print("step %d,train_accuracy= %g"%(i,train_accuracy))
    train_step.run(feed_dict={x:batch[0],y_:batch[1],keep_prob:0.5})#这里才开始真正进行训练计算
# 模型储存位置
saver.save(sess, ".\\MNIST_data\\model.ckpt")

#训练之后,使用测试集进行测试,输出最终结果
print("test_accuracy= %g"% accuracy.eval(feed_dict={x:mnist.test.images,y_:mnist.test.labels,keep_prob:1}))
以上程序用于导入MNIST数据集-创建模型-保存模型到指定路径。
保存的路径会出现以下四个文件

各个文件的作用:
- checkpoint: 文本文件,记录了模型文件的路径信息列表
- model.ckpt.data-00000-of-00001: 网络权重信息
- model.ckpt.index: .data和.index这两个文件是二进制文件,保存了模型中的变量参数(权重)信息
- model.ckpt.meta: 二进制文件,保存了模型的计算图结构信息(模型的网络结构)protobuf
识别数字
整体来看,和刚才的代码相似度很高,也是将需要测试的图片进行卷积,池化,softmax回归等等。
from PIL import Image, ImageFilter
import tensorflow as tf
import matplotlib.pyplot as plt
def imageprepare():
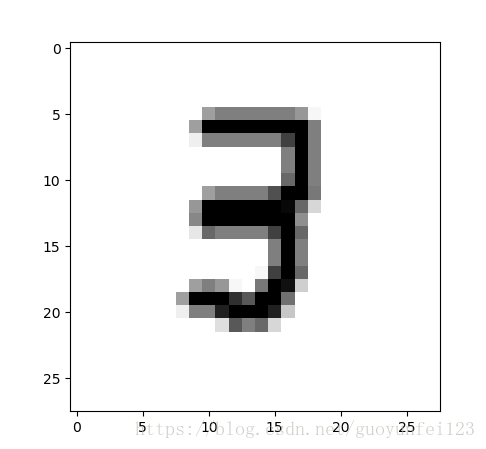
im = Image.open("MNIST_data\\test3.png") #读取的图片所在路径,注意是28*28像素
plt.imshow(im) #显示需要识别的图片
plt.show()
im = im.convert('L')
tv = list(im.getdata())
tva = [(255-x)*1.0/255.0 for x in tv]
return tva
x = tf.placeholder(tf.float32, [None, 784])
y_ = tf.placeholder(tf.float32, [None, 10])
def weight_variable(shape):
initial = tf.truncated_normal(shape,stddev = 0.1)
return tf.Variable(initial)
def bias_variable(shape):
initial = tf.constant(0.1,shape = shape)
return tf.Variable(initial)
def conv2d(x,W):
return tf.nn.conv2d(x, W, strides = [1,1,1,1], padding = 'SAME')
def max_pool_2x2(x):
return tf.nn.max_pool(x, ksize=[1,2,2,1], strides=[1,2,2,1], padding='SAME')
W_conv1 = weight_variable([3, 3, 1, 32])
b_conv1 = bias_variable([32])
x_image = tf.reshape(x,[-1,28,28,1])
h_conv1 = tf.nn.relu(conv2d(x_image,W_conv1) + b_conv1)
h_pool1 = max_pool_2x2(h_conv1)
W_conv2 = weight_variable([3, 3, 32, 50])
b_conv2 = bias_variable([50])
h_conv2 = tf.nn.relu(conv2d(h_pool1, W_conv2) + b_conv2)
h_pool2 = max_pool_2x2(h_conv2)
W_fc1 = weight_variable([7 * 7 * 50, 1024])
b_fc1 = bias_variable([1024])
h_pool2_flat = tf.reshape(h_pool2, [-1, 7*7*50])
h_fc1 = tf.nn.relu(tf.matmul(h_pool2_flat, W_fc1) + b_fc1)
keep_prob = tf.placeholder("float")
h_fc1_drop = tf.nn.dropout(h_fc1, keep_prob)
W_fc2 = weight_variable([1024, 10])
b_fc2 = bias_variable([10])
y_conv=tf.nn.softmax(tf.matmul(h_fc1_drop, W_fc2) + b_fc2)
cross_entropy = -tf.reduce_sum(y_*tf.log(y_conv))
train_step = tf.train.AdamOptimizer(1e-4).minimize(cross_entropy)
correct_prediction = tf.equal(tf.argmax(y_conv,1), tf.argmax(y_,1))
accuracy = tf.reduce_mean(tf.cast(correct_prediction, "float"))
saver = tf.train.Saver()
with tf.Session() as sess:
sess.run(tf.global_variables_initializer())
saver.restore(sess, "MNIST_data\\model.ckpt") #使用模型,参数和之前的代码保持一致
result = imageprepare()
prediction=tf.argmax(y_conv,1)
predint=prediction.eval(feed_dict={x: [result],keep_prob: 1.0}, session=sess)
print('识别结果:')
print(predint[0])
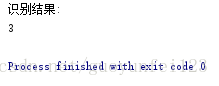
从测试结果来看,失败率还是挺高的。
问题总结
制作图片
图片大小必须是 28 x 28,可以选择ps或者美图秀秀或者其他任何的画图工具。
以下是博主通过美图秀秀制作的图片

错误:
tensorflow.python.framework.errors_impl.InvalidArgumentError: Assign requires shapes of both tensors to match
出现这个错误的原因是由于在训练模型做卷积和池化的时候,尺寸选择不一致造成的。
举例来说:
模型保存用的是
W_conv2 = weight_variable([3, 3, 32, 50])但在识别的时候用的是
W_conv2 = weight_variable([5, 5, 32, 64])
务必保持相关参数一致
