创建虚拟环境并镜像安装PyTorch
1、conda create -n torch2 python=3.7
torch2为我们创建的虚拟环境名称,用户自定义名称。
2、conda activate torch2
切换到虚拟环境
如图所示:

我们可以看到(torch2),说明已经切换成功。
3、更换镜像源(注意顺序)
conda config --add channels https://mirrors.tuna.tsinghua.edu.cn/anaconda/pkgs/free/
conda config --add channels https://mirrors.tuna.tsinghua.edu.cn/anaconda/pkgs/main/
conda config --set show_channel_urls yes
conda config --add channels https://mirrors.tuna.tsinghua.edu.cn/anaconda/cloud/pytorch/
4、运行执行安装pytorch
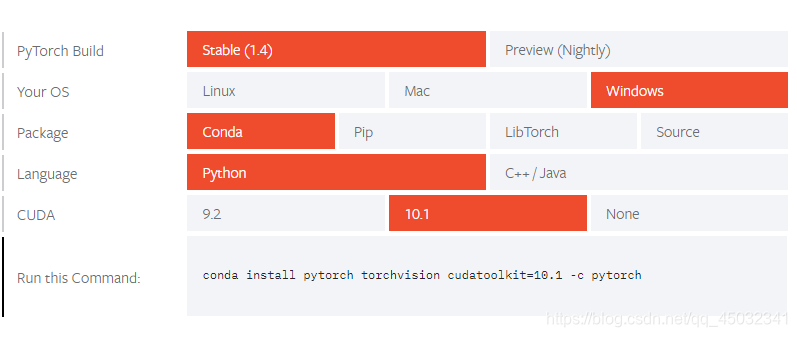
pytorch提供的下载命令为:conda install pytorch torchvision cudatoolkit=10.1 -c pytorch
但是,运行此命令未能成功安装。
运行:conda install pytorch torchvision cudatoolkit=10.1 成功安装(亲测有效)
cuda选择的是10.1
利用jupyter notebook访问虚拟环境
在base虚拟环境下输入以下命令:
1、安装nb_conda:
conda install nb_conda
2、安装ipykernel
conda install ipykernel
3、为虚拟环境创建kernel文件:
conda install -n torch2 ipykernel
如图:

出现了Python[conda env:torch2]
在创建新的python文件时选中Python[conda env:torch2]即可。
下面我们在Jupyter Notebook测试PyTorch GPU版本安装是否成功:
import torch

print(torch.__version__)
print(torch.cuda.is_available())
输出结果:
1.4.0
True
Pytorch版本为1.4.0
GPU版本安装成功。
