目录
4.在pom.xml中添加Mybatis、MySQL、FreeMarker等的starter
5.在application.properties中添加数据库、Mybatis、FreeMarker等的相关配置
6.在SpringBoot启动类MallApplication配置扫描mapper接口类
1.新建一个SpringBoot项目
(1)File--->New--->Project

(2)选择项目工具和JDK版本

(3)填写项目信息

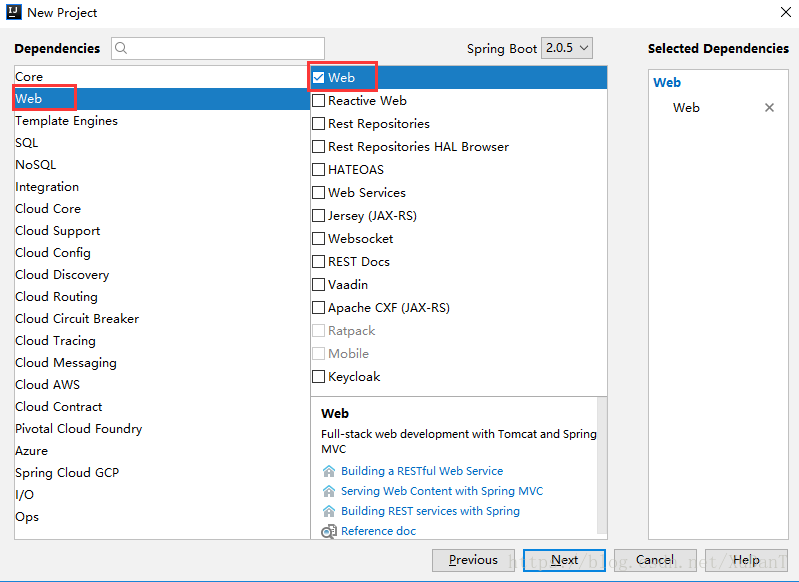
(4)选择Web依赖包
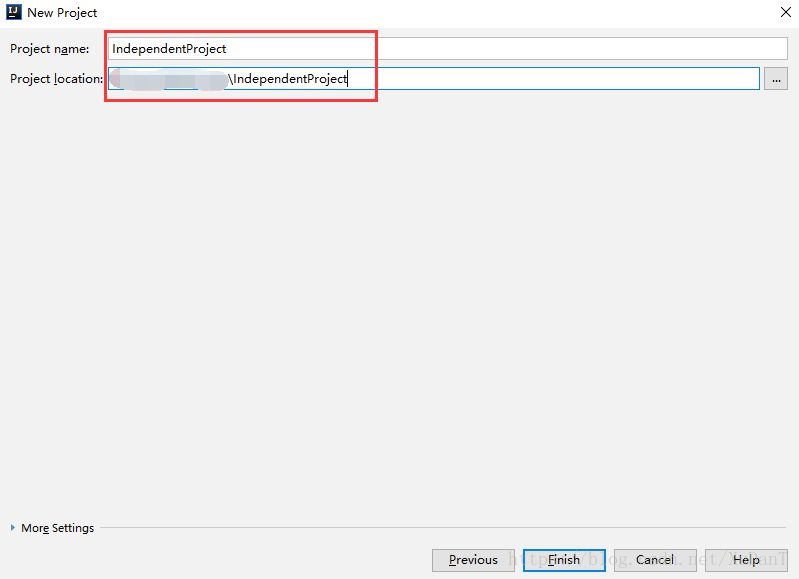
(5)填写项目名称和项目保存地址
(6)搭建好的目录结构

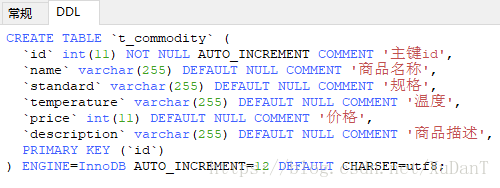
2.数据库设计
3.项目整体目录结构

4.在pom.xml中添加Mybatis、MySQL、FreeMarker等的starter
        <!-- spring boot mybatis依赖 -->
        <dependency>
            <groupId>org.mybatis.spring.boot</groupId>
            <artifactId>mybatis-spring-boot-starter</artifactId>
            <version>${mybatis-spring-boot}</version>
        </dependency>

        <!-- mysql连接驱动依赖 -->
        <dependency>
            <groupId>mysql</groupId>
            <artifactId>mysql-connector-java</artifactId>
            <version>${mysql-connector}</version>
        </dependency>

        <!-- spring boot freemarker依赖 -->
        <dependency>
            <groupId>org.springframework.boot</groupId>
            <artifactId>spring-boot-starter-freemarker</artifactId>
        </dependency>
5.在application.properties中添加数据库、Mybatis、FreeMarker等的相关配置
## 数据源配置
spring.datasource.url=jdbc:mysql://localhost:3306/testproject?useUnicode=true&characterEncoding=utf8
spring.datasource.username=root
spring.datasource.password=123456
spring.datasource.driver-class-name=com.mysql.jdbc.Driver

## Mybatis配置
## 实体类包路径
mybatis.typeAliasesPackage=org.mall.domain
## mapper.xml路径
mybatis.mapperLocations=classpath:mapper/*.xml

## Freemarker 配置
## 文件配置路径
spring.freemarker.template-loader-path=classpath:/web/
spring.freemarker.cache=false
spring.freemarker.charset=UTF-8
spring.freemarker.check-template-location=true
spring.freemarker.content-type=text/html
spring.freemarker.expose-request-attributes=true
spring.freemarker.expose-session-attributes=true
## 获取contextPath
spring.freemarker.request-context-attribute=request
spring.freemarker.suffix=.ftl
6.在SpringBoot启动类MallApplication配置扫描mapper接口类
package org.mall;

import org.mybatis.spring.annotation.MapperScan;
import org.springframework.boot.SpringApplication;
import org.springframework.boot.autoconfigure.SpringBootApplication;

//Spring Boot应用的标识
@SpringBootApplication
//mapper接口类扫描包配置,用这个注解可以注册mybatis mapper接口类
@MapperScan("org.mall.dao")
public class MallApplication {
    public static void main(String[] args) {
        // 程序启动入口,启动嵌入式的 Tomcat 并初始化 Spring 环境及其各 Spring 组件
        SpringApplication.run(MallApplication.class,args);
    }
}
7.实现增删改查
(1)Commodity 实体类
package org.mall.domain;

/*
* 商品实体类
* */
public class Commodity {
    //主键id
    private Integer id;
    //商品名称
    private String name;
    //商品规格
    private String standard;
    //商品温度
    private String temperature;
    //商品价格
    private int price;
    //商品描述
    private String description;

    //省略getter、setter方法
    ......
}
(2)CommodityDao接口类
package org.mall.dao;

import org.mall.domain.Commodity;

import java.util.List;

/*
* 商品DAO
* */
public interface CommodityDao {
    //获取全部商品
    List<Commodity> findAll();

    //新增商品
    void insertCommodity(Commodity commodity);

    //修改商品
    void updateCommodity(Commodity commodity);

    //根据id获取商品
    Commodity findById(Integer id);

    //根据id删除商品
    void deleteById(Integer id);
}
(3)CommodityService接口
package org.mall.service;

import org.mall.domain.Commodity;

import java.util.List;

/*
* 商品Service接口
* */
public interface CommodityService {
    //获取全部商品信息
    List<Commodity> findAll();

    //新增商品信息
    void insertCommodity(Commodity commodity);

    //修改商品信息
    void updateCommodity(Commodity commodity);

    //根据id查询获取商品信息
    Commodity findById(Integer id);

    //根据id删除商品信息
    void deleteById(Integer id);
}
(4)CommodityService接口实现类
package org.mall.service.impl;

import org.mall.dao.CommodityDao;
import org.mall.domain.Commodity;
import org.mall.service.CommodityService;
import org.springframework.beans.factory.annotation.Autowired;
import org.springframework.stereotype.Service;

import java.util.List;

/*
* 商品Service实现类
* */
@Service
public class CommodityServiceImpl implements CommodityService {
    @Autowired
    private CommodityDao commodityDao;

    //获取全部商品
    public List<Commodity> findAll(){
        return commodityDao.findAll();
    }

    //新增商品
    public void insertCommodity(Commodity commodity){
        commodityDao.insertCommodity(commodity);
    }

    //修改商品
    public void updateCommodity(Commodity commodity){
        commodityDao.updateCommodity(commodity);
    }

    //根据id获取商品
    public Commodity findById(Integer id){
        return commodityDao.findById(id);
    }

    //根据id删除商品
    public void deleteById(Integer id){
        commodityDao.deleteById(id);
    }
}
(5)Commodity控制层
注:在控制层使用了Swagger实现接口说明,具体使用请参考在项目中使用Swagger
package org.mall.controller;

import io.swagger.annotations.Api;
import io.swagger.annotations.ApiImplicitParam;
import io.swagger.annotations.ApiImplicitParams;
import io.swagger.annotations.ApiOperation;
import org.mall.common.ResultUtils;
import org.mall.domain.Commodity;
import org.mall.service.CommodityService;
import org.springframework.beans.factory.annotation.Autowired;
import org.springframework.stereotype.Controller;
import org.springframework.web.bind.annotation.RequestMapping;
import org.springframework.web.bind.annotation.RequestMethod;
import org.springframework.web.bind.annotation.ResponseBody;
import org.springframework.web.servlet.ModelAndView;

@Api(description = "商品信息接口")
@Controller
@RequestMapping("/commodity")
public class CommodityController {
        @Autowired
        private CommodityService commodityService;

        /*
         * description:获取商品
         * @ApiOperation:描述接口
         */
        @ApiOperation(value = "查询所有商品" ,  notes="查询所有商品")
        @RequestMapping(value = "findAll", method = RequestMethod.GET)
        public ModelAndView findAll(){
            ModelAndView model = new ModelAndView("commodity/commodity_list");
            model.addObject("commodity",commodityService.findAll());
            return model;
        }

        /*
         * description:根据id获取商品
         */
        @ApiOperation(value = "根据id获取商品" ,  notes="根据id获取商品")
        //@ApiImplicitParams:多个请求参数
        @ApiImplicitParams({
                //@ApiImplicitParam:一个请求参数
                @ApiImplicitParam(name = "id", value = "主键id", required = true, paramType = "query", dataType = "int")
        })
        @RequestMapping(value = "findById", method = RequestMethod.GET)
        public ModelAndView findById(Integer id){
            ModelAndView model = new ModelAndView("commodity/edit");
            if (id != null && id != 0 ) {
                model.addObject("commodity", commodityService.findById(id));
            }
            return model;
        }

        /*
         * description:根据id删除商品
         */
        @ApiOperation(value = "根据id删除商品" ,  notes="根据id删除商品")
        @ApiImplicitParams({
                @ApiImplicitParam(name = "id", value = "主键id", required = true, paramType = "query", dataType = "int")
        })
        @RequestMapping(value = "deleteById", method = RequestMethod.GET)
        @ResponseBody
        public Object deleteById(Integer id){
            ResultUtils res = new ResultUtils();
            try{
                commodityService.deleteById(id);
            }catch (Exception e){
                res.errorResult();
            }
            return res.successResult();
        }

        /*
         * description:修改商品
         */
        @ApiOperation(value = "修改商品" ,  notes="修改商品")
        @ApiImplicitParams({
                @ApiImplicitParam(name = "commodity", value = "实体对象", required = true, paramType = "body", dataType = "Commodity")
        })
        @RequestMapping(value = "editCommodity")
        @ResponseBody
        public Object editCommodity(Commodity commodity){
            ResultUtils res = new ResultUtils();
            try{
                if (commodity.getId() != null){
                    commodityService.updateCommodity(commodity);
                } else {
                    commodityService.insertCommodity(commodity);
                }
            }catch (Exception e){
                return res.errorResult();
            }
            return res.successResult();
        }
    }
(6)mapper.xml
<?xml version="1.0" encoding="UTF-8" ?>
<!DOCTYPE mapper PUBLIC "-//mybatis.org//DTD Mapper 3.0//EN" "http://mybatis.org/dtd/mybatis-3-mapper.dtd" >
<mapper namespace="org.mall.dao.CommodityDao">
<resultMap id="BaseResultMap" type="org.mall.domain.Commodity">
<result column="id" property="id" />
<result column="name" property="name" />
<result column="standard" property="standard" />
<result column="temperature" property="temperature" />
<result column="price" property="price" />
<result column="description" property="description" />
</resultMap>
<parameterMap id="Commodity" type="org.mall.domain.Commodity"/>
<sql id="Base_Column_List">
id, name, standard, temperature, price, description
</sql>
<!--获取全部商品-->
<select id="findAll" resultMap="BaseResultMap">
select
<include refid="Base_Column_List" />
from t_commodity
</select>
<!--新增商品-->
<insert id="insertCommodity" parameterType="Commodity">
insert into t_commodity (name, standard, temperature, price, description)
values (#{name}, #{standard}, #{temperature}, #{price}, #{description})
</insert>
<!--修改商品-->
<update id="updateCommodity" parameterType="Commodity">
update t_commodity set
name = #{name}, standard = #{standard}, temperature = #{temperature}, price = #{price}, description = #{description}
where id = #{id}
</update>
<!--根据id获取商品-->
<select id="findById" resultMap="BaseResultMap" parameterType="int">
select
<include refid="Base_Column_List" />
from t_commodity where id = #{id}
</select>
<!--根据id伤处商品-->
<delete id="deleteById" parameterType="int">
delete from t_commodity where id = #{id}
</delete>
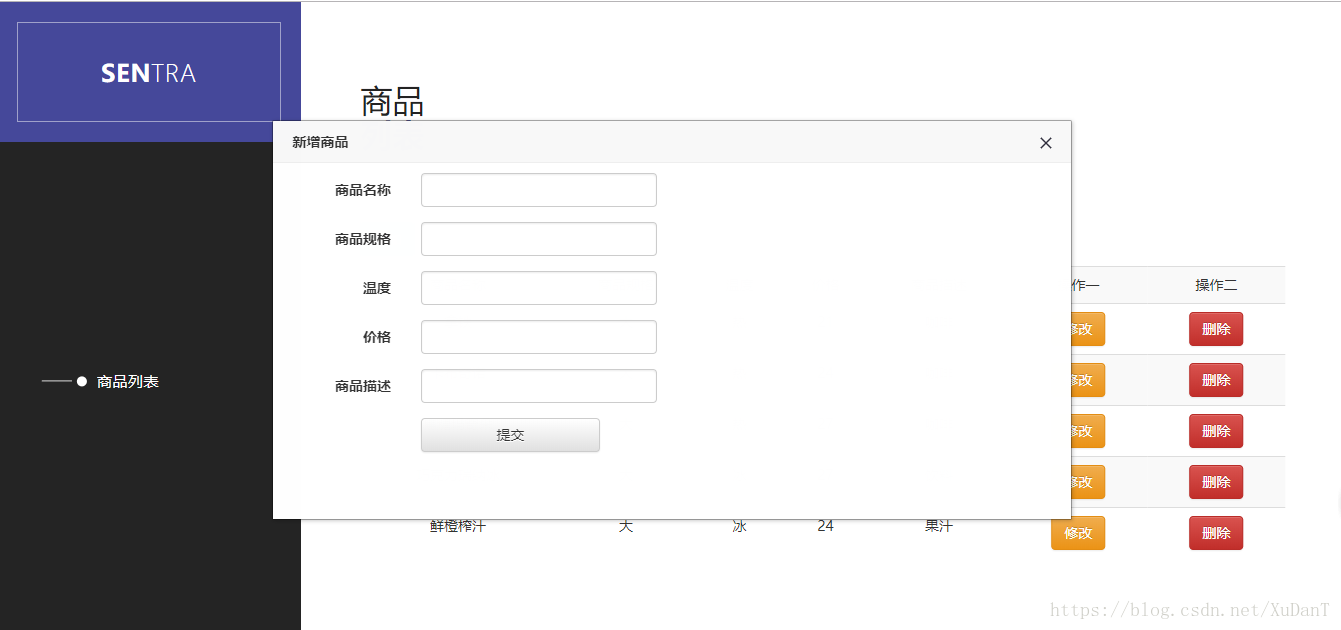
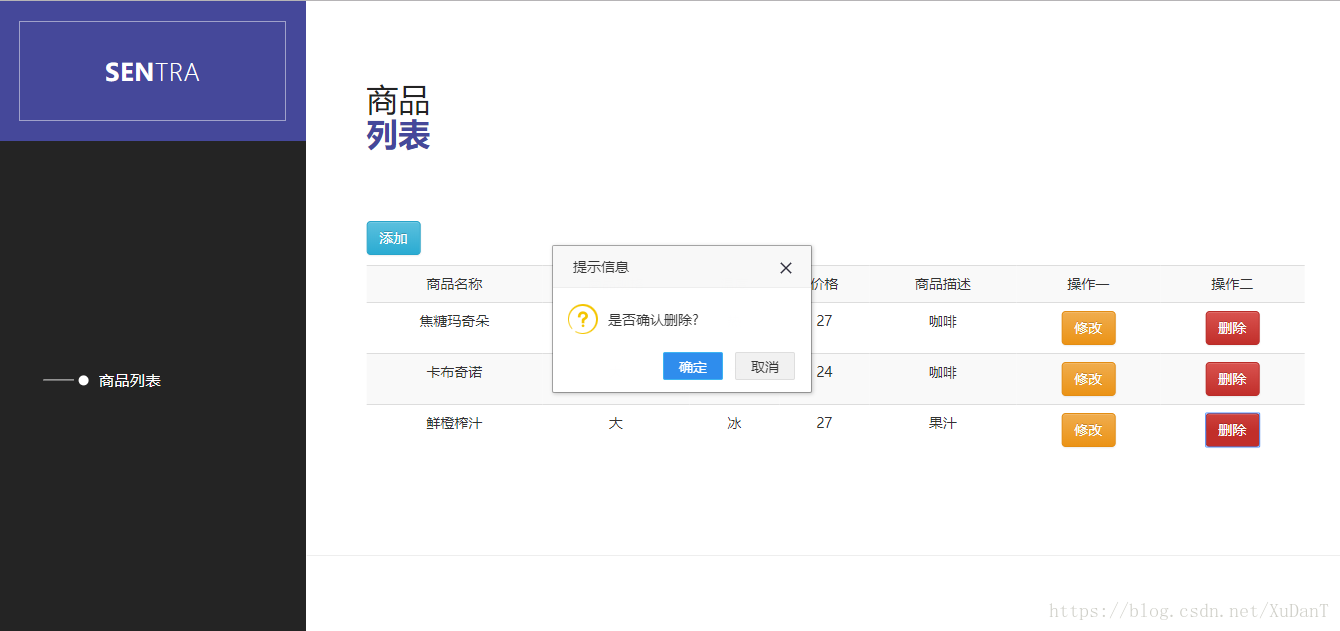
</mapper>(7)获取商品信息列表页面
注:页面设计使用了插件bootstrap、layer
<!DOCTYPE html>
<html>
<head>
    <meta charset="utf-8">
    <meta http-equiv="X-UA-Compatible" content="IE=edge,chrome=1">
    <title>商品信息</title>
    <meta name="description" content="">
    <meta name="viewport" content="width=device-width, initial-scale=1">
    <#include "../common/common.ftl" />
</head>

<body>
<header class="nav-down responsive-nav hidden-lg hidden-md">
    <button type="button" id="nav-toggle" class="navbar-toggle" data-toggle="collapse" data-target="#main-nav">
        <span class="sr-only">Toggle navigation</span>
        <span class="icon-bar"></span>
        <span class="icon-bar"></span>
        <span class="icon-bar"></span>
    </button>

    <div id="main-nav" class="collapse navbar-collapse">
        <nav>
            <ul class="nav navbar-nav">
                <li><a href="#top">Home</a></li>
            </ul>
        </nav>
    </div>
</header>

<div class="sidebar-navigation hidde-sm hidden-xs">
    <div class="logo">
        <a href="#">Sen<em>tra</em></a>
    </div>
    <nav>
        <ul>
            <li>
                <a href="#featured">
                    <span class="rect"></span>
                    <span class="circle"></span>
                    商品列表
                </a>
            </li>
        </ul>
    </nav>
</div>

<div class="page-content">
    <section id="featured" class="content-section">
        <div class="section-heading">
            <h1>商品<br><em>列表</em></h1>
        </div>
        <div class="section-content">
            <div>
                <button type="button" class="btn btn-info" οnclick="edit(0);" style="position: relative;float: left;margin-bottom: 10px;">
                    添加
                </button>
            </div>

            <table class="table table-striped">
                <tr>
                    <td>商品名称</td>
                    <td>商品规格</td>
                    <td>温度</td>
                    <td>价格</td>
                    <td>商品描述</td>
                    <td>操作一</td>
                    <td>操作二</td>
                </tr>
<#list commodity as item>
        <tr>
            <td>${(item.name)!}</td>
            <td>${(item.standard)!}</td>
            <td>${(item.temperature)!}</td>
            <td>${(item.price)!}</td>
            <td>${(item.description)!}</td>
            <td><button type="button" class="btn btn-warning" οnclick="edit(${(item.id)});">
                修改
            </button>
            </td>
            <td><button type="button" class="btn btn-danger" οnclick="deleteById(${(item.id)!})">
                删除
            </button>
            </td>
        </tr>
</#list>
            </table>
        </div>
    </section>
    <section id="contact" class="content-section">
    </section>
</div>
<script>
    var didScroll;
    var lastScrollTop = 0;
    var delta = 5;
    var navbarHeight = $('header').outerHeight();

    $(window).scroll(function(event){
        didScroll = true;
    });

    setInterval(function() {
        if (didScroll) {
            hasScrolled();
            didScroll = false;
        }
    }, 250);

    function hasScrolled() {
        var st = $(this).scrollTop();

        if(Math.abs(lastScrollTop - st) <= delta)
            return;

        if (st > lastScrollTop && st > navbarHeight){
            $('header').removeClass('nav-down').addClass('nav-up');
        } else {
            if(st + $(window).height() < $(document).height()) {
                $('header').removeClass('nav-up').addClass('nav-down');
            }
        }
        lastScrollTop = st;
    }
</script>
<script>
    function edit(id) {
        var title = "新增商品";
        if (id != 0) {
            title = "编辑商品";
        }
        var ob = {
            title: "<label>"+title+"</label>",
            width: "800",
            height: "400",
            url: "findById?id="+id
        };
        my.open(ob);
    }
    function reload(){
        window.location.reload();
    }
    function deleteById(id) {
        my.confirm('是否确认删除?', function() {
            $.get("/commodity/deleteById", {id: id}, function(data) {
                if (data.success) {
                    layer.msg("删除成功!",
                            {icon:6,time:1000},
                            function(){
                                reload();
                            })
                } else {
                    my.alert('删除失败!');
                }
            });
        })
    }
</script>
</body>
</html>
(8)新增修改页面
<!DOCTYPE html>
<html lang="en">
<#include "../common/common.ftl" />
<body>
<form class="form-horizontal" id="editForm" enctype="multipart/form-data">
<input type="hidden" name="id" value="${(commodity.id)!}" size=85/>
<div class="form-group">
<label class="col-sm-2 control-label">商品名称</label>
<div class="col-sm-4">
<input type="text" class="form-control" name="name" value="${(commodity.name)!}">
</div>
</div>
<div class="form-group">
<label class="col-sm-2 control-label">商品规格</label>
<div class="col-sm-4">
<input type="text" class="form-control" name="standard" value="${(commodity.standard)!}">
</div>
</div>
<div class="form-group">
<label class="col-sm-2 control-label">温度</label>
<div class="col-sm-4">
<input type="text" class="form-control" name="temperature" value="${(commodity.temperature)!}">
</div>
</div>
<div class="form-group">
<label class="col-sm-2 control-label">价格</label>
<div class="col-sm-4">
<input type="text" class="form-control" name="price" value="${(commodity.price)!}">
</div>
</div>
<div class="form-group">
<label class="col-sm-2 control-label">商品描述</label>
<div class="col-sm-4">
<input type="text" class="form-control" name="description" value="${(commodity.description)!}">
</div>
</div>
<div class="form-group">
<div class="col-sm-offset-2 col-sm-10">
<input οnclick="submitForm();" class="btn btn-default" value="提交">
</div>
</div>
</form>
<script>
function submitForm() {
$.ajax({
type: "POST",//方法类型
dataType: "json",//预期服务器返回的数据类型
url: "/commodity/editCommodity",//url
data: $('#editForm').serialize(),
success: function (data) {
if (data.success) {
layer.msg("提交成功!",
{icon:6,time:1000},
function(){
parent.reload();
})
}
},
error: function () {
my.alert("提交失败!");
}
});
}
</script>
</body>
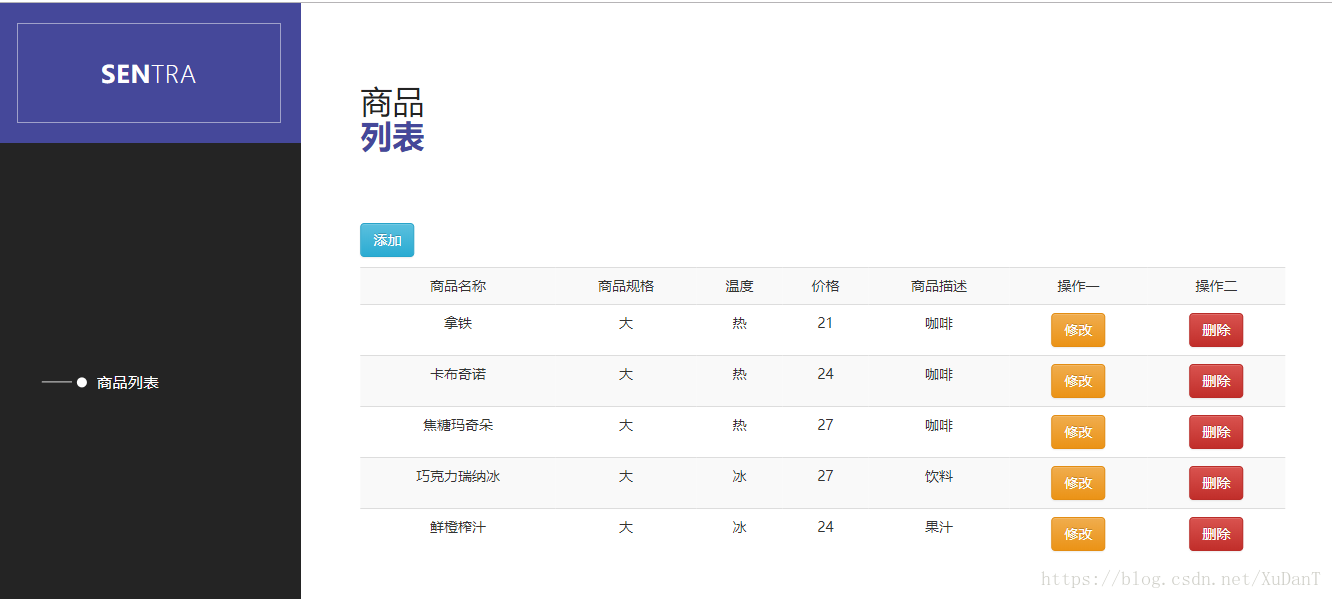
</html>8.页面展示

9.使用Git将项目上传到GitHub
(1)安装 Git,创建本地仓库
(2)在https://github.com/新建一个版本库


(3)查看仓库地址
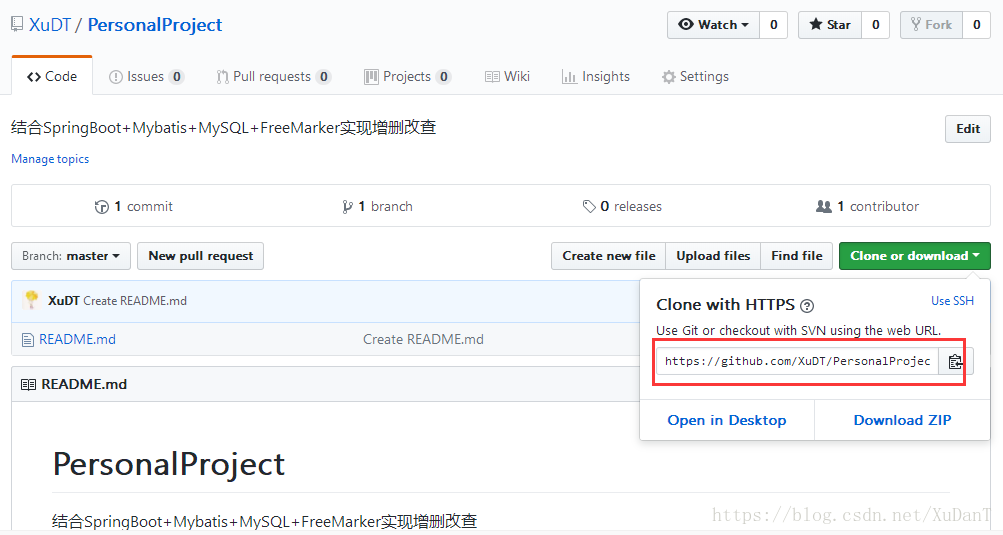
(4)打开GitBash,将远程版本克隆到本地


(5)将当前目录及子目录中的文件都添加到版本库里

(6)提交文件

(7)推送到远程仓库

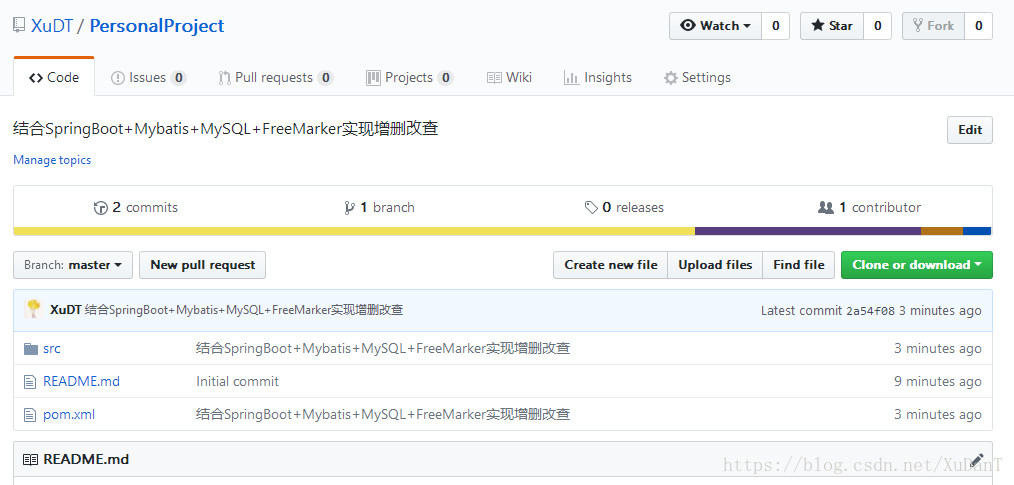
(8)刷新GitHub上PersonalProject工程主页
(9)更新代码
查看当前Git仓库状态

更新全部

拉取当前分支最新代码

推送到远程仓库

10.使用git-commit-id-plugin插件
在项目中添加git版本信息可以查看提交人、提交时间、版本号等信息,有便于项目版本管理,有助于团队协作开发。
(1)在pom.xml中添加git-commit-id-plugin插件
<build>
<plugins>
<plugin>
<groupId>org.apache.maven.plugins</groupId>
<artifactId>maven-jar-plugin</artifactId>
<version>2.4</version>
</plugin>
<plugin>
<groupId>pl.project13.maven</groupId>
<artifactId>git-commit-id-plugin</artifactId>
<version>2.2.4</version>
<executions>
<execution>
<goals>
<goal>revision</goal>
</goals>
</execution>
</executions>
<configuration>
<!-- 日期格式:默认值:dd.MM.yyyy HH:mm:ss -->
<dateFormat>yyyyMMddHHmmss</dateFormat>
<!-- 构建过程中是否打印详细信息,默认值:false; -->
<verbose>true</verbose>
<!-- ".git"文件路径,默认值:${project.basedir}/.git -->
<dotGitDirectory>${project.basedir}/.git</dotGitDirectory>
<!-- 若项目打包类型为pom是否取消构建,默认值:true; -->
<skipPoms>false</skipPoms>
<!-- 是否生成"git.properties"文件,默认值:false; -->
<generateGitPropertiesFile>true</generateGitPropertiesFile>
<!-- 指定"git.properties"文件的存放路径(相对于${project.basedir}的路径) -->
<generateGitPropertiesFilename>src/main/resources/git.properties</generateGitPropertiesFilename>
<!-- ".git"文件夹未找到时构建是否失败,若设置true,则构建失败;若设置false,则跳过执行该目标,默认值:true; -->
<failOnNoGitDirectory>true</failOnNoGitDirectory>
<!-- git描述配置(可选),由JGit提供实现; -->
<gitDescribe>
<!-- 是否生成描述属性 -->
<skip>false</skip>
<!-- 提交操作未发现tag时仅打印提交操作ID -->
<always>false</always>
<!-- 提交操作ID显式字符长度,最大值为40,默认值为7,0代表特殊意义 -->
<abbrev>7</abbrev>
<!-- 构建触发时,代码有修改时(即"dirty state"),添加指定后缀;默认值:"" -->
<dirty>-dirty</dirty>
<forceLongFormat>false</forceLongFormat>
</gitDescribe>
</configuration>
</plugin>
</plugins>
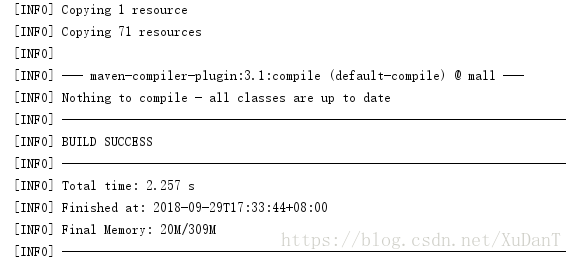
</build>(2)使用Maven compile命令编译运行
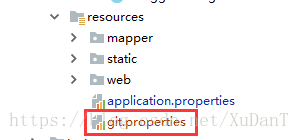
(3)运行成功后会在src/main/resources目录下生成一个git.properties文件
(4)编写一个读取git.properties文件的类
package org.mall.controller;

import org.springframework.web.bind.annotation.RequestMapping;
import org.springframework.web.bind.annotation.RequestMethod;
import org.springframework.web.bind.annotation.RestController;

import java.io.IOException;
import java.io.InputStream;
import java.util.Properties;

/*
 * 获取git.properties文件
 * */
@RestController
public class VersionController {
    @RequestMapping(value = "/version", method = RequestMethod.GET)
    public Properties versionInformation() {
        Properties properties = null;
        try {
            //获取文件
            InputStream inputStream = Thread.currentThread().getContextClassLoader().getResourceAsStream("git.properties");
            properties = new Properties();
            //读取git.properties
            properties.load(inputStream);
        }catch (IOException e){
        }
        return properties;
    }
}
(5)访问http://localhost:8080/version查看git.properties文件内容

11.自定义starter读取git.properties
(1)新建一个Maven项目。
(2)在pom.xml中添加自动配置相关依赖。
<dependency>
    <groupId>org.springframework.boot</groupId>
    <artifactId>spring-boot-autoconfigure</artifactId>
    <version>2.0.0.RELEASE</version>
</dependency>

<dependency>
    <groupId>org.springframework.boot</groupId>
    <artifactId>spring-boot-configuration-processor</artifactId>
    <version>2.0.0.RELEASE</version>
    <optional>true</optional>
</dependency>
(3)核心功能类(同第10点的VersionController)。
(4)在resources文件夹下新建一个META-INF文件夹,新建文件spring.factories,配置自动配置类。
org.springframework.boot.autoconfigure.EnableAutoConfiguration=org.git.version.VersionController(5)使用maven install打包。
(6)在项目中引入自定义starter 的依赖。
<dependency>
    <groupId>org.git</groupId>
    <artifactId>version-spring-boot-starter</artifactId>
    <version>1.0-SNAPSHOT</version>
</dependency>(7)运行项目,访问http://localhost:8080/version即可查看git版本信息。
(8)完整代码:自定义读取git.properties文件的starter
