前言:
先看一下 WPS 的登陆界面
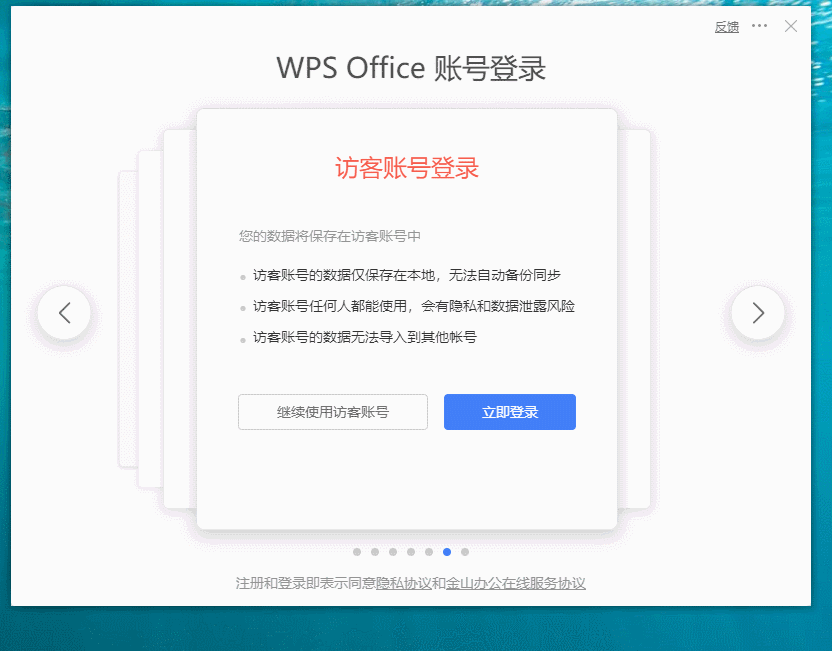
多看两遍 你会发现他的细节真的很多
比如 鼠标 hover 阴影背景
切换的翻页效果
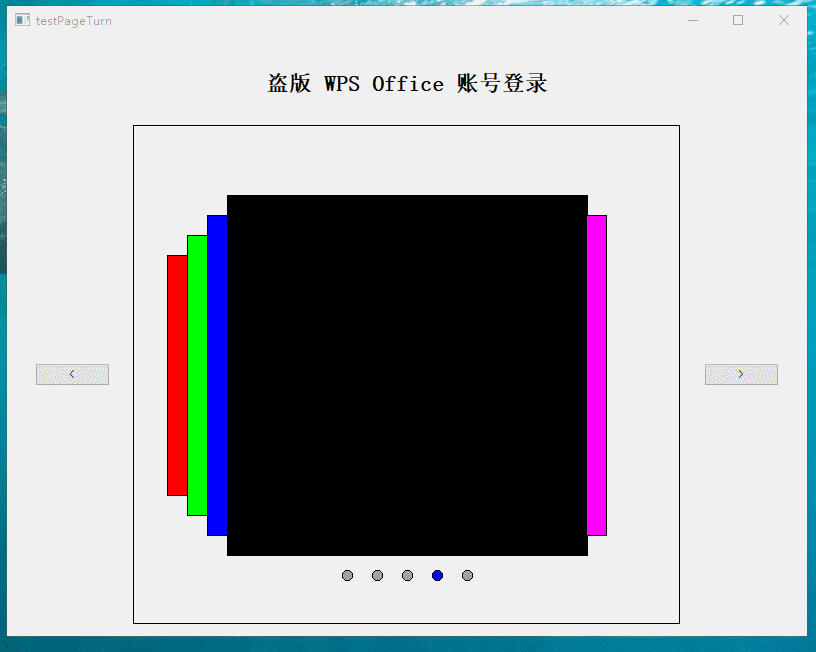
然后我想的是我也实现一下这个大体的效果吧
最后 这个翻页动画效果没有实现 。。。
我代码都是用 Qpainter 画出来的 实在不知道怎么实现 翻书动画效果了
QPropertyAnimation 这个类貌似不能给Qpainter 用
各位小伙伴如果有好的实现方法 可以在评论区告诉我
下面是我实现的效果 时间问题 没有美化 大体实现了 这个效果
支持 动态插入页面 删除页面 不需要修改 painter 部分
项目结构:

main 函数
一个 widget 主界面类
一个 customPainterLabel 类
没有 UI 文件 界面都是代码写的

widget.h
#ifndef WIDGET_H
#define WIDGET_H

#include "custompainterlabel.h"

#include <QWidget>


class QLabel;
class QPushButton;

namespace Ui {
class Widget;
}

class Widget : public QWidget
{
    Q_OBJECT

public:
    explicit Widget(QWidget *parent = 0);
    ~Widget();

private:

    QLabel* titleLabel;
    QPushButton* leftBtn;
    QPushButton* rightBtn;


    customPainterLabel* cPainterLabel;
};

#endif // WIDGET_H
widget.cpp
#include "widget.h"
#include "ui_widget.h"

#include <QLabel>
#include <QPushButton>
#include <QHBoxLayout>
#include <QVBoxLayout>
#include <QSpacerItem>
#include <QDebug>
Widget::Widget(QWidget *parent) :
    QWidget(parent)
{

    titleLabel = new QLabel("盗版 WPS Office 账号登录");

    QFont labelFont;
    labelFont.setBold(true);
    labelFont.setPixelSize(22);
    titleLabel->setFont(labelFont);


    leftBtn = new QPushButton("<");
    rightBtn = new QPushButton(">");

    cPainterLabel = new customPainterLabel();
    cPainterLabel->setMinimumSize(500,500);
    QHBoxLayout *hLayout = new QHBoxLayout();
    hLayout->addWidget(leftBtn,1,Qt::AlignHCenter);
    hLayout->addWidget(cPainterLabel,5);
    hLayout->addWidget(rightBtn,1,Qt::AlignHCenter);


    QVBoxLayout *vLayout = new QVBoxLayout();
    vLayout->addWidget(titleLabel,1,Qt::AlignHCenter );
    vLayout->addLayout(hLayout);

    this->setLayout(vLayout);


    connect(leftBtn,&QPushButton::clicked,[=]()
    {

        for(auto i = 0; i < cPainterLabel->getResourceSize();i++)
        {
            if(cPainterLabel->getResourceIsSelect(i) && i != 0)
            {

                cPainterLabel->setResourceIsSelect(i,false);
                cPainterLabel->setResourceIsSelect(--i,true);

                cPainterLabel->update();
            }
        }
    });

    connect(rightBtn,&QPushButton::clicked,[=]()
    {
        for(auto i = 0; i < cPainterLabel->getResourceSize();i++)
        {
            if(cPainterLabel->getResourceIsSelect(i) && i< cPainterLabel->getResourceSize()-1)
            {

                cPainterLabel->setResourceIsSelect(i,false);
                cPainterLabel->setResourceIsSelect(++i,true);

                cPainterLabel->update();
            }
        }
    });
}

Widget::~Widget()
{

}
结构是这样的 中间的画布 是 customPainterLabel 类 左边和右边 各一个按钮 水平布局
这个水平布局和上面的 盗版wps label 是垂直布局

就构成了这个样子
上面的两个 点击按钮的信号槽是 Lambda 表达式形式
实现的内容就是切换页面
customPainterLabel.h
#ifndef CUSTOMPAINTERLABEL_H
#define CUSTOMPAINTERLABEL_H

#include <QObject>
#include <QLabel>

struct Resource
{
    QColor backgroundColor;
    bool isSelect;
    int ellipseRadius;
    QColor ellipseSelectColor;
    QColor ellipseColor;
    Resource()
    {
        backgroundColor = Qt::black;
        ellipseSelectColor = Qt::blue;
        ellipseColor = Qt::gray;
        isSelect = false;
        ellipseRadius = 5;
    }
};

class customPainterLabel : public QLabel
{
public:
    customPainterLabel();


    inline bool getResourceIsSelect(int index)
    {
        if(index < 0 || index >= m_resourceVec.size())
            return false;

        return m_resourceVec.at(index).isSelect;

    }

    inline void setResourceIsSelect(int index,bool state)
    {
        if(index < 0 || index >= m_resourceVec.size())
            return;
        m_resourceVec[index].isSelect = state;
    }

    inline int getResourceSize()const{return m_resourceVec.size();}

protected:
    void paintEvent(QPaintEvent *e) override;

    void drawEllipseList(QPainter *p,int centerX,int centerY);
    void drawBackgroundList(QPainter *p,QRect rect);
private:
    QVector<Resource> m_resourceVec;
};

#endif // CUSTOMPAINTERLABEL_H
customPainterLabel.cpp
#include "custompainterlabel.h"

#include <QPainter>
#include <QPaintEvent>
#include <QDebug>

#define ELLIPSE_SPACE 30
customPainterLabel::customPainterLabel()
{
    Resource r1;
    r1.backgroundColor = Qt::red;

    Resource r2;
    r2.backgroundColor = Qt::green;

    Resource r3;
    r3.backgroundColor = Qt::blue;

    Resource r4;
    r4.backgroundColor = Qt::black;
    r4.isSelect = true;

    Resource r5;
    r5.backgroundColor = Qt::magenta;


    m_resourceVec<< r1 << r2 << r3 << r4 << r5 ;
}

void customPainterLabel::paintEvent(QPaintEvent *e)
{
    QPainter p(this);


    auto w = this->width();
    auto h = this->height();


    p.save();
    drawEllipseList(&p,w/2,h - h/10);
    drawBackgroundList(&p,QRect(w/2 -180,h/2-180,360,360));
    p.restore();

    p.setPen(QPen(Qt::black));
    p.drawRect(0,0,this->rect().width()-2,this->rect().height()-2);
}


void customPainterLabel::drawEllipseList(QPainter *p, int centerX, int centerY)
{
    int size = m_resourceVec.size();
    if(size <= 0)
        return;

    int startX = centerX - (size / 2) * ELLIPSE_SPACE;

    for(auto i = 0; i< size;i++)
    {
        if(m_resourceVec.at(i).isSelect)
            p->setBrush(QBrush(m_resourceVec.at(i).ellipseSelectColor));
        else
            p->setBrush(QBrush(m_resourceVec.at(i).ellipseColor));

       p->drawEllipse(QPoint(startX + i * ELLIPSE_SPACE,centerY),m_resourceVec.at(i).ellipseRadius,m_resourceVec.at(i).ellipseRadius);

    }

    update();
}

void customPainterLabel::drawBackgroundList(QPainter *p, QRect rect)
{
    int size = m_resourceVec.size();
    if(size <= 0)
        return;

    //// 先找到被选中的那个 然后画出来

    int isSelectedIndex = -1;
    for(auto i = 0; i < size; i++)
    {
        if(m_resourceVec.at(i).isSelect)
        {
            isSelectedIndex = i;
            p->setBrush(QBrush(m_resourceVec.at(i).backgroundColor));
            p->drawRect(rect);
        }
    }

    //// 依次从中间画左边的

    for(auto i = isSelectedIndex-1,j = 1; i >=0; i--,j++)
    {
        p->setBrush(QBrush(m_resourceVec.at(i).backgroundColor));

        int startX = rect.topLeft().x() - 20 * j;
        int startY = rect.topLeft().y() + 20 * j;

        p->drawRect(startX,startY,20,rect.height() - 40 * j);
    }
    //// 依次从中间画右边的
    for(auto i = isSelectedIndex+1,j=1; i<size; i++,j++)
    {
        p->setBrush(QBrush(m_resourceVec.at(i).backgroundColor));

        int startX = rect.topRight().x() + 20 *(j-1);
        int startY = rect.topRight().y() + 20 * j;

        p->drawRect(startX,startY,20,rect.height() - 40 *j);
    }


    update();

}
Resource 这个结构体就是中间的页面
我现在是给了个背景色 可以给 图片 或者 widget 都可以
时间原因 我简单写了下
QVector m_resourceVec; 就是管理页面资源的容器
当想增加页面 只需要添加一个进容器
删除页面 就减少一个 比较方便
画中间的内容 用的 paintEvent

主要的两个函数 一个 是画下面的当前选择的条目
drawEllipseList

另一个就是画中间的 ‘页’
drawBackgroundList

先说 第一个
思路就是 先判断有几个页面 就是几个点
然后 找到中间的点 比如有6个 找到第三个
往前面数3个 每个都有间距 算出第一个的坐标
然后 从第一个位置开始画 直到画到最后一个
如果当前页是选中了的 就换个颜色

下面的 实现思路类似 先找到 当前选中的页面 把他先画出来
然后在找 这个选中页面的左边的页面 画出来
然后在找 这个选中页面的右边的页面 画出来

只需要画一小部分就行 后面的遮挡了不用画
这里面用到一些 数值 比如20啊 啥的 都是 间距 之类的 我也没用宏
写 的不规范 大家知道就行了
void customPainterLabel::drawBackgroundList(QPainter *p, QRect rect)
{
    int size = m_resourceVec.size();
    if(size <= 0)
        return;

    //// 先找到被选中的那个 然后画出来

    int isSelectedIndex = -1;
    for(auto i = 0; i < size; i++)
    {
        if(m_resourceVec.at(i).isSelect)
        {
            isSelectedIndex = i;
            p->setBrush(QBrush(m_resourceVec.at(i).backgroundColor));
            p->drawRect(rect);
        }
    }

    //// 依次从中间画左边的

    for(auto i = isSelectedIndex-1,j = 1; i >=0; i--,j++)
    {
        p->setBrush(QBrush(m_resourceVec.at(i).backgroundColor));

        int startX = rect.topLeft().x() - 20 * j;
        int startY = rect.topLeft().y() + 20 * j;

        p->drawRect(startX,startY,20,rect.height() - 40 * j);
    }
    //// 依次从中间画右边的
    for(auto i = isSelectedIndex+1,j=1; i<size; i++,j++)
    {
        p->setBrush(QBrush(m_resourceVec.at(i).backgroundColor));

        int startX = rect.topRight().x() + 20 *(j-1);
        int startY = rect.topRight().y() + 20 * j;

        p->drawRect(startX,startY,20,rect.height() - 40 *j);
    }


    update();

}
理类上下一步要实现 翻页的动画 我这没有
我也想不出啥好的实现办法了
大家有好的实现办法 可以在评论区告诉我 我继续实现一下

