转自:https://blog.csdn.net/learning_tortosie/article/details/85121576
写在前面
这是Adrian Rosebrock博客的第二篇翻译,原文地址请戳这里。
博客写得通俗易懂,逐行解释代码,非常适合初学者。
Introduction

在本教程中,您将学习如何使用OpenCV来执行人脸识别。为了构建我们的人脸识别系统,我们首先进行人脸检测,使用深度学习从每个人脸提取面部嵌入,在嵌入上训练人脸识别模型,然后最终使用OpenCV识别图像和视频流中的人脸。
今天的教程也是我未婚妻Trisha(现在正式为我的妻子)的特别礼物。我们的婚礼是在周末,当你正在阅读这篇博文时,我们将在机场准备搭乘我们的航班度蜜月。
为了庆祝这个场合,并向她展示她对我自己的支持,PyImageSearch博客和PyImageSearch社区对我意味着什么,我决定使用OpenCV对我们脸部的数据集进行人脸识别。
您当然可以更换自己的面部数据集!您需要做的就是按照我的目录结构插入您自己的面部图像。
作为福利,我还包括如何标记“未知”的面孔,这些面孔无法充分放心地分类。
OpenCV人脸识别
您可能想知道本教程与我几个月前用dlib进行人脸识别时所写的不同?
好吧,请记住,dlib人脸识别帖子依赖于两个重要的外部库:
- dlib(显然)
- face_recognition(这是一组易于使用的人脸识别实用程序,包含dlib)
虽然我们使用OpenCV来进行人脸识别,但OpenCV本身并不负责识别人脸。
在今天的教程中,我们将学习如何将深度学习和OpenCV一起应用(除了scikit-learn之外没有其他库):
- 检测人脸
- 计算128维人脸嵌入以量化人脸
- 在嵌入之上训练支持向量机(SVM)
- 识别图像和视频流中的人脸
所有这些任务都将通过OpenCV完成,使我们能够获得“纯粹的”OpenCV人脸识别管道(pipeline)。
OpenCV的人脸识别如何工作

为了构建我们的OpenCV人脸识别管道,我们将在两个关键步骤中应用深度学习:
- 应用人脸检测,检测人脸在图像中的存在和位置,但不识别它
- 提取量化图像中每个面部的128维特征向量(称为“嵌入”)
我之前已经讨论过OpenCV的人脸检测是如何工作的,所以如果你以前没有检测到人脸,请参考它。
负责实际量化图像中每个面部的模型来自OpenFace项目,这是一个Python和Torch实现的面部识别和深度学习。该实现来自Schroff等人于2015年在CVPR发表的论文,FaceNet: A Unified Embedding for Face Recognition and Clustering。
查看整个FaceNet实现超出了本教程的范围,但管道(pipeline)的要点可以在上图中看到。
首先,我们将图像或视频帧输入到人脸识别管道。给定输入图像,我们应用面部检测来检测图像中面部的位置。
顾名思义,面部对齐是:(1)识别面部的几何结构;(2)基于平移,旋转和缩放来尝试获得面部的规范对齐的过程。
虽然可选,但已经证明面部对齐可以提高某些管道中的人脸识别精度。
在我们(可选)应用人脸对齐和裁剪之后,将其输入到深度神经网络:

深度学习模型FaceNet计算128维嵌入,以量化人脸。
但网络如何实际计算面部人脸?
答案在于训练过程本身,包括:
- 输入数据到网络
- 三重损失函数
为了使用深度学习训练人脸识别模型,每个输入的批量数据包括三个图像:
- The anchor
- The positive image
- The negative image
anchor是我们当前的人脸并具有身份A。
第二张图片是我们的positive image,此图像也包含A的人脸。
另一方面,negative image不具有相同的身份,可能属于人B,C,甚至Y!
关键是anchor和positive image都属于同一个人/人脸,而negative image不包含相同的人脸。
神经网络计算每个人脸的128-d嵌入,然后调整网络的权重(通过三重损失函数),这样:
- anchor和positive image的128-d嵌入更靠近在一起
- 与此同时,将negative image的嵌入推得更远
以这种方式,网络能够学习量化面部并返回适合于面部识别的高度鲁棒且有区别的嵌入。
而且,我们实际上可以将OpenFace模型重用于我们自己的应用程序,而无需明确地训练它!
即使我们今天使用的深度学习模型(很可能)从未见过我们即将通过它的人脸,模型仍然能够为每个人脸计算嵌入,理想情况下,这些人脸嵌入将充分不同,以便我们可以在人脸嵌入的基础上训练“标准”机器学习分类器(SVM,SGD分类器,随机森林等),从而获得我们的OpenCV人脸识别管道。
如果您有兴趣了解有关三重损失的详细信息以及如何使用它来训练人脸嵌入模型,请务必参考我之前的博客文章,以及Schroff等人的论文。
我们的人脸识别数据集
我们今天使用的数据集包含三个人:
- 我
- 特丽莎(我的妻子)
- “未知”,用于表示我们不知道并希望标记的人脸(这里我只是从我之前的帖子中使用的电影“侏罗纪公园”中采样,你可能想插入自己的“未知”“数据集”)。
每个类包含六个图像。
如果您正在构建自己的人脸识别数据集,理想情况下,我建议有每个想要识别的人的10-20张图像,请务必参考这篇博客的“缺点,限制以及如何获得更高的人脸识别准确度”部分以了解更多详情。
项目结构
下载代码,并在终端使用tree命令:
$ tree --dirsfirst
.
├── dataset
│   ├── adrian [6 images]
│   ├── trisha [6 images]
│   └── unknown [6 images]
├── images
│   ├── adrian.jpg
│   ├── patrick_bateman.jpg
│   └── trisha_adrian.jpg
├── face_detection_model
│   ├── deploy.prototxt
│   └── res10_300x300_ssd_iter_140000.caffemodel
├── output
│   ├── embeddings.pickle
│   ├── le.pickle
│   └── recognizer.pickle
├── extract_embeddings.py
├── openface_nn4.small2.v1.t7
├── train_model.py
├── recognize.py
└── recognize_video.py
7 directories, 31 files
- 1
- 2
- 3
- 4
- 5
- 6
- 7
- 8
- 9
- 10
- 11
- 12
- 13
- 14
- 15
- 16
- 17
- 18
- 19
- 20
- 21
- 22
- 23
- 24
我们的项目在根文件夹中有四个目录:
- dataset/:包含按名称组织到子文件夹中的人脸图像。
- images/:包含三个测试图像,我们将用它们来验证模型的运行。
- face_detection_model/:包含OpenCV提供的预先训练的Caffe深度学习模型,用于检测人脸。该模型检测并定位图像中的人脸。
- output/:包含我输出的pickle文件。如果您正在使用自己的数据集,也可以将输出文件存储在此处。输出文件包括:
- embeddings.pickle:一个序列化的人脸嵌入文件。已为数据集中的每个人脸计算嵌入并将其存储在此文件中。
- le.pickle:我们的标签编码器。包含我们的模型可识别的人员的名称标签。
- recognizer.pickle:我们的线性支持向量机(SVM)模型。这是一个机器学习模型而不是深度学习模型,它负责实际识别人脸。
让我们总结一下根目录中的五个文件:
extract_embeddings.py:我们将在步骤1中查看此文件,该文件负责使用深度学习特征提取器生成描述人脸的128-D向量。我们的数据集中的所有面将通过神经网络传递以生成嵌入。我们的数据集中的所有人脸将传递给神经网络以生成嵌入。- `openface_nn4.small2.v1.t7``:Torch深度学习模型,可生成128-D人脸嵌入。我们将在步骤1,2和3以及福利部分中使用这个深度学习模型。
train_model.py:我们的线性SVM模型,将在步骤2中通过此脚本进行训练。我们将检测人脸,提取嵌入,并使我们的SVM模型适合嵌入数据。recognize.py:在步骤3中,我们将识别图像中的人脸。我们将检测人脸,提取嵌入,并查询我们的SVM模型以确定图像中的人的身份。我们将在人脸周围绘制框并用名称注释每个框。recogn_video.py:我们的福利部分描述了如何识别视频流的帧中的人,就像我们在步骤3中的的静态图像上所做的那样。
步骤1:从人脸数据集中提取嵌入
打开extract_embeddings.py文件并插入以下代码:
# import the necessary packages
from imutils import paths
import numpy as np
import argparse
import imutils
import pickle
import cv2
import os
construct the argument parser and parse the arguments
ap = argparse.ArgumentParser()
ap.add_argument("-i", “–dataset”, required=True,
help=“path to input directory of faces + images”)
ap.add_argument("-e", “–embeddings”, required=True,
help=“path to output serialized db of facial embeddings”)
ap.add_argument("-d", “–detector”, required=True,
help=“path to OpenCV’s deep learning face detector”)
ap.add_argument("-m", “–embedding-model”, required=True,
help=“path to OpenCV’s deep learning face embedding model”)
ap.add_argument("-c", “–confidence”, type=float, default=0.5,
help=“minimum probability to filter weak detections”)
args = vars(ap.parse_args())
- 1
- 2
- 3
- 4
- 5
- 6
- 7
- 8
- 9
- 10
- 11
- 12
- 13
- 14
- 15
- 16
- 17
- 18
- 19
- 20
- 21
- 22
我们在第2-8行导入我们所需的包。您需要安装OpenCV和imutils。要安装OpenCV,只需按照我的指南之一(我推荐OpenCV 3.4.2,所以请务必下载正确的版本)。我的imutils软件包可以用pip安装:
$ pip install --upgrade imutils
- 1
接下来,我们处理命令行参数:
--dataset:输入的人脸图像数据集的路径。--embeddings:输出嵌入文件的路径。我们的脚本将计算我们将序列化到磁盘的人脸嵌入。--detector:OpenCV中的基于Caffe的深度学习人脸检测器的路径,用于实际定位图像中的人脸。--embedding-model:OpenCV深度学习Torch嵌入模型的路径。该模型将允许我们提取128-D人脸嵌入向量。--confidence:过滤虚假人脸检测的可选阈值。
现在我们已经导入了包和解析的命令行参数,让我们从磁盘加载人脸检测器和嵌入器:
# load our serialized face detector from disk
print("[INFO] loading face detector...")
protoPath = os.path.sep.join([args["detector"], "deploy.prototxt"])
modelPath = os.path.sep.join([args["detector"],
	"res10_300x300_ssd_iter_140000.caffemodel"])
detector = cv2.dnn.readNetFromCaffe(protoPath, modelPath)
load our serialized face embedding model from disk
print("[INFO] loading face recognizer…")
embedder = cv2.dnn.readNetFromTorch(args[“embedding_model”])
- 1
- 2
- 3
- 4
- 5
- 6
- 7
- 8
- 9
- 10
在这里我们加载人脸检测器和嵌入器:
detector:在第3-6行加载。我们使用基于Caffe的深度学习人脸检测器来定位图像中人脸。embedder:在第10行加载。该模型基于Torch,负责通过深度学习特征提取提取面部嵌入。
请注意,我们使用相应的cv2.dnn函数来加载两个单独的模型。在OpenCV 3.3之前,dnn模块不能像这样提供,但我建议您在此博客文章中使用OpenCV 3.4.2或更高版本。
继续前进,让我们获取我们的图像路径并执行初始化:
# grab the paths to the input images in our dataset
print("[INFO] quantifying faces...")
imagePaths = list(paths.list_images(args["dataset"]))
initialize our lists of extracted facial embeddings and
corresponding people names
knownEmbeddings = []
knownNames = []
initialize the total number of faces processed
total = 0
- 1
- 2
- 3
- 4
- 5
- 6
- 7
- 8
- 9
- 10
- 11
在第3行上构建的imagePaths列表包含数据集中每个图像的路径。通过我的imutils包中的函数paths.list_images,就很容易实现。
我们的嵌入和相应的名称将保存在两个列表中:knownEmbeddings和knownNames(第7和8行)。
我们还将通过一个名为total的变量(第11行)跟踪我们处理的人脸数量。
让我们开始在图像路径上循环,这个循环将负责从每个图像中找到的人脸提取嵌入:
# loop over the image paths for (i, imagePath) in enumerate(imagePaths): # extract the person name from the image path print("[INFO] processing image {}/{}".format(i + 1, len(imagePaths))) name = imagePath.split(os.path.sep)[-2]# load the image, resize it to have a width of 600 pixels (while # maintaining the aspect ratio), and then grab the image # dimensions image = cv2.imread(imagePath) image = imutils.resize(image, width=600) (h, w) = image.shape[:2]
- 1
- 2
- 3
- 4
- 5
- 6
- 7
- 8
- 9
- 10
- 11
- 12
- 13
我们开始在第2行上循环遍历imagePaths。
首先,我们从路径中提取人的名字(第6行)。要解释这是如何工作的,请在我的Python shell中考虑以下示例:
$ python
>>> from imutils import paths
>>> import os
>>> imagePaths = list(paths.list_images("dataset"))
>>> imagePath = imagePaths[0]
>>> imagePath
'dataset/adrian/00004.jpg'
>>> imagePath.split(os.path.sep)
['dataset', 'adrian', '00004.jpg']
>>> imagePath.split(os.path.sep)[-2]
'adrian'
>>>
- 1
- 2
- 3
- 4
- 5
- 6
- 7
- 8
- 9
- 10
- 11
- 12
注意如何通过使用imagePath.split拆分字符(操作系统路径分隔符,在unix上的“/”和Windows上的“\”),该函数生成一个沿着目录树向下走的文件夹/文件名(字符串)列表。我们获取倒数第二个索引,即人的name,在这种情况下是'adrian'。
最后,我们加载图像并将其调整为已知宽度(第11和12行)。
让我们检测并定位人脸:
# construct a blob from the image imageBlob = cv2.dnn.blobFromImage( cv2.resize(image, (300, 300)), 1.0, (300, 300), (104.0, 177.0, 123.0), swapRB=False, crop=False)# apply OpenCV's deep learning-based face detector to localize # faces in the input image detector.setInput(imageBlob) detections = detector.forward()
- 1
- 2
- 3
- 4
- 5
- 6
- 7
- 8
- 9
在第2-4行,我们构造了一个blob。要了解有关此过程的更多信息,请阅读Deep learning: How OpenCV’s blobFromImage works。
我们通过将imageBlob传递到detector网络来检测图像中的面部(第8和9行)。
让我们处理检测detections:
# ensure at least one face was found if len(detections) > 0: # we're making the assumption that each image has only ONE # face, so find the bounding box with the largest probability i = np.argmax(detections[0, 0, :, 2]) confidence = detections[0, 0, i, 2]# ensure that the detection with the largest probability also # means our minimum probability test (thus helping filter out # weak detections) if confidence > args["confidence"]: # compute the (x, y)-coordinates of the bounding box for # the face box = detections[0, 0, i, 3:7] * np.array([w, h, w, h]) (startX, startY, endX, endY) = box.astype("int") # extract the face ROI and grab the ROI dimensions face = image[startY:endY, startX:endX] (fH, fW) = face.shape[:2] # ensure the face width and height are sufficiently large if fW < 20 or fH < 20: continue
- 1
- 2
- 3
- 4
- 5
- 6
- 7
- 8
- 9
- 10
- 11
- 12
- 13
- 14
- 15
- 16
- 17
- 18
- 19
- 20
- 21
- 22
- 23
detections列表包含图像中的人脸的的概率和定位人脸的坐标。
假设我们至少有一个检测,我们将进入if语句的主体(第2行)。
我们假设图像中只有一个人脸,因此我们以最高置信度(confidence)提取检测并检查以确保置信度满足用于滤除弱检测的最小概率阈值(第5-11行)。
假设我们已满足该阈值,我们提取人脸(face)ROI并获取/检查尺寸以确保人脸ROI足够大(第14-23行)。
我们将利用我们的embedderCNN并提取人脸嵌入:
# construct a blob for the face ROI, then pass the blob # through our face embedding model to obtain the 128-d # quantification of the face faceBlob = cv2.dnn.blobFromImage(face, 1.0 / 255, (96, 96), (0, 0, 0), swapRB=True, crop=False) embedder.setInput(faceBlob) vec = embedder.forward()# add the name of the person + corresponding face # embedding to their respective lists knownNames.append(name) knownEmbeddings.append(vec.flatten()) total += 1
- 1
- 2
- 3
- 4
- 5
- 6
- 7
- 8
- 9
- 10
- 11
- 12
- 13
我们在第4-5行构建了另一个blob,这次是人脸ROI(不是我们之前做过的整个图像)。
随后,我们将faceBlob传递给嵌入器CNN(第6-7行)。这将生成描述人脸的128-D向量(vec)。我们将利用这些数据通过机器学习识别新的人脸。
然后我们分别添加name和vec到knownNames和knownEmbeddings(第11-12行)。
不能忘记我们设置的跟踪人脸数量的变量total (第13行)。
我们继续循环图像,为数据集中的每个图像,执行检测人脸和提取人脸嵌入。
循环结束时,将数据存储到磁盘:
# dump the facial embeddings + names to disk
print("[INFO] serializing {} encodings...".format(total))
data = {"embeddings": knownEmbeddings, "names": knownNames}
f = open(args["embeddings"], "wb")
f.write(pickle.dumps(data))
f.close()
- 1
- 2
- 3
- 4
- 5
- 6
我们将名称和嵌入数据添加到字典中,然后用一个pickle文件序列化data(第3-6行)。
此时我们已准备好通过运行脚本来提取嵌入。
打开一个终端并执行以下命令来使用OpenCV计算人脸嵌入:
$ python extract_embeddings.py --dataset dataset \
	--embeddings output/embeddings.pickle \
	--detector face_detection_model \
	--embedding-model openface_nn4.small2.v1.t7
[INFO] loading face detector...
[INFO] loading face recognizer...
[INFO] quantifying faces...
[INFO] processing image 1/18
[INFO] processing image 2/18
[INFO] processing image 3/18
[INFO] processing image 4/18
[INFO] processing image 5/18
[INFO] processing image 6/18
[INFO] processing image 7/18
[INFO] processing image 8/18
[INFO] processing image 9/18
[INFO] processing image 10/18
[INFO] processing image 11/18
[INFO] processing image 12/18
[INFO] processing image 13/18
[INFO] processing image 14/18
[INFO] processing image 15/18
[INFO] processing image 16/18
[INFO] processing image 17/18
[INFO] processing image 18/18
[INFO] serializing 18 encodings...
- 1
- 2
- 3
- 4
- 5
- 6
- 7
- 8
- 9
- 10
- 11
- 12
- 13
- 14
- 15
- 16
- 17
- 18
- 19
- 20
- 21
- 22
- 23
- 24
- 25
- 26
步骤2:训练人脸识别模型
此时我们已经为每个人脸提取了128-d嵌入,但我们如何根据这些嵌入实际识别一个人?答案是我们需要在嵌入之上训练“标准”机器学习模型(例如SVM,k-NN分类器,随机森林等)。
在我之前的人脸识别教程中,我们发现了k-NN的修改版本如何用于通过dlib和face_recognition库创建的128-d嵌入的人脸识别。
今天,我想分享一下我们如何在嵌入之上构建一个更强大的分类器 - 如果您愿意的话,您也可以在基于dlib的人脸识别管道中使用相同的方法。
打开train_model.py文件并插入以下代码:
# import the necessary packages
from sklearn.preprocessing import LabelEncoder
from sklearn.svm import SVC
import argparse
import pickle
construct the argument parser and parse the arguments
ap = argparse.ArgumentParser()
ap.add_argument("-e", “–embeddings”, required=True,
help=“path to serialized db of facial embeddings”)
ap.add_argument("-r", “–recognizer”, required=True,
help=“path to output model trained to recognize faces”)
ap.add_argument("-l", “–le”, required=True,
help=“path to output label encoder”)
args = vars(ap.parse_args())
- 1
- 2
- 3
- 4
- 5
- 6
- 7
- 8
- 9
- 10
- 11
- 12
- 13
- 14
- 15
在运行此脚本之前,我们需要在我们的环境中安装scikit-learn,它是一个机器学习库。你可以通过pip安装它:
$ pip install scikit-learn
- 1
我们在第2-5行导入包和模块。我们将使用scikit-learn的支持向量机(SVM)实现,这是一种常见的机器学习模型。
解析命令行参数:
--embeddings:序列化嵌入的路径(我们通过运行以前的extract_embeddings.py脚本导出它)。--recognizer:这将是我们识别人脸的输出模型。它基于SVM。我们将保存它,以便我们可以在接下来的两个识别脚本中使用它。--le:我们的标签编码器输出文件路径。我们将序列化标签编码器到磁盘,以便我们可以在图像/视频人脸识别脚本中使用它和识别器模型。
每个参数都是必需的。
加载人脸嵌入并编码标签:
# load the face embeddings
print("[INFO] loading face embeddings...")
data = pickle.loads(open(args["embeddings"], "rb").read())
encode the labels
print("[INFO] encoding labels…")
le = LabelEncoder()
labels = le.fit_transform(data[“names”])
- 1
- 2
- 3
- 4
- 5
- 6
- 7
- 8
第3行加载步骤1中生成的嵌入。我们不会在这个模型训练脚本中生成任何嵌入,而是使用先前生成和序列化的嵌入。
然后在第7-8行初始化scikit-learn中的LabelEncoder并编码名称标签(lables)。
训练SVM模型识别人脸了:
# train the model used to accept the 128-d embeddings of the face and
# then produce the actual face recognition
print("[INFO] training model...")
recognizer = SVC(C=1.0, kernel="linear", probability=True)
recognizer.fit(data["embeddings"], labels)
- 1
- 2
- 3
- 4
- 5
在第29行,初始化SVM模型,在第30行,拟合(fit)模型(也称为“训练模型”)。
这里我们使用线性支持向量机(SVM),但如果您愿意,可以尝试使用其他机器学习模型。
训练模型后,我们将模型和标签编码器作为pickle文件输出到磁盘。
# write the actual face recognition model to disk
f = open(args["recognizer"], "wb")
f.write(pickle.dumps(recognizer))
f.close()
write the label encoder to disk
f = open(args[“le”], “wb”)
f.write(pickle.dumps(le))
f.close()
- 1
- 2
- 3
- 4
- 5
- 6
- 7
- 8
- 9
这段代码,将两个pickle文件写入磁盘,包括人脸识别器模型和标签编码器。
此时,请务必先执行步骤1中的代码。
现在我们已经完成了train_model.py的编码,让我们将它应用于我们提取的人脸嵌入:
$ python train_model.py --embeddings output/embeddings.pickle \
	--recognizer output/recognizer.pickle \
	--le output/le.pickle
[INFO] loading face embeddings...
[INFO] encoding labels...
[INFO] training model...
$ ls output/
embeddings.pickle	le.pickle		recognizer.pickle
- 1
- 2
- 3
- 4
- 5
- 6
- 7
- 8
在这里,可以看到我们的SVM已经在嵌入上训练,并且SVM和标签编码已写入磁盘,使我们能够将它们应用于输入的图像和视频。
步骤3:使用OpenCV识别人脸
我们将首先识别本节中图像中的人脸,然后继续在下一节中识别视频流中的人脸。
打开项目中的recogn.py文件并插入以下代码:
# import the necessary packages
import numpy as np
import argparse
import imutils
import pickle
import cv2
import os
construct the argument parser and parse the arguments
ap = argparse.ArgumentParser()
ap.add_argument("-i", “–image”, required=True,
help=“path to input image”)
ap.add_argument("-d", “–detector”, required=True,
help=“path to OpenCV’s deep learning face detector”)
ap.add_argument("-m", “–embedding-model”, required=True,
help=“path to OpenCV’s deep learning face embedding model”)
ap.add_argument("-r", “–recognizer”, required=True,
help=“path to model trained to recognize faces”)
ap.add_argument("-l", “–le”, required=True,
help=“path to label encoder”)
ap.add_argument("-c", “–confidence”, type=float, default=0.5,
help=“minimum probability to filter weak detections”)
args = vars(ap.parse_args())
- 1
- 2
- 3
- 4
- 5
- 6
- 7
- 8
- 9
- 10
- 11
- 12
- 13
- 14
- 15
- 16
- 17
- 18
- 19
- 20
- 21
- 22
- 23
我们在第2-7行导入我们所需的包。此时,您应该安装每个软件包。
我们的六个命令行参数在第10-23行解析:
--image:输入图像的路径。我们将尝试识别这些图像中的人脸。--detector:OpenCV深度学习人脸检测器的路径。我们将使用此模型来检测图像中人脸ROI的位置。--embedding-model:OpenCV深度学习人脸嵌入模型的路径。我们将使用此模型从人脸ROI中提取128-D人脸嵌入,此数据将提供给识别器。--recognizer:识别器模型的路径。我们在步骤2中训练了我们的SVM识别器。这实际上决定了一张脸是谁的。--le:标签编码器的路径。这包含我们的人脸标签,如'adrian'或'trisha'。--confidence:过滤弱面部检测的可选阈值。
一定要研究这些命令行参数,了解两个深度学习模型和SVM模型之间的区别非常重要。如果您在此脚本中稍后发现自己感到困惑,请参阅此处。
现在我们已经处理了导入和命令行参数,让我们将三个模型从磁盘加载到内存中:
# load our serialized face detector from disk
print("[INFO] loading face detector...")
protoPath = os.path.sep.join([args["detector"], "deploy.prototxt"])
modelPath = os.path.sep.join([args["detector"],
	"res10_300x300_ssd_iter_140000.caffemodel"])
detector = cv2.dnn.readNetFromCaffe(protoPath, modelPath)
load our serialized face embedding model from disk
print("[INFO] loading face recognizer…")
embedder = cv2.dnn.readNetFromTorch(args[“embedding_model”])
load the actual face recognition model along with the label encoder
recognizer = pickle.loads(open(args[“recognizer”], “rb”).read())
le = pickle.loads(open(args[“le”], “rb”).read())
- 1
- 2
- 3
- 4
- 5
- 6
- 7
- 8
- 9
- 10
- 11
- 12
- 13
- 14
我们在这个块中加载了三个模型。冒着多余的风险,我想明确地提醒您模型之间的差异:
detector:预训练的Caffe DL模型,用于检测人脸在图像中的位置(第3-6行)。embedder:预训练的Torch DL模型,用于计算我们的128-D人脸嵌入(第10行)。recognizer:我们的线性SVM人脸识别模型(第13行)。我们在步骤2中训练了这个模型。
detector和embedder都是预先训练的,这意味着它们是由OpenCV按原样提供给您的。他们在GitHub上的OpenCV项目中,但为了方便起见,我将它们包含在今天帖子的“下载”部分中。我还按照我们将它们用于识别人脸的顺序对模型进行编号。
我们还加载了标签编码器,其中包含我们模型可识别的人员的姓名(第14行)。
现在让我们加载我们的图像并检测人脸:
# load the image, resize it to have a width of 600 pixels (while
# maintaining the aspect ratio), and then grab the image dimensions
image = cv2.imread(args["image"])
image = imutils.resize(image, width=600)
(h, w) = image.shape[:2]
construct a blob from the image
imageBlob = cv2.dnn.blobFromImage(
cv2.resize(image, (300, 300)), 1.0, (300, 300),
(104.0, 177.0, 123.0), swapRB=False, crop=False)
apply OpenCV’s deep learning-based face detector to localize
faces in the input image
detector.setInput(imageBlob)
detections = detector.forward()
- 1
- 2
- 3
- 4
- 5
- 6
- 7
- 8
- 9
- 10
- 11
- 12
- 13
- 14
- 15
在这里,我们:
- 将图像加载到内存中并构造一个blob(第2-9行)。在这里了解
cv2.dnn.blobFromImage。 - 通过我们的
detector定位图像中的人脸(第13和14行)。
已知新的检测(detections),让我们识别图像中的人脸。但首先我们需要过滤弱检测并提取人脸ROI:
# loop over the detections for i in range(0, detections.shape[2]): # extract the confidence (i.e., probability) associated with the # prediction confidence = detections[0, 0, i, 2]# filter out weak detections if confidence > args["confidence"]: # compute the (x, y)-coordinates of the bounding box for the # face box = detections[0, 0, i, 3:7] * np.array([w, h, w, h]) (startX, startY, endX, endY) = box.astype("int") # extract the face ROI face = image[startY:endY, startX:endX] (fH, fW) = face.shape[:2] # ensure the face width and height are sufficiently large if fW < 20 or fH < 20: continue
- 1
- 2
- 3
- 4
- 5
- 6
- 7
- 8
- 9
- 10
- 11
- 12
- 13
- 14
- 15
- 16
- 17
- 18
- 19
- 20
识别人脸ROI的名字只需几个步骤:
# construct a blob for the face ROI, then pass the blob # through our face embedding model to obtain the 128-d # quantification of the face faceBlob = cv2.dnn.blobFromImage(face, 1.0 / 255, (96, 96), (0, 0, 0), swapRB=True, crop=False) embedder.setInput(faceBlob) vec = embedder.forward()# perform classification to recognize the face preds = recognizer.predict_proba(vec)[0] j = np.argmax(preds) proba = preds[j] name = le.classes_[j]
- 1
- 2
- 3
- 4
- 5
- 6
- 7
- 8
- 9
- 10
- 11
- 12
- 13
首先,我们构造一个faceBlob(从人脸ROI),并将其传递给嵌入器(embedder)以生成描述人脸的128-D向量(第4-7行)
然后,我们将vec传入SVM识别器模型(第10行),其结果是我们对人脸ROI是谁的预测。
我们采用最高概率的索引(第11行)并查询我们的标签编码器以找到名字(第13行)。在两者之间,我在第12行获取概率。
注意:您可以通过对概率应用额外的阈值测试来进一步滤除弱人脸识别。例如,插入if proba <T(其中T是您定义的变量)可以提供额外的过滤层,以确保较少的假阳性人脸识别。
现在,让我们显示OpenCV人脸识别结果:
		# draw the bounding box of the face along with the associated
		# probability
		text = "{}: {:.2f}%".format(name, proba * 100)
		y = startY - 10 if startY - 10 > 10 else startY + 10
		cv2.rectangle(image, (startX, startY), (endX, endY),
			(0, 0, 255), 2)
		cv2.putText(image, text, (startX, y),
			cv2.FONT_HERSHEY_SIMPLEX, 0.45, (0, 0, 255), 2)
show the output image
cv2.imshow(“Image”, image)
cv2.waitKey(0)
- 1
- 2
- 3
- 4
- 5
- 6
- 7
- 8
- 9
- 10
- 11
- 12
对于我们在循环中识别的每个人脸(包括“未知”):
- 我们在第3行构造一个包含名称和概率的文本字符串(
text)。 - 然后我们在人脸周围画一个矩形并将文本放在框的上方(第4-8行)。
然后我们最终在屏幕上显示结果,直到按下一个键(第11和12行)。
打开一个终端并执行以下命令:
$ python recognize.py --detector face_detection_model \
	--embedding-model openface_nn4.small2.v1.t7 \
	--recognizer output/recognizer.pickle \
	--le output/le.pickle \
	--image images/adrian.jpg
[INFO] loading face detector...
[INFO] loading face recognizer...
- 1
- 2
- 3
- 4
- 5
- 6
- 7

我的人脸预测只有47.15%的置信度;但是,这个置信度高于“未知”类。
让我们尝试另一个OpenCV人脸识别示例:
$ python recognize.py --detector face_detection_model \
	--embedding-model openface_nn4.small2.v1.t7 \
	--recognizer output/recognizer.pickle \
	--le output/le.pickle \
	--image images/trisha_adrian.jpg
[INFO] loading face detector...
[INFO] loading face recognizer...
- 1
- 2
- 3
- 4
- 5
- 6
- 7

在最后一个例子中,让我们看一下当我们的模型无法识别实际人脸时会发生什么:
$ python recognize.py --detector face_detection_model \
	--embedding-model openface_nn4.small2.v1.t7 \
	--recognizer output/recognizer.pickle \
	--le output/le.pickle \
	--image images/patrick_bateman.jpg
[INFO] loading face detector...
[INFO] loading face recognizer...
- 1
- 2
- 3
- 4
- 5
- 6
- 7

福利:识别视频流中的人脸
实际的管道本身几乎与识别图像中的人脸相同,只有一些更新,我们将在此过程中进行检查。
打开recogn_video.py文件,让我们开始吧:
# import the necessary packages
from imutils.video import VideoStream
from imutils.video import FPS
import numpy as np
import argparse
import imutils
import pickle
import time
import cv2
import os
construct the argument parser and parse the arguments
ap = argparse.ArgumentParser()
ap.add_argument("-d", “–detector”, required=True,
help=“path to OpenCV’s deep learning face detector”)
ap.add_argument("-m", “–embedding-model”, required=True,
help=“path to OpenCV’s deep learning face embedding model”)
ap.add_argument("-r", “–recognizer”, required=True,
help=“path to model trained to recognize faces”)
ap.add_argument("-l", “–le”, required=True,
help=“path to label encoder”)
ap.add_argument("-c", “–confidence”, type=float, default=0.5,
help=“minimum probability to filter weak detections”)
args = vars(ap.parse_args())
- 1
- 2
- 3
- 4
- 5
- 6
- 7
- 8
- 9
- 10
- 11
- 12
- 13
- 14
- 15
- 16
- 17
- 18
- 19
- 20
- 21
- 22
- 23
- 24
我们的导入与上面的步骤3部分相同,除了我们使用imutils.video模块。我们将使用VideoStream从我们的相机和FPS捕获帧以计算每秒帧数统计数据。
命令行参数也是相同的,我们将获取网络摄像头的视频并处理。
我们的三个模型和标签编码器在这里加载:
# load our serialized face detector from disk
print("[INFO] loading face detector...")
protoPath = os.path.sep.join([args["detector"], "deploy.prototxt"])
modelPath = os.path.sep.join([args["detector"],
	"res10_300x300_ssd_iter_140000.caffemodel"])
detector = cv2.dnn.readNetFromCaffe(protoPath, modelPath)
load our serialized face embedding model from disk
print("[INFO] loading face recognizer…")
embedder = cv2.dnn.readNetFromTorch(args[“embedding_model”])
load the actual face recognition model along with the label encoder
recognizer = pickle.loads(open(args[“recognizer”], “rb”).read())
le = pickle.loads(open(args[“le”], “rb”).read())
- 1
- 2
- 3
- 4
- 5
- 6
- 7
- 8
- 9
- 10
- 11
- 12
- 13
- 14
让我们初始化我们的视频流并开始处理帧:
# initialize the video stream, then allow the camera sensor to warm up
print("[INFO] starting video stream...")
vs = VideoStream(src=0).start()
time.sleep(2.0)
start the FPS throughput estimator
fps = FPS().start()
loop over frames from the video file stream
while True:
# grab the frame from the threaded video stream
frame = vs.read()
# resize the frame to have a width of 600 pixels (while
# maintaining the aspect ratio), and then grab the image
# dimensions
frame = imutils.resize(frame, width=600)
(h, w) = frame.shape[:2]

# construct a blob from the image
imageBlob = cv2.dnn.blobFromImage(
	cv2.resize(frame, (300, 300)), 1.0, (300, 300),
	(104.0, 177.0, 123.0), swapRB=False, crop=False)

# apply OpenCV's deep learning-based face detector to localize
# faces in the input image
detector.setInput(imageBlob)
detections = detector.forward()
- 1
- 2
- 3
- 4
- 5
- 6
- 7
- 8
- 9
- 10
- 11
- 12
- 13
- 14
- 15
- 16
- 17
- 18
- 19
- 20
- 21
- 22
- 23
- 24
- 25
- 26
- 27
- 28
在第3行,我们的VideoStream对象已初始化并启动。在第4行,我们等待相机传感器预热。
我们还初始化每秒帧数(第7行),并开始循环(第10行)。我们从网络摄像头抓取一帧(第12行)。
从这里开始,一切都与步骤3相同。
现在让我们处理检测:
# loop over the detections for i in range(0, detections.shape[2]): # extract the confidence (i.e., probability) associated with # the prediction confidence = detections[0, 0, i, 2]# filter out weak detections if confidence > args["confidence"]: # compute the (x, y)-coordinates of the bounding box for # the face box = detections[0, 0, i, 3:7] * np.array([w, h, w, h]) (startX, startY, endX, endY) = box.astype("int") # extract the face ROI face = frame[startY:endY, startX:endX] (fH, fW) = face.shape[:2] # ensure the face width and height are sufficiently large if fW < 20 or fH < 20: continue
- 1
- 2
- 3
- 4
- 5
- 6
- 7
- 8
- 9
- 10
- 11
- 12
- 13
- 14
- 15
- 16
- 17
- 18
- 19
- 20
现在是时候进行OpenCV人脸识别了:
# construct a blob for the face ROI, then pass the blob # through our face embedding model to obtain the 128-d # quantification of the face faceBlob = cv2.dnn.blobFromImage(face, 1.0 / 255, (96, 96), (0, 0, 0), swapRB=True, crop=False) embedder.setInput(faceBlob) vec = embedder.forward()# perform classification to recognize the face preds = recognizer.predict_proba(vec)[0] j = np.argmax(preds) proba = preds[j] name = le.classes_[j] # draw the bounding box of the face along with the # associated probability text = "{}: {:.2f}%".format(name, proba * 100) y = startY - 10 if startY - 10 > 10 else startY + 10 cv2.rectangle(frame, (startX, startY), (endX, endY), (0, 0, 255), 2) cv2.putText(frame, text, (startX, y), cv2.FONT_HERSHEY_SIMPLEX, 0.45, (0, 0, 255), 2) # update the FPS counter fps.update()
- 1
- 2
- 3
- 4
- 5
- 6
- 7
- 8
- 9
- 10
- 11
- 12
- 13
- 14
- 15
- 16
- 17
- 18
- 19
- 20
- 21
- 22
- 23
- 24
- 25
让我们显示结果并清理:
# show the output frame cv2.imshow("Frame", frame) key = cv2.waitKey(1) & 0xFF# if the `q` key was pressed, break from the loop if key == ord("q"): break
stop the timer and display FPS information
fps.stop()
print("[INFO] elasped time: {:.2f}".format(fps.elapsed()))
print("[INFO] approx. FPS: {:.2f}".format(fps.fps()))
do a bit of cleanup
cv2.destroyAllWindows()
vs.stop()
- 1
- 2
- 3
- 4
- 5
- 6
- 7
- 8
- 9
- 10
- 11
- 12
- 13
- 14
- 15
- 16
要在视频流上执行OpenCV人脸识别管道,请打开终端并执行以下命令:
$ python recognize_video.py --detector face_detection_model \
	--embedding-model openface_nn4.small2.v1.t7 \
	--recognizer output/recognizer.pickle \
	--le output/le.pickle
[INFO] loading face detector...
[INFO] loading face recognizer...
[INFO] starting video stream...
[INFO] elasped time: 12.52
[INFO] approx. FPS: 16.13
- 1
- 2
- 3
- 4
- 5
- 6
- 7
- 8
- 9
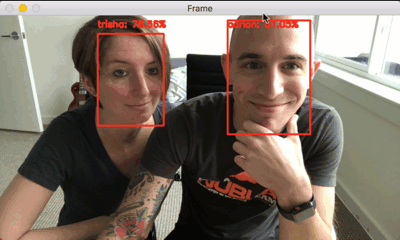
如你所见,Trisha和我的脸都被正确识别了!我们的OpenCV人脸识别管道也在我的iMac上获得了大约16 FPS的吞吐率。在我的MacBook Pro上,获得了大约14 FPS的吞吐率。
缺点,限制以及如何获得更高的人脸识别准确度

所有人脸识别系统都容易出错。永远不会有100%准确的人脸识别系统。
不可避免地,你会遇到OpenCV无法正确识别脸部的情况。
你在那些情况下做了什么?
您如何提高您的OpenCV人脸识别准确度?
在本节中,我将详细介绍一些建议的方法,以提高人脸识别管道的准确性。
您可能需要更多数据

大多数人都没有用足够的数据训练他们的OpenCV人脸识别模型。
如果你发现自己的人脸识别准确率低,而且每人只有一些示例人脸,那么收集更多数据,没有“计算机视觉技巧”可以帮助你避免数据采集过程。
一般来说,我建议每人至少10-20张人脸。
注意:我们今天在这里讨论的OpenCV人脸识别系统有效,但总是可以改进。有时,较小的数据集会为您提供所需的结果,尝试使用小型数据集并没有错,但是当您未达到所需的精度时,您将需要收集更多数据。
进行人脸对齐

为OpenCV人脸识别执行人脸对齐可以显着提高人脸识别性能。
OpenFace模型在已对齐的人脸上表现更好。
人脸对齐是以下过程:
- 识别图像中人脸的几何结构。
- 尝试基于平移,旋转和缩放获得人脸的规范对齐。
从本节顶部的图片中可以看出:
- 检测到图像中的人脸并提取ROI(基于边界框坐标)。
- 应用人脸标志检测来提取眼睛的坐标。
- 计算每个眼睛的质心以及眼睛之间的中点。
- 并且基于这些点,应用仿射变换将人脸大小调整为固定大小和尺寸。
如果我们将人脸对齐应用于数据集中的每个人脸,则在输出坐标空间中,所有人脸应该:
- 以图像为中心。
- 旋转使得眼睛位于水平线上(即旋转人脸使得眼睛沿着相同的y坐标)。
- 缩放使得人脸的大小大致相同。
查看我的博客文章,使用OpenCV和Python进行Face Alignment。
调整你的超参数
在本教程中,我们使用了线性SVM;但是,我们没有调整C值,这通常是调整SVM的最重要的值。
C值是一个“严格”参数,用于控制您希望避免错误分类训练集中每个数据点的程度。
较大的C值将更严格,并且更加努力地对每个输入数据点进行正确分类,即使存在过度拟合的风险。
较小的C值将更“宽松”,允许在训练数据中进行一些错误分类,但理想情况下更好地泛化测试数据。
有趣的是,根据OpenFace GitHub中的一个分类示例,他们实际上建议不调整超参数,因为根据他们的经验,他们发现设置C = 1在大多数设置中获得令人满意的人脸识别结果。
尽管如此,如果您的面部识别准确度不够,通过网格搜索或随机搜索调整超参数可能需要额外的工作量和计算成本。
使用dlib的嵌入模型(但不是它的k-NN用于人脸识别)
根据我使用OpenCV的人脸识别模型和dlib的人脸识别模型的经验,我发现dlib的人脸嵌入更具有辨别力,特别是对于较小的数据集。
此外,我发现dlib的模型较少依赖于:
- 人脸对齐等预处理
- 在提取的人脸嵌入上使用更强大的机器学习模型
如果你看一下我的原始人脸识别教程,你会注意到我们使用了一个简单的k-NN算法进行人脸识别(通过一个小的修改来投出距离超过阈值的最近邻投票)。
k-NN模型运行得非常好,但正如我们所知,存在更强大的机器学习模型。
为了进一步提高准确性,你可能想要使用dlib的嵌入模型,然后不是应用k-NN,而是从今天的帖子开始遵循步骤2,并在人脸嵌入上训练更强大的分类器。
您是否遇到过运行今天Python人脸识别脚本的“USAGE”错误?
这部分就不翻译了。
总结
我们的OpenCV人脸识别管道是使用四阶段流程创建的:
- 创建人脸图像的数据集
- 为图像中的每个人脸提取人脸嵌入(同样,使用OpenCV)
- 为人脸嵌入训练模型
- 利用OpenCV识别图像和视频流中的人脸
当然,如果您遵循上面详述的项目的目录结构,您可以更换自己的人脸数据集。
如果您需要帮助收集自己的人脸数据集,请务必参阅构建面部识别数据集。
        </div>
					<link href="https://csdnimg.cn/release/phoenix/mdeditor/markdown_views-258a4616f7.css" rel="stylesheet">
            </div>
</article>

写在前面
这是Adrian Rosebrock博客的第二篇翻译,原文地址请戳这里。
博客写得通俗易懂,逐行解释代码,非常适合初学者。
Introduction
在本教程中,您将学习如何使用OpenCV来执行人脸识别。为了构建我们的人脸识别系统,我们首先进行人脸检测,使用深度学习从每个人脸提取面部嵌入,在嵌入上训练人脸识别模型,然后最终使用OpenCV识别图像和视频流中的人脸。
今天的教程也是我未婚妻Trisha(现在正式为我的妻子)的特别礼物。我们的婚礼是在周末,当你正在阅读这篇博文时,我们将在机场准备搭乘我们的航班度蜜月。
为了庆祝这个场合,并向她展示她对我自己的支持,PyImageSearch博客和PyImageSearch社区对我意味着什么,我决定使用OpenCV对我们脸部的数据集进行人脸识别。
您当然可以更换自己的面部数据集!您需要做的就是按照我的目录结构插入您自己的面部图像。
作为福利,我还包括如何标记“未知”的面孔,这些面孔无法充分放心地分类。
OpenCV人脸识别
您可能想知道本教程与我几个月前用dlib进行人脸识别时所写的不同?
好吧,请记住,dlib人脸识别帖子依赖于两个重要的外部库:
- dlib(显然)
- face_recognition(这是一组易于使用的人脸识别实用程序,包含dlib)
虽然我们使用OpenCV来进行人脸识别,但OpenCV本身并不负责识别人脸。
在今天的教程中,我们将学习如何将深度学习和OpenCV一起应用(除了scikit-learn之外没有其他库):
- 检测人脸
- 计算128维人脸嵌入以量化人脸
- 在嵌入之上训练支持向量机(SVM)
- 识别图像和视频流中的人脸
所有这些任务都将通过OpenCV完成,使我们能够获得“纯粹的”OpenCV人脸识别管道(pipeline)。
OpenCV的人脸识别如何工作
为了构建我们的OpenCV人脸识别管道,我们将在两个关键步骤中应用深度学习:
- 应用人脸检测,检测人脸在图像中的存在和位置,但不识别它
- 提取量化图像中每个面部的128维特征向量(称为“嵌入”)
我之前已经讨论过OpenCV的人脸检测是如何工作的,所以如果你以前没有检测到人脸,请参考它。
负责实际量化图像中每个面部的模型来自OpenFace项目,这是一个Python和Torch实现的面部识别和深度学习。该实现来自Schroff等人于2015年在CVPR发表的论文,FaceNet: A Unified Embedding for Face Recognition and Clustering。
查看整个FaceNet实现超出了本教程的范围,但管道(pipeline)的要点可以在上图中看到。
首先,我们将图像或视频帧输入到人脸识别管道。给定输入图像,我们应用面部检测来检测图像中面部的位置。
顾名思义,面部对齐是:(1)识别面部的几何结构;(2)基于平移,旋转和缩放来尝试获得面部的规范对齐的过程。
虽然可选,但已经证明面部对齐可以提高某些管道中的人脸识别精度。
在我们(可选)应用人脸对齐和裁剪之后,将其输入到深度神经网络:
深度学习模型FaceNet计算128维嵌入,以量化人脸。
但网络如何实际计算面部人脸?
答案在于训练过程本身,包括:
- 输入数据到网络
- 三重损失函数
为了使用深度学习训练人脸识别模型,每个输入的批量数据包括三个图像:
- The anchor
- The positive image
- The negative image
anchor是我们当前的人脸并具有身份A。
第二张图片是我们的positive image,此图像也包含A的人脸。
另一方面,negative image不具有相同的身份,可能属于人B,C,甚至Y!
关键是anchor和positive image都属于同一个人/人脸,而negative image不包含相同的人脸。
神经网络计算每个人脸的128-d嵌入,然后调整网络的权重(通过三重损失函数),这样:
- anchor和positive image的128-d嵌入更靠近在一起
- 与此同时,将negative image的嵌入推得更远
以这种方式,网络能够学习量化面部并返回适合于面部识别的高度鲁棒且有区别的嵌入。
而且,我们实际上可以将OpenFace模型重用于我们自己的应用程序,而无需明确地训练它!
即使我们今天使用的深度学习模型(很可能)从未见过我们即将通过它的人脸,模型仍然能够为每个人脸计算嵌入,理想情况下,这些人脸嵌入将充分不同,以便我们可以在人脸嵌入的基础上训练“标准”机器学习分类器(SVM,SGD分类器,随机森林等),从而获得我们的OpenCV人脸识别管道。
如果您有兴趣了解有关三重损失的详细信息以及如何使用它来训练人脸嵌入模型,请务必参考我之前的博客文章,以及Schroff等人的论文。
我们的人脸识别数据集
我们今天使用的数据集包含三个人:
- 我
- 特丽莎(我的妻子)
- “未知”,用于表示我们不知道并希望标记的人脸(这里我只是从我之前的帖子中使用的电影“侏罗纪公园”中采样,你可能想插入自己的“未知”“数据集”)。
每个类包含六个图像。
如果您正在构建自己的人脸识别数据集,理想情况下,我建议有每个想要识别的人的10-20张图像,请务必参考这篇博客的“缺点,限制以及如何获得更高的人脸识别准确度”部分以了解更多详情。
项目结构
下载代码,并在终端使用tree命令:
$ tree --dirsfirst
.
├── dataset
│   ├── adrian [6 images]
│   ├── trisha [6 images]
│   └── unknown [6 images]
├── images
│   ├── adrian.jpg
│   ├── patrick_bateman.jpg
│   └── trisha_adrian.jpg
├── face_detection_model
│   ├── deploy.prototxt
│   └── res10_300x300_ssd_iter_140000.caffemodel
├── output
│   ├── embeddings.pickle
│   ├── le.pickle
│   └── recognizer.pickle
├── extract_embeddings.py
├── openface_nn4.small2.v1.t7
├── train_model.py
├── recognize.py
└── recognize_video.py