ImageFilter模块提供了滤波器相关定义,这些滤波器主要用于Image类的filter()方法。
一、ImageFilter模块所支持的滤波器
当前的PIL版本中ImageFilter模块支持十种滤波器:
1、BLUR方法
ImageFilter.BLUR为模糊滤波,处理之后的图像会整体变得模糊。
例子:
from PIL import ImageFilter,Image
im02 =Image.open("D:\\Code\\Python\\test\\img\\test02.jpg")
im = im02.filter(ImageFilter.BLUR)      #BLUR的参数默认
原图:

滤波后图像:(稍微变得模糊了)

2、CONTOUR
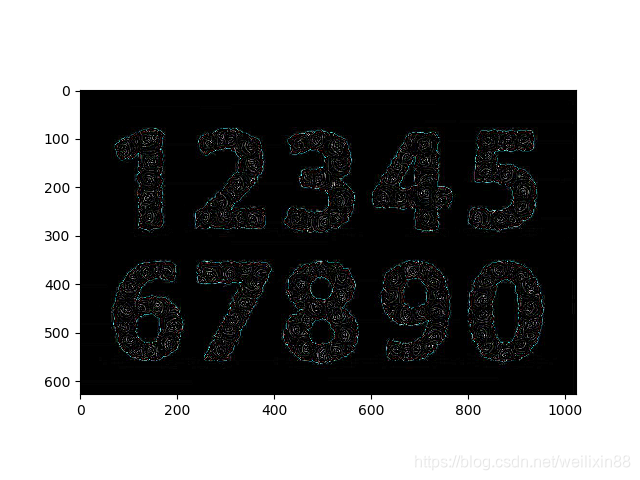
ImageFilter.CONTOUR为轮廓滤波,将图像中的轮廓信息全部提取出来。

例子:
from PIL import ImageFilter,Image
im02 = Image.open("D:\\Code\\Python\\test\\img\\test02.jpg")
im= im02.filter(ImageFilter.CONTOUR)
图像im为轮廓图像,如下图:

3、DETAIL
ImageFilter.DETAIL为细节增强滤波,会使得图像中细节更加明显。
例子:
from PIL import ImageFilter,Image
im02 = Image.open("D:\\Code\\Python\\test\\img\\test02.jpg")
im= im02.filter(ImageFilter.DETAIL)
图像im为细节增强后的图像,如下图:

4、EDGE_ENHANCE
ImageFilter.EDGE_ENHANCE为边缘增强滤波,突出、加强和改善图像中不同灰度区域之间的边界和轮廓的图像增强方法。经处理使得边界和边缘在图像上表现为图像灰度的突变,用以提高人眼识别能力。
例子:
from PIL import ImageFilter,Image
im02 = Image.open("D:\\Code\\Python\\test\\img\\test02.jpg")
im= im02.filter(ImageFilter.EDGE_ENHANCE)
图像im为边缘增强后的图像,如下图:

5、 EDGE_ENHANCE_MORE
ImageFilter.EDGE_ENHANCE_MORE为深度边缘增强滤波,会使得图像中边缘部分更加明显。
例子:
from PIL import ImageFilter,Image
im02 = Image.open("D:\\Code\\Python\\test\\img\\test02.jpg")
im= im02.filter(ImageFilter.EDGE_ENHANCE_MORE)
图像im为深度边缘增强后的图像,如下图:

6、 EMBOSS
ImageFilter.EMBOSS为浮雕滤波,会使图像呈现出浮雕效果。
例子:
from PIL import ImageFilter,Image
im02 = Image.open("D:\\Code\\Python\\test\\img\\test02.jpg")
im= im02.filter(ImageFilter.EMBOSS)
图像im为浮雕效果的图像,如下图:

7、 FIND_EDGES
ImageFilter.FIND_EDGES为寻找边缘信息的滤波,会找出图像中的边缘信息。
例子:
from PIL import ImageFilter,Image
im02 = Image.open("D:\\Code\\Python\\test\\img\\test02.jpg")
im= im02.filter(ImageFilter.FIND_EDGES)
图像im为边缘信息的图像,如下图:
8、 SMOOTH
ImageFilter.SMOOTH为平滑滤波,突出图像的宽大区域、低频成分、主干部分或抑制图像噪声和干扰高频成分,使图像亮度平缓渐变,减小突变梯度,改善图像质量。
例子:
from PIL import ImageFilter,Image
im02 = Image.open("D:\\Code\\Python\\test\\img\\test02.jpg")
im= im02.filter(ImageFilter.SMOOTH)
图像im为平滑滤波的图像,如下图:

9、 SMOOTH_MORE
ImageFilter.SMOOTH_MORE为深度平滑滤波,会使得图像变得更加平滑。
例子:
from PIL importImageFilter,Image
im02 =Image.open("D:\\Code\\Python\\test\\img\\test02.jpg")
im =im02.filter(ImageFilter.SMOOTH_MORE)
图像im为深度平滑滤波的图像,如下图:

10、SHARPEN
ImageFilter.SHARPEN为锐化滤波,补偿图像的轮廓,增强图像的边缘及灰度跳变的部分,使图像变得清晰。
例子:
from PIL import ImageFilter,Image
im02 =Image.open("D:\\Code\\Python\\test\\img\\test02.jpg")
im =im02.filter(ImageFilter.SHARPEN)
图像im为锐化滤波的图像,如下图:
二、ImageFilter模块的函数
1、Kernel
定义:Kernel(size,kernel, scale=None, offset=0)
含义:(New in 1.1.5)生成一个给定尺寸的卷积核。在当前的版本中,变量size必须为(3,3)或者(5,5)。变量kernel与变量size对应地必须为包含9个或者25个整数或者浮点数的序列。
如果设置了变量scale,那将卷积核作用于每个像素值之后的数据,都需要除以这个变量。默认值为卷积核的权重之和。
如果设置变量offset,这个值将加到卷积核作用的结果上,然后再除以变量scale。
例子:
from PIL import ImageFilter,Image
im02 =Image.open("D:\\Code\\Python\\test\\img\\test02.jpg")
im=im02.filter(ImageFilter.Kernel((3,3),(1,1,1,0,0,0,2,0,2)))
图像im为经过卷积核处理过的图像,如下图:

2、RankFilter
定义:RankFilter(size,rank)
含义:(New in 1.1.5)生成给定尺寸的等级滤波器。对于输入图像的每个像素点,等级滤波器根据像素值,在(size,size)的区域中对所有像素点进行排序,然后拷贝对应等级的值存储到输出图像中。
例子:
from PIL import ImageFilter,Image
im02 = Image.open("D:\\Code\\Python\\test\\img\\test02.jpg")
im=im02.filter(ImageFilter.RankFilter(5,24))图像im为等级滤波后的图像,在每个像素点为中心的5x5区域25个像素点中选择排序第24位的像素作为新的值。如下图:

3、MinFilter
定义:MinFilter(size=3)
含义:(New in 1.1.5)生成给定尺寸的最小滤波器。对于输入图像的每个像素点,该滤波器从(size,size)的区域中拷贝最小的像素值存储到输出图像中。
例子:
from PIL import ImageFilter,Image
im02 =Image.open("D:\\Code\\Python\\test\\img\\test02.jpg")
im=im02.filter(ImageFilter.MinFilter(5))
图像im为最小滤波后的图像,在每个像素点为中心的5x5区域25个像素点中选择最小的像素作为新的值。如下图:
4、MaxFilter
定义:MaxFilter(size=3)
含义:(New in 1.1.5)生成给定尺寸的最大滤波器。对于输入图像的每个像素点,该滤波器从(size,size)的区域中拷贝最大的像素值存储到输出图像中。
例子:
from PIL import ImageFilter,Iamge
im02 =Image.open("D:\\Code\\Python\\test\\img\\test02.jpg")
im=im02.filter(ImageFilter.MaxFilter(5))
图像im为最大滤波后的图像,在每个像素点为中心的5x5区域25个像素点中选择最大的像素作为新的值。如下图:

5、MedianFilter
定义:MedianFilter(size=3)
含义:(New in 1.1.5)生成给定尺寸的中值滤波器。对于输入图像的每个像素点,该滤波器从(size,size)的区域中拷贝中值对应的像素值存储到输出图像中。
例子:
from PIL import ImageFilter,Image
im02 = Image.open("D:\\Code\\Python\\test\\img\\test02.jpg")
im=im02.filter(ImageFilter.MedianFilter(5))
图像im为中值滤波后的图像,在每个像素点为中心的5x5区域25个像素点中选择中值作为新的值。如下图:

6、ModeFilter
定义:ModeFilter(size=3)
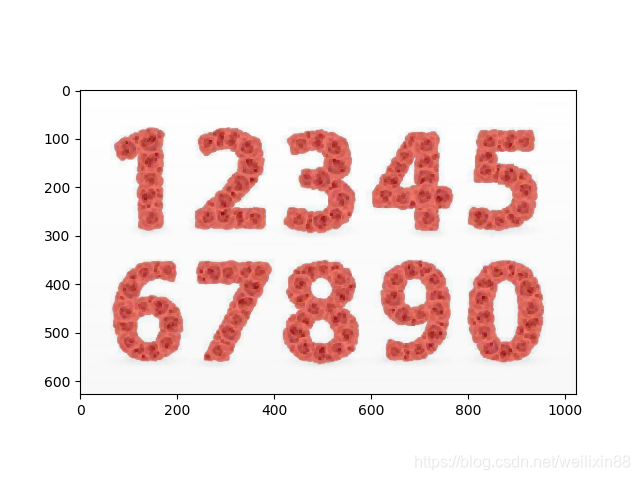
含义:(New in 1.1.5)生成给定尺寸的模式滤波器。对于输入图像的每个像素点,该滤波器从(size,size)的区域中拷贝出现次数最多的像素值存储到输出图像中。如果没有一个像素值出现过两次极其以上,则使用原始像素值。
例子:
from PIL import ImageFilter,Image
im02 = Image.open("D:\\Code\\Python\\test\\img\\test02.jpg")
im=im02.filter(ImageFilter.ModeFilter(5))
图像im为模式滤波后的图像,在每个像素点为中心的5x5区域25个像素点中选择出现次数最多的像素作为新的值。如下图:

---------------------
以上为作者——icamera0整理内容
来源:CSDN
原文:https://blog.csdn.net/icamera0/article/details/50708888
---------------------
为了更好的将这些方法进行对比,将其放在一起展示会显得更好。
三、对比ImageFilter中方法和滤波函数
1、滤波函数生成的对比
代码如下:
from PIL import Image,ImageFilter
import matplotlib.pyplot as plt
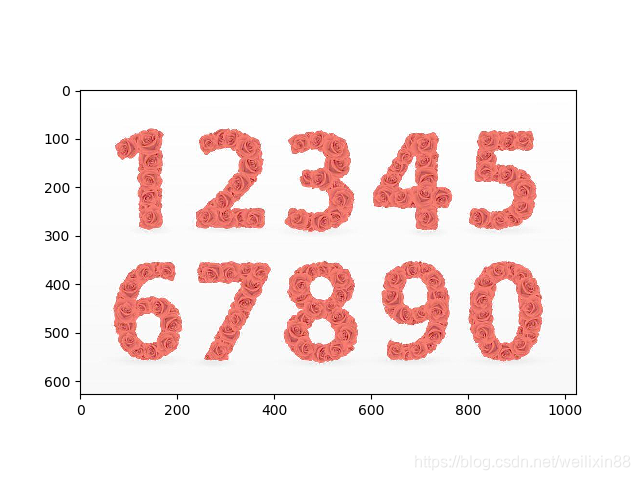
img = Image.open('C:/Users/wlx/Documents/py_study/number.jpg')
Kernel_img = img.filter(ImageFilter.Kernel((3,3),(1,1,1,0,0,0,2,0,2))) #创建3*3的核,核的内容(1,1,1;0,0,0;2,0,2)
RankFilter_img = img.filter(ImageFilter.RankFilter(5,24)) #创建5*5大小的区域,选择第24个像素替换原来的像素
MinFilter_img = img.filter(ImageFilter.MinFilter(5)) #5x5区域25个像素点中选择最小的像素作为新的值(默认是3*3)
MaxFilter_img = img.filter(ImageFilter.MaxFilter(5)) #5x5区域25个像素点中选择最大的像素作为新的值(默认是3*3)
MedianFilter_img = img.filter(ImageFilter.MedianFilter(5)) #5x5区域25个像素点中选择中值作为新的值(默认是3*3)中值滤波
ModeFilter_img = img.filter(ImageFilter.ModeFilter(5)) #5x5区域25个像素点中选择出现次数最多的像素作为新的值(默认3*3)
plt.figure('ImageFilter滤波函数对比图',figsize=(10,5)) #图像的名称,以及图像实例的大小(英寸为单位)
plt.subplot(2,3,1),plt.title('Kernel') #在大图上创建2*3个子空间,将下面显示的图像放在第1个位置上,并设置标题为Kernel
plt.imshow(Kernel_img),plt.axis('off')
plt.subplot(2,3,2),plt.title('RankFilter')
plt.imshow(RankFilter_img),plt.axis('off')
plt.subplot(2,3,3),plt.title('MinFilter')
plt.imshow(MinFilter_img),plt.axis('off')
plt.subplot(2,3,4),plt.title('MaxFilter')
plt.imshow(MaxFilter_img),plt.axis('off')
plt.subplot(2,3,5),plt.title('MedianFilter')
plt.imshow(MedianFilter_img),plt.axis('off')
plt.subplot(2,3,6),plt.title('ModeFilter')
plt.imshow(ModeFilter_img),plt.axis('off') plt.show()图像如下:

2、ImageFilter的滤波方法的对比
代码如下:
from PIL import Image,ImageFilter
import matplotlib.pyplot as plt

img = Image.open('C:/Users/wlx/Documents/py_study/number.jpg')
blur_img = img.filter(ImageFilter.BLUR)                               #默认参数情况下的模糊滤波
contour_img = img.filter(ImageFilter.CONTOUR)                         #默认参数情况下的轮廓滤波
detail_img = img.filter(ImageFilter.DETAIL)                           #默认参数情况下的细节增强滤波
EDGE_ENHANCE_img = img.filter(ImageFilter.EDGE_ENHANCE)               #默认参数情况下的边缘增强滤波
EDGE_ENHANCE_MORE_img = img.filter(ImageFilter.EDGE_ENHANCE_MORE)     #默认参数情况下的深度边缘增强滤波
EMBOSS_img = img.filter(ImageFilter.EMBOSS)                           #默认参数情况下的浮雕滤波
FIND_EDGES_img = img.filter(ImageFilter.FIND_EDGES)                   #默认参数情况下的寻找边缘信息的滤波
SMOOTH_img = img.filter(ImageFilter.SMOOTH)                           #默认参数情况下的平滑滤波
SMOOTH_MORE_img = img.filter(ImageFilter.SMOOTH_MORE)                 #默认参数情况下的深度平滑滤波
SHARPEN_img = img.filter(ImageFilter.SHARPEN)                         #默认参数情况下的锐化滤波

plt.figure(num='ImageFilter滤波方法对比图',figsize=(13,6),)
plt.subplot(2,5,1),plt.title('BLUR')
plt.imshow(blur_img),plt.axis('off')

plt.subplot(2,5,2),plt.title('CONTOUR')
plt.imshow(contour_img),plt.axis('off')

plt.subplot(2,5,3),plt.title('DETAIL')
plt.imshow(detail_img),plt.axis('off')

plt.subplot(2,5,4),plt.title('EDGE_ENHANCE')
plt.imshow(EDGE_ENHANCE_img),plt.axis('off')

plt.subplot(2,5,5),plt.title('EDGE_ENHANCE_MORE')
plt.imshow(EDGE_ENHANCE_MORE_img),plt.axis('off')

plt.subplot(2,5,6),plt.title('EMBOSS')
plt.imshow(EMBOSS_img),plt.axis('off')

plt.subplot(2,5,7),plt.title('FIND_EDGES')
plt.imshow(FIND_EDGES_img),plt.axis('off')

plt.subplot(2,5,8),plt.title('SMOOTH')
plt.imshow(SMOOTH_img),plt.axis('off')

plt.subplot(2,5,9),plt.title('SMOOTH_MORE')
plt.imshow(SMOOTH_MORE_img),plt.axis('off')

plt.subplot(2,5,10),plt.title('SHARPEN')
plt.imshow(SHARPEN_img),plt.axis('off')
plt.show()
图像如下:

