Java调用微信登录
一. 准备工作
1. 需要准备订阅号
微信开发者官网
在微信开放平台注册开发者帐号,并拥有一个已审核通过的网站应用,并获得相应的AppID和AppSecret,申请微信登录且通过审核后,可开始接入流程。具体流程可以看官方文档。
具体需要三个参数 分别是AppID、AppSecret和回调地址
这里用的是 尚硅谷一位老师提供的,这里就不分享给大家了
三个参数:

二.构造项目
1.创建maven项目,导入springboot依赖
这里我也不过多演示
创建成功:

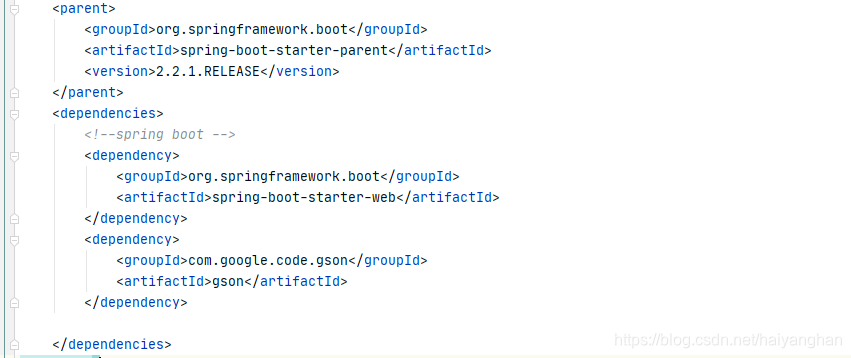
2. 导入依赖
    <parent>
        <groupId>org.springframework.boot</groupId>
        <artifactId>spring-boot-starter-parent</artifactId>
        <version>2.2.1.RELEASE</version>
    </parent>
    <dependencies>
        <!--spring boot -->
        <dependency>
            <groupId>org.springframework.boot</groupId>
            <artifactId>spring-boot-starter-web</artifactId>
        </dependency>
        <dependency>
            <groupId>com.google.code.gson</groupId>
            <artifactId>gson</artifactId>
        </dependency>
    </dependencies>
3.创建包
结构如下

4. 编写application.properties配置文件
# 服务端口
server.port=8080

# 微信开放平台 appid
wx.open.app_id=
# 微信开放平台 appsecret
wx.open.app_secret=
# 微信开放平台 重定向url
wx.open.redirect_url=

5. 编写App启动类
@SpringBootApplication
@ComponentScan(basePackages = {"com.haiyang.wxlogin"})
public class Application {

    public static void main(String[] args) {
        SpringApplication.run(Application.class, args);
    }
}
三. 代码实现
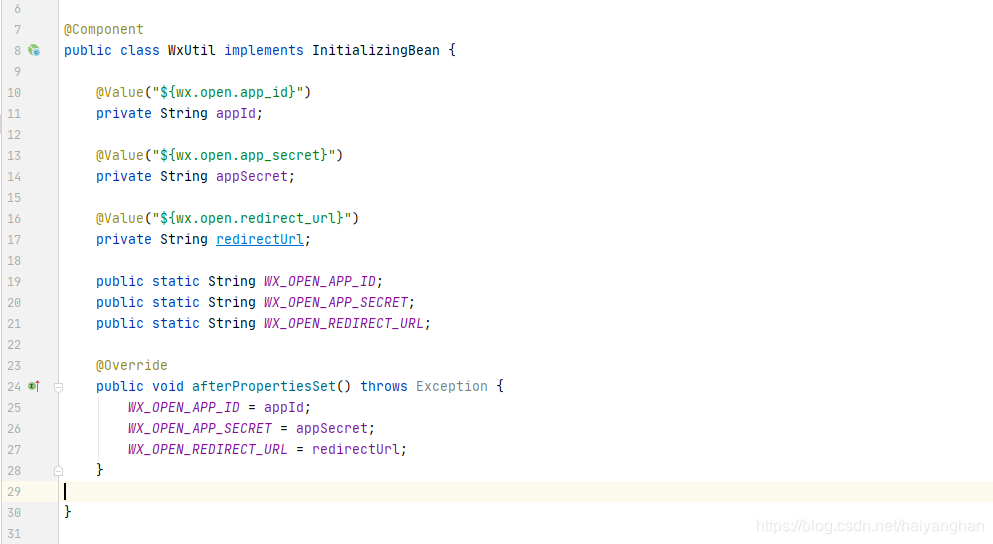
1.编写工具类 读取配置文件参数
@Component
public class WxUtil implements InitializingBean {

    @Value("${wx.open.app_id}")
    private String appId;

    @Value("${wx.open.app_secret}")
    private String appSecret;

    @Value("${wx.open.redirect_url}")
    private String redirectUrl;

    public static String WX_OPEN_APP_ID;
    public static String WX_OPEN_APP_SECRET;
    public static String WX_OPEN_REDIRECT_URL;

    @Override
    public void afterPropertiesSet() throws Exception {
        WX_OPEN_APP_ID = appId;
        WX_OPEN_APP_SECRET = appSecret;
        WX_OPEN_REDIRECT_URL = redirectUrl;
    }

}
2.编写controller 生成二维码
@RequestMapping
@Controller
public class WxloginController {

    //生成二维码
    @RequestMapping("/wxlogin")
    public String createQRcode() throws Exception{
        //先对回调地址做url编码
        String redirectUrl = URLEncoder.encode(WxUtil.WX_OPEN_REDIRECT_URL, "utf-8");

        String url = "https://open.weixin.qq.com/connect/qrconnect" +
                "?appid=" + WxUtil.WX_OPEN_APP_ID+
                "&redirect_uri=" +redirectUrl+
                "&response_type=code" +
                "&scope=snsapi_login" +
                "&state=" +"微信登录案例"+
                "#wechat_redirect";

        return "redirect:"+url;
    }
}

然后我们测试一下,打开浏览器 输入我们的请求地址

页面变成了 扫码
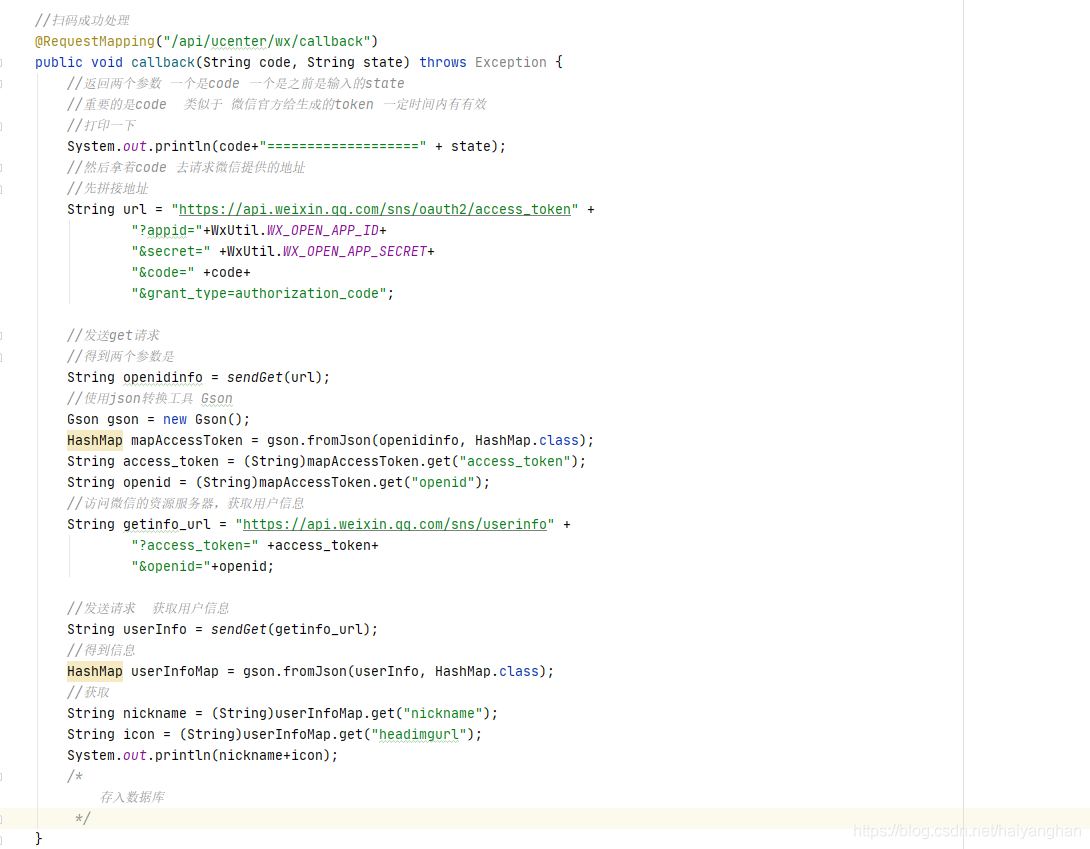
3.编写编写扫码成功,处理
//扫码成功处理
    @RequestMapping("/api/ucenter/wx/callback")
    public void callback(String code, String state) throws Exception {
        //返回两个参数 一个是code 一个是之前是输入的state
        //重要的是code  类似于 微信官方给生成的token 一定时间内有有效
        //打印一下
        System.out.println(code+"===================" + state);
        //然后拿着code 去请求微信提供的地址
        //先拼接地址
        String url = "https://api.weixin.qq.com/sns/oauth2/access_token" +
                "?appid="+WxUtil.WX_OPEN_APP_ID+
                "&secret=" +WxUtil.WX_OPEN_APP_SECRET+
                "&code=" +code+
                "&grant_type=authorization_code";

        //发送get请求
        //得到两个参数是
        String openidinfo = sendGet(url);
        //使用json转换工具 Gson
        Gson gson = new Gson();
        HashMap mapAccessToken = gson.fromJson(openidinfo, HashMap.class);
        String access_token = (String)mapAccessToken.get("access_token");
        String openid = (String)mapAccessToken.get("openid");
        //访问微信的资源服务器,获取用户信息
        String getinfo_url = "https://api.weixin.qq.com/sns/userinfo" +
                "?access_token=" +access_token+
                "&openid="+openid;

        //发送请求  获取用户信息
        String userInfo = sendGet(getinfo_url);
        //得到信息
        HashMap userInfoMap = gson.fromJson(userInfo, HashMap.class);
        //获取
        String nickname = (String)userInfoMap.get("nickname");
        String icon = (String)userInfoMap.get("headimgurl");
        System.out.println(nickname+icon);
        /*
            存入数据库
         */
    }
这是我用来发送get的方法
    /**
     * 模拟get请求
     * 接口调用 GET
     */
    public static String sendGet(String GET_URL) {
        try {
            URL url = new URL(GET_URL); // 把字符串转换为URL请求地址
            HttpURLConnection connection = (HttpURLConnection) url.openConnection();// 打开连接
            connection.connect();// 连接会话
            // 获取输入流
            BufferedReader br = new BufferedReader(new InputStreamReader(connection.getInputStream(), "UTF-8"));
            String line;
            StringBuilder sb = new StringBuilder();
            while ((line = br.readLine()) != null) {// 循环读取流
                sb.append(line);
            }
            br.close();// 关闭流
            connection.disconnect();// 断开连接
            System.out.println(sb.toString());
            return sb.toString();
        } catch (Exception e) {
            e.printStackTrace();
            System.out.println("失败!");
        }
        return "";
    }
四.总结
到这里,微信登录就完成了
总结一下流程:
1.生成微信二维码
2.用户扫码二维码授权登录
3.授权成功跳转到回调地址-带两个参数
4.两个参数中的code拿来请求微信提供的固定地址,返回用户的openid和临时token,这个openid是固定不会随着每次扫码变化,可以存入数据库,判断获取的openid是否存在数据库,存在就直接获取,省去了第五步
5.拿着opnenid和临时token再去请求微信提供的固定地址,获取到用户信息,获取到的信息是json格式的,在java中属于是字符串类型的,需要用工具转成Java可以识别的类型。
6.最后存入数据库,并且将需要返回的数据返回