最后学习一下RabbitMQ如何整合Spring,毕竟现在大多是使用框架来做项目。这篇主要使用的方式是XML配置。
介绍
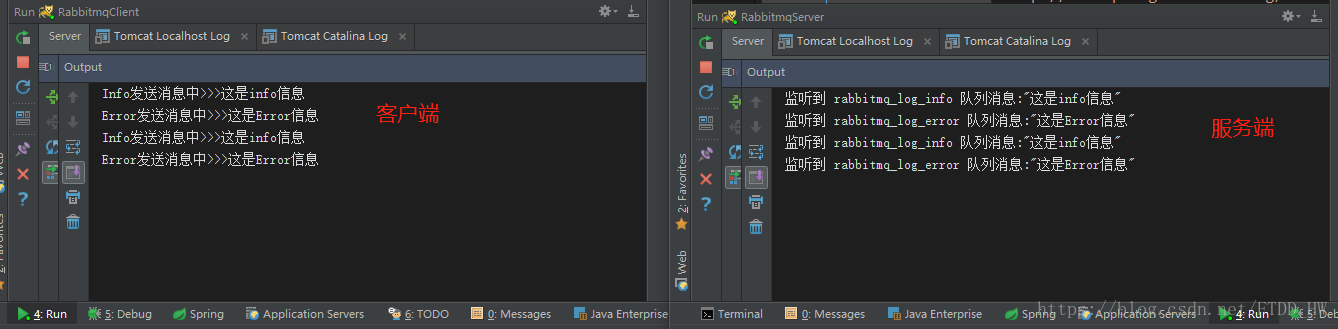
RabbitMQ整合Spring的学习中,搭了两个web项目,一个作为客户端,一个作为服务端,放在一个项目中也可以实现效果,但毕竟RabbitMQ也是在这种类似的环境中使用的。客户端会把info类型和error类型的日志发送给RabbitMQ,RabbitMQ根据所定义的路由与绑定的key分别把日志消息传递给不同的队列。
客户端项目结构:
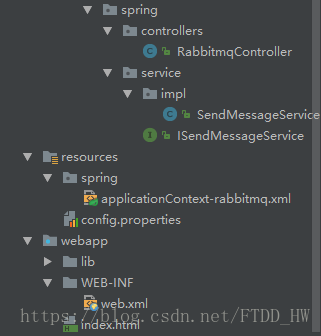
客户端实现
RabbitMQ配置文件
config.properties
# RabbitMQ config
rabbitmq.host=localhost
rabbitmq.username=guest
rabbitmq.password=guest
rabbitmq.port=5672这里在我本机的RabbitMQ,如果是在远程主机上则要做相应修改。需要注意的是,我们访问RabbitMQ管理界面是使用的15672端口,但通过连接访问RabbitMQ是使用5672端口
XML配置
<?xml version="1.0" encoding="UTF-8"?>
<beans xmlns="http://www.springframework.org/schema/beans"
       xmlns:xsi="http://www.w3.org/2001/XMLSchema-instance"
       xmlns:rabbit="http://www.springframework.org/schema/rabbit"
       xmlns:context="http://www.springframework.org/schema/context"
       xmlns:mvc="http://www.springframework.org/schema/mvc"
       xsi:schemaLocation="http://www.springframework.org/schema/beans http://www.springframework.org/schema/beans/spring-beans-4.2.xsd
                           http://www.springframework.org/schema/rabbit http://www.springframework.org/schema/rabbit/spring-rabbit-1.7.xsd
                           http://www.springframework.org/schema/context http://www.springframework.org/schema/context/spring-context-4.2.xsd
                           http://www.springframework.org/schema/mvc http://www.springframework.org/schema/mvc/spring-mvc.xsd
                           http://www.springframework.org/schema/beans http://www.springframework.org/schema/beans/spring-beans-4.2.xsd">

    <context:component-scan base-package="com.rabbitmq.spring"/>
    <context:property-placeholder location="classpath*:config.properties"/>
    <mvc:annotation-driven />
    <mvc:default-servlet-handler/>
    <!--连接工厂-->
    <rabbit:connection-factory id="connectionFactory" host="${rabbitmq.host}" username="${rabbitmq.username}" password="${rabbitmq.password}" port="${rabbitmq.port}"></rabbit:connection-factory>
    <!--RabbitAdmin主要用于创建队列和交换器以及绑定关系等。-->
    <rabbit:admin id="rabbitAdmin" connection-factory="connectionFactory"/>
    <!--声明队列-->
    <rabbit:queue name="rabbitmq_log_info" durable="true" auto-delete="false"  />
    <rabbit:queue name="rabbitmq_log_error" durable="true" auto-delete="false" />
    <!--声明路由并绑定队列,指定routingKey-->
    <rabbit:direct-exchange name="hap.log.exchange"  auto-delete="false" durable="true">
        <rabbit:bindings>
            <rabbit:binding queue="rabbitmq_log_info" key="info"></rabbit:binding>
            <rabbit:binding queue="rabbitmq_log_error" key="error"></rabbit:binding>
        </rabbit:bindings>
    </rabbit:direct-exchange>
    <!--定义RabbitTemplate,用于发送与接收消息-->
    <rabbit:template id="rabbitTemplateLogInfo" connection-factory="connectionFactory" routing-key="info" exchange="hap.log.exchange" message-converter="jsonMessageConverter"></rabbit:template>
    <rabbit:template id="rabbitTemplateLogError" connection-factory="connectionFactory" routing-key="error" exchange="hap.log.exchange" message-converter="jsonMessageConverter"></rabbit:template>

    <!-- 消息对象json转换类 -->
    <bean id="jsonMessageConverter" class="org.springframework.amqp.support.converter.Jackson2JsonMessageConverter" />
</beans>
rabbit-admin 标签如不声明,则 rabbit:queue 与 rabbit:direct-exchange 标签中必须添加 auto-declare 属性为true ,表示如果队列或路由不存在则自动声明,如不声明rabbit-admin,也不添加auto-declare属性则启动时会报声明队列错误,或队列不存在。
rabbit:template 标签中的routing-key、exchange也可以不在XML中配置,在类中发送消息时可以作为参数代入。
Service
Service接口
public interface ISendMessageService {
    public void sendInfoMessage(String message);

    public void sendErrorMessage(String message);
}
Service实现类
@Service
public class SendMessageService implements ISendMessageService{

    @Autowired
    @Qualifier("rabbitTemplateLogInfo")
    public RabbitTemplate rabbitTemplateLogInfo;

    @Autowired
    @Qualifier("rabbitTemplateLogError")
    private RabbitTemplate rabbitTemplateLogError;

    @Override
    public void sendInfoMessage(String message) {
        System.out.println("Info发送消息中>>>" + message);
        this.rabbitTemplateLogInfo.convertAndSend(message);
    }

    @Override
    public void sendErrorMessage(String message) {
        System.out.println("Error发送消息中>>>" + message);
        this.rabbitTemplateLogError.convertAndSend(message);
    }
}
RabbitTemplate的convertAndSend方法中,如果XML中已经配置好了对应的exchange与routingKey则可以直接传入一个消息进行发送即可。如果没有可以在参数中加入Exchange 与 routingkey
Controller
@Controller
@RequestMapping("/rabbitmqLog")
public class RabbitmqController {

    @Autowired
    @Qualifier("sendMessageService")
    ISendMessageService service = new SendMessageService();


    @RequestMapping(value = "/sendInfoLog",method = RequestMethod.GET)
    public void sendInfoMessage(String message){
        service.sendInfoMessage(message);
    }

    @RequestMapping("/sendErrorLog")
    public void sendErrorMessage(String message){
        service.sendErrorMessage(message);
    }

}
服务端实现
因为这里只是做一个简单的示例,所以服务端只做了监听,没有做什么业务逻辑。
RabbitMQ配置文件
这里与客户端是一样的
XML配置
<?xml version="1.0" encoding="UTF-8"?>
<beans xmlns="http://www.springframework.org/schema/beans"
       xmlns:xsi="http://www.w3.org/2001/XMLSchema-instance"
       xmlns:rabbit="http://www.springframework.org/schema/rabbit"
       xmlns:context="http://www.springframework.org/schema/context"
       xmlns:mvc="http://www.springframework.org/schema/mvc"
       xsi:schemaLocation="http://www.springframework.org/schema/beans http://www.springframework.org/schema/beans/spring-beans-4.2.xsd
                           http://www.springframework.org/schema/rabbit http://www.springframework.org/schema/rabbit/spring-rabbit-1.7.xsd
                           http://www.springframework.org/schema/context http://www.springframework.org/schema/context/spring-context-4.2.xsd
                           http://www.springframework.org/schema/mvc http://www.springframework.org/schema/mvc/spring-mvc.xsd
                           http://www.springframework.org/schema/beans http://www.springframework.org/schema/beans/spring-beans-4.2.xsd">


    <context:component-scan base-package="com.rabbitmq.spring"/>
    <context:property-placeholder location="classpath*:config.properties"/>
    <mvc:annotation-driven />
    <mvc:default-servlet-handler/>
    <rabbit:connection-factory id="connectionFactory" host="${rabbitmq.host}" username="${rabbitmq.username}" password="${rabbitmq.password}" port="${rabbitmq.port}"></rabbit:connection-factory>
    <rabbit:admin id="rabbitAdmin" connection-factory="connectionFactory"/>
    <rabbit:queue name="rabbitmq_log_info" durable="true" auto-delete="false" />
    <rabbit:queue name="rabbitmq_log_error" durable="true" auto-delete="false" />

    <rabbit:listener-container connection-factory="connectionFactory" acknowledge="auto">
        <rabbit:listener ref="messageRecevicer" queues="rabbitmq_log_info"/>
        <rabbit:listener ref="messageRecevicer" queues="rabbitmq_log_error"/>
    </rabbit:listener-container>

    <bean id="messageRecevicer" class="com.rabbitmq.spring.listener.QueueListener"/>

    <!-- 消息对象json转换类 -->
    <bean id="jsonMessageConverter" class="org.springframework.amqp.support.converter.Jackson2JsonMessageConverter" />
</beans>
服务端的XML与客户端不同的是多了监听配置与监听类的Bean,少了路由声明与队列绑定的配置。
监听类
@Component
public class QueueListener implements MessageListener{
    @Override
    public void onMessage(Message message) {
        String msg = null;
        try {
            msg = new String(message.getBody(),"UTF-8");
        } catch (UnsupportedEncodingException e) {
            e.printStackTrace();
        }
        System.out.println("监听到 "+ message.getMessageProperties().getConsumerQueue()+" 队列消息:" + msg);
    }
}
测试
最后我们分别启动客户端与服务端。客户端调用Controller向服务端发送消息 。