1生产者代码
rabbitmq.properties:
rabbitmq.host=127.0.0.1
rabbitmq.port=5672
rabbitmq.username=heima
rabbitmq.password=heima
rabbitmq.virtual-host=/itcast
spring-rabbitmq-producer.xml:
<?xml version="1.0" encoding="UTF-8"?>
<beans xmlns="http://www.springframework.org/schema/beans"
xmlns:xsi="http://www.w3.org/2001/XMLSchema-instance"
xmlns:context="http://www.springframework.org/schema/context"
xmlns:rabbit="http://www.springframework.org/schema/rabbit"
xsi:schemaLocation="http://www.springframework.org/schema/beans
http://www.springframework.org/schema/beans/spring-beans.xsd
http://www.springframework.org/schema/context
https://www.springframework.org/schema/context/spring-context.xsd
http://www.springframework.org/schema/rabbit
http://www.springframework.org/schema/rabbit/spring-rabbit.xsd">
<!--加载配置文件-->
<context:property-placeholder location="classpath:rabbitmq.properties"/>
<!-- 定义rabbitmq connectionFactory -->
<rabbit:connection-factory id="connectionFactory" host="${rabbitmq.host}"
port="${rabbitmq.port}"
username="${rabbitmq.username}"
password="${rabbitmq.password}"
virtual-host="${rabbitmq.virtual-host}"/>
<!--定义管理交换机、队列-->
<rabbit:admin connection-factory="connectionFactory"/>
<!--定义持久化队列,不存在则自动创建;不绑定到交换机则绑定到默认交换机
默认交换机类型为direct,名字为:"",路由键为队列的名称
-->
<!--
id:bean的名称
name:queue的名称
auto-declare:自动创建
auto-delete:自动删除。 最后一个消费者和该队列断开连接后,自动删除队列
exclusive:是否独占
durable:是否持久化
-->
<rabbit:queue id="spring_queue" name="spring_queue" auto-declare="true"/>
<!-- ~~~~~~~~~~~~~~~~~~~~~~~~~~~~广播;所有队列都能收到消息~~~~~~~~~~~~~~~~~~~~~~~~~~~~ -->
<!--定义广播交换机中的持久化队列,不存在则自动创建-->
<rabbit:queue id="spring_fanout_queue_1" name="spring_fanout_queue_1" auto-declare="true"/>
<!--定义广播交换机中的持久化队列,不存在则自动创建-->
<rabbit:queue id="spring_fanout_queue_2" name="spring_fanout_queue_2" auto-declare="true"/>
<!--定义广播类型交换机;并绑定上述两个队列-->
<rabbit:fanout-exchange id="spring_fanout_exchange" name="spring_fanout_exchange" auto-declare="true">
<rabbit:bindings>
<rabbit:binding queue="spring_fanout_queue_1" />
<rabbit:binding queue="spring_fanout_queue_2"/>
</rabbit:bindings>
</rabbit:fanout-exchange>
<!--如果是routing路由模式,则要指定routing-key如error、info。。。-->
<!--<rabbit:direct-exchange name="aa" >
<rabbit:bindings>
<!–direct 类型的交换机绑定队列 key :路由key queue:队列名称–>
<rabbit:binding queue="spring_queue" key="xxx"></rabbit:binding>
</rabbit:bindings>
</rabbit:direct-exchange>-->
<!-- ~~~~~~~~~~~~~~~~~~~~~~~~~~~~通配符;*匹配一个单词,#匹配多个单词 ~~~~~~~~~~~~~~~~~~~~~~~~~~~~ -->
<!--定义广播交换机中的持久化队列,不存在则自动创建-->
<rabbit:queue id="spring_topic_queue_star" name="spring_topic_queue_star" auto-declare="true"/>
<!--定义广播交换机中的持久化队列,不存在则自动创建-->
<rabbit:queue id="spring_topic_queue_well" name="spring_topic_queue_well" auto-declare="true"/>
<!--定义广播交换机中的持久化队列,不存在则自动创建-->
<rabbit:queue id="spring_topic_queue_well2" name="spring_topic_queue_well2" auto-declare="true"/>
<rabbit:topic-exchange id="spring_topic_exchange" name="spring_topic_exchange" auto-declare="true">
<rabbit:bindings>
<rabbit:binding pattern="heima.*" queue="spring_topic_queue_star"/>
<rabbit:binding pattern="heima.#" queue="spring_topic_queue_well"/>
<rabbit:binding pattern="itcast.#" queue="spring_topic_queue_well2"/>
</rabbit:bindings>
</rabbit:topic-exchange>
<!--定义rabbitTemplate对象操作可以在代码中方便发送消息-->
<rabbit:template id="rabbitTemplate" connection-factory="connectionFactory"/>
</beans>
com.itheima.ProducerTest:
package com.itheima;

import org.junit.Test;
import org.junit.runner.RunWith;
import org.springframework.amqp.rabbit.core.RabbitTemplate;
import org.springframework.beans.factory.annotation.Autowired;
import org.springframework.test.context.ContextConfiguration;
import org.springframework.test.context.junit4.SpringJUnit4ClassRunner;

/**
 * @author QLBF
 * @version 1.0
 * @date 2021/2/26 18:14
 */
@RunWith(SpringJUnit4ClassRunner.class)
@ContextConfiguration(locations = "classpath:spring-rabbitmq-producer.xml")
public class ProducerTest {


    //1.注入 RabbitTemplate(要和spring-rabbitmq-producer.xml对应id)
    @Autowired
    private RabbitTemplate rabbitTemplate;

    @Test
    public void testHello(){


        //2.发送消息,spring_queue为spring-rabbitmq-producer.xml其中的一个队列iD
        rabbitTemplate.convertAndSend("spring_queue","hello spring with mq!");
    }

    /**
     * 发送fanout消息
     */
    @Test
    public void testFanout(){


        //2.发送消息

        rabbitTemplate.convertAndSend("spring_fanout_exchange","","spring fanout....");
    }


    /**
     * 发送topic消息
     */
    @Test
    public void testTopics(){


        //2.发送消息

        rabbitTemplate.convertAndSend("spring_topic_exchange","heima.hehe.haha","spring topic....");
    }
}
直接点小绿点运行:

成功!
2消费者代码
 rabbitmq.properties:
rabbitmq.host=127.0.0.1
rabbitmq.port=5672
rabbitmq.username=heima
rabbitmq.password=heima
rabbitmq.virtual-host=/itcast
spring-rabbitmq-consumer.xml:
<?xml version="1.0" encoding="UTF-8"?>
<beans xmlns="http://www.springframework.org/schema/beans"
       xmlns:xsi="http://www.w3.org/2001/XMLSchema-instance"
       xmlns:context="http://www.springframework.org/schema/context"
       xmlns:rabbit="http://www.springframework.org/schema/rabbit"
       xsi:schemaLocation="http://www.springframework.org/schema/beans
       http://www.springframework.org/schema/beans/spring-beans.xsd
       http://www.springframework.org/schema/context
       https://www.springframework.org/schema/context/spring-context.xsd
       http://www.springframework.org/schema/rabbit
       http://www.springframework.org/schema/rabbit/spring-rabbit.xsd">
    <!--加载配置文件-->
    <context:property-placeholder location="classpath:rabbitmq.properties"/>

    <!-- 定义rabbitmq connectionFactory -->
    <rabbit:connection-factory id="connectionFactory" host="${rabbitmq.host}"
                               port="${rabbitmq.port}"
                               username="${rabbitmq.username}"
                               password="${rabbitmq.password}"
                               virtual-host="${rabbitmq.virtual-host}"/>
    <!--这些只要创建类,实现相应的接口就可以收到信息了,下面只演示一个-->
    <bean id="springQueueListener" class="com.itheima.rabbitmq.listener.SpringQueueListener"/>
    <!--<bean id="fanoutListener1" class="com.itheima.rabbitmq.listener.FanoutListener1"/>
    <bean id="fanoutListener2" class="com.itheima.rabbitmq.listener.FanoutListener2"/>
    <bean id="topicListenerStar" class="com.itheima.rabbitmq.listener.TopicListenerStar"/>
    <bean id="topicListenerWell" class="com.itheima.rabbitmq.listener.TopicListenerWell"/>
    <bean id="topicListenerWell2" class="com.itheima.rabbitmq.listener.TopicListenerWell2"/>
-->
    <rabbit:listener-container connection-factory="connectionFactory" auto-declare="true">
        <rabbit:listener ref="springQueueListener" queue-names="spring_queue"/>
       <!-- <rabbit:listener ref="fanoutListener1" queue-names="spring_fanout_queue_1"/>
        <rabbit:listener ref="fanoutListener2" queue-names="spring_fanout_queue_2"/>
        <rabbit:listener ref="topicListenerStar" queue-names="spring_topic_queue_star"/>
        <rabbit:listener ref="topicListenerWell" queue-names="spring_topic_queue_well"/>
        <rabbit:listener ref="topicListenerWell2" queue-names="spring_topic_queue_well2"/>-->
    </rabbit:listener-container>
</beans>
com.itheima.rabbitmq.listener.SpringQueueListener:
package com.itheima.rabbitmq.listener;

import org.springframework.amqp.core.Message;
import org.springframework.amqp.core.MessageListener;

/**
 * @author QLBF
 * @version 1.0
 * @date 2021/2/26 18:37
 */
public class SpringQueueListener implements MessageListener{


    public void onMessage(Message message) {


        //打印消息
        System.out.println(new String(message.getBody()));
    }
}
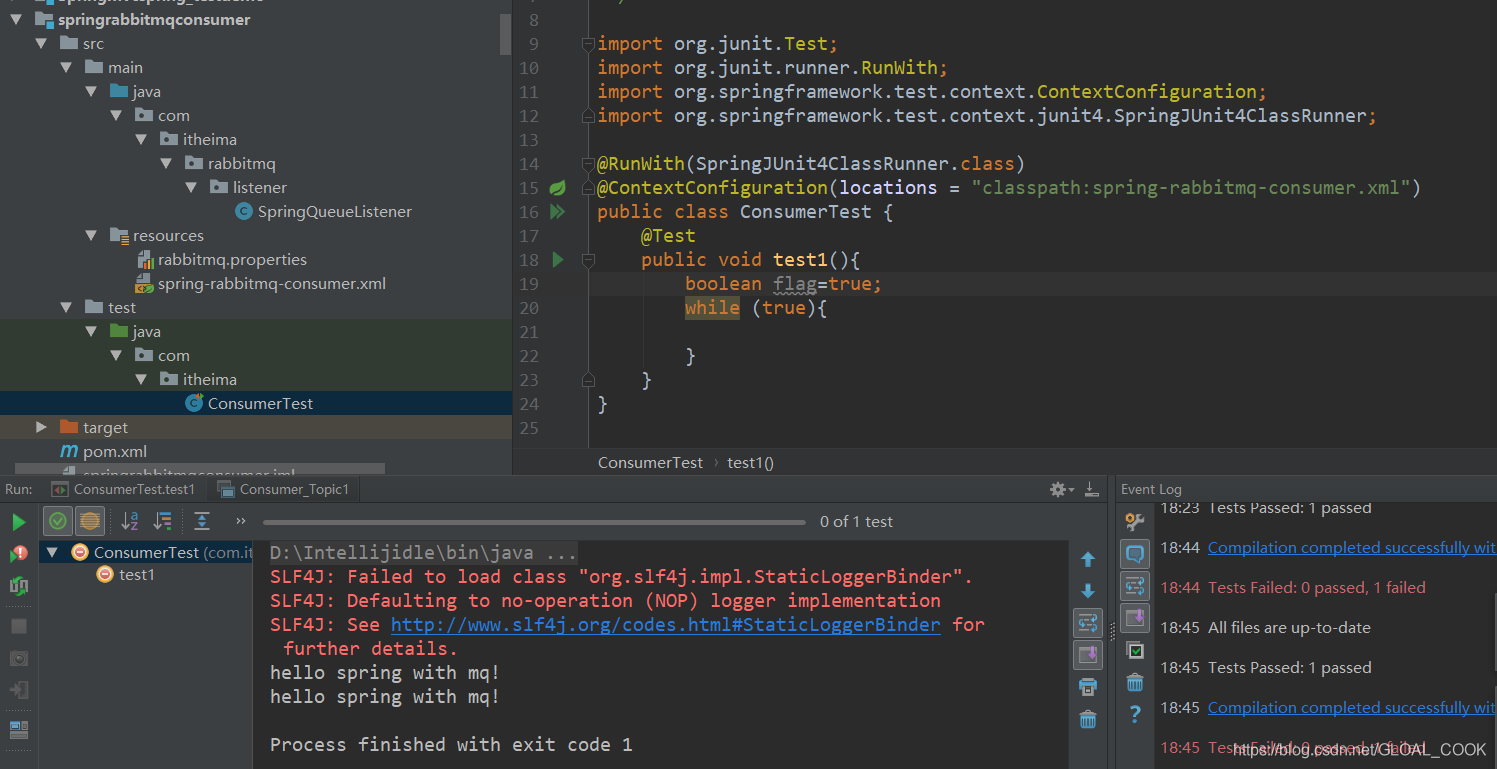
com.itheima.ConsumerTest:
package com.itheima;

/**
 * @author QLBF
 * @version 1.0
 * @date 2021/2/26 18:43
 */

import org.junit.Test;
import org.junit.runner.RunWith;
import org.springframework.test.context.ContextConfiguration;
import org.springframework.test.context.junit4.SpringJUnit4ClassRunner;

@RunWith(SpringJUnit4ClassRunner.class)
@ContextConfiguration(locations = "classpath:spring-rabbitmq-consumer.xml")
public class ConsumerTest {


    @Test
    public void test1(){


        boolean flag=true;
        while (true){


        }
    }
}
获取成功
3小结
