在读者学习本章之前,最好拥有外设和架构相关理论知识
本章使用的平台为百问网IMX6ULL,通过对NXP提供uboot的分析和修改,使其支持百问网IMX6ULL
本章参考文件有:《i.MX 6 BSP Porting Guide》、《ARMv7架构参考手册》
百度网盘链接:
https://pan.baidu.com/s/1h3LjDtOmAYChti7Rr30aSA
提取码为:07yl
一、uboot准备过程
首先需要解压uboot,解压后得到的顶层文件夹有:

《i.MX 6 BSP Porting Guide》中1.2.1节所述流程如下:
1. 复制开发板目录中相关文件夹(我选择的是mx6ull_ddr3_arm2)到自定义文件夹:
$ cp -R ./board/freescale/mx6ullevk/ ./board/freescale/mx6ull_lioker
$ mv ./board/freescale/mx6ull_lioker/mx6ullevk.c ./board/freescale/mx6ull_lioker/mx6ull_lioker.c
2. 复制头文件目录中相关文件为自定义文件:
$ cp ./include/configs/mx6ullevk.h ./include/configs/mx6ull_lioker.h
3. 复制配置文件目录中相关文件为自定义文件:
$ cp ./configs/mx6ull_14x14_evk_emmc_defconfig ./configs/mx6ull_lioker_defconfig
4. 修改上述自定义文件
修改后的文件存放在百度网盘链接的./uboot-imx-rel_imx_4.1.15_2.1.0_ga_lioker/文件夹中
5. 修改相关的配置文件:arch/arm/cpu/armv7/mx6/Kconfig

a. 添加自定义配置选项
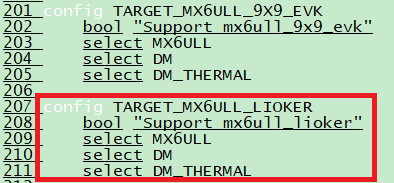
b. 添加自定义配置文件

在解压uboot之后,通常还需要打补丁、配置和编译。如:
1. $ patch -p1 < u-boot-2012.04.01_100ask.patch
2. $ make 100ask24x0_config
3. $ make
其中,配置和编译都会调用uboot的顶层Makefile,接下来我会简单分析此过程
本文所使用的uboot中并没有补丁文件,因此只需要配置和编译:
1. $ make ARCH=arm CROSS_COMPILE=arm-linux- mx6ull_lioker_defconfig

2. $ make V=1 ARCH=arm CROSS_COMPILE=arm-linux-

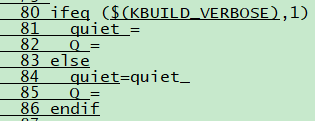
配置过程通过scripts/kconfig/conf生成.config,若想获取更多信息可通过修改顶层Makefile中“Q = ”实现:

通过编译过程图,可以确定编译过程所使用的链接文件和主汇编文件分别为u-boot.lds和arch/arm/cpu/armv7/start.S
二、u-boot.lds


 1 OUTPUT_FORMAT("elf32-littlearm", "elf32-littlearm", "elf32-littlearm")
 2 OUTPUT_ARCH(arm)
 3 ENTRY(_start)
 4 SECTIONS
 5 {
 6  . = 0x00000000;
 7  . = ALIGN(4);
 8  .text :
 9  {
10   *(.__image_copy_start)
11   *(.vectors)
12   arch/arm/cpu/armv7/start.o (.text*)
13   *(.text*)
14  }
15  . = ALIGN(4);
16  .rodata : { *(SORT_BY_ALIGNMENT(SORT_BY_NAME(.rodata*))) }
17  . = ALIGN(4);
18  .data : {
19   *(.data*)
20  }
21  . = ALIGN(4);
22  . = .;
23  . = ALIGN(4);
24  .u_boot_list : {
25   KEEP(*(SORT(.u_boot_list*)));
26  }
27  . = ALIGN(4);
28  .image_copy_end :
29  {
30   *(.__image_copy_end)
31  }
32  .rel_dyn_start :
33  {
34   *(.__rel_dyn_start)
35  }
36  .rel.dyn : {
37   *(.rel*)
38  }
39  .rel_dyn_end :
40  {
41   *(.__rel_dyn_end)
42  }
43  .end :
44  {
45   *(.__end)
46  }
47  _image_binary_end = .;
48  . = ALIGN(4096);
49  .mmutable : {
50   *(.mmutable)
51  }
52  .bss_start __rel_dyn_start (OVERLAY) : {
53   KEEP(*(.__bss_start));
54   __bss_base = .;
55  }
56  .bss __bss_base (OVERLAY) : {
57   *(.bss*)
58    . = ALIGN(4);
59    __bss_limit = .;
60  }
61  .bss_end __bss_limit (OVERLAY) : {
62   KEEP(*(.__bss_end));
63  }
64  .dynsym _image_binary_end : { *(.dynsym) }
65  .dynbss : { *(.dynbss) }
66  .dynstr : { *(.dynstr*) }
67  .dynamic : { *(.dynamic*) }
68  .plt : { *(.plt*) }
69  .interp : { *(.interp*) }
70  .gnu.hash : { *(.gnu.hash) }
71  .gnu : { *(.gnu*) }
72  .ARM.exidx : { *(.ARM.exidx*) }
73  .gnu.linkonce.armexidx : { *(.gnu.linkonce.armexidx.*) }
74 }
其中,
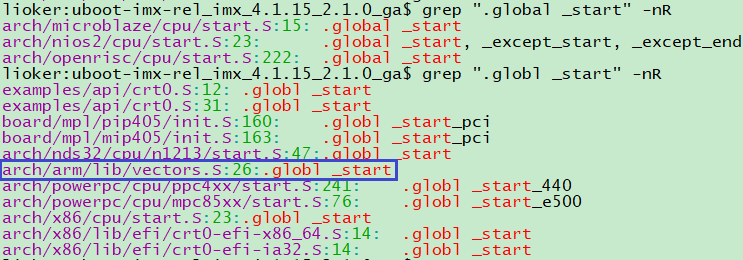
变量_start定义在文件arch/arm/lib/vectors.S中,为0x87800000,此文件被用来定义中断向量表,其中还包含有变量.vectors和ax
通过链接文件可以确定vectors.S在start.S之前运行
变量__image_copy_start在System.map和u-boot.map中均有定义,此处以u-boot.map为例:

其他变量也可以在System.map和u-boot.map中找到定义
而且我们可以通过u-boot.map中函数所属的文件夹确定其粗略位置,如后面章节需要用到的_main()函数就定义在arch/arm/lib/文件夹内

接下来我将分析start.S,因其内容较多,因此以功能分节
三、进入Supervisor模式,屏蔽IRQ和FIQ
1 b reset                                vectors.S
2   -> b save_boot_params                start.S
3     -> ENTRY(save_boot_params)         start.S
4       -> b save_boot_params_ret        start.S
其中,save_boot_params_ret()函数定义如下:
1 mrs    r0, cpsr               @ 将cpsr寄存器值存储至r0寄存器中
2 and    r1, r0, #0x1f          @ 将r0寄存器值的低5位存储至r1寄存器中
3 teq    r1, #0x1a              @ 判断r1寄存器值是否等于0x1a(0b11010,Hyp模式)
4 bicne  r0, r0, #0x1f          @ 如果不相等,则将r0寄存器值的低5位置0
5 orrne  r0, r0, #0x13          @ 并且与0x13(0b10011,Supervisor模式)进行或运算
6 orr    r0, r0, #0xc0          @ 将r0寄存器值的bit[7:6]置0
7 msr    cpsr,r0
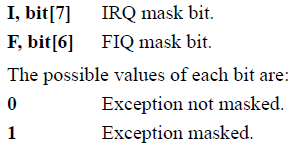
cpsr的格式在《ARMv7架构参考手册》中B1.3.3一节

其低五位为M[4:0]定义在B1.3.1一节
bit[7]为IRQ屏蔽位,bit[6]为FIQ屏蔽位
四、向量表重定位
/* Set V=0 in CP15 SCTLR register - for VBAR to point to vector */
/* CP15寄存器在《ARMv7架构参考手册》的Table B3-33中有定义,如下图所示 */
/* 参考《ARMv7架构参考手册》的B4.1.130一节 */
mrc    p15, 0, r0, c1, c0, 0    @ 将CP15协处理器c1中SCTLR值存储至r0寄存器中
/* Source Insight提示arch/arm/include/asm/system.h中有其定义:#define CR_V (1 << 13)*/
bic    r0, #CR_V                @ 设置向量表地址为0,让向量表可以重定位
mcr    p15, 0, r0, c1, c0, 0    @ Write CP15 SCTLR Register

/* Set vector address in CP15 VBAR register */
ldr    r0, =_start              @ _start = 0x87800000
/* 参考《ARMv7架构参考手册》的B4.1.156一节 */
mcr    p15, 0, r0, c12, c0, 0   @ Set VBAR,设置向量表基地址
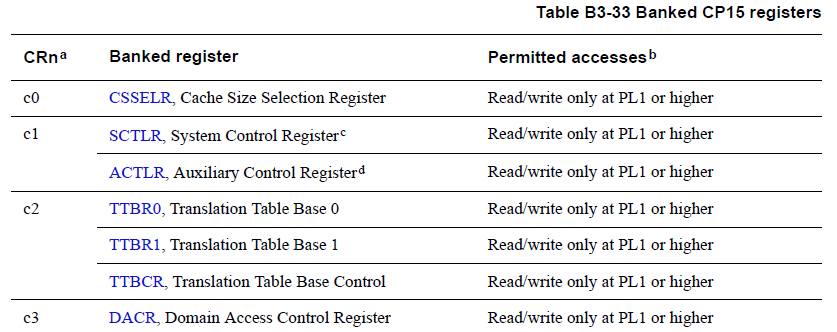
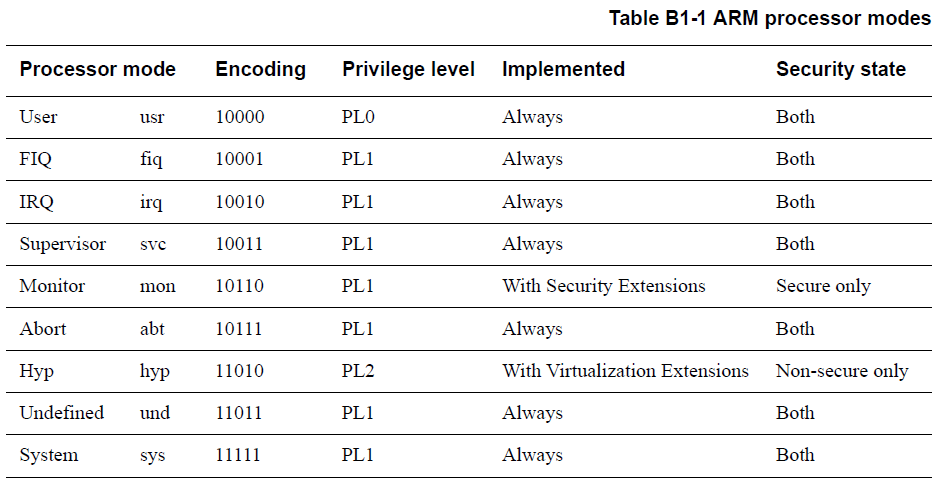
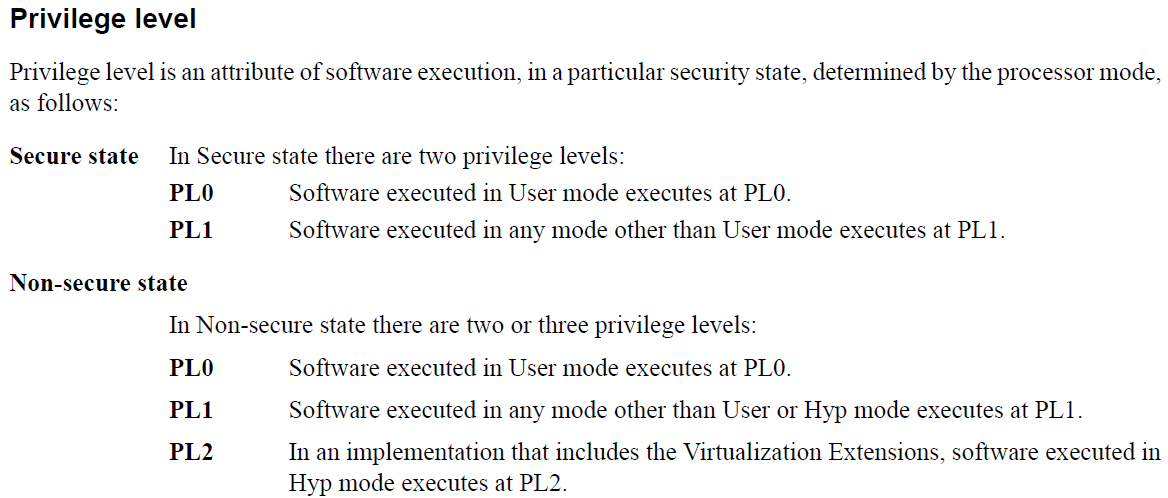
在上图中,读者可能会注意到的PL1 or higher
这个是ARM所划分的特权等级,在ARM v7-A架构中有PL0、PL1和PL2三种等级,PL0包含User,PL2包含Hyp,PL1包含其他模式,如下图所示:
五、设置CP15协处理器
bl cpu_init_cp15
  -> ENTRY(cpu_init_cp15)
 1 /* 参考《ARMv7架构参考手册》的Table B3-38 */
 2 mov    r0, #0                   @ set up for MCR
 3 mcr    p15, 0, r0, c8, c7, 0    @ invalidate TLBs,B4.2.3 PL2或Monitor Mode
 4 mcr    p15, 0, r0, c7, c5, 0    @ invalidate icache,B4.2.1 PL1 or higher
 5 mcr    p15, 0, r0, c7, c5, 6    @ invalidate branch predictors array,Table D14-3
 6 mcr    p15, 0, r0, c7, c10, 4   @ DSB
 7 mcr    p15, 0, r0, c7, c5, 4    @ ISB
 8
 9 /*
10  * disable MMU stuff and caches
11  */
12 mrc    p15, 0, r0, c1, c0, 0
13 bic    r0, r0, #0x00002000      @ clear bits 13 (--V-)
14 bic    r0, r0, #0x00000007      @ clear bits 2:0 (-CAM)
15 orr    r0, r0, #0x00000002      @ set bit 1 (--A-) Align
16 orr    r0, r0, #0x00000800      @ set bit 11 (Z---) BTB
17 orr    r0, r0, #0x00001000      @ set bit 12 (I) I-cache
18 mcr    p15, 0, r0, c1, c0, 0
19
20 mov    r5, lr                   @ Store my Caller
21 mrc    p15, 0, r1, c0, c0, 0    @ r1 has Read Main ID Register (MIDR)
22 mov    r3, r1, lsr #20          @ get variant field
23 and    r3, r3, #0xf             @ r3 has CPU variant
24 and    r4, r1, #0xf             @ r4 has CPU revision
25 mov    r2, r3, lsl #4           @ shift variant field for combined value
26 orr    r2, r4, r2               @ r2 has combined CPU variant + revision
27
28 mov    pc, r5                   @ back to my caller
六、lowlevel_init.S
bl cpu_init_crit                    start.S
  -> ENTRY(cpu_init_crit)
    -> b lowlevel_init
      -> ENTRY(lowlevel_init)       arch/arm/cpu/armv7/lowlevel_init.S
        -> ldr sp, =CONFIG_SYS_INIT_SP_ADDR
        -> bl s_init
1. 使用内部RAM设置栈顶
 1 ldr    sp, =CONFIG_SYS_INIT_SP_ADDR
 2 /* 8bit对齐 */
 3 bic    sp, sp, #7
CONFIG_SYS_INIT_SP_ADDR值确定过程如下:
ldr sp, =CONFIG_SYS_INIT_SP_ADDR
  -> #define CONFIG_SYS_INIT_SP_ADDR \                        include/configs/mx6ull_lioker.h
  ->   (CONFIG_SYS_INIT_RAM_ADDR + CONFIG_SYS_INIT_SP_OFFSET)
    -> #define CONFIG_SYS_INIT_RAM_ADDR    IRAM_BASE_ADDR
    -> #define CONFIG_SYS_INIT_SP_OFFSET \
    ->   (CONFIG_SYS_INIT_RAM_SIZE - GENERATED_GBL_DATA_SIZE)
    -> #define CONFIG_SYS_INIT_RAM_SIZE    IRAM_SIZE
也就是CONFIG_SYS_INIT_SP_ADDR = IRAM_BASE_ADDR + IRAM_SIZE - GENERATED_GBL_DATA_SIZE
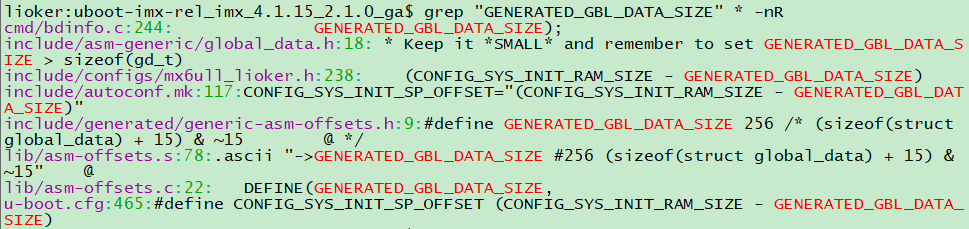
IRAM_BASE_ADDR和IRAM_SIZE根据mx6ull_lioker.h头文件和如下的grep命令确定定义在arch/arm/include/asm/arch/imx-regs.h中
$ grep "IRAM_BASE_ADDR" * -nR

arch/arm/include/asm/arch/为arch/arm/include/asm/arch-mx6/的链接文件
![]()
GENERATED_GBL_DATA_SIZE根据如下的grep命令确定定义在include/generated/generic-asm-offsets.h中,grep命令如下:
上述变量定义如下:
 1 #define IRAM_BASE_ADDR              0x00900000
 2
 3 /* CONFIG_MX6UL在.config中定义,因此IRAM_SIZE = 0x00040000 */
 4 #if !(defined(CONFIG_MX6SX) || defined(CONFIG_MX6UL) || \
 5     defined(CONFIG_MX6SLL) || defined(CONFIG_MX6SL))
 6 #define IRAM_SIZE                   0x00040000
 7 #else
 8 #define IRAM_SIZE                   0x00020000
 9 #endif
10
11 #define GENERATED_GBL_DATA_SIZE     256
最终,CONFIG_SYS_INIT_SP_ADDR = 0x0091FF00
2. s_init()函数
 1 /* Save the old lr(passed in ip) and the current lr to stack */
 2 push   {ip, lr}
 3 /*
 4  * Call the very early init function. This should do only the
 5  * absolute bare minimum to get started. It should not:
 6  *
 7  * - set up DRAM
 8  * - use global_data
 9  * - clear BSS
10  * - try to start a console
11  */
12 bl     s_init
13 pop    {ip, pc}
s_init()函数定义在arch/arm/cpu/armv7/mx6/soc.c中:
1 void s_init(void) {
2 ...     /* 省略变量定义代码 */
3     if (is_cpu_type(MXC_CPU_MX6SX) || is_cpu_type(MXC_CPU_MX6UL) ||
4         is_cpu_type(MXC_CPU_MX6ULL) || is_cpu_type(MXC_CPU_MX6SLL))
5         return;
6 ...
7 }
对于IMX6ULL芯片,s_init()函数为空函数
cpu_init_cp15()和cpu_init_crit()函数执行完后,开始执行指令bl _main
七、_main()函数
在第二节中,我们已经确定_main()函数定义在arch/arm/lib/文件夹内
在arch/arm/lib/文件夹内执行grep命令,从而确定_main()函数定义在arch/arm/lib/crt0.S文件中
